android 仿微信小demo(实现移动端,服务端)
文章目录
- android studio创建移动端项目
- 微信启动界面
-
- 显示页面延迟activity
- 启动页activity
- 测试
- 注册功能
-
- 移动端注册相关功能实现
-
- 注册activity
- 测试
- 服务端功能实现
-
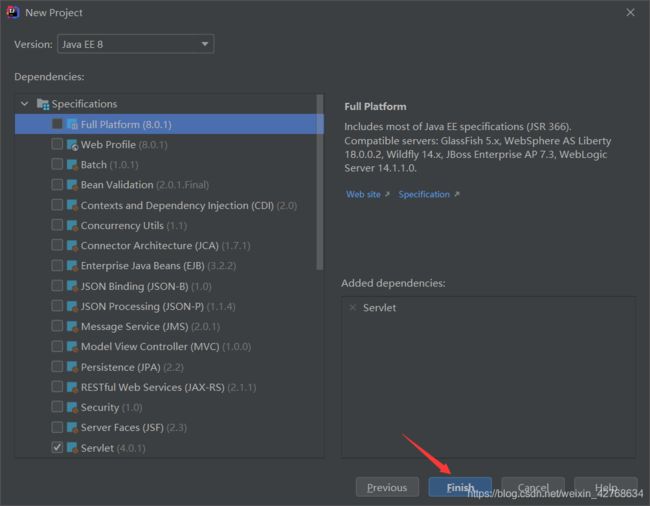
- idea创建服务端项目
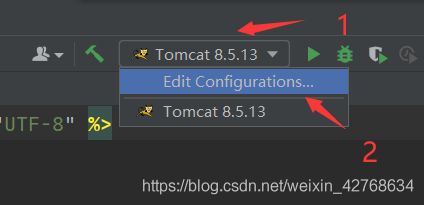
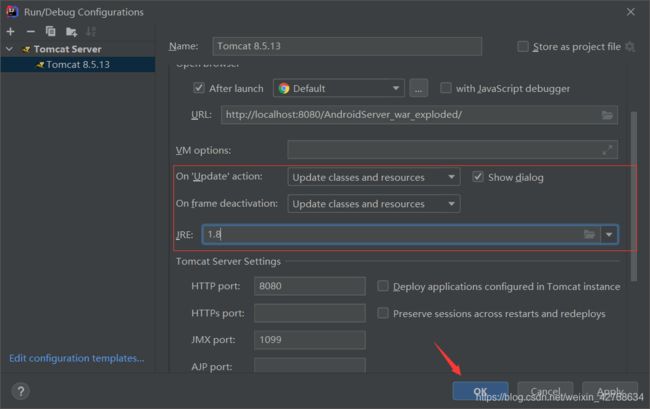
- 配置tomcat服务器
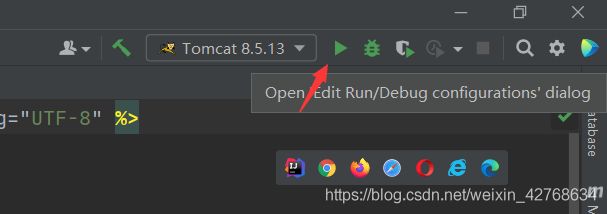
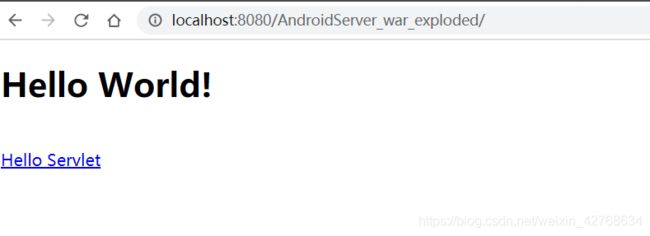
- 启动项目测试服务器
- 创建web层和客户端完成数据交互
- 创建service层处理业务逻辑功能
- 创建dao层去操作数据库
- 通过JDBC工具类访问数据库
- 通过navicat可视化工具创建数据库和表
- 测试注册功能
- 登录功能
-
- 移动端登录相关功能实现
-
- 登录activity
- 测试
- 服务端功能实现
-
- 创建web层和客户端完成数据交互
- 在service层中添加处理业务逻辑功能
- 在dao层添加操作数据库的功能
- 测试登录功能
- 微信四个页面实现
-
- 微信四个页面框架
-
- 测试效果
仿微信UI设计,移动端用android studio写,服务端用idea。
主要功能包括注册登录,微信登录成功后显示微信首页(四个页面),所有功能数据处理都是在服务器中处理,数据也是从服务器获得(图片,文字)
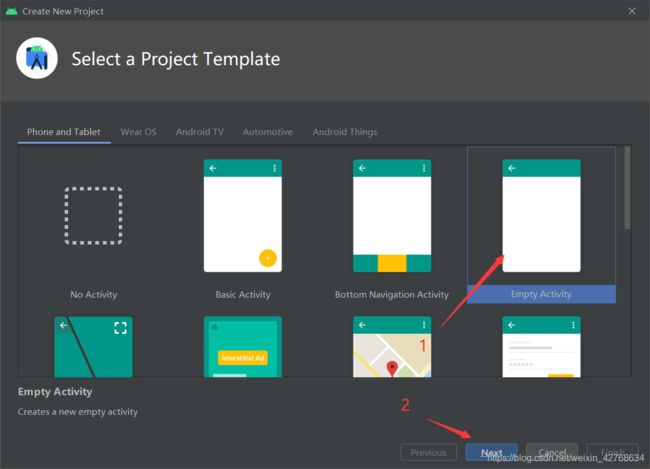
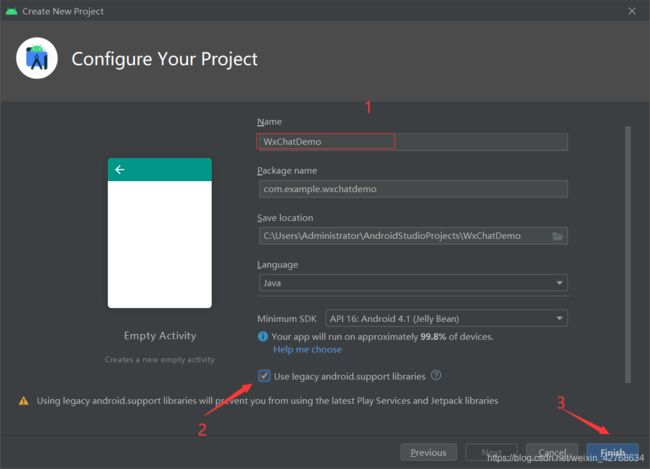
android studio创建移动端项目
微信启动界面
我们启动微信页面时会看到有页面延迟后才跳转到启动页面,所以创建的两个activity要实现这个功能。
显示页面延迟activity
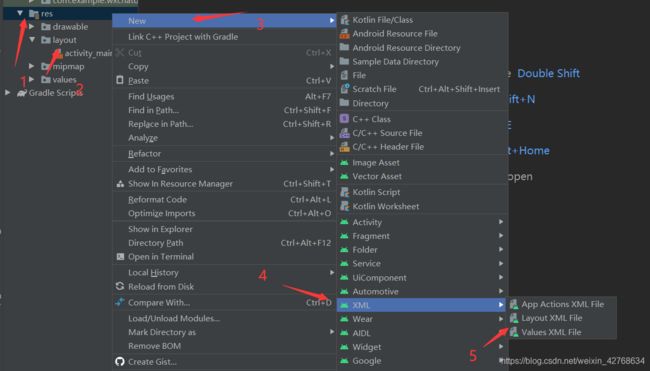
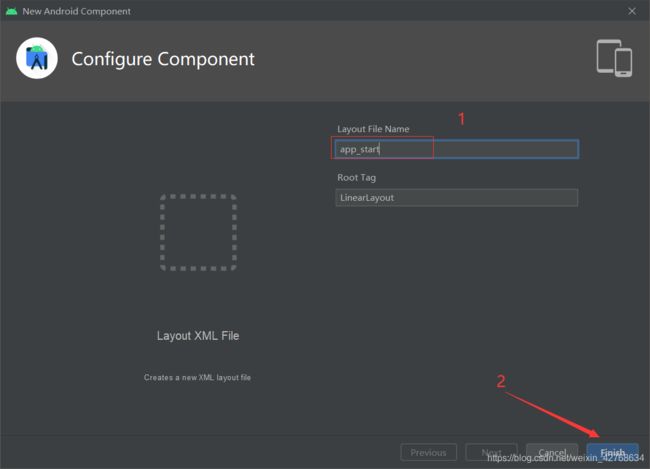
创建AppStart.java activity,用于显示页面延迟跳转到启动页功能


AppStart.java代码如下
package com.example.wxchatdemo;

import android.app.Activity;
import android.content.Intent;
import android.os.Bundle;
import android.os.Handler;

public class AppStart extends Activity {


    @Override
    public void onCreate(Bundle savedInstanceState) {

        // TODO Auto-generated method stub
        super.onCreate(savedInstanceState);
        setContentView(R.layout.app_start); //设置布局

        //延迟页面跳转
        new Handler().postDelayed(new Runnable() {

            @Override
            public void run() {

                /*页面延迟1秒跳转到微信启动页面*/
                Intent intent = new Intent(com.example.wxchatdemo.AppStart.this, com.example.wxchatdemo.Welcome.class);
                startActivity(intent);
                com.example.wxchatdemo.AppStart.this.finish(); //结束当前activity
            }
        }, 1000);
    }
}
<LinearLayout xmlns:android="http://schemas.android.com/apk/res/android"
    android:layout_width="fill_parent"
    android:layout_height="fill_parent"
    android:background="@drawable/welcome" >
LinearLayout>
启动页activity
创建上面AppStart跳转的activity Welcome.java,显示app启动页面及跳转到两个页面(登录,注册)的功能
代码如下
package com.example.wxchatdemo;

import android.app.Activity;
import android.content.Intent;
import android.os.Bundle;
import android.view.View;

public class Welcome extends Activity {


    @Override
    public void onCreate(Bundle savedInstanceState) {

        super.onCreate(savedInstanceState);
        setContentView(R.layout.welcome); //设置布局
    }

    //登录按钮点击事件处理方法
    public void welcome_login(View v) {

        Intent intent = new Intent();
       /* 页面跳转到登录界面*/
        intent.setClass(com.example.wxchatdemo.Welcome.this, Login.class);
        startActivity(intent);
        this.finish(); //结束当前activity
    }

    //注册按钮点击事件处理方法
    public void welcome_register(View v) {

        Intent intent = new Intent();
        /*页面跳转到注册界面*/
        intent.setClass(com.example.wxchatdemo.Welcome.this, com.example.wxchatdemo.Register.class);
        startActivity(intent);
        this.finish(); //结束当前activity
    }

}
对应的布局welcome.xml文件如下
<LinearLayout xmlns:android="http://schemas.android.com/apk/res/android"
    android:id="@+id/linearLayout1"
    android:layout_width="fill_parent"
    android:layout_height="fill_parent"
    android:background="#eee"
    android:gravity="center"
    android:orientation="vertical">

    <RelativeLayout xmlns:android="http://schemas.android.com/apk/res/android"
        android:layout_width="match_parent"
        android:layout_height="match_parent">

        <ImageView
            android:id="@+id/photoImageView"
            android:layout_width="match_parent"
            android:layout_height="match_parent"
            android:background="@android:color/white"
            android:scaleType="fitXY"
            android:src="@drawable/wx_login_reigister" />

        <Button
            android:id="@+id/main_login_btn"
            android:layout_width="100dp"
            android:layout_height="50dp"
            android:layout_alignLeft="@id/photoImageView"
            android:layout_alignBottom="@id/photoImageView"
            android:layout_marginLeft="20dp"
            android:layout_marginBottom="20dp"
            android:background="@drawable/btn_style_green"
            android:onClick="welcome_login"
            android:text="登录"
            android:textColor="#ffffff"
            android:textSize="18sp" />

        <Button
            android:id="@+id/main_regist_btn"
            android:layout_width="100dp"
            android:layout_height="50dp"
            android:layout_alignRight="@id/photoImageView"
            android:layout_alignBottom="@id/photoImageView"
            android:layout_marginRight="20dp"
            android:layout_marginBottom="20dp"
            android:background="@drawable/btn_style_white"
            android:onClick="welcome_register"
            android:text="注册"
            android:textColor="#00FF00"
            android:textSize="18sp" />
    RelativeLayout>

LinearLayout>
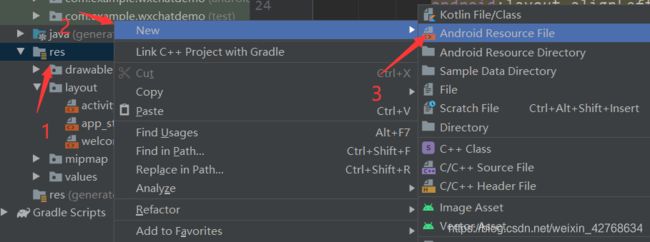
创建两个selector选择器btn_style_green.xml,btn_style_white.xml文件,用于控制上面welcome.xml布局按钮的不同状态
<selector xmlns:android="http://schemas.android.com/apk/res/android">
    <item android:drawable="@drawable/btn_style_one_pressed" android:state_focused="false" android:state_pressed="true" />
    <item android:drawable="@drawable/btn_style_one_normal" android:state_focused="false" />
selector>
btn_style_white.xml代码如下
<selector xmlns:android="http://schemas.android.com/apk/res/android">
    <item android:drawable="@drawable/btn_style_two_pressed" android:state_focused="false" android:state_pressed="true" />
    <item android:drawable="@drawable/btn_style_two_normal" android:state_focused="false" />
selector>
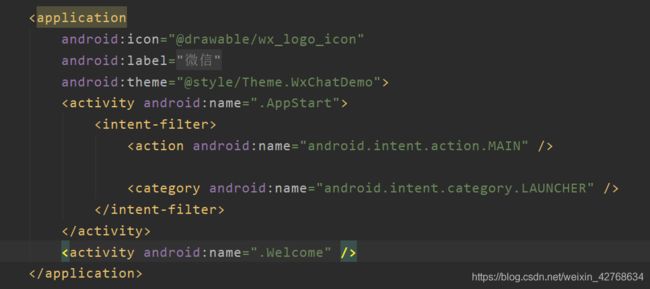
在AndroidMainfest.xml文件中声明创建的activity

测试
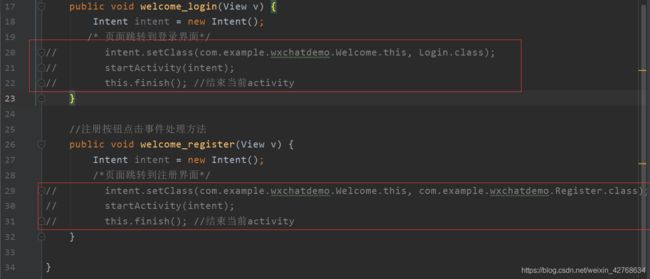
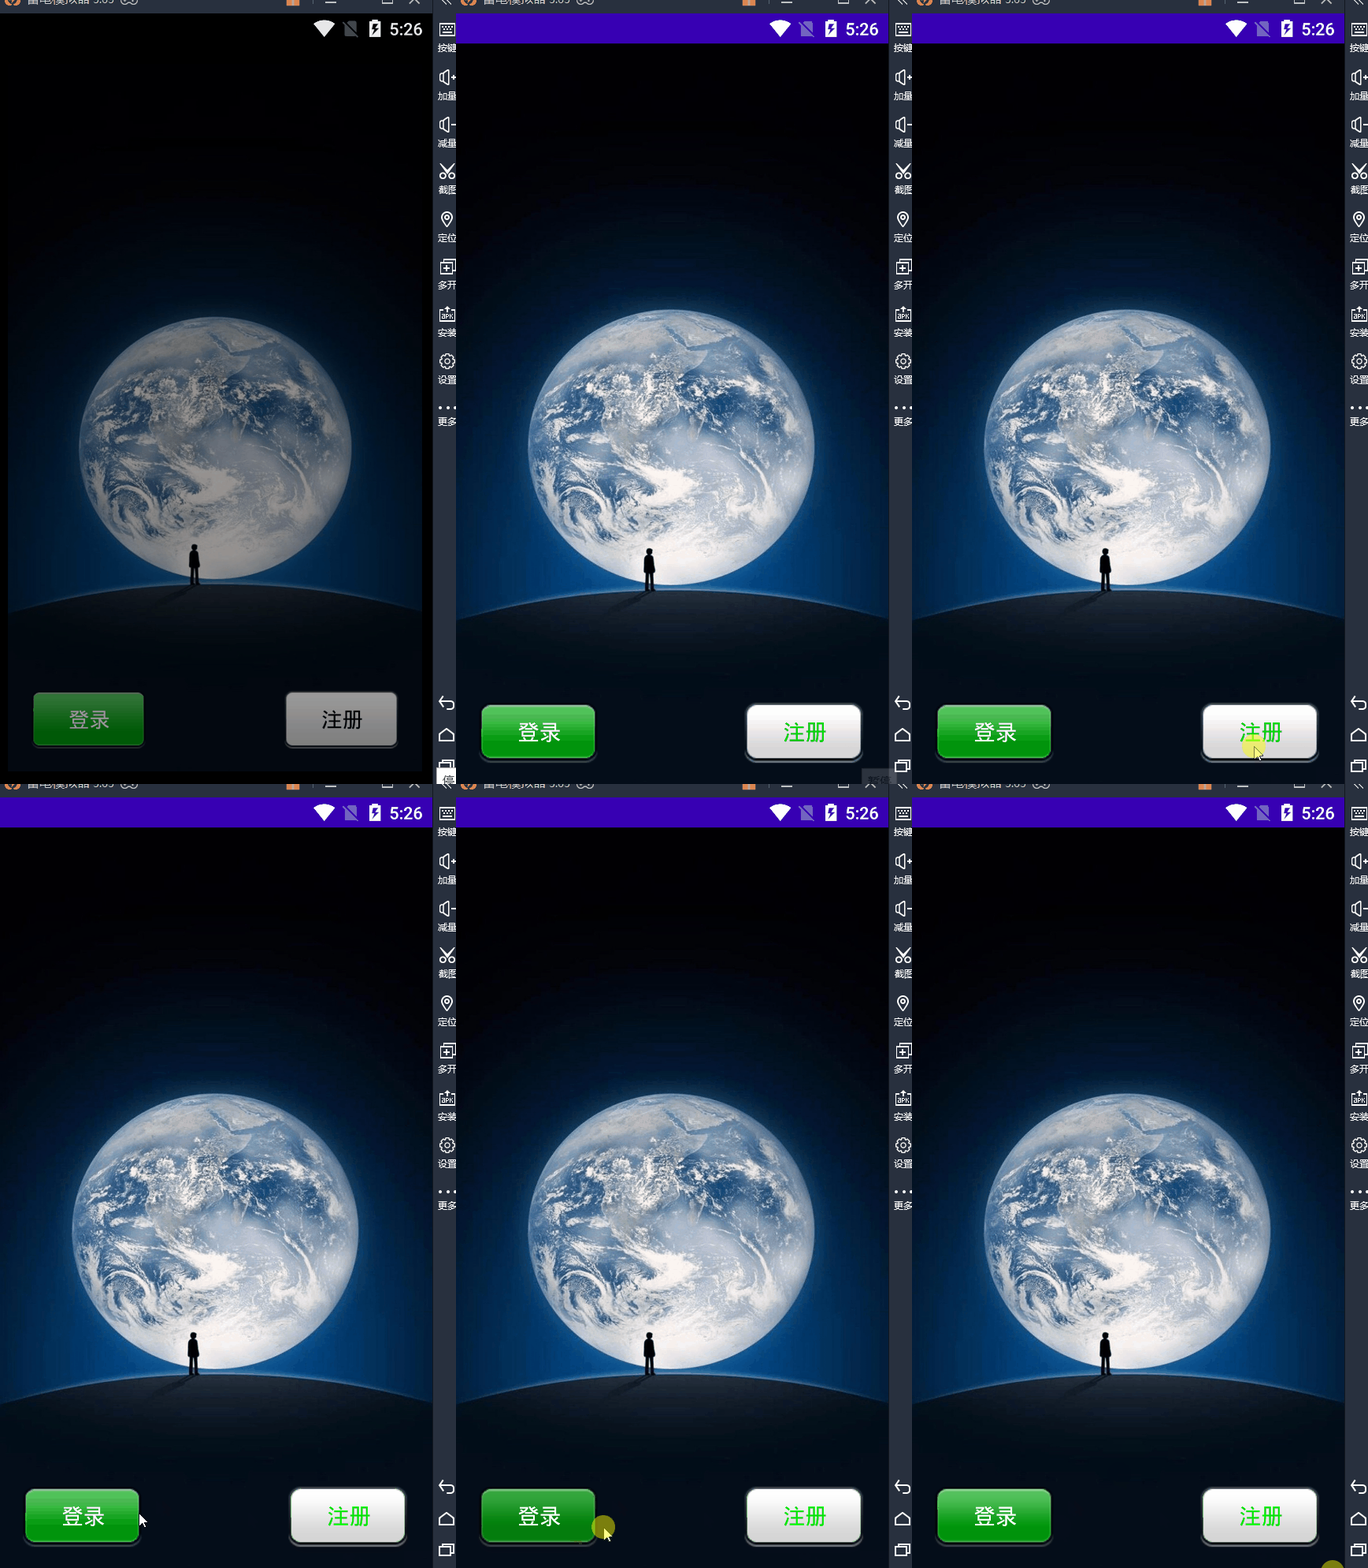
可以把welcome.java中的跳转页面注释掉,然后启动项目测试效果,如下所示
注册功能
注册功能主要包括移动端的注册相关功能(比如界面,向服务器发送http请求)和服务端的表单处理功能,而且服务器的表单验证的数据要从mysql中获取
移动端注册相关功能实现
移动端注册功能主要包括界面的实现,以及向服务器发送请求,请求成功后跳转到登录界面
注册activity
实现的功能很多,这里例举几个(如按钮是否可点击,校验手机号,改变按钮的状态需要借助下面要说明的工具类和shape文件),其他的可以自己运行体会,注释都有说明。
创建注册Register.java activity,代码如下
package com.example.wxchatdemo;

import android.annotation.SuppressLint;
import android.content.Intent;
import android.graphics.Color;
import android.os.Build;
import android.os.Bundle;
import android.os.Handler;
import android.os.Message;
import android.support.annotation.Nullable;
import android.support.v7.app.ActionBar;
import android.support.v7.app.AppCompatActivity;
import android.util.Log;
import android.view.View;
import android.widget.Button;
import android.widget.EditText;
import android.widget.ImageView;
import android.widget.Toast;

import org.json.JSONObject;

import java.io.BufferedReader;
import java.io.BufferedWriter;
import java.io.InputStream;
import java.io.InputStreamReader;
import java.io.OutputStream;
import java.io.OutputStreamWriter;
import java.net.HttpURLConnection;
import java.net.URL;
import java.net.URLEncoder;
import java.util.regex.Matcher;
import java.util.regex.Pattern;

public class Register extends AppCompatActivity {

    //声明组件
    private EditText username;
    private EditText phone;
    private EditText password;
    private Button button;
    //自定义一个UI修改机制
    private MyHander myhander = new MyHander();

    @Override
    protected void onCreate(@Nullable Bundle savedInstanceState) {

        super.onCreate(savedInstanceState);
        setContentView(R.layout.register); //设置布局
        /* 隐藏自带标题*/
        ActionBar actionBar = getSupportActionBar();
        if (actionBar != null) {

            actionBar.hide();
        }
        if (Build.VERSION.SDK_INT >= 21) {

            View decorView = getWindow().getDecorView();
            int option = View.SYSTEM_UI_FLAG_LAYOUT_FULLSCREEN //全屏显示
                    | View.SYSTEM_UI_FLAG_LAYOUT_STABLE
                    | View.SYSTEM_UI_FLAG_LIGHT_STATUS_BAR; //因为背景为浅色所以将状态栏字体设置为黑色
            decorView.setSystemUiVisibility(option);
            getWindow().setStatusBarColor(Color.TRANSPARENT);
        }
        initViews();  // 初始化布局元素
        // 设置注册按钮是否可点击
        if (username.getText() + "" == "" || phone.getText() + "" == "" || password.getText() + "" == "") {

            button.setEnabled(false);
        } else {

            button.setEnabled(true);
        }
        inputFocus(); //监听EditView变色
        buttonChangeColor(); //登录按钮变色
        //button的点击事件事件
        button.setOnClickListener(new View.OnClickListener() {

            @Override
            public void onClick(View v) {

                /*判断输入的手机号格式对不对,对的话开一个线程完成网络请求操作*/
                Pattern pattern = Pattern
                        .compile("^(13[0-9]|15[0-9]|153|15[6-9]|180|18[23]|18[5-9])\\d{8}$");
                Matcher matcher = pattern.matcher(phone.getText());
                if (matcher.matches()) {

                    // 开一个线程完成网络请求操作
                    new Thread(new Runnable() {

                        @Override
                        public void run() {

                            httpUrlConnPost(Register.this.username.getText() + "",
                                    phone.getText() + "", password.getText() + "");
                        }
                    }).start();
                } else {

                    Toast.makeText(getApplicationContext(), "手机格式错误", Toast.LENGTH_LONG).show();
                }
            }
        });
    }

    /*在这里面获取到每个需要用到的控件的实例*/
    @SuppressLint("NewApi")
    public void initViews() {

        // 得到所有的组件
        username = (EditText) this.findViewById(R.id.reg_name);
        phone = (EditText) this.findViewById(R.id.reg_phone);
        password = (EditText) this.findViewById(R.id.reg_passwd);
        button = (Button) this.findViewById(R.id.reg_button);
    }

    /*监听EditView变色*/
    public void inputFocus() {

        username.setOnFocusChangeListener(new View.OnFocusChangeListener() {

            @Override
            public void onFocusChange(View v, boolean hasFocus) {

                if (hasFocus) {

                    // 此处为得到焦点时的处理内容
                    ImageView imageView = (ImageView) findViewById(R.id.reg_diver1);
                    imageView.setBackgroundResource(R.color.input_dvier_focus);
                } else {

                    // 此处为失去焦点时的处理内容
                    ImageView imageView = (ImageView) findViewById(R.id.reg_diver1);
                    imageView.setBackgroundResource(R.color.input_dvier);
                }
            }
        });
        phone.setOnFocusChangeListener(new View.OnFocusChangeListener() {

            @Override
            public void onFocusChange(View v, boolean hasFocus) {

                if (hasFocus) {

                    // 此处为得到焦点时的处理内容
                    ImageView imageView = (ImageView) findViewById(R.id.reg_diver2);
                    imageView.setBackgroundResource(R.color.input_dvier_focus);
                } else {

                    // 此处为失去焦点时的处理内容
                    ImageView imageView = (ImageView) findViewById(R.id.reg_diver2);
                    imageView.setBackgroundResource(R.color.input_dvier);
                }
            }
        });
        password.setOnFocusChangeListener(new View.OnFocusChangeListener() {

            @Override
            public void onFocusChange(View v, boolean hasFocus) {

                if (hasFocus) {

                    // 此处为得到焦点时的处理内容
                    ImageView imageView = (ImageView) findViewById(R.id.reg_diver3);
                    imageView.setBackgroundResource(R.color.input_dvier_focus);
                } else {

                    // 此处为失去焦点时的处理内容
                    ImageView imageView = (ImageView) findViewById(R.id.reg_diver3);
                    imageView.setBackgroundResource(R.color.input_dvier);
                }
            }
        });
    }

    /*登录按钮变色*/
    public void buttonChangeColor() {

        //创建工具类对象 把要改变颜色的Button先传过去
        WorksSizeCheckUtil.textChangeListener textChangeListener = new WorksSizeCheckUtil.textChangeListener(button);
        textChangeListener.addAllEditText(username, phone, password);//把所有要监听的EditText都添加进去
        //接口回调 在这里拿到boolean变量 根据isHasContent的值决定 Button应该设置什么颜色
        WorksSizeCheckUtil.setChangeListener(new IEditTextChangeListener() {

            @Override
            public void textChange(boolean isHasContent) {

                if (isHasContent) {

                    button.setBackgroundResource(R.drawable.login_button_focus);
                    button.setTextColor(getResources().getColor(R.color.loginButtonTextFouse));
                } else {

                    button.setBackgroundResource(R.drawable.login_button_shape);
                    button.setTextColor(getResources().getColor(R.color.loginButtonText));
                }
            }
        });
    }

    /*发送请求的主要方法*/
    public void httpUrlConnPost(String name, String phone, String password) {

        HttpURLConnection urlConnection = null;
        URL url;
        try {

            // 请求的URL地地址
            url = new URL(
                    "http://100.2.178.10:8080/AndroidServer_war_exploded/Register");
            urlConnection = (HttpURLConnection) url.openConnection();// 打开http连接
            urlConnection.setConnectTimeout(3000);// 连接的超时时间
            urlConnection.setUseCaches(false);// 不使用缓存
            // urlConnection.setFollowRedirects(false);是static函数,作用于所有的URLConnection对象。
            urlConnection.setInstanceFollowRedirects(true);// 是成员函数,仅作用于当前函数,设置这个连接是否可以被重定向
            urlConnection.setReadTimeout(3000);// 响应的超时时间
            urlConnection.setDoInput(true);// 设置这个连接是否可以写入数据
            urlConnection.setDoOutput(true);// 设置这个连接是否可以输出数据
            urlConnection.setRequestMethod("POST");// 设置请求的方式
            urlConnection.setRequestProperty("Content-Type",
                    "application/json;charset=UTF-8");// 设置消息的类型
            urlConnection.connect();// 连接,从上述至此的配置必须要在connect之前完成,实际上它只是建立了一个与服务器的TCP连接
            JSONObject json = new JSONObject();// 创建json对象
            json.put("username", URLEncoder.encode(name, "UTF-8"));// 使用URLEncoder.encode对特殊和不可见字符进行编码
            json.put("phone", URLEncoder.encode(phone, "UTF-8"));
            json.put("password", URLEncoder.encode(password, "UTF-8"));// 把数据put进json对象中
            String jsonstr = json.toString();// 把JSON对象按JSON的编码格式转换为字符串
            // ------------字符流写入数据------------
            OutputStream out = urlConnection.getOutputStream();// 输出流,用来发送请求,http请求实际上直到这个函数里面才正式发送出去
            BufferedWriter bw = new BufferedWriter(new OutputStreamWriter(out));// 创建字符流对象并用高效缓冲流包装它,便获得最高的效率,发送的是字符串推荐用字符流,其它数据就用字节流
            bw.write(jsonstr);// 把json字符串写入缓冲区中
            bw.flush();// 刷新缓冲区,把数据发送出去,这步很重要
            out.close();
            bw.close();// 使用完关闭
            Log.i("aa", urlConnection.getResponseCode() + "");
            //以下判斷是否訪問成功,如果返回的状态码是200则说明访问成功
            if (urlConnection.getResponseCode() == HttpURLConnection.HTTP_OK) {
     // 得到服务端的返回码是否连接成功
                // ------------字符流读取服务端返回的数据------------
                InputStream in = urlConnection.getInputStream();
                BufferedReader br = new BufferedReader(
                        new InputStreamReader(in));
                String str = null;
                StringBuffer buffer = new StringBuffer();
                while ((str = br.readLine()) != null) {
     // BufferedReader特有功能,一次读取一行数据
                    buffer.append(str);
                }
                in.close();
                br.close();
                JSONObject rjson = new JSONObject(buffer.toString());
                Log.i("aa", "rjson=" + rjson);// rjson={"json":true}
                boolean result = rjson.getBoolean("json");// 从rjson对象中得到key值为"json"的数据,这里服务端返回的是一个boolean类型的数据
                System.out.println("json:===" + result);
                //如果服务器端返回的是true,则说明注册成功,否则注册失败
                if (result) {
     // 判断结果是否正确
                    //在Android中http请求,必须放到线程中去作请求,但是在线程中不可以直接修改UI,只能通过hander机制来完成对UI的操作
                    myhander.sendEmptyMessage(1);
                    Log.i("用户:", "注册成功");
                } else {

                    myhander.sendEmptyMessage(2);
                    Log.i("用户:", "注册失败");
                }
            } else {

                myhander.sendEmptyMessage(2);
            }
        } catch (Exception e) {

            e.printStackTrace();
            Log.i("aa", e.toString());
            myhander.sendEmptyMessage(2);
        } finally {

            urlConnection.disconnect();// 使用完关闭TCP连接,释放资源
        }
    }

    // 在Android中不可以在线程中直接修改UI,只能借助Handler机制来完成对UI的操作
    class MyHander extends Handler {

        @Override
        public void handleMessage(Message msg) {

            super.handleMessage(msg);
            //判断hander的内容是什么,如果是1则说明注册成功,如果是2说明注册失败
            switch (msg.what) {

                case 1:
                    Log.i("aa", msg.what + "");
                    Toast.makeText(getApplicationContext(), "注册成功",
                            Toast.LENGTH_SHORT).show();
                    /*跳转到登录页面*/
                    Intent intent = new Intent();
                    intent.setClass(com.example.wxchatdemo.Register.this, Login.class);
                    startActivity(intent);
                    com.example.wxchatdemo.Register.this.finish(); //结束当前activity
                    break;
                case 2:
                    Log.i("aa", msg.what + "");
                    //這是一個提示消息
                    Toast.makeText(getApplicationContext(), "注册失败", Toast.LENGTH_LONG).show();
            }
        }
    }

    //返回按钮处理事件
    public void rigister_activity_back(View v) {

        /*跳转到微信启动页*/
        Intent intent = new Intent();
        intent.setClass(com.example.wxchatdemo.Register.this, Welcome.class);
        startActivity(intent);
        com.example.wxchatdemo.Register.this.finish(); //结束当前activity
    }
}
上面有个接口和接口的实现类(工具类),实现按钮在不同输入框输入条件的状态变化。创建工具类WorksSizeCheckUtil.java代码如下
package com.example.wxchatdemo;

import android.text.Editable;
import android.text.TextUtils;
import android.text.TextWatcher;
import android.widget.Button;
import android.widget.EditText;

public class WorksSizeCheckUtil {

    static IEditTextChangeListener mChangeListener;

    public static void setChangeListener(IEditTextChangeListener changeListener) {

        mChangeListener = changeListener;
    }

    //检测输入框是否都输入了内容 从而改变按钮的是否可点击
    public static class textChangeListener {

        private Button button;
        private EditText[] editTexts;

        public textChangeListener(Button button) {

            this.button = button;
        }

        public textChangeListener addAllEditText(EditText... editTexts) {

            this.editTexts = editTexts;
            initEditListener();
            return this;
        }

        private void initEditListener() {

            //调用了遍历editext的方法
            for (EditText editText : editTexts) {

                editText.addTextChangedListener(new textChange());
            }
        }

        // edit输入的变化来改变按钮的是否点击
        private class textChange implements TextWatcher {

            @Override
            public void beforeTextChanged(CharSequence charSequence, int i, int i1, int i2) {

            }

            @Override
            public void onTextChanged(CharSequence charSequence, int i, int i1, int i2) {

                if (checkAllEdit()) {

                    //所有EditText有值了
                    mChangeListener.textChange(true);
                    button.setEnabled(true);
                } else {

                    //所有EditText值为空
                    button.setEnabled(false);
                    mChangeListener.textChange(false);
                }
            }

            @Override
            public void afterTextChanged(Editable editable) {

            }
        }

        //检查所有的edit是否输入了数据
        private boolean checkAllEdit() {

            for (EditText editText : editTexts) {

                if (!TextUtils.isEmpty(editText.getText() + "")) {

                    continue;
                } else {

                    return false;
                }
            }
            return true;
        }
    }
}
接口IEditTextChangeListener.java
package com.example.wxchatdemo;

public interface IEditTextChangeListener {

    void textChange(boolean isHasContent);
}
创建上面工具类WorksSizeCheckUtil.java用到的两个shape文件,设置按钮不同状态。


shapre文件login_button_focus.xml代码如下
<shape xmlns:android="http://schemas.android.com/apk/res/android">
    <solid android:color="@color/loginButtonBackgroundFouse" />


    <corners
        android:bottomLeftRadius="6dp"
        android:bottomRightRadius="6dp"
        android:topLeftRadius="6dp"
        android:topRightRadius="6dp" />

shape>
shapre文件login_button_shape,代码如下
<shape xmlns:android="http://schemas.android.com/apk/res/android">
    <solid android:color="@color/loginButtonBackgroundNotFouse" />


    <corners
        android:bottomLeftRadius="6dp"
        android:bottomRightRadius="6dp"
        android:topLeftRadius="6dp"
        android:topRightRadius="6dp" />

shape>
创建上面Register.java activity的布局文件register.xml,代码如下
<LinearLayout xmlns:android="http://schemas.android.com/apk/res/android"
    android:layout_width="match_parent"
    android:layout_height="match_parent"
    android:background="@color/title"
    android:orientation="vertical">

    <ImageView
        android:layout_width="17dp"
        android:layout_height="17dp"
        android:layout_marginLeft="20dp"
        android:layout_marginTop="45dp"
        android:onClick="rigister_activity_back"
        android:src="@drawable/backpay" />

    <TextView
        android:layout_width="match_parent"
        android:layout_height="wrap_content"
        android:layout_marginLeft="30dp"
        android:layout_marginTop="25dp"
        android:text="手机号注册"
        android:textColor="@color/loginText"
        android:textSize="25sp" />

    <LinearLayout
        android:layout_width="match_parent"
        android:layout_height="wrap_content"
        android:layout_marginTop="40dp">

        <TextView
            android:layout_width="wrap_content"
            android:layout_height="wrap_content"
            android:layout_marginLeft="30dp"
            android:text="昵称"
            android:textColor="@color/loginText"
            android:textSize="16sp" />

        <EditText
            android:id="@+id/reg_name"
            android:layout_width="200dp"
            android:layout_height="wrap_content"
            android:layout_marginLeft="55dp"
            android:background="@null"
            android:hint="例如:陈晨"
            android:singleLine="true"
            android:textColorHint="@color/textColorHint"
            android:textCursorDrawable="@drawable/edit_cursor_color"
            android:textSize="16sp" />
    LinearLayout>

    <ImageView
        android:id="@+id/reg_diver1"
        android:layout_width="320dp"
        android:layout_height="1dp"
        android:layout_gravity="center_horizontal"
        android:layout_marginTop="17dp"
        android:background="@color/input_dvier" />

    <LinearLayout
        android:layout_width="match_parent"
        android:layout_height="wrap_content"
        android:layout_marginTop="20dp">

        <TextView
            android:layout_width="wrap_content"
            android:layout_height="wrap_content"
            android:layout_marginLeft="30dp"
            android:text="手机号"
            android:textColor="@color/loginText"
            android:textSize="16sp" />

        <EditText
            android:id="@+id/reg_phone"
            android:layout_width="200dp"
            android:layout_height="wrap_content"
            android:layout_marginLeft="36dp"
            android:background="@null"
            android:hint="请填写手机号"
            android:singleLine="true"
            android:textColorHint="@color/textColorHint"
            android:textCursorDrawable="@drawable/edit_cursor_color"
            android:textSize="16sp" />
    LinearLayout>

    <ImageView
        android:id="@+id/reg_diver2"
        android:layout_width="320dp"
        android:layout_height="1dp"
        android:layout_gravity="center_horizontal"
        android:layout_marginTop="17dp"
        android:background="@color/input_dvier" />

    <LinearLayout
        android:layout_width="match_parent"
        android:layout_height="wrap_content"
        android:layout_marginTop="20dp">

        <TextView
            android:layout_width="wrap_content"
            android:layout_height="wrap_content"
            android:layout_marginLeft="30dp"
            android:text="密码"
            android:textColor="@color/loginText"
            android:textSize="16sp" />

        <EditText
            android:id="@+id/reg_passwd"
            android:layout_width="200dp"
            android:layout_height="wrap_content"
            android:layout_marginLeft="55dp"
            android:background="@null"
            android:hint="请填写密码"
            android:singleLine="true"
            android:password="true"
            android:textColorHint="@color/textColorHint"
            android:textCursorDrawable="@drawable/edit_cursor_color"
            android:textSize="16sp" />
    LinearLayout>

    <ImageView
        android:id="@+id/reg_diver3"
        android:layout_width="320dp"
        android:layout_height="1dp"
        android:layout_gravity="center_horizontal"
        android:layout_marginTop="17dp"
        android:background="@color/input_dvier" />

    <LinearLayout
        android:layout_width="match_parent"
        android:layout_height="wrap_content"
        android:layout_marginTop="40dp"
        android:gravity="center_horizontal">

        <Button
            android:id="@+id/reg_button"
            android:layout_width="321dp"
            android:layout_height="48dp"
            android:background="@drawable/login_button_shape"
            android:text="注册"
            android:textColor="@color/loginButtonText"
            android:textSize="16sp" />
    LinearLayout>

LinearLayout>
创建上面布局register.xml文件用到shape文件edit_cursor_color.xml,改变光标的颜色,代码如下
<shape xmlns:android="http://schemas.android.com/apk/res/android"
    android:shape="rectangle" >
    <size android:width="1dp" />
    <size android:height="10dp"/>
    <solid android:color="@color/loginButtonBackgroundFouse" />
shape>
在color.xml中添加用到的颜色,代码如下
    <color name="loginButtonBackgroundNotFouse">#D4D8D5color>
    <color name="loginButtonText">#B5B2B2color>
    <color name="title">#EDEDEDcolor>
    <color name="loginText">#5A5959color>
    <color name="textColorHint">#DDDDDDcolor>
    <color name="loginButtonBackgroundFouse">#07C160color>
    <color name="input_dvier">#D8D8D8color>
    <color name="input_dvier_focus">#1BB879color>
    <color name="loginButtonTextFouse">#FFFFFFcolor>
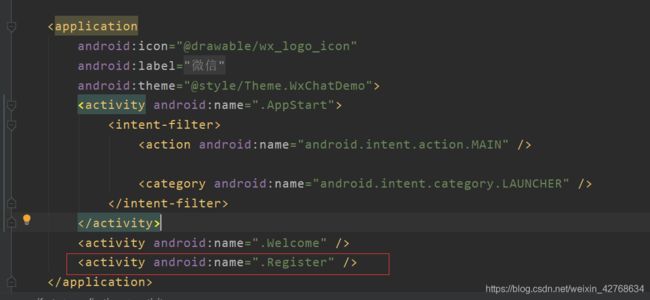
在AndroidMainfest.xml中声明注册activity,如下
测试
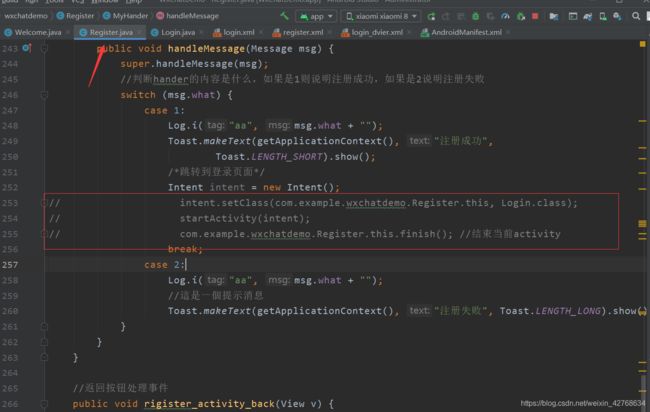
因为注册成功跳转的登录activity还没写,所以要注释掉
把上面注册Register.java activity注册成功跳转Login.java activity的代码段注释掉后运行项目测试,如下
因为服务端还没写所以注册失败
服务端功能实现
通过web层完成客户端和服务端的数据交互(接受数据,发送数据),service层完成业务逻辑(注册,登录),dao层操作数据库(要借助工具类)
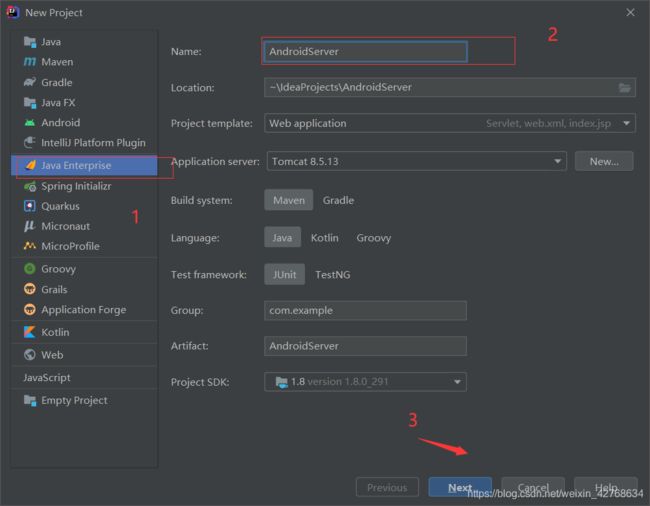
idea创建服务端项目
配置tomcat服务器
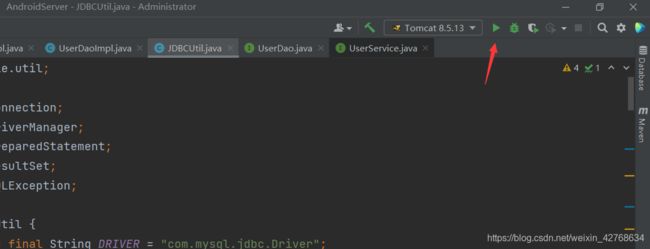
启动项目测试服务器
创建web层和客户端完成数据交互
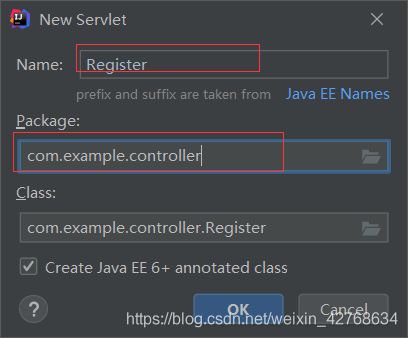
Register.java代码如下
package com.example.controller;

import com.alibaba.fastjson.JSON;
import com.alibaba.fastjson.JSONObject;
import com.example.pojo.User;
import com.example.service.UserService;
import com.example.service.UserServiceImpl;

import javax.servlet.*;
import javax.servlet.http.*;
import javax.servlet.annotation.*;
import java.io.BufferedReader;
import java.io.IOException;
import java.io.InputStreamReader;
import java.net.URLDecoder;

@WebServlet(name = "Register", value = "/Register")
public class Register extends HttpServlet {

    @Override
    protected void doGet(HttpServletRequest request, HttpServletResponse response) throws ServletException, IOException {

        doPost(request, response);
    }

    @Override
    protected void doPost(HttpServletRequest request, HttpServletResponse response) throws ServletException, IOException {

        /* 设置中文字符编码,防止乱码*/
        request.setCharacterEncoding("utf-8");
        response.setCharacterEncoding("UTF-8");
        //以json数据完成操作
        response.setContentType("application/json;charset=UTF-8");
        System.out.println(request.getContentType());// 得到客户端发送过来内容的类型,application/json;charset=UTF-8
        System.out.println(request.getRemoteAddr());// 得到客户端的ip地址,
        BufferedReader br = new BufferedReader(new InputStreamReader(// 使用字符流读取客户端发过来的数据
                request.getInputStream()));
        String line = null;
        StringBuffer s = new StringBuffer();//StringBuffer String的区别,如果要对数据作频繁的修改,則用StringBuffer
        // 以一行的形式读取数据
        while ((line = br.readLine()) != null) {

            s.append(line);
        }
        // 关闭io流
        br.close();
        System.out.println(s.toString());
        //JSON:这是json解析包,idea是没有的,要我们自己导入
        User user = JSON.parseObject(s.toString(), User.class);//是用了发射机制來完成对象的封闭
        //以utf-8解码操作
        String username = URLDecoder.decode(user.getUsername(), "utf-8");
        String phone = URLDecoder.decode(user.getPhone(), "utf-8");
        String password = URLDecoder.decode(user.getPassword(), "utf-8");
        System.out.println("用户名是:" + username + ", 密码;" + password);
        System.out.println(user);
        // 去数据库完成用户注册功能
        UserService us = new UserServiceImpl();
        //调用注册的方法
        int i = us.registerUser(username, phone, password);
        boolean rs = false;
        //判断是否注册成功
        if (i > 0) {

            System.out.println("注册成功");
            rs = true;
        }
        //将结果返回给客户端	,將结果构建成json数据返回給客戶端
        JSONObject rjson = new JSONObject();
        rjson.put("json", rs);
        response.getOutputStream().write(
                rjson.toString().getBytes("UTF-8"));// 向客户端发送一个带有json对象内容的响应
    }
}
User.java,代码如下
package com.example.pojo;

public class User {

    private int id;
    private String username;
    private String phone;
    private String password;

    public int getId() {

        return id;
    }

    public void setId(int id) {

        this.id = id;
    }

    public String getUsername() {

        return username;
    }

    public void setUsername(String username) {

        this.username = username;
    }

    public String getPassword() {

        return password;
    }

    public void setPassword(String password) {

        this.password = password;
    }

    public String getPhone() {

        return phone;
    }

    public void setPhone(String phone) {

        this.phone = phone;
    }

    @Override
    public String toString() {

        return "User{" +
                "id=" + id +
                ", username='" + username + '\'' +
                ", phone='" + phone + '\'' +
                ", password='" + password + '\'' +
                '}';
    }
}
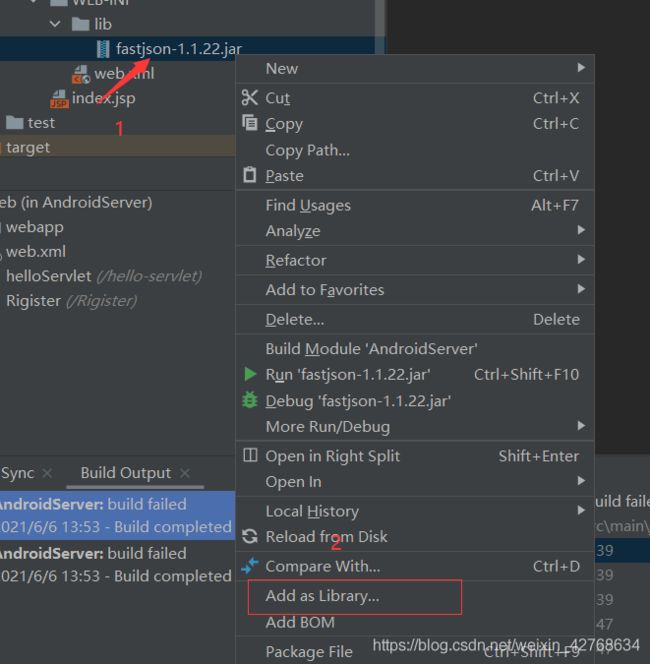
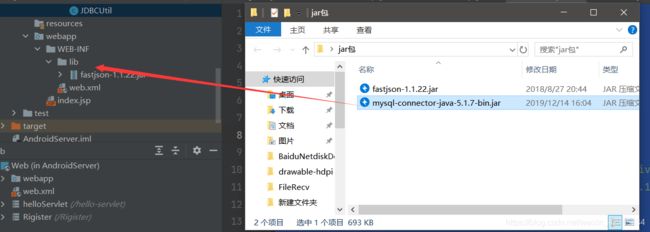
下载JSON解析jar包
下载地址 :https://pan.baidu.com/s/131P_eiT7-57X1CaMyehICg(提取码:zdou)
创建service层处理业务逻辑功能
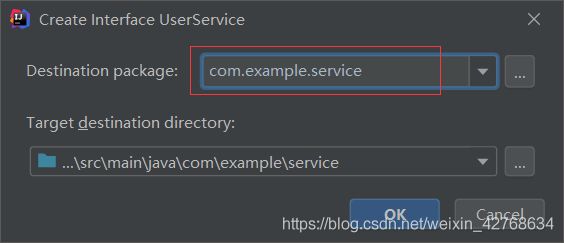
创建接口,用到面向接口编程思想,方便添加其他业务功能,因为我们后面还添加其他功能(比如登录)
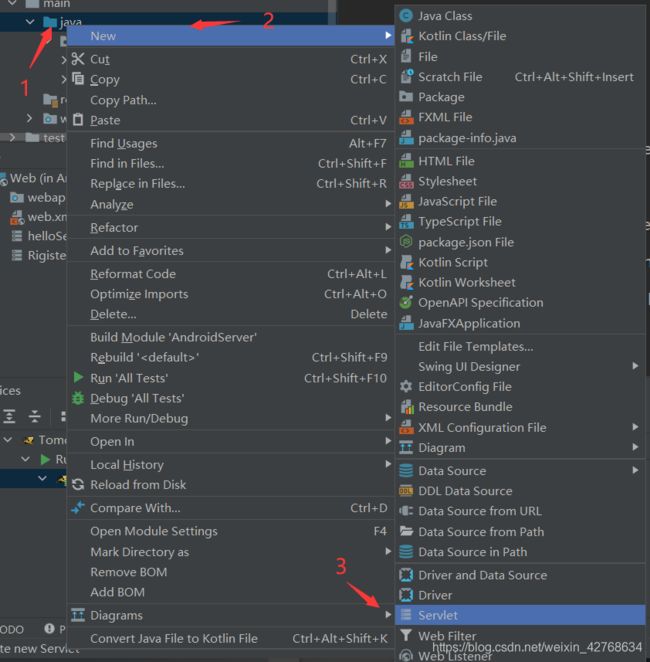
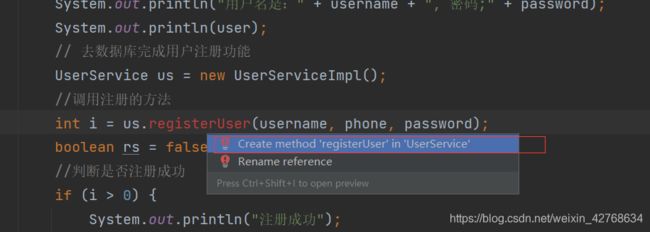
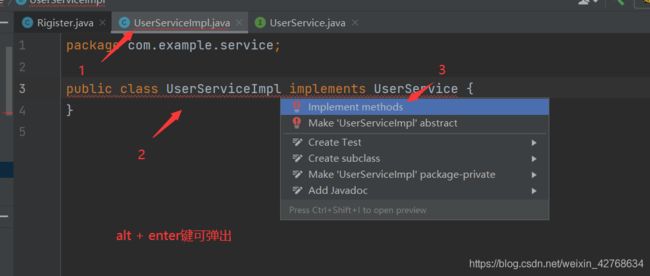
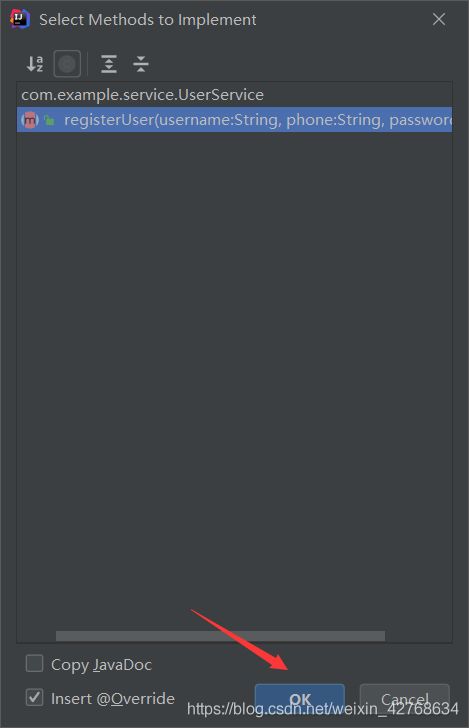
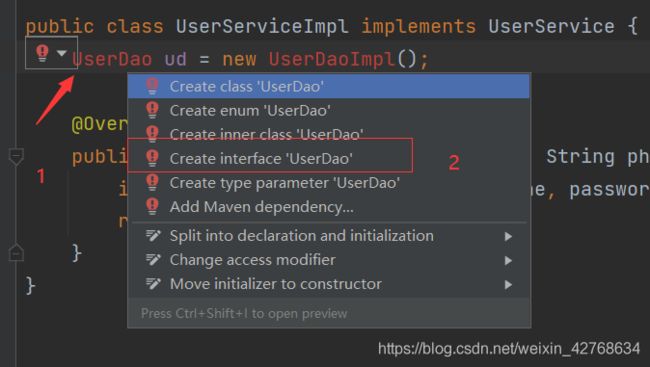
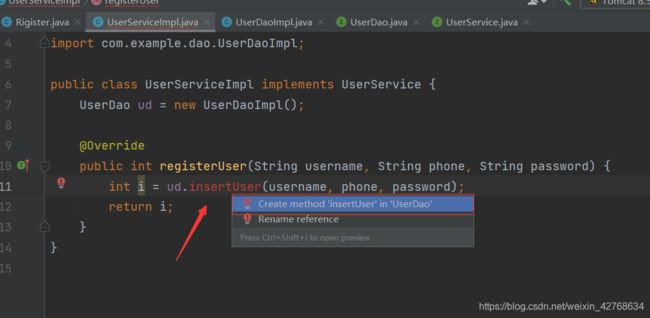
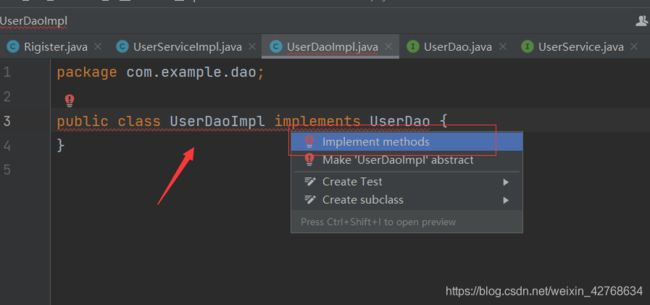
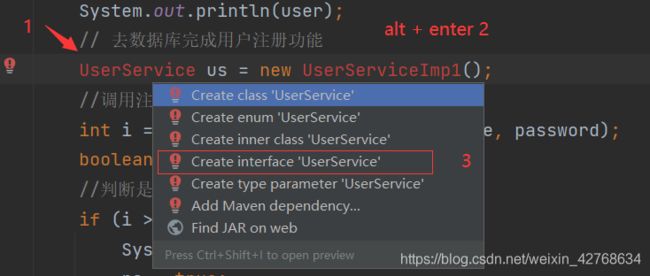
在上面创建Servlet Rigister.java文件中报红的地方按alt+enter键创建接口,如下
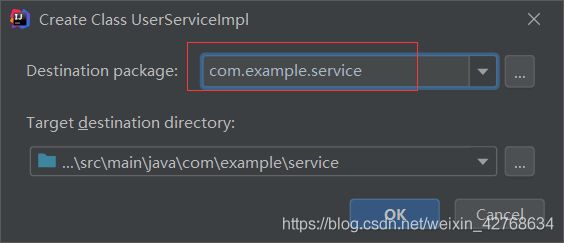
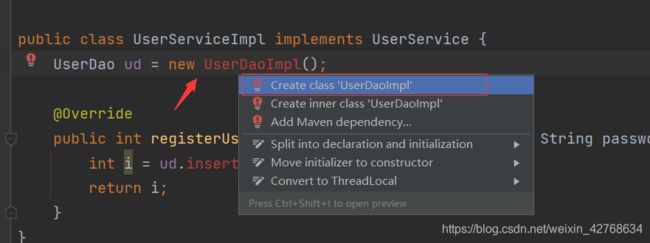
创建接口的实现类
package com.example.service;

public class UserServiceImpl implements UserService {

    UserDao ud = new UserDaoImpl();

    @Override
    public int registerUser(String username, String phone, String password) {

        int i = ud.insertUser(username, phone, password);
        return i;
    }
}
创建dao层去操作数据库
package com.example.dao;

public class UserDaoImpl implements UserDao {

    @Override
    public int insertUser(String username, String phone, String password) {

        String sql = "insert into user (username, phone, password) values(?,?,?);";
        //i如果操作成功,就是操作成功的条数
        int i = JDBCUtil.executeUpdate(sql,username,phone,password);
        return i;
    }
}
通过JDBC工具类访问数据库
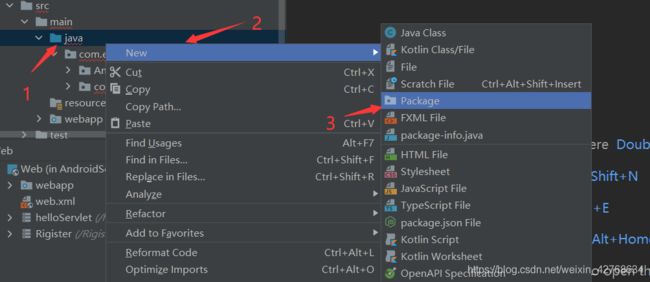
创建一个包单独存放工具类

创建工具类JDBCUtil.java代码如下
package com.example.util;

import java.sql.Connection;
import java.sql.DriverManager;
import java.sql.PreparedStatement;
import java.sql.ResultSet;
import java.sql.SQLException;

public class JDBCUtil {

    private static final String DRIVER = "com.mysql.jdbc.Driver";
    private static final String URL = "jdbc:mysql://127.0.0.1:3306/androiddb1?useUnicode=true&characterEncoding=utf-8";
    private static final String USER = "root";
    private static final String PASSWORD = "root";
    private static Connection ct;
    private static PreparedStatement ps;
    private static ResultSet rs;

    static {

        // 1.加载驱动,只需要加载一次,所以放到静态代码块中
        try {

            Class.forName(DRIVER);
        } catch (ClassNotFoundException e) {

            e.printStackTrace();
        }
    }

    /**
     * 描述:封装一个方法可以获得连接,目的可以在其他地方之接调用
     */
    public static Connection getConnection() {


        try {


            ct = DriverManager.getConnection(URL, USER, PASSWORD);
        } catch (SQLException e) {

            // TODO Auto-generated catch block
            e.printStackTrace();
        }
        return ct;
    }

    /**
     * 描述:封装一个方法可以完成查询操作
     *
     * @param sql 要查询的sql语句
     * @param obj 占位符的具体内容
     * @return ResultSet 将查询到的结果返回
     */
    public static ResultSet executeQuery(String sql, Object... obj) {

        // 1.得到连接
        ct = getConnection();
        // 2.创键发送对象
        try {

            ps = ct.prepareStatement(sql);
            // 处理占位符问题
            if (obj != null) {


                for (int i = 0; i < obj.length; i++) {

                    ps.setObject(i + 1, obj[i]);
                }
            }
            rs = ps.executeQuery();
        } catch (SQLException e) {

            // TODO Auto-generated catch block
            e.printStackTrace();
        }
        return rs;
    }

    /**
     * 描述:封装一个方法可以完成DDL,DML操作
     *
     * @param sql 要操作的sql语句
     * @param obj 占位符
     * @return
     */
    public static int executeUpdate(String sql, Object... obj) {

        // 1.得到连接
        ct = getConnection();
        // 2.创键发送对象
        try {

            ps = ct.prepareStatement(sql);
            // 处理占位符问题
            if (obj != null) {

                for (int i = 0; i < obj.length; i++) {

                    ps.setObject(i + 1, obj[i]);
                }
            }
            int in = ps.executeUpdate();
            close(ct, ps, null);
            return in;
        } catch (SQLException e) {

            // TODO Auto-generated catch block
            e.printStackTrace();
        }
        return 0;
    }

    /**
     * 描述:封装一个关闭资源的方法
     *
     * @param ct 连接对象
     * @param ps 发送sql语句对象
     * @param rs 返回值对象
     */
    public static void close(Connection ct, PreparedStatement ps, ResultSet rs) {


        if (rs != null) {

            try {

                rs.close();
            } catch (SQLException e) {

                // TODO Auto-generated catch block
                e.printStackTrace();
            }
        }
        if (ps != null) {

            try {

                ps.close();
            } catch (SQLException e) {

                // TODO Auto-generated catch block
                e.printStackTrace();
            }
        }

        if (ct != null) {

            try {

                ct.close();
            } catch (SQLException e) {

                // TODO Auto-generated catch block
                e.printStackTrace();
            }
        }

    }

    // 给外部一个访问ct,和ps的方法
    public static Connection getCt() {

        return ct;
    }

    public static PreparedStatement getPs() {

        return ps;
    }

}
把驱动包添加到类库,跟上面的JSON包添加一样的
通过navicat可视化工具创建数据库和表
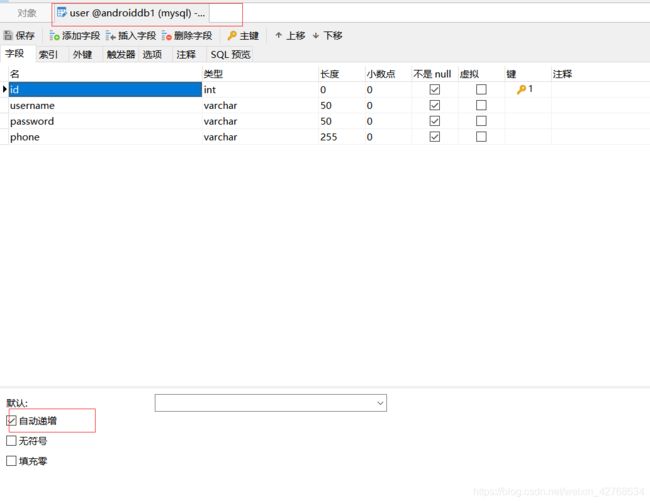
我的数据库名为androiddb1,表名user。可以自己定义
测试注册功能
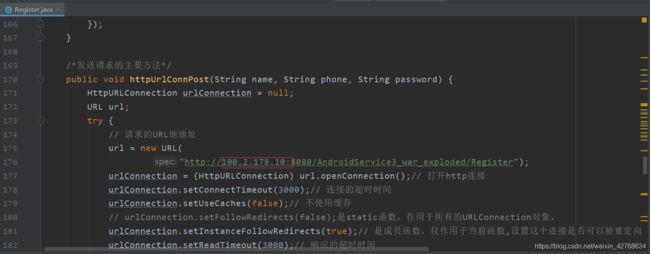
在客户端的注册activity中有个请求服务器的方法,里面要把URL的ip地址修改成自己的ip地址,如下所示
查看ip地址的方法,win+R,输入cmd进入命令行,然后输入ipconfig,如下所示


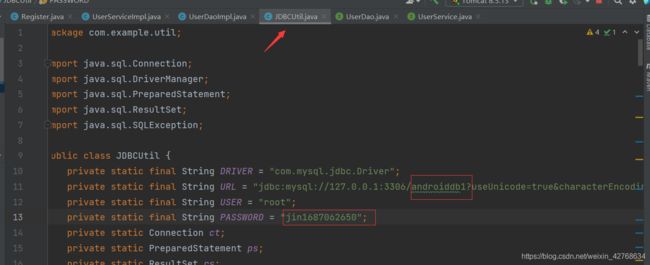
把数据库密码和数据库名改为自己的
由于登录功能还没实现,所以要把注册成功跳转的页面注释掉,如下

登录功能
登录功能主要包括移动端的登录相关功能(比如界面,向服务器发送http请求)和服务端的表单处理功能,而且服务器的表单验证的数据要从mysql中获取,即和注册类似
移动端登录相关功能实现
移动端登录功能主要包括界面的实现,以及向服务器发送请求,请求成功后跳转到微信首页
登录activity
微信的登录界面有两个,分别为手机号登录,微信号登录,所以要创建两个activity
创建通过用户名登录的LoginUser.java activity 代码如下
package com.example.wxchatdemo;

import android.annotation.SuppressLint;
import android.app.AlertDialog;
import android.content.Intent;
import android.graphics.Color;
import android.os.Build;
import android.os.Bundle;
import android.os.Handler;
import android.os.Message;
import android.support.v7.app.ActionBar;
import android.support.v7.app.AppCompatActivity;
import android.util.Log;
import android.view.View;
import android.widget.Button;
import android.widget.EditText;
import android.widget.ImageView;
import android.widget.TextView;
import android.widget.Toast;
import org.json.JSONObject;
import java.io.BufferedReader;
import java.io.BufferedWriter;
import java.io.InputStream;
import java.io.InputStreamReader;
import java.io.OutputStream;
import java.io.OutputStreamWriter;
import java.net.HttpURLConnection;
import java.net.URL;
import java.net.URLEncoder;

public class LoginUser extends AppCompatActivity {

    //声明组件变量
    private EditText username;
    private EditText password;
    private TextView phone_login;
    private Button button;
    //自定义的一个Hander消息机制
    private MyHander myhander = new MyHander();

    @Override
    public void onCreate(Bundle savedInstanceState) {

        super.onCreate(savedInstanceState);
        setContentView(R.layout.login_user); //设置布局
        /* 隐藏自带标题*/
        ActionBar actionBar = getSupportActionBar();
        if (actionBar != null) {

            actionBar.hide();
        }
        if (Build.VERSION.SDK_INT >= 21) {

            View decorView = getWindow().getDecorView();
            int option = View.SYSTEM_UI_FLAG_LAYOUT_FULLSCREEN //全屏显示
                    | View.SYSTEM_UI_FLAG_LAYOUT_STABLE
                    | View.SYSTEM_UI_FLAG_LIGHT_STATUS_BAR; //因为背景为浅色所以将状态栏字体设置为黑色
            decorView.setSystemUiVisibility(option);
            getWindow().setStatusBarColor(Color.TRANSPARENT);
        }
        initViews();  // 初始化布局元素
        // 设置注册按钮是否可点击
        if (username.getText() + "" == "" || password.getText() + "" == "") {

            button.setEnabled(false);
        } else {

            button.setEnabled(true);
        }
        inputFocus(); //监听EditView变色
        buttonChangeColor(); //登录按钮变色
        // 设置手机号登录的监听器
        phone_login.setOnClickListener(new View.OnClickListener() {

            @Override
            public void onClick(View v) {

                //跳转到手机号登录的activity
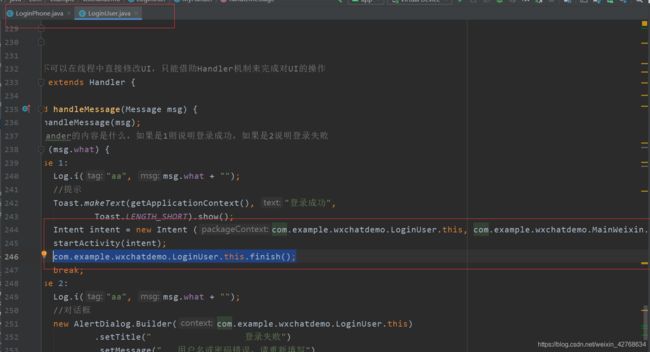
                Intent intent=new Intent(LoginUser.this,LoginPhone.class);
                startActivity(intent);
            }
        });
        //button的点击事件
        button.setOnClickListener(new View.OnClickListener() {

            @Override
            public void onClick(View v) {

                //创建一个进度条的activity,通过AndroidMainfest.xml文件声明为对胡框,这样activity就不会覆盖当前的activity
                Intent intent = new Intent();
                intent.setClass(LoginUser.this, Loading.class);
                startActivity(intent);
                // 开一个线程完成网络请求操作
                new Thread(new Runnable() {

                    @Override
                    public void run() {

                        try {

                            Thread.sleep(1000);
                            httpUrlConnPost(LoginUser.this.username.getText() + "",
                                    password.getText() + "");
                        } catch (InterruptedException e) {

                            e.printStackTrace();
                        }
                    }
                }).start();
            }
        });

    }

    @SuppressLint("NewApi")
    public void initViews() {

        // 得到所有的组件
        username = (EditText) this.findViewById(R.id.log_name);
        password = (EditText) this.findViewById(R.id.log_passwd);
        phone_login = (TextView) this.findViewById(R.id.phone_log);
        button = (Button) this.findViewById(R.id.log_button);
    }

    public void inputFocus() {

        username.setOnFocusChangeListener(new View.OnFocusChangeListener() {

            @Override
            public void onFocusChange(View v, boolean hasFocus) {

                if (hasFocus) {

                    // 此处为得到焦点时的处理内容
                    ImageView imageView = (ImageView) findViewById(R.id.login_diver1);
                    imageView.setBackgroundResource(R.color.input_dvier_focus);
                } else {

                    // 此处为失去焦点时的处理内容
                    ImageView imageView = (ImageView) findViewById(R.id.login_diver1);
                    imageView.setBackgroundResource(R.color.input_dvier);
                }
            }
        });
        password.setOnFocusChangeListener(new View.OnFocusChangeListener() {

            @Override
            public void onFocusChange(View v, boolean hasFocus) {

                if (hasFocus) {

                    // 此处为得到焦点时的处理内容
                    ImageView imageView = (ImageView) findViewById(R.id.login_diver2);
                    imageView.setBackgroundResource(R.color.input_dvier_focus);
                } else {

                    // 此处为失去焦点时的处理内容
                    ImageView imageView = (ImageView) findViewById(R.id.login_diver2);
                    imageView.setBackgroundResource(R.color.input_dvier);
                }
            }
        });
    }

    public void buttonChangeColor() {

        //创建工具类对象 把要改变颜色的Button先传过去
        WorksSizeCheckUtil.textChangeListener textChangeListener = new WorksSizeCheckUtil.textChangeListener(button);
        textChangeListener.addAllEditText(username, password);//把所有要监听的EditText都添加进去
        //接口回调 在这里拿到boolean变量 根据isHasContent的值决定 Button应该设置什么颜色
        WorksSizeCheckUtil.setChangeListener(new IEditTextChangeListener() {

            @Override
            public void textChange(boolean isHasContent) {

                if (isHasContent) {

                    button.setBackgroundResource(R.drawable.login_button_focus);
                    button.setTextColor(getResources().getColor(R.color.loginButtonTextFouse));
                } else {

                    button.setBackgroundResource(R.drawable.login_button_shape);
                    button.setTextColor(getResources().getColor(R.color.loginButtonText));
                }
            }
        });
    }

    // 发送请求的主要方法
    public void httpUrlConnPost(String name, String password) {

        HttpURLConnection urlConnection = null;
        URL url;
        try {

            // 请求的URL地地址
            url = new URL(
                    "http://100.2.178.10:8080/AndroidServer_war_exploded/Login");
            urlConnection = (HttpURLConnection) url.openConnection();// 打开http连接
            urlConnection.setConnectTimeout(3000);// 连接的超时时间
            urlConnection.setUseCaches(false);// 不使用缓存
            // urlConnection.setFollowRedirects(false);是static函数,作用于所有的URLConnection对象。
            urlConnection.setInstanceFollowRedirects(true);// 是成员函数,仅作用于当前函数,设置这个连接是否可以被重定向
            urlConnection.setReadTimeout(3000);// 响应的超时时间
            urlConnection.setDoInput(true);// 设置这个连接是否可以写入数据
            urlConnection.setDoOutput(true);// 设置这个连接是否可以输出数据
            urlConnection.setRequestMethod("POST");// 设置请求的方式
            urlConnection.setRequestProperty("Content-Type",
                    "application/json;charset=UTF-8");// 设置消息的类型
            urlConnection.connect();// 连接,从上述至此的配置必须要在connect之前完成,实际上它只是建立了一个与服务器的TCP连接
            JSONObject json = new JSONObject();// 创建json对象
            json.put("username", URLEncoder.encode(name, "UTF-8"));// 使用URLEncoder.encode对特殊和不可见字符进行编码
            json.put("password", URLEncoder.encode(password, "UTF-8"));// 把数据put进json对象中
            String jsonstr = json.toString();// 把JSON对象按JSON的编码格式转换为字符串
            // ------------字符流写入数据------------
            OutputStream out = urlConnection.getOutputStream();// 输出流,用来发送请求,http请求实际上直到这个函数里面才正式发送出去
            BufferedWriter bw = new BufferedWriter(new OutputStreamWriter(out));// 创建字符流对象并用高效缓冲流包装它,便获得最高的效率,发送的是字符串推荐用字符流,其它数据就用字节流
            bw.write(jsonstr);// 把json字符串写入缓冲区中
            bw.flush();// 刷新缓冲区,把数据发送出去,这步很重要
            out.close();
            bw.close();// 使用完关闭
            Log.i("aa", urlConnection.getResponseCode() + "");
            //以下判斷是否訪問成功,如果返回的状态码是200则说明访问成功
            if (urlConnection.getResponseCode() == HttpURLConnection.HTTP_OK) {
     // 得到服务端的返回码是否连接成功
                // ------------字符流读取服务端返回的数据------------
                InputStream in = urlConnection.getInputStream();
                BufferedReader br = new BufferedReader(
                        new InputStreamReader(in));
                String str = null;
                StringBuffer buffer = new StringBuffer();
                while ((str = br.readLine()) != null) {
     // BufferedReader特有功能,一次读取一行数据
                    buffer.append(str);
                }
                in.close();
                br.close();
                JSONObject rjson = new JSONObject(buffer.toString());
                Log.i("aa", "rjson=" + rjson);// rjson={"json":true}
                boolean result = rjson.getBoolean("json");// 从rjson对象中得到key值为"json"的数据,这里服务端返回的是一个boolean类型的数据
                System.out.println("json:===" + result);
                //如果服务器端返回的是true,则说明注册成功,否则注册失败
                if (result) {
     // 判断结果是否正确
                    //在Android中http请求,必须放到线程中去作请求,但是在线程中不可以直接修改UI,只能通过hander机制来完成对UI的操作
                    myhander.sendEmptyMessage(1);
                    Log.i("用户:", "登录成功");
                } else {

                    myhander.sendEmptyMessage(2);
                    System.out.println("222222222222222");
                    Log.i("用户:", "登录失败");
                }
            } else {

                myhander.sendEmptyMessage(2);
            }
        } catch (Exception e) {

            e.printStackTrace();
            Log.i("aa", e.toString());
            System.out.println("11111111111111111");
            myhander.sendEmptyMessage(2);
        } finally {

            urlConnection.disconnect();// 使用完关闭TCP连接,释放资源
        }
    }

    // 在Android中不可以在线程中直接修改UI,只能借助Handler机制来完成对UI的操作
    class MyHander extends Handler {

        @Override
        public void handleMessage(Message msg) {

            super.handleMessage(msg);
            //判断hander的内容是什么,如果是1则说明登录成功,如果是2说明登录失败
            switch (msg.what) {

                case 1:
                    Log.i("aa", msg.what + "");
                    //提示
                    Toast.makeText(getApplicationContext(), "登录成功",
                            Toast.LENGTH_SHORT).show();
                    break;
                case 2:
                    Log.i("aa", msg.what + "");
                    //对话框
                    new AlertDialog.Builder(com.example.wxchatdemo.LoginUser.this)
                            .setTitle("                  登录失败")
                            .setMessage("   用户名或密码错误,请重新填写")
                            .setPositiveButton("确定", null)
                            .show();
                    break;
            }
        }
    }

    //返回按钮处理事件
    public void login_activity_back(View v) {

        /*跳转到微信启动页*/
        Intent intent = new Intent();
        intent.setClass(com.example.wxchatdemo.LoginUser.this, Welcome.class);
        startActivity(intent);
        com.example.wxchatdemo.LoginUser.this.finish(); //结束当前activity
    }
}
创建对应的布局login_user.xml文件,代码如下
<LinearLayout xmlns:android="http://schemas.android.com/apk/res/android"
    android:layout_width="match_parent"
    android:layout_height="match_parent"
    android:background="@color/title"
    android:orientation="vertical">

    <ImageView
        android:id="@+id/close"
        android:layout_width="17dp"
        android:layout_height="17dp"
        android:layout_marginLeft="20dp"
        android:layout_marginTop="45dp"
        android:onClick="login_activity_back"
        android:src="@drawable/backpay" />

    <TextView
        android:layout_width="match_parent"
        android:layout_height="wrap_content"
        android:layout_marginLeft="30dp"
        android:layout_marginTop="45dp"
        android:text="微信号/QQ号/邮箱登录"
        android:textColor="@color/loginText"
        android:textSize="25sp" />

    <LinearLayout
        android:layout_width="match_parent"
        android:layout_height="wrap_content"
        android:layout_marginTop="40dp">

        <TextView
            android:layout_width="wrap_content"
            android:layout_height="wrap_content"
            android:layout_marginLeft="30dp"
            android:text="账号"
            android:textColor="@color/loginText"
            android:textSize="16sp" />

        <EditText
            android:id="@+id/log_name"
            android:layout_width="200dp"
            android:layout_height="wrap_content"
            android:layout_marginLeft="55dp"
            android:background="@null"
            android:hint="请填写微信号/QQ号/邮箱"
            android:singleLine="true"
            android:textColorHint="@color/textColorHint"
            android:textCursorDrawable="@drawable/edit_cursor_color"
            android:textSize="16sp" />
    LinearLayout>

    <ImageView
        android:id="@+id/login_diver1"
        android:layout_width="320dp"
        android:layout_height="1dp"
        android:layout_gravity="center_horizontal"
        android:layout_marginTop="17dp"
        android:background="@color/input_dvier" />

    <LinearLayout
        android:layout_width="match_parent"
        android:layout_height="wrap_content"
        android:layout_marginTop="40dp">

        <TextView
            android:layout_width="wrap_content"
            android:layout_height="wrap_content"
            android:layout_marginLeft="30dp"
            android:text="密码"
            android:textColor="@color/loginText"
            android:textSize="16sp" />

        <EditText
            android:id="@+id/log_passwd"
            android:layout_width="200dp"
            android:layout_height="wrap_content"
            android:layout_marginLeft="55dp"
            android:background="@null"
            android:hint="请填写密码"
            android:singleLine="true"
            android:textColorHint="@color/textColorHint"
            android:textCursorDrawable="@drawable/edit_cursor_color"
            android:textSize="16sp" />
    LinearLayout>

    <ImageView
        android:id="@+id/login_diver2"
        android:layout_width="320dp"
        android:layout_height="1dp"
        android:layout_gravity="center_horizontal"
        android:layout_marginTop="17dp"
        android:background="@color/input_dvier" />

    <LinearLayout
        android:layout_width="match_parent"
        android:layout_height="wrap_content">

        <TextView
            android:id="@+id/phone_log"
            android:layout_width="wrap_content"
            android:layout_height="wrap_content"
            android:layout_marginLeft="30dp"
            android:layout_marginTop="30dp"
            android:text="用手机号登录"
            android:textColor="@color/massageLogin"
            android:textSize="17dp" />
    LinearLayout>

    <LinearLayout
        android:layout_width="match_parent"
        android:layout_height="wrap_content"
        android:layout_marginTop="40dp"
        android:gravity="center_horizontal">

        <Button
            android:id="@+id/log_button"
            android:layout_width="321dp"
            android:layout_height="48dp"
            android:background="@drawable/login_button_shape"
            android:text="登录"
            android:textColor="@color/loginButtonText"
            android:textSize="16sp" />
    LinearLayout>

    <LinearLayout
        android:layout_width="match_parent"
        android:layout_height="wrap_content"
        android:layout_marginTop="150dp"
        android:divider="@drawable/login_dvier"
        android:gravity="center_horizontal"
        android:showDividers="middle">

        <TextView
            android:layout_width="wrap_content"
            android:layout_height="wrap_content"
            android:paddingHorizontal="10dp"
            android:text="找回密码"
            android:textColor="@color/massageLogin"
            android:textSize="14dp" />

        <TextView
            android:layout_width="wrap_content"
            android:layout_height="wrap_content"
            android:paddingHorizontal="10dp"
            android:text="紧急冻结"
            android:textColor="@color/massageLogin"
            android:textSize="14dp" />

        <TextView
            android:layout_width="wrap_content"
            android:layout_height="wrap_content"
            android:paddingHorizontal="10dp"
            android:text="微信安全中心"
            android:textColor="@color/massageLogin"
            android:textSize="14dp" />
    LinearLayout>
LinearLayout>
创建上面布局文件用到的login_diver.xml shape文件,实现竖直分割线效果,代码如下
<shape xmlns:android="http://schemas.android.com/apk/res/android" >
    <solid android:color="@color/login_dvier" />
    <size android:height="1dp">size>
    <size android:width="1dp">size>
shape>
创建通过手机号登录的LoginPhone.java activity 代码如下
package com.example.wxchatdemo;

import android.annotation.SuppressLint;
import android.app.AlertDialog;
import android.content.Intent;
import android.graphics.Color;
import android.os.Build;
import android.os.Bundle;
import android.os.Handler;
import android.os.Message;
import android.support.v7.app.ActionBar;
import android.support.v7.app.AppCompatActivity;
import android.util.Log;
import android.view.View;
import android.widget.Button;
import android.widget.EditText;
import android.widget.ImageView;
import android.widget.TextView;
import android.widget.Toast;

import org.json.JSONObject;

import java.io.BufferedReader;
import java.io.BufferedWriter;
import java.io.InputStream;
import java.io.InputStreamReader;
import java.io.OutputStream;
import java.io.OutputStreamWriter;
import java.net.HttpURLConnection;
import java.net.URL;
import java.net.URLEncoder;

public class LoginPhone extends AppCompatActivity {

    //声明组件变量
    private EditText phone;
    private EditText password;
    private TextView user_login;
    private Button button;
    //自定义的一个Hander消息机制
    private LoginPhone.MyHander myhander = new LoginPhone.MyHander();

    @Override
    public void onCreate(Bundle savedInstanceState) {

        super.onCreate(savedInstanceState);
        setContentView(R.layout.login_phone); //设置布局
        /* 隐藏自带标题*/
        ActionBar actionBar = getSupportActionBar();
        if (actionBar != null) {

            actionBar.hide();
        }
        if (Build.VERSION.SDK_INT >= 21) {

            View decorView = getWindow().getDecorView();
            int option = View.SYSTEM_UI_FLAG_LAYOUT_FULLSCREEN //全屏显示
                    | View.SYSTEM_UI_FLAG_LAYOUT_STABLE
                    | View.SYSTEM_UI_FLAG_LIGHT_STATUS_BAR; //因为背景为浅色所以将状态栏字体设置为黑色
            decorView.setSystemUiVisibility(option);
            getWindow().setStatusBarColor(Color.TRANSPARENT);
        }
        initViews();  // 初始化布局元素
        // 设置注册按钮是否可点击
        if (phone.getText() + "" == "" || password.getText() + "" == "") {

            button.setEnabled(false);
        } else {

            button.setEnabled(true);
        }
        inputFocus(); //监听EditView变色
        buttonChangeColor(); //登录按钮变色
        //设置通过微信号登录的监听器
        user_login.setOnClickListener(new View.OnClickListener() {

            @Override
            public void onClick(View v) {

                //跳转到用微信号登录的activity
                Intent intent = new Intent(LoginPhone.this, LoginUser.class);
                startActivity(intent);
            }
        });
        //button的点击事件
        button.setOnClickListener(new View.OnClickListener() {

            @Override
            public void onClick(View v) {

                //创建一个进度条的activity,通过AndroidMainfest.xml文件声明为对胡框,这样activity就不会覆盖当前的activity
                Intent intent = new Intent();
                intent.setClass(LoginPhone.this, com.example.wxchatdemo.LoadingActivity.class);
                startActivity(intent);
                // 开一个线程完成网络请求操作
                new Thread(new Runnable() {

                    @Override
                    public void run() {

                        httpUrlConnPost(LoginPhone.this.phone.getText() + "",
                                password.getText() + "");
                    }
                }).start();
            }
        });

    }

    @SuppressLint("NewApi")
    public void initViews() {

        // 得到所有的组件
        phone = (EditText) this.findViewById(R.id.log_phone);
        password = (EditText) this.findViewById(R.id.log_passwd);
        user_login = (TextView) this.findViewById(R.id.user_log);
        button = (Button) this.findViewById(R.id.log_button);
    }

    public void inputFocus() {

        phone.setOnFocusChangeListener(new View.OnFocusChangeListener() {

            @Override
            public void onFocusChange(View v, boolean hasFocus) {

                if (hasFocus) {

                    // 此处为得到焦点时的处理内容
                    ImageView imageView = (ImageView) findViewById(R.id.login_diver1);
                    imageView.setBackgroundResource(R.color.input_dvier_focus);
                } else {

                    // 此处为失去焦点时的处理内容
                    ImageView imageView = (ImageView) findViewById(R.id.login_diver1);
                    imageView.setBackgroundResource(R.color.input_dvier);
                }
            }
        });
        password.setOnFocusChangeListener(new View.OnFocusChangeListener() {

            @Override
            public void onFocusChange(View v, boolean hasFocus) {

                if (hasFocus) {

                    // 此处为得到焦点时的处理内容
                    ImageView imageView = (ImageView) findViewById(R.id.login_diver2);
                    imageView.setBackgroundResource(R.color.input_dvier_focus);
                } else {

                    // 此处为失去焦点时的处理内容
                    ImageView imageView = (ImageView) findViewById(R.id.login_diver2);
                    imageView.setBackgroundResource(R.color.input_dvier);
                }
            }
        });
    }

    public void buttonChangeColor() {

        //创建工具类对象 把要改变颜色的Button先传过去
        WorksSizeCheckUtil.textChangeListener textChangeListener = new WorksSizeCheckUtil.textChangeListener(button);
        textChangeListener.addAllEditText(phone, password);//把所有要监听的EditText都添加进去
        //接口回调 在这里拿到boolean变量 根据isHasContent的值决定 Button应该设置什么颜色
        WorksSizeCheckUtil.setChangeListener(new IEditTextChangeListener() {

            @Override
            public void textChange(boolean isHasContent) {

                if (isHasContent) {

                    button.setBackgroundResource(R.drawable.login_button_focus);
                    button.setTextColor(getResources().getColor(R.color.loginButtonTextFouse));
                } else {

                    button.setBackgroundResource(R.drawable.login_button_shape);
                    button.setTextColor(getResources().getColor(R.color.loginButtonText));
                }
            }
        });
    }

    // 发送请求的主要方法
    public void httpUrlConnPost(String phone, String password) {

        HttpURLConnection urlConnection = null;
        URL url;
        try {

            // 请求的URL地地址
            url = new URL(
                    "http://100.2.178.10:8080/AndroidServer_war_exploded/Login");
            urlConnection = (HttpURLConnection) url.openConnection();// 打开http连接
            urlConnection.setConnectTimeout(3000);// 连接的超时时间
            urlConnection.setUseCaches(false);// 不使用缓存
            // urlConnection.setFollowRedirects(false);是static函数,作用于所有的URLConnection对象。
            urlConnection.setInstanceFollowRedirects(true);// 是成员函数,仅作用于当前函数,设置这个连接是否可以被重定向
            urlConnection.setReadTimeout(3000);// 响应的超时时间
            urlConnection.setDoInput(true);// 设置这个连接是否可以写入数据
            urlConnection.setDoOutput(true);// 设置这个连接是否可以输出数据
            urlConnection.setRequestMethod("POST");// 设置请求的方式
            urlConnection.setRequestProperty("Content-Type",
                    "application/json;charset=UTF-8");// 设置消息的类型
            urlConnection.connect();// 连接,从上述至此的配置必须要在connect之前完成,实际上它只是建立了一个与服务器的TCP连接
            JSONObject json = new JSONObject();// 创建json对象
            json.put("username", URLEncoder.encode(phone, "UTF-8"));// 使用URLEncoder.encode对特殊和不可见字符进行编码
            json.put("password", URLEncoder.encode(password, "UTF-8"));// 把数据put进json对象中
            String jsonstr = json.toString();// 把JSON对象按JSON的编码格式转换为字符串
            // ------------字符流写入数据------------
            OutputStream out = urlConnection.getOutputStream();// 输出流,用来发送请求,http请求实际上直到这个函数里面才正式发送出去
            BufferedWriter bw = new BufferedWriter(new OutputStreamWriter(out));// 创建字符流对象并用高效缓冲流包装它,便获得最高的效率,发送的是字符串推荐用字符流,其它数据就用字节流
            bw.write(jsonstr);// 把json字符串写入缓冲区中
            bw.flush();// 刷新缓冲区,把数据发送出去,这步很重要
            out.close();
            bw.close();// 使用完关闭
            Log.i("aa", urlConnection.getResponseCode() + "");
            //以下判斷是否訪問成功,如果返回的状态码是200则说明访问成功
            if (urlConnection.getResponseCode() == HttpURLConnection.HTTP_OK) {
     // 得到服务端的返回码是否连接成功
                // ------------字符流读取服务端返回的数据------------
                InputStream in = urlConnection.getInputStream();
                BufferedReader br = new BufferedReader(
                        new InputStreamReader(in));
                String str = null;
                StringBuffer buffer = new StringBuffer();
                while ((str = br.readLine()) != null) {
     // BufferedReader特有功能,一次读取一行数据
                    buffer.append(str);
                }
                in.close();
                br.close();
                JSONObject rjson = new JSONObject(buffer.toString());
                Log.i("aa", "rjson=" + rjson);// rjson={"json":true}
                boolean result = rjson.getBoolean("json");// 从rjson对象中得到key值为"json"的数据,这里服务端返回的是一个boolean类型的数据
                System.out.println("json:===" + result);
                //如果服务器端返回的是true,则说明登录成功,否则登录失败
                if (result) {
     // 判断结果是否正确
                    //在Android中http请求,必须放到线程中去作请求,但是在线程中不可以直接修改UI,只能通过hander机制来完成对UI的操作
                    myhander.sendEmptyMessage(1);
                    Log.i("用户:", "登录成功");
                } else {

                    myhander.sendEmptyMessage(2);
                    System.out.println("222222222222222");
                    Log.i("用户:", "登录失败");
                }
            } else {

                myhander.sendEmptyMessage(2);
            }
        } catch (Exception e) {

            e.printStackTrace();
            Log.i("aa", e.toString());
            System.out.println("11111111111111111");
            myhander.sendEmptyMessage(2);
        } finally {

            urlConnection.disconnect();// 使用完关闭TCP连接,释放资源
        }
    }

    // 在Android中不可以在线程中直接修改UI,只能借助Handler机制来完成对UI的操作
    class MyHander extends Handler {

        @Override
        public void handleMessage(Message msg) {

            super.handleMessage(msg);
            //判断hander的内容是什么,如果是1则说明注册成功,如果是2说明注册失败
            switch (msg.what) {

                case 1:
                    Log.i("aa", msg.what + "");
                    Toast.makeText(getApplicationContext(), "登录成功",
                            Toast.LENGTH_SHORT).show();
                    break;
                case 2:
                    Log.i("aa", msg.what + "");
                    new AlertDialog.Builder(com.example.wxchatdemo.LoginPhone.this)
                            .setTitle("                   登录失败")
                            .setMessage("    用户名或密码错误,请重新填写")
                            .setPositiveButton("确定", null)
                            .show();
            }
        }
    }

    //返回按钮处理事件
    public void login_activity_back(View v) {

        /*跳转到微信启动页*/
        Intent intent = new Intent();
        intent.setClass(com.example.wxchatdemo.LoginPhone.this, Welcome.class);
        startActivity(intent);
        com.example.wxchatdemo.LoginPhone.this.finish(); //结束当前activity
    }
}
创建对应的布局login_phone.xml文件,代码如下
<LinearLayout xmlns:android="http://schemas.android.com/apk/res/android"
    android:layout_width="match_parent"
    android:layout_height="match_parent"
    android:background="@color/title"
    android:orientation="vertical">

    <ImageView
        android:id="@+id/close"
        android:layout_width="17dp"
        android:layout_height="17dp"
        android:layout_marginLeft="20dp"
        android:layout_marginTop="45dp"
        android:onClick="login_activity_back"
        android:src="@drawable/backpay" />

    <TextView
        android:layout_width="match_parent"
        android:layout_height="wrap_content"
        android:layout_marginLeft="30dp"
        android:layout_marginTop="45dp"
        android:text="手机号登录"
        android:textColor="@color/loginText"
        android:textSize="25sp" />

    <LinearLayout
        android:layout_width="match_parent"
        android:layout_height="wrap_content"
        android:layout_marginTop="40dp">

        <TextView
            android:layout_width="wrap_content"
            android:layout_height="wrap_content"
            android:layout_marginLeft="30dp"
            android:text="手机号"
            android:textColor="@color/loginText"
            android:textSize="16sp" />

        <EditText
            android:id="@+id/log_phone"
            android:layout_width="200dp"
            android:layout_height="wrap_content"
            android:layout_marginLeft="35dp"
            android:background="@null"
            android:hint="请填写手机号"
            android:singleLine="true"
            android:textColorHint="@color/textColorHint"
            android:textCursorDrawable="@drawable/edit_cursor_color"
            android:textSize="16sp" />
    LinearLayout>

    <ImageView
        android:id="@+id/login_diver1"
        android:layout_width="320dp"
        android:layout_height="1dp"
        android:layout_gravity="center_horizontal"
        android:layout_marginTop="17dp"
        android:background="@color/input_dvier" />

    <LinearLayout
        android:layout_width="match_parent"
        android:layout_height="wrap_content"
        android:layout_marginTop="40dp">

        <TextView
            android:layout_width="wrap_content"
            android:layout_height="wrap_content"
            android:layout_marginLeft="30dp"
            android:text="密码"
            android:textColor="@color/loginText"
            android:textSize="16sp" />

        <EditText
            android:id="@+id/log_passwd"
            android:layout_width="200dp"
            android:layout_height="wrap_content"
            android:layout_marginLeft="55dp"
            android:background="@null"
            android:hint="请填写密码"
            android:singleLine="true"
            android:textColorHint="@color/textColorHint"
            android:textCursorDrawable="@drawable/edit_cursor_color"
            android:textSize="16sp" />
    LinearLayout>

    <ImageView
        android:id="@+id/login_diver2"
        android:layout_width="320dp"
        android:layout_height="1dp"
        android:layout_gravity="center_horizontal"
        android:layout_marginTop="17dp"
        android:background="@color/input_dvier" />

    <LinearLayout
        android:layout_width="match_parent"
        android:layout_height="wrap_content">

        <TextView
            android:id="@+id/user_log"
            android:layout_width="wrap_content"
            android:layout_height="wrap_content"
            android:layout_marginLeft="30dp"
            android:layout_marginTop="30dp"
            android:text="用微信号/QQ号/邮箱登录"
            android:textColor="@color/massageLogin"
            android:textSize="17dp" />
    LinearLayout>

    <LinearLayout
        android:layout_width="match_parent"
        android:layout_height="wrap_content"
        android:layout_marginTop="40dp"
        android:gravity="center_horizontal">

        <Button
            android:id="@+id/log_button"
            android:layout_width="321dp"
            android:layout_height="48dp"
            android:background="@drawable/login_button_shape"
            android:text="登录"
            android:textColor="@color/loginButtonText"
            android:textSize="16sp" />
    LinearLayout>

    <LinearLayout
        android:layout_width="match_parent"
        android:layout_height="wrap_content"
        android:layout_marginTop="150dp"
        android:divider="@drawable/login_dvier"
        android:gravity="center_horizontal"
        android:showDividers="middle">

        <TextView
            android:layout_width="wrap_content"
            android:layout_height="wrap_content"
            android:paddingHorizontal="10dp"
            android:text="找回密码"
            android:textColor="@color/massageLogin"
            android:textSize="14dp" />

        <TextView
            android:layout_width="wrap_content"
            android:layout_height="wrap_content"
            android:paddingHorizontal="10dp"
            android:text="紧急冻结"
            android:textColor="@color/massageLogin"
            android:textSize="14dp" />

        <TextView
            android:layout_width="wrap_content"
            android:layout_height="wrap_content"
            android:paddingHorizontal="10dp"
            android:text="微信安全中心"
            android:textColor="@color/massageLogin"
            android:textSize="14dp" />
    LinearLayout>
LinearLayout>
上面两个登录activity都实现了一个自定义的等待框activity,但是自定义的activity会覆盖原有的界面。因为微信点击登录按钮后会弹出一个等待框且不会覆盖原有的activity(即原有界面),所以要给自定义的等待框activity在Androidfest.xml文件配置为等待框,这样就不会覆盖原有activity.
创建Loading.java activity,实现自定义等待框,代码如下
package com.example.wxchatdemo;

import android.app.Activity;
import android.os.Bundle;
import android.os.Handler;

public class Loading extends Activity {


    @Override
    public void onCreate(Bundle savedInstanceState) {

        // TODO Auto-generated method stub
        super.onCreate(savedInstanceState);
        setContentView(R.layout.loading); //设置布局
        //一秒后结束当前activity
        new Handler().postDelayed(new Runnable() {

            @Override
            public void run() {

                Loading.this.finish();
            }
        }, 1000);
    }
}
对应的布局loading.xml文件,代码如下
<RelativeLayout xmlns:android="http://schemas.android.com/apk/res/android"
    android:layout_width="match_parent"
    android:layout_height="match_parent">

    <RelativeLayout
        android:layout_width="180dp"
        android:layout_height="180dp"
        android:layout_centerInParent="true"
        android:background="@drawable/loading_bg">

        <LinearLayout
            android:layout_width="fill_parent"
            android:layout_height="fill_parent"
            android:gravity="center"
            android:orientation="vertical">

            <ProgressBar
                android:id="@+id/progressBar1"
                style="?android:attr/progressBarStyleLarge"
                android:layout_width="wrap_content"
                android:layout_height="wrap_content"
                android:layout_gravity="center_horizontal" />

            <TextView
                android:layout_width="wrap_content"
                android:layout_height="wrap_content"
                android:layout_marginTop="10dp"
                android:text="正在登录"
                android:textColor="#fff"
                android:textSize="20sp" />
        LinearLayout>

    RelativeLayout>

RelativeLayout>
在AndroidMainfest.xml文件中配置自定义等待框Loading.java activity为对话框,添加如下代码
<activity android:name=".Loading" android:theme="@style/MyDialogStyle"/>
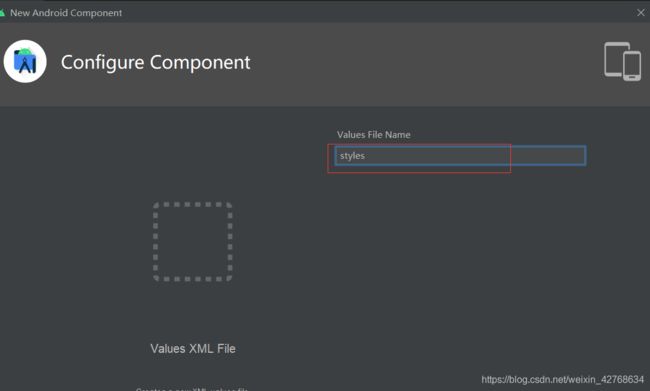
上面用到的主题是自定义的主题,要自己定义,创建样式styles.xml文件,如下
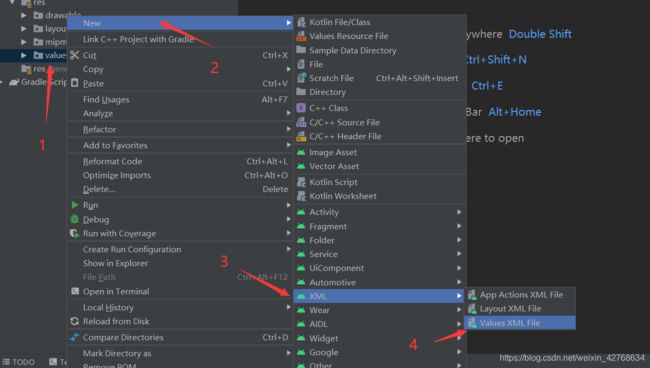
在上面styles.xml文件添加如下代码,使自定义的等待框activity变为对话框
<style name="MyDialogStyle">
- "android:windowBackground"
>@android:color/transparent
- "android:windowFrame"
>@null
- "android:windowNoTitle">true
- "android:windowIsFloating">true
- "android:windowIsTranslucent">true
- "android:windowContentOverlay">@null
- "android:windowAnimationStyle">@android:style/Animation.Dialog
- "android:backgroundDimEnabled">true
style>
在colors.xml文件中定义上面所以文件用到的颜色,添加如下代码
    <color name="massageLogin">#5A6A8Bcolor>
    <color name="login_dvier">#BEBEBEcolor>
在AndroidMainfest.xml文件中声明activity,如下

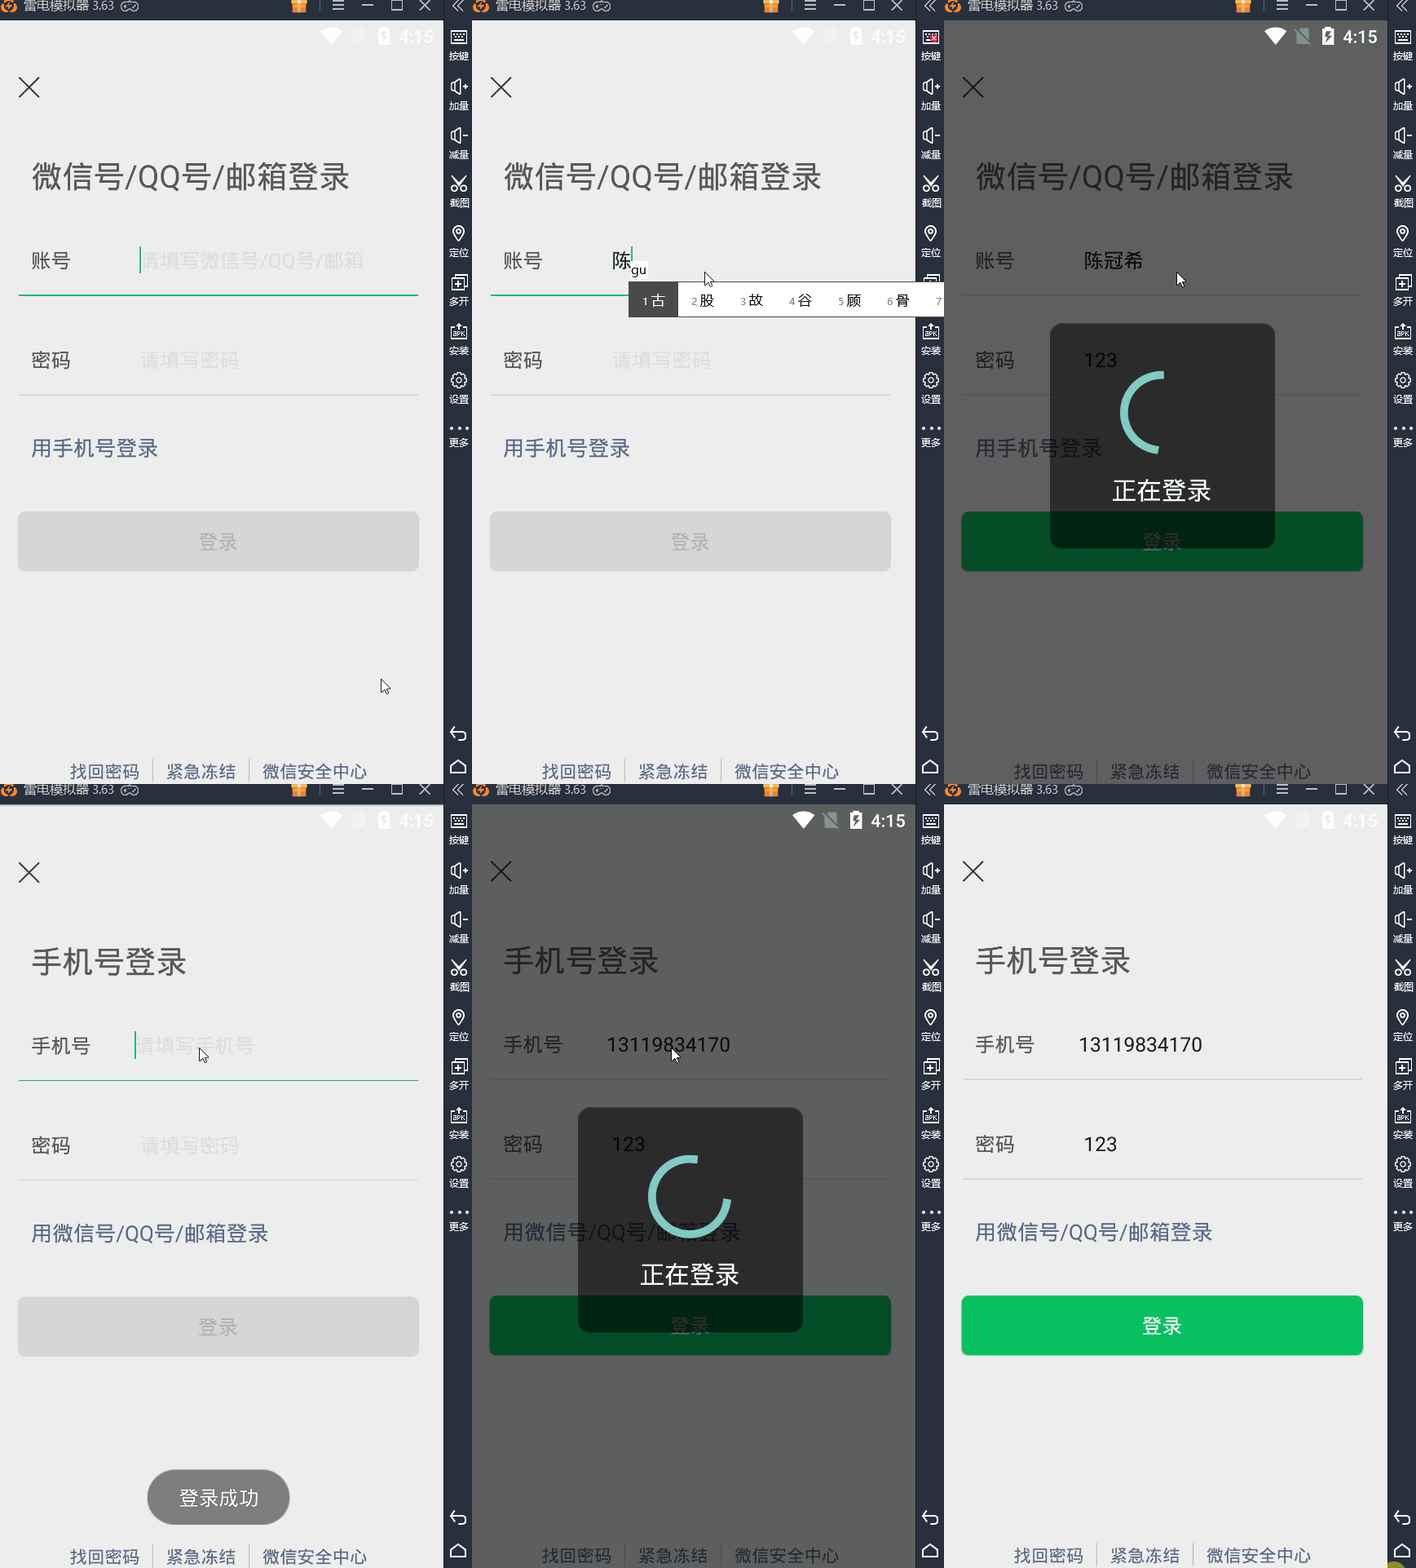
测试
因为服务端表单验证功能还没写,所以登录会失败的,但是还是可以测试上面的效果
启动移动端项目,测试效果如下
服务端功能实现
通过web层完成客户端和服务端的数据交互(接受数据,发送数据),service层完成业务逻辑(注册,登录),dao层操作数据库(要借助工具类)
创建web层和客户端完成数据交互
创建Servlet Login.java 代码如下
package com.example.controller;

import com.alibaba.fastjson.JSON;
import com.alibaba.fastjson.JSONObject;
import com.example.pojo.User;
import com.example.service.UserServiceImpl;
import javax.servlet.*;
import javax.servlet.http.*;
import javax.servlet.annotation.*;
import java.io.BufferedReader;
import java.io.IOException;
import java.io.InputStreamReader;
import java.net.URLDecoder;

@WebServlet(name = "Login", value = "/Login")
public class Login extends HttpServlet {

    @Override
    protected void doGet(HttpServletRequest request, HttpServletResponse response) throws ServletException, IOException {

        doPost(request, response);
    }

    @Override
    protected void doPost(HttpServletRequest request, HttpServletResponse response) throws ServletException, IOException {

        //设置字符编码,防止中文乱码
        request.setCharacterEncoding("utf-8");
        response.setCharacterEncoding("UTF-8");
        //以json数据完成操作
        response.setContentType("application/json;charset=UTF-8");
        System.out.println(request.getContentType());// 得到客户端发送过来内容的类型,application/json;charset=UTF-8
        System.out.println(request.getRemoteAddr());// 得到客户端的ip地址,
        BufferedReader br = new BufferedReader(new InputStreamReader(// 使用字符流读取客户端发过来的数据
                request.getInputStream()));
        String line = null;
        StringBuffer s = new StringBuffer();//StringBuffer String的区别,如果要对数据作頻繁的修改,則用StringBuffer
        // 以一行的形式读取数据
        while ((line = br.readLine()) != null) {

            s.append(line);
        }
        // 关闭io流
        br.close();
        System.out.println(s.toString());// {"password":"123456","name":"admin"}
        //JSON:这是json解析包,IDEA是没有,要我们自己导入
        User user = JSON.parseObject(s.toString(), User.class);//是用了反射机制來完成对象的封闭
        //以utf-8解码操作
        String username = URLDecoder.decode(user.getUsername(), "utf-8");
        String password = URLDecoder.decode(user.getPassword(), "utf-8");
        System.out.println("用户名是:" + username + ", 密码;" + password);
        System.out.println(user);
        // 去数据库完成用户登录功能
        UserServiceImpl us = new UserServiceImpl();
        //调用登录的方法
        User user1 = us.login(username, password);
        boolean loginInfo = false;
        if (user1 != null) {

            //登录成功
            loginInfo = true;
        }
        //将结果返回给客户端,将結果构建成json数据返回给客戶端
        JSONObject rjson = new JSONObject();
        rjson.put("json", loginInfo);
        response.getOutputStream().write(
                rjson.toString().getBytes("UTF-8"));// 向客户端发送一个带有json对象内容的响应
    }
}
在service层中添加处理业务逻辑功能
service层我们在注册已经写过了,只需要添加一个登录处理功能即可
在上面创建service层的UserService接口中添加登录的抽象方法,如下
User login(String username,String password);
![]()
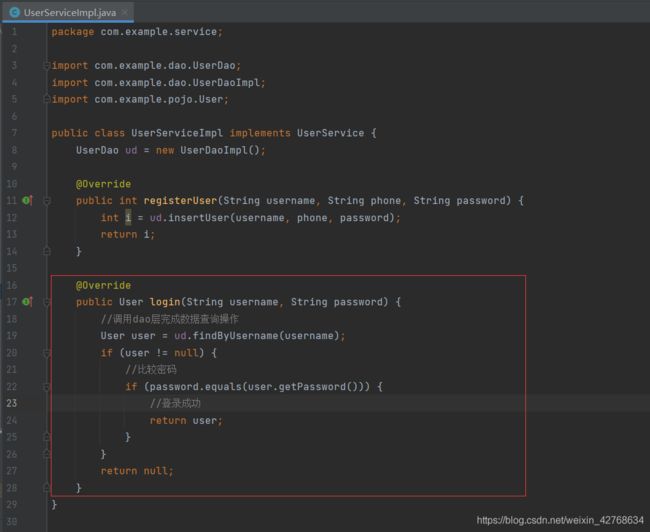
在实现类UserServiceImpl中重写接口方法,如下
 @Override
    public User login(String username, String password) {

        //调用dao层完成数据查询操作
        User user = ud.findByUsername(username);
        if (user != null) {

            //比较密码
            if (password.equals(user.getPassword())) {

                //登录成功
                return user;
            }
        }
        return null;
    }
在dao层添加操作数据库的功能
在接口UserDao中添加把数据添加到数据库的抽象方法,如下
    //查询用户通过username
    User findByUsername(String username);
实现类重写接口方法,如下
    @Override
    public User findByUsername(String username) {

        //判断数据是用户名还是手机
        Pattern pattern = Pattern
                .compile("^(13[0-9]|15[0-9]|153|15[6-9]|180|18[23]|18[5-9])\\d{8}$");
        Matcher matcher = pattern.matcher(username);
        //手机sql执行语句
        if (matcher.matches()) {

            //sql
            String sql = "select * from user where phone=?";
            rs = JDBCUtil.executeQuery(sql, username);
        } else {
       //用户名sql执行语句
            //sql
            String sql = "select * from user where username=?";
            rs = JDBCUtil.executeQuery(sql, username);
        }
        //判断是否查询到用户
        try {

            if (rs.next()) {

                //如果查询到用户,将用户封装到User对象中
                int id = rs.getInt("id");
                String username1 = rs.getString("username");
                String password = rs.getString("password");
                //将查询到的用户封装到一个User对象中
                User user = new User();
                user.setId(id);
                user.setUsername(username);
                user.setPassword(password);
                System.out.println("查询到的用户" + user);
                return user;
            }
        } catch (SQLException throwables) {

            throwables.printStackTrace();
        }
        return null;
    }
测试登录功能
微信四个页面实现
在微信中可以通过点击下面的导航按钮选择对应的显示界面,也可以通过滑动界面(fragment)来实现界面切换,同时下面的导航按钮状态也会发生变化,顶部是一个操作栏(包括搜索搜索框和菜单)第四个页面没有这个操作栏,中间是listview,listview数据(图片,消息)要动态从服务器获取。
微信四个页面框架
可以实现通过点击微信下方导航或滑动屏切换页面,上面顶部操作栏只是实现UI界面,没有实现事件处理(不能点击),中间先用TextView测试效果,后面会换成listview并把数据写活(从服务器获取图片和数据)
创建主布局文件main_weixin.xml,直接部署ViewPager以及下方的导航布局,代码如下
<LinearLayout xmlns:android="http://schemas.android.com/apk/res/android"
    xmlns:tools="http://schemas.android.com/tools"
    android:id="@+id/activity_main"
    android:layout_width="match_parent"
    android:layout_height="match_parent"
    android:orientation="vertical"
    tools:context="com.example.wxchatdemo.MainWeixin">

    <android.support.v4.view.ViewPager
        android:id="@+id/viewPager"
        android:layout_width="match_parent"
        android:layout_height="0dp"
        android:layout_weight="1" />

    <LinearLayout
        android:layout_width="match_parent"
        android:layout_height="wrap_content"
        android:background="#DEDEDE"
        android:orientation="horizontal"
        android:padding="5dp">

        <LinearLayout
            android:id="@+id/weixin"
            android:layout_width="0dp"
            android:layout_height="wrap_content"
            android:layout_weight="1"
            android:clickable="true"
            android:gravity="center"
            android:orientation="vertical">

            <ImageView
                android:id="@+id/weixin_img"
                android:layout_width="30dp"
                android:layout_height="25dp"
                android:background="@drawable/weixin_picture_selector" />

            <TextView
                android:id="@+id/weixin_txt"
                android:layout_width="wrap_content"
                android:layout_height="wrap_content"
                android:gravity="center"
                android:text="微信"
                android:textColor="@drawable/wenxin_text_selector"
                android:textSize="12sp" />
        LinearLayout>

        <LinearLayout
            android:id="@+id/contact"
            android:layout_width="0dp"
            android:layout_height="wrap_content"
            android:layout_weight="1"
            android:clickable="true"
            android:gravity="center"
            android:orientation="vertical">

            <ImageView
                android:id="@+id/contact_img"
                android:layout_width="30dp"
                android:layout_height="25dp"
                android:background="@drawable/address_picture_selector" />

            <TextView
                android:id="@+id/contact_txt"
                android:layout_width="wrap_content"
                android:layout_height="wrap_content"
                android:gravity="center"
                android:text="通讯录"
                android:textColor="@drawable/wenxin_text_selector"
                android:textSize="12sp" />
        LinearLayout>

        <LinearLayout
            android:id="@+id/find"
            android:layout_width="0dp"
            android:layout_height="wrap_content"
            android:layout_weight="1"
            android:clickable="true"
            android:gravity="center"
            android:orientation="vertical">

            <ImageView
                android:id="@+id/find_img"
                android:layout_width="30dp"
                android:layout_height="25dp"
                android:background="@drawable/find_pricture_selector" />

            <TextView
                android:id="@+id/find_txt"
                android:layout_width="wrap_content"
                android:layout_height="wrap_content"
                android:gravity="center"
                android:text="发现"
                android:textColor="@drawable/wenxin_text_selector"
                android:textSize="12sp" />
        LinearLayout>

        <LinearLayout
            android:id="@+id/self"
            android:layout_width="0dp"
            android:layout_height="wrap_content"
            android:layout_weight="1"
            android:clickable="true"
            android:gravity="center"
            android:orientation="vertical">

            <ImageView
                android:id="@+id/self_img"
                android:layout_width="30dp"
                android:layout_height="25dp"
                android:background="@drawable/settings_pricture_selector" />

            <TextView
                android:id="@+id/self_txt"
                android:layout_width="wrap_content"
                android:layout_height="wrap_content"
                android:gravity="center"
                android:text="我"
                android:textColor="@drawable/wenxin_text_selector"
                android:textSize="12sp" />
        LinearLayout>
    LinearLayout>
LinearLayout>
创建四个fragment布局,对应四个页面
微信消息fragment布局weixin_fragment.xml
<LinearLayout xmlns:android="http://schemas.android.com/apk/res/android"
    android:layout_width="match_parent"
    android:layout_height="match_parent"
    android:orientation="vertical">

    <LinearLayout
        android:layout_width="match_parent"
        android:layout_height="wrap_content"
        android:background="#DEDEDE"
        android:paddingTop="30dp"
        android:paddingBottom="10dp">

        <TextView
            android:layout_width="0dp"
            android:layout_height="match_parent"
            android:layout_marginLeft="150dp"
            android:layout_weight="1"
            android:text="  微信"
            android:textColor="@color/black"
            android:textSize="20sp" />

        <ImageView
            android:layout_width="wrap_content"
            android:layout_height="wrap_content"
            android:layout_marginRight="20dp"
            android:adjustViewBounds="true"
            android:maxHeight="23dp"
            android:src="@drawable/search" />

        <ImageView
            android:layout_width="wrap_content"
            android:layout_height="wrap_content"
            android:layout_marginRight="10dp"
            android:adjustViewBounds="true"
            android:maxHeight="23dp"
            android:src="@drawable/plus" />
    LinearLayout>

    <TextView
        android:id="@+id/tv"
        android:layout_width="match_parent"
        android:layout_height="match_parent"
        android:gravity="center"
        android:text="微信消息"
        android:textSize="50sp" />
LinearLayout>
联系人fragment布局文件contaclist_fragment.xml
<LinearLayout xmlns:android="http://schemas.android.com/apk/res/android"
    android:layout_width="match_parent"
    android:layout_height="match_parent"
    android:orientation="vertical">

    <LinearLayout
        android:layout_width="match_parent"
        android:layout_height="wrap_content"
        android:background="#DEDEDE"
        android:paddingTop="30dp"
        android:paddingBottom="10dp">

        <TextView
            android:layout_width="0dp"
            android:layout_height="match_parent"
            android:layout_marginLeft="150dp"
            android:layout_weight="1"
            android:text="通信录"
            android:textColor="@color/black"
            android:textSize="20sp" />

        <ImageView
            android:layout_width="wrap_content"
            android:layout_height="wrap_content"
            android:layout_marginRight="20dp"
            android:adjustViewBounds="true"
            android:maxHeight="23dp"
            android:src="@drawable/search" />

        <ImageView
            android:layout_width="wrap_content"
            android:layout_height="wrap_content"
            android:layout_marginRight="10dp"
            android:adjustViewBounds="true"
            android:maxHeight="23dp"
            android:src="@drawable/plus" />
    LinearLayout>

    <TextView
        android:id="@+id/tv"
        android:layout_width="match_parent"
        android:layout_height="match_parent"
        android:gravity="center"
        android:text="联系人"
        android:textSize="50sp" />
LinearLayout>
发现fragment布局文件find_fragment.xml
<LinearLayout xmlns:android="http://schemas.android.com/apk/res/android"
    android:layout_width="match_parent"
    android:layout_height="match_parent"
    android:orientation="vertical">

    <LinearLayout
        android:layout_width="match_parent"
        android:layout_height="wrap_content"
        android:background="#DEDEDE"
        android:paddingTop="30dp"
        android:paddingBottom="10dp">

        <TextView
            android:layout_width="0dp"
            android:layout_height="match_parent"
            android:layout_marginLeft="150dp"
            android:layout_weight="1"
            android:text="  发现"
            android:textColor="@color/black"
            android:textSize="20sp" />

        <ImageView
            android:layout_width="wrap_content"
            android:layout_height="wrap_content"
            android:layout_marginRight="20dp"
            android:adjustViewBounds="true"
            android:maxHeight="23dp"
            android:src="@drawable/search" />

        <ImageView
            android:layout_width="wrap_content"
            android:layout_height="wrap_content"
            android:layout_marginRight="10dp"
            android:adjustViewBounds="true"
            android:maxHeight="23dp"
            android:src="@drawable/plus" />
    LinearLayout>

    <TextView
        android:id="@+id/tv"
        android:layout_width="match_parent"
        android:layout_height="match_parent"
        android:gravity="center"
        android:text="发现"
        android:textSize="50sp" />
LinearLayout>
个人消息fragment布局文件self_fragment.xml
<LinearLayout xmlns:android="http://schemas.android.com/apk/res/android"
    android:orientation="vertical"
    android:layout_width="match_parent"
    android:layout_height="match_parent">

    <TextView
        android:id="@+id/tv"
        android:layout_width="match_parent"
        android:layout_height="match_parent"
        android:text="个人信息"
        android:gravity="center"
        android:textSize="50sp"/>
LinearLayout>
上面四个fragment布局中间都是用TextView,只是为了演示效果,后面会换成listview,并把数据写活(从数据库获取)
设定下方导航组件不同的形态
导航组件中文字形态变化只是颜色不同,通过选择器selector即可实现
创建选择器weixin_text_selector.xml文件,代码如下
<selector xmlns:android="http://schemas.android.com/apk/res/android">
    <item android:color="#66CD00" android:state_selected="true" />
    <item android:color="@color/black" android:state_selected="false" />
selector>
图片的话需要设置点击前后不同的图片,需要创建四个选择器
创建选择器weixin_picture_selector.xml文件,代码如下
<selector xmlns:android="http://schemas.android.com/apk/res/android">
    <item android:drawable="@drawable/tab_weixin_pressed" android:state_selected="true" />
    <item android:drawable="@drawable/tab_weixin_normal" android:state_selected="false" />
selector>
创建选择器address_picture_selector.xml文件,代码如下
<selector xmlns:android="http://schemas.android.com/apk/res/android">
    <item android:drawable="@drawable/tab_address_pressed"  android:state_selected="true"/>
    <item android:drawable="@drawable/tab_address_normal" android:state_selected="false" />
selector>
创建选择器find_picture_selector.xml文件,代码如下
<selector xmlns:android="http://schemas.android.com/apk/res/android">
    <item android:drawable="@drawable/tab_find_frd_pressed" android:state_selected="true" />
    <item android:drawable="@drawable/tab_find_frd_normal" android:state_selected="false" />
selector>
创建选择器settings_picture_selector.xml文件,代码如下
<selector xmlns:android="http://schemas.android.com/apk/res/android">
    <item android:drawable="@drawable/tab_settings_pressed" android:state_selected="true" />
    <item android:drawable="@drawable/tab_settings_normal" android:state_selected="false" />
selector>
创建对应四个fragment布局的四个Fragment继承类
WeixinFragment.java
package com.example.wxchatdemo;

import android.os.Bundle;
import android.support.annotation.Nullable;
import android.support.v4.app.Fragment;
import android.view.LayoutInflater;
import android.view.View;
import android.view.ViewGroup;

public class WeixinFragment extends Fragment {

    @Nullable
    @Override
    public View onCreateView(LayoutInflater inflater, ViewGroup container, Bundle savedInstanceState) {

        View view = inflater.inflate(R.layout.weixin_fragment, container, false);
        return view;
    }
}
ContactListFragment.java
package com.example.wxchatdemo;

import android.os.Bundle;
import android.support.v4.app.Fragment;
import android.view.LayoutInflater;
import android.view.View;
import android.view.ViewGroup;

public class ContactListFragment extends Fragment {

    public View onCreateView(LayoutInflater inflater, ViewGroup container, Bundle savedInstanceState) {

        View view = inflater.inflate(R.layout.contactlist_fragment, container, false);
        return view;
    }
}
FindFragment.java
package com.example.wxchatdemo;

import android.os.Bundle;
import android.support.v4.app.Fragment;
import android.view.LayoutInflater;
import android.view.View;
import android.view.ViewGroup;

public class FindFragment extends Fragment {

    public View onCreateView(LayoutInflater inflater, ViewGroup container, Bundle savedInstanceState) {

        View view = inflater.inflate(R.layout.find_fragment, container, false);
        return view;
    }
}
SelfFragment.java
package com.example.wxchatdemo;

import android.os.Bundle;
import android.support.v4.app.Fragment;
import android.view.LayoutInflater;
import android.view.View;
import android.view.ViewGroup;

public class SelfFragment extends Fragment {

    public View onCreateView(LayoutInflater inflater, ViewGroup container, Bundle savedInstanceState) {

        View view = inflater.inflate(R.layout.self_fragment, container, false);
        return view;
    }
}
创建主布局对应的activity MainWeixin.java
package com.example.wxchatdemo;

import android.graphics.Color;
import android.os.Build;
import android.os.Bundle;
import android.support.v4.app.Fragment;
import android.support.v4.app.FragmentManager;
import android.support.v4.app.FragmentPagerAdapter;
import android.support.v4.view.ViewPager;
import android.support.v7.app.ActionBar;
import android.support.v7.app.AppCompatActivity;
import android.view.View;
import android.widget.ImageView;
import android.widget.LinearLayout;
import android.widget.TextView;

import java.util.ArrayList;

public class MainWeixin extends AppCompatActivity implements View.OnClickListener {

    //声明存储fragment的集合
    private ArrayList<Fragment> fragments;
    //声明四个导航对应fragment
    WeixinFragment weixinFragment;
    ContactListFragment contactListFragment;
    FindFragment findFragment;
    SelfFragment selfFragment;
    //声明ViewPager
    private ViewPager viewPager;
    FragmentManager fragmentManager;//声明fragment管理
    //声明导航栏中对应的布局
    private LinearLayout weixin, contact, find, self;
    //声明导航栏中包含的imageview和textview
    private ImageView weixin_img, contact_img, find_img, self_img;
    private TextView weixin_txt, contact_txt, find_txt, self_txt;

    @Override
    protected void onCreate(Bundle savedInstanceState) {

        super.onCreate(savedInstanceState);
        setContentView(R.layout.main_weixin);
        /* 隐藏自带标题*/
        ActionBar actionBar = getSupportActionBar();
        if (actionBar != null) {

            actionBar.hide();
        }
        if (Build.VERSION.SDK_INT >= 21) {

            View decorView = getWindow().getDecorView();
            int option = View.SYSTEM_UI_FLAG_LAYOUT_FULLSCREEN //全屏显示
                    | View.SYSTEM_UI_FLAG_LAYOUT_STABLE
                    | View.SYSTEM_UI_FLAG_LIGHT_STATUS_BAR; //因为背景为浅色所以将状态栏字体设置为黑色
            decorView.setSystemUiVisibility(option);
            getWindow().setStatusBarColor(Color.TRANSPARENT);
        }
        //初始化加载首页布局
        initView();
        //调用自定义initListener方法,为各个组件添加监听事件
        initListener();
        //设置默认选择的pager和导航栏的状态
        viewPager.setCurrentItem(0);
        weixin_img.setSelected(true);
        weixin_txt.setSelected(true);
    }

    private void initListener() {

        //为四大导航组件添加监听
        weixin.setOnClickListener(this);
        contact.setOnClickListener(this);
        find.setOnClickListener(this);
        self.setOnClickListener(this);
        //为viewpager添加页面变化的监听以及事件处理
        viewPager.addOnPageChangeListener(new ViewPager.OnPageChangeListener() {

            @Override
            public void onPageScrolled(int position, float positionOffset, int positionOffsetPixels) {


            }

            @Override
            public void onPageSelected(int position) {

                //根据位置直接决定显示哪个fragment
                viewPager.setCurrentItem(position);
                switch (position) {

                    case 0:
                        weixin_img.setSelected(true);
                        weixin_txt.setSelected(true);

                        contact_img.setSelected(false);
                        contact_txt.setSelected(false);
                        find_img.setSelected(false);
                        find_txt.setSelected(false);
                        self_img.setSelected(false);
                        self_txt.setSelected(false);

                        break;
                    case 1:
                        weixin_img.setSelected(false);
                        weixin_txt.setSelected(false);

                        contact_img.setSelected(true);
                        contact_txt.setSelected(true);
                        find_img.setSelected(false);
                        find_txt.setSelected(false);
                        self_img.setSelected(false);
                        self_txt.setSelected(false);

                        break;
                    case 2:
                        weixin_img.setSelected(false);
                        weixin_txt.setSelected(false);

                        contact_img.setSelected(false);
                        contact_txt.setSelected(false);
                        find_img.setSelected(true);
                        find_txt.setSelected(true);
                        self_img.setSelected(false);
                        self_txt.setSelected(false);

                        break;
                    case 3:
                        weixin_img.setSelected(false);
                        weixin_txt.setSelected(false);

                        contact_img.setSelected(false);
                        contact_txt.setSelected(false);
                        find_img.setSelected(false);
                        find_txt.setSelected(false);
                        self_img.setSelected(true);
                        self_txt.setSelected(true);
                        break;
                }
            }

            @Override
            public void onPageScrollStateChanged(int state) {


            }
        });

    }

    private void initView() {

        //在主布局中根据id找到ViewPager
        viewPager = (ViewPager) findViewById(R.id.viewPager);
        //实例化所属四个fragment
        weixinFragment = new WeixinFragment();
        contactListFragment = new ContactListFragment();
        findFragment = new FindFragment();
        selfFragment = new SelfFragment();
        fragments = new ArrayList<>();
        //添加fragments到集合中
        fragments.add(weixinFragment);
        fragments.add(contactListFragment);
        fragments.add(findFragment);
        fragments.add(selfFragment);
        fragmentManager = getSupportFragmentManager();
        //为ViewPager设置适配器用于部署fragments
        viewPager.setAdapter(new MyFragmentPagerAdapter(fragmentManager));


        weixin = (LinearLayout) findViewById(R.id.weixin);
        contact = (LinearLayout) findViewById(R.id.contact);
        find = (LinearLayout) findViewById(R.id.find);
        self = (LinearLayout) findViewById(R.id.self);


        weixin_img = (ImageView) findViewById(R.id.weixin_img);
        contact_img = (ImageView) findViewById(R.id.contact_img);
        find_img = (ImageView) findViewById(R.id.find_img);
        self_img = (ImageView) findViewById(R.id.self_img);

        weixin_txt = (TextView) findViewById(R.id.weixin_txt);
        contact_txt = (TextView) findViewById(R.id.contact_txt);
        find_txt = (TextView) findViewById(R.id.find_txt);
        self_txt = (TextView) findViewById(R.id.self_txt);
    }

    /**
     * 设置导航栏的点击事件并同步更新对应的ViewPager
     * 点击事件其实就是更改导航布局中对应的Text/ImageView
     * 的选中状态,配合drable中的selector更改图片以及文字变化
     *
     *
     */
    @Override
    public void onClick(View v) {

        switch (v.getId()) {

            case R.id.weixin:
                viewPager.setCurrentItem(0);
                weixin_img.setSelected(true);
                weixin_txt.setSelected(true);

                contact_img.setSelected(false);
                contact_txt.setSelected(false);
                find_img.setSelected(false);
                find_txt.setSelected(false);
                self_img.setSelected(false);
                self_txt.setSelected(false);

                break;
            case R.id.contact:
                viewPager.setCurrentItem(1);
                weixin_img.setSelected(false);
                weixin_txt.setSelected(false);

                contact_img.setSelected(true);
                contact_txt.setSelected(true);
                find_img.setSelected(false);
                find_txt.setSelected(false);
                self_img.setSelected(false);
                self_txt.setSelected(false);

                break;
            case R.id.find:
                viewPager.setCurrentItem(2);
                weixin_img.setSelected(false);
                weixin_txt.setSelected(false);

                contact_img.setSelected(false);
                contact_txt.setSelected(false);
                find_img.setSelected(true);
                find_txt.setSelected(true);
                self_img.setSelected(false);
                self_txt.setSelected(false);

                break;
            case R.id.self:
                viewPager.setCurrentItem(3);
                weixin_img.setSelected(false);
                weixin_txt.setSelected(false);

                contact_img.setSelected(false);
                contact_txt.setSelected(false);
                find_img.setSelected(false);
                find_txt.setSelected(false);
                self_img.setSelected(true);
                self_txt.setSelected(true);

                break;
        }
    }

    //创建FragmentPagerAdapter
    class MyFragmentPagerAdapter extends FragmentPagerAdapter {


        public MyFragmentPagerAdapter(FragmentManager fm) {

            super(fm);
        }

        @Override
        public Fragment getItem(int position) {

            return fragments.get(position);
        }

        @Override
        public int getCount() {

            return fragments.size();
        }
    }
}
测试效果
在两个登录activity中登录成功后的代码段添加跳转的activity,如下
Intent intent = new Intent (com.example.wxchatdemo.LoginUser.this, com.example.wxchatdemo.MainWeixin.class);
startActivity(intent);
com.example.wxchatdemo.LoginUser.this.finish();
在AndroidMainfest.xml中声明activity
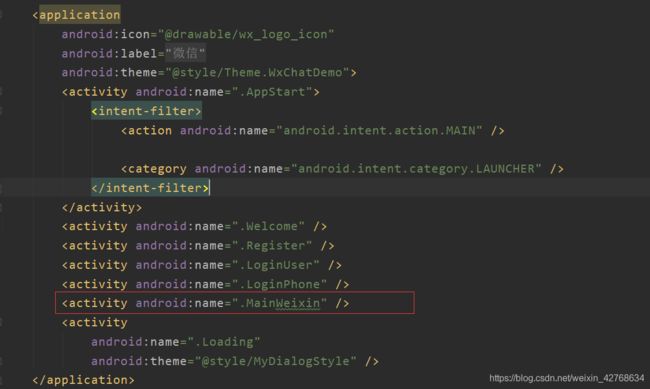
先告一段落,后面在更新四个页面以及数据动态从服务器获取。
