搭建前端工程化
在我们日常开发项目时,基本上会采用官方脚手架进行开发。然后使用官方脚手架开发也有缺点:不能很好的自定义一些功能。下面我将总结出来我是如何从零开始搭建前端工程的,希望对大家有所帮助。
1. 工程化的目的
- 前端工程化就是通过流程规范化、标准化提升团队协作效率
- 通过组件化、模块化提升代码质量
- 使用构建工具、自动化工具提升开发效率
2. 工程化开发的流程
- 编译 => 打包(合并) => 压缩 (webpack 或者 rollup)
- 代码检查 => eslint
- 测试 => jest
- 发包
- 持续继承
3. 编译工具的选择
大的编译工具主要包括两种,分别时webpack 和 rollup,下面我们将讲解如何配置。
3.1 webpack 配置
const webpack = require("webpack");
// html 的插件,可以指定一个index.html 将对应的js文件插入到页面中
const HtmlWebpackPlugin = require("html-webpack-plugin");
const path = require("path");
module.exports = {
  mode: "development",
  devtool:false,
  entry: "./src/index.tsx",
  output: {
    filename: "[name].[hash].js",
    path: path.join(__dirname, "dist"),
  },
  // webpack5 内置了 webpack-dev-server, 如果5一下的需要单独安装
  devServer: {
    hot: true,
    contentBase: path.join(__dirname, "dist"),
    historyApiFallback: {
      index: "./index.html",
    },
  },
  resolve: {
    extensions: [".ts", ".tsx", ".js", ".json"],
    alias: {
      "@": path.resolve("src"), // 这样配置后 @ 可以指向 src 目录
    },
  },

  module: {
    rules: [
      {
        test: /\.tsx?$/,
        loader: "ts-loader"
      }
    ],
  },

  plugins: [
    new HtmlWebpackPlugin({
      template: "./src/index.html"
    }),
    // webpack 的内置插件。热更新使用
    new webpack.HotModuleReplacementPlugin()
  ],
};
注意: webpack5 内置了 webpack-dev-server,可以直接使用 webpack server 命令启动。
3.2 rollup的配置
import ts from 'rollup-plugin-typescript2'; // 解析ts的插件
import {
  nodeResolve
} from '@rollup/plugin-node-resolve'; // 解析第三方模块的插件
import commonjs from '@rollup/plugin-commonjs'; // 让第三方非esm模块支持编译
import json from 'rollup-plugin-json'; // 支持编译json
import serve from 'rollup-plugin-serve'; // 启动本地服务的插件
import path from 'path'

// 区分开发环境
const isDev = process.env.NODE_ENV === 'development'
// rollup 支持es6语法
export default {
  input: 'packages/index.ts',
  output: {
    // amd iife commonjs umd..
    name:'hp',
    format: 'umd', // esm 模块
    file: path.resolve(__dirname, 'dist/index.js'), // 出口文件
    sourcemap: true, // 根据源码产生映射文件
  },
  plugins: [
    commonjs({
      include: 'node_modules/**', // Default: undefined
       extensions: ['.js','.ts']
      // exclude: ['node_modules/foo/**', 'node_modules/bar/**'], // Default: undefined

    }),
    json({
      // All JSON files will be parsed by default,
      // but you can also specifically include/exclude files
      include: 'node_modules/**',
      // preferConst: true,
      // namedExports: true // Default: true
    }),
    nodeResolve({ // 第三方文件解析
      browser:true,
      extensions: ['.js', '.ts']
    }),
    ts({
      tsconfig: path.resolve(__dirname, 'tsconfig.json')
    }),
    isDev ? serve({
      openPage: '/public/index.html',
      contentBase: '',
      port: 3000
    }) : null
  ]
}
3.3 编译typescript文件。
比你ts 两种方案,一种时基于babel 编译,一种是基于 tsc 编译。
基于tsc 编译
// webpack 中
// cnpm i typescript ts-loader -D
module: {
    rules: [
      {
        test: /\.tsx?$/,
        loader: "ts-loader"
      }
    ],
},

 // rollup 中
 // cnpm i rollup-plugin-typescript2 -D

ts({
      tsconfig: path.resolve(__dirname, 'tsconfig.json')
})
基于babel 编译
分别在 webpack 和 rollup 引入babel 插件
babel 的配置文件
const presets = [
    ['@babel/preset-env', { // 一个预设集合
        // chrome, opera, edge, firefox, safari, ie, ios, android, node, electron
        // targets 和 browerslist 合并取最低版本
        // 启用更符合规范的转换,但速度会更慢,默认为 `false`,从目前来看,是更严格的转化,包括一些代码检查。
        spec: false,

        // 有两种模式:normal, loose。其中 normal 更接近 es6 loose 更接近 es5
        loose: false,

        // "amd" | "umd" | "systemjs" | "commonjs" | "cjs" | false, defaults to "commonjs"
        modules: false, // 代表是esm 模块

        // 打印插件使用情况
        debug: false,
        useBuiltIns: 'usage', // 按需引入
        corejs: { version: 3, proposals: true } // 考虑使用2,还是3
    }],
    ['@babel/preset-typescript', { // ts的配置
        'isTSX': true,
        'allExtensions': true
    }],
    '@vue/babel-preset-jsx'
];
const plugins = [
    '@babel/plugin-syntax-jsx',
    '@babel/plugin-transform-runtime',
    '@babel/plugin-syntax-dynamic-import',
    // ['@babel/plugin-transform-modules-commonjs'], 支持tree sharking 必须是esm 模块, 所以删除此插件
    //  支持装饰器模式开发
    ['@babel/plugin-proposal-decorators', { 'legacy': true }],
    ['@babel/plugin-proposal-class-properties', { 'loose': true }],
];

module.exports = {
    presets,
    plugins
};
建议: webpack 在业务中开发推荐使用babel 编译。 编辑js库使用tsc编译。
3.4 ts 配置文件梳理
基本参数
| 参数 | 解释 |
|---|---|
| target | 用于指定编译之后的版本目标 |
| module | 生成的模块形式:none、commonjs、amd、system、umd、es6、es2015 或 esnext 只有 amd 和 system 能和 outFile 一起使用 target 为 es5 或更低时可用 es6 和 es2015 |
| lib | 编译时引入的 ES 功能库,包括:es5 、es6、es7、dom 等。如果未设置,则默认为: target 为 es5 时: ["dom", "es5", "scripthost"] target 为 es6 时: ["dom", "es6", "dom.iterable", "scripthost"] |
| allowJs | 是否允许编译JS文件,默认是false,即不编译JS文件 |
| checkJs | 是否检查和报告JS文件中的错误,默认是false |
| jsx | 指定jsx代码用于的开发环境 preserve指保留JSX语法,扩展名为.jsx,react-native是指保留jsx语法,扩展名js,react指会编译成ES5语法 详解 |
| declaration | 是否在编译的时候生成相应的.d.ts声明文件 |
| declarationDir | 生成的 .d.ts 文件存放路径,默认与 .ts 文件相同 |
| declarationMap | 是否为声明文件.d.ts生成map文件 |
| sourceMap | 编译时是否生成.map文件 |
| outFile | 是否将输出文件合并为一个文件,值是一个文件路径名,只有设置module的值为amd和system模块时才支持这个配置 |
| outDir | 指定输出文件夹 |
| rootDir | 编译文件的根目录,编译器会在根目录查找入口文件 |
| composite | 是否编译构建引用项目 |
| removeComments | 是否将编译后的文件中的注释删掉 |
| noEmit | 不生成编译文件 |
| importHelpers | 是否引入tslib里的辅助工具函数 |
| downlevelIteration | 当target为ES5或ES3时,为for-of、spread和destructuring中的迭代器提供完全支持 |
| isolatedModules | 指定是否将每个文件作为单独的模块,默认为true |
严格检查
**
| 参数 | 解释 |
|---|---|
| strict | 是否启动所有类型检查 |
| noImplicitAny | 不允许默认any类型 |
| strictNullChecks | 当设为true时,null和undefined值不能赋值给非这两种类型的值 |
| strictFunctionTypes | 是否使用函数参数双向协变检查 |
| strictBindCallApply | 是否对bind、call和apply绑定的方法的参数的检测是严格检测的 |
| strictPropertyInitialization | 检查类的非undefined属性是否已经在构造函数里初始化 |
| noImplicitThis | 不允许this表达式的值为any类型的时候 |
| alwaysStrict | 指定始终以严格模式检查每个模块 |
额外检查
**
| 参数 | 解释 |
|---|---|
| noUnusedLocals | 检查是否有定义了但是没有使用的变量 |
| noUnusedParameters | 检查是否有在函数体中没有使用的参数 |
| noImplicitReturns | 检查函数是否有返回值 |
| noFallthroughCasesInSwitch | 检查switch中是否有case没有使用break跳出 |
模块解析检查
**
| 参数 | 解释 |
|---|---|
| moduleResolution | 选择模块解析策略,有node和classic两种类型,详细说明 |
| baseUrl | 解析非相对模块名称的基本目录 |
| paths | 设置模块名到基于baseUrl的路径映射 |
| rootDirs | 可以指定一个路径列表,在构建时编译器会将这个路径列表中的路径中的内容都放到一个文件夹中 |
| typeRoots | 指定声明文件或文件夹的路径列表 |
| types | 用来指定需要包含的模块 |
| allowSyntheticDefaultImports | 允许从没有默认导出的模块中默认导入 |
| esModuleInterop | 为导入内容创建命名空间,实现CommonJS和ES模块之间的互相访问 |
| preserveSymlinks | 不把符号链接解析为其真实路径 |
sourcemap检查
**
| 参数 | 解释 |
|---|---|
| sourceRoot | 调试器应该找到TypeScript文件而不是源文件位置 |
| mapRoot | 调试器找到映射文件而非生成文件的位置,指定map文件的根路径 |
| inlineSourceMap | 指定是否将map文件的内容和js文件编译在一个同一个js文件中 |
| inlineSources | 是否进一步将.ts文件的内容也包含到输出文件中 |
**
试验选项
**
| 参数 | 解释 |
|---|---|
| experimentalDecorators | 是否启用实验性的装饰器特性 |
| emitDecoratorMetadata | 是否为装饰器提供元数据支持 |
试验选项
| 参数 | 解释 |
|---|---|
| files | 配置一个数组列表,里面包含指定文件的相对或绝对路径,编译器在编译的时候只会编译包含在files中列出的文件 |
| include | include也可以指定要编译的路径列表,但是和files的区别在于,这里的路径可以是文件夹,也可以是文件 |
| exclude | exclude表示要排除的、不编译的文件,他也可以指定一个列表 |
| extends | extends可以通过指定一个其他的tsconfig.json文件路径,来继承这个配置文件里的配置 |
| compileOnSave | 在我们编辑了项目中文件保存的时候,编辑器会根据tsconfig.json的配置重新生成文件 |
| references | 一个对象数组,指定要引用的项目 |
tsconfig.json 的基本配置
{
  "compilerOptions": {
    "outDir": "./dist",
    "sourceMap": true,
    "strict": true,
    "noImplicitAny": true,
    "strictNullChecks": true,
    "module": "commonjs",
    "target": "es5",
    "jsx": "react",
    "baseUrl": ".",
    "paths": {
      "@/*": [
        "src/*"
      ]
    }
  },
  "include": [
    "./src/**/*"
  ]
}
ts配置文件梳理完毕。
4. 代码校验
4.1 代码检查的目的:
- 规范的代码可以促进团队合作
- 规范的代码可以降低维护成本
- 规范的代码有助于 code review(代码审查)
4.2 常见的代码规范文档
- airbnb中文版
- standard中文版
- 百度前端编码规范
- styleguide
- CSS编码规范
4.3 代码与检查插件eslint(vscode)
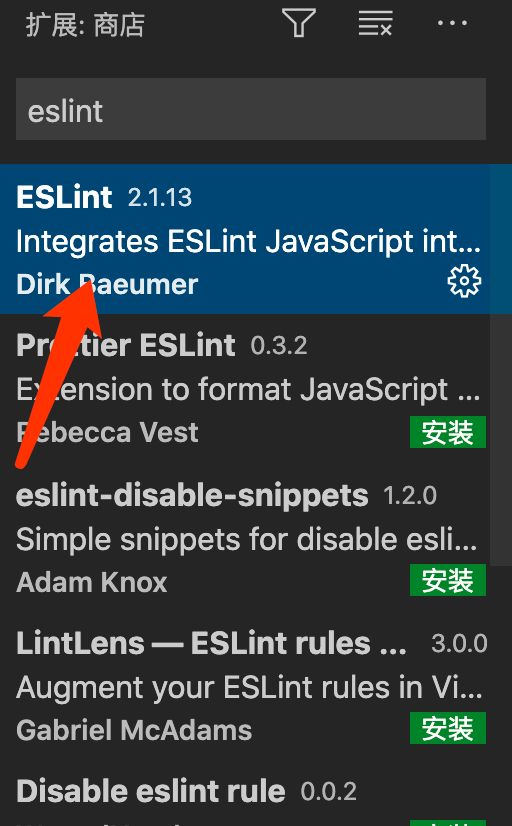
在vscode 商店中搜索 eslint, 然后安装
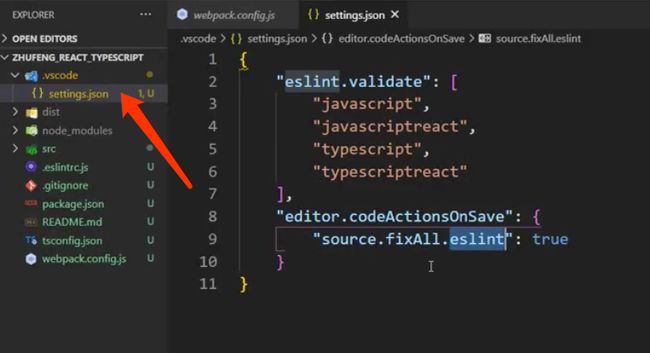
配置生效方式一:(修改vscode 配置)
{
  "eslint.options": { "configFile": "C:/mydirectory/.eslintrc.json" }
}
方式二:给每个单独的工程增加配置文件
4.4 安装模块
cnpm i eslint typescript @typescript-eslint/parser @typescript-eslint/eslint-plugin --save-dev
4.5 基本配置
- 英文rules
- 中文rules
- 需要添加
parserOptions以支持模块化的写法
module.exports = {
    "parser":"@typescript-eslint/parser",
    "plugins":["@typescript-eslint"],
    "rules":{
        "no-var":"error",
        "no-extra-semi":"error",
        "@typescript-eslint/indent":["error",2]
    },
    "parserOptions": {
        "ecmaVersion": 6,
        "sourceType": "module",
        "ecmaFeatures": {
          "modules": true
        }
    }
}

// package.json
"scripts": {
+  "lint": "eslint --fix  --ext .js,.vue src",
 }
4.6 代码与检查
cnpm i husky lint-staged --save-dev
// package.json

"husky": {
    "hooks": {
      "pre-commit": "lint-staged"
    }
  },
  "lint-staged": {
    "src/**/*.js": [
      "eslint --fix",
      "git add"
    ],
    "src/**/*.less": [
      "stylelint --fix",
      "git add"
    ]
  },
5. 单元测试
5.1 安装与配置
cnpm i jest @types/jest ts-jest jest -D // 依赖包
npx ts-jest config:init // 生成配置文件

// package.json
 "scripts": {
 +  "jest-test": "jest -o",
 +  "jest-coverage": "jest --coverage"
  },
5.2 配置文件展示
module.exports = {
  roots: [
    "/packages"
  ],
  testRegex: 'test/(.+)\\.test\\.(jsx?|tsx?)$',
  transform: {
    "^.+\\.tsx?$": "ts-jest"
  },
  moduleFileExtensions: ['ts', 'tsx', 'js', 'jsx', 'json', 'node'],
};
注意: 这里只是简单的列举了下需要的东西,和一个够用的配置。如果要按照具体需求配置的话,需要查看文档。
6. git提交规范与changelog (发包)
6.1 优点
- 良好的git commit好处
- 可以加快code review 的流程
- 可以根据git commit 的元数据生成changelog
- 可以让其它开发者知道修改的原因
6.2 良好的commit
commitizen是一个格式化commit message的工具
validate-commit-msg 用于检查项目的
Commit message是否符合格式conventional-changelog-cli可以从
git metadata生成变更日志统一团队的git commit 标准
-
可以使用
angular的git commit日志作为基本规范- 提交的类型限制为 feat、fix、docs、style、refactor、perf、test、chore、revert等
- 提交信息分为两部分,标题(首字母不大写,末尾不要加标点)、主体内容(描述修改内容)
日志提交友好的类型选择提示 使用commitize工具
-
不符合要求格式的日志拒绝提交 的保障机制
- 需要使用
validate-commit-msg工具
- 需要使用
-
统一changelog文档信息生成
- 使用
conventional-changelog-cli工具
- 使用
cnpm i commitizen  validate-commit-msg conventional-changelog-cli -D
commitizen init cz-conventional-changelog --save --save-exact
git cz
使用 git cz 命令:可以很方便的操作。
6.3 提交的格式
():
- 代表某次提交的类型,比如是修复bug还是增加feature
- 表示作用域,比如一个页面或一个组件
- 主题 ,概述本次提交的内容
- 详细的影响内容
- 修复的bug和issue链接
| 类型 | 含义 |
| :--- | :--- |
| feat | 新增feature |
| fix | 修复bug |
| docs | 仅仅修改了文档,比如README、CHANGELOG、CONTRIBUTE等 |
| style | 仅仅修改了空格、格式缩进、偏好等信息,不改变代码逻辑 |
| refactor | 代码重构,没有新增功能或修复bug |
| perf | 优化相关,提升了性能和体验 |
| test | 测试用例,包括单元测试和集成测试 |
| chore | 改变构建流程,或者添加了依赖库和工具 |
| revert | 回滚到上一个版本 |
| ci | CI 配置,脚本文件等更新 |
6.4 升级package.json 版本
安装依赖 cnpm install standard-version inquirer shelljs -D
执行脚本:
const inquirer = require('inquirer'); // 命令行交互模块
const shell = require('shelljs');

if (!shell.which('git')) {
    shell.echo('Sorry, this script requires git');
    shell.exit(1);
}

const getVersion = async() => {
    return new Promise((resolve, reject) => {
        inquirer.prompt([
            {
                type: 'list',
                name: 'version',
                choices: ['patch', 'minor', 'major'],
                message: 'please choose argument [major|minor|patch]: '
            }
        ]).then(answer => {
            resolve(answer.version);
        }).catch(err => {
            reject(err);
        });
    });
};

const main = async() => {
    const version = await getVersion();
    shell.echo(`\nReleasing ${version} ...\n`);
    await shell.exec(`npm run standard-version -- --release-as ${version}`);
};

main();
major:升级主要版本
minor: 升级次要版本
patch:升级补丁版本
6.5 生成CHANGELOG.md
-
conventional-changelog-cli默认推荐的 commit 标准是来自angular项目 - 参数
-i CHANGELOG.md表示从CHANGELOG.md读取changelog - 参数 -s 表示读写
CHANGELOG.md为同一文件 - 参数 -r 表示生成 changelog 所需要使用的 release 版本数量,默认为1,全部则是0
cnpm i conventional-changelog-cli -D
"scripts": {
    "changelogs": "conventional-changelog -p angular -i CHANGELOG.md -s -r 0"
}
彩蛋:
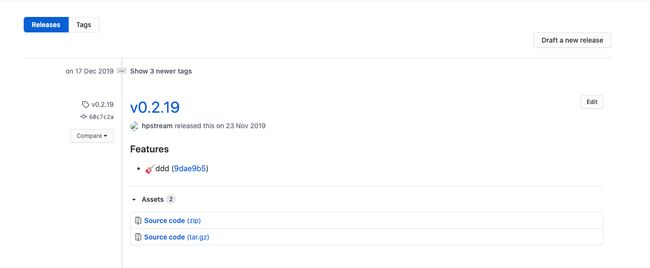
你是否在github上见过这样的release文档
如果你感兴趣,下面会教你怎么配置
安装 cnpm install gh-release -D
// package.json
 "scripts": {
    "rel": "gh-release"
  },
操作步骤:
- 使用 git cz 提交代码。
- 使用 standard-version 升级版本
- 使用 changelogs 生成md (注意:这个时候不要提交代码了)
- 执行 npm run rel。
就可以得到上面好看的文档了。
7. 持续集成
继续集成有很多中不同的方案,实现方式也各有不同,方式:1.Travis CI 。2 jenkins 等。 由于配置比较不复杂这里就不展开说了,具体的可以根据公司的情况,和运维一起进行配置。
结束!!!!


