写在最前面
Android源码初探 —— 初次相遇,便无法自拔!
以下源码均源于 Android API 24
结论预览
导火索
每次我们创建一个 Activity 时,都会通过调用 setContentView(@LayoutRes int layoutResID)设置布局文件。所以,我们第一步在Activity源码中找到 setContentView方法。
Activity
setContentView 源码:
public void setContentView(@LayoutRes int layoutResID) {
        getWindow().setContentView(layoutResID);
        initWindowDecorActionBar();
}
public Window getWindow() {
        return mWindow;
}
public void attach( ...){
        ......
        mWindow = new PhoneWindow(this, window);
        ......
}
从代码中看出,调用了 mWindow.setContentView 方法,mWindow是一个 Window 类型,但是实现的是PhoneWindow。我们先看看 Window 类里面的代码。
Window
/**
 * Abstract base class for a top-level window look and behavior policy.  An
 * instance of this class should be used as the top-level view added to the
 * window manager. It provides standard UI policies such as a background, title
 * area, default key processing, etc.
 *
 * The only existing implementation of this abstract class is
 * android.view.PhoneWindow, which you should instantiate when needing a
 * Window.
 */
public abstract class Window{
        public abstract void setContentView(@LayoutRes int layoutResID);
}
Window 是一个抽象类,它的 setContentView 也是一个抽象方法。而且,我们从注释中可以看到:
Window 用于顶级窗口外观和行为策略的抽象基类。 此类的实例应该用作添加到窗口管理器的顶级视图。 它提供标准UI策略,如背景,标题区域,默认键处理等。
且只存在唯一实现类 PhoneWindow。
所以,我们知道 Window 是Android 视图窗口的顶级。而且,我们明白 PhoneWindow 是 Window 的实现类,那么,我们看一下 PhoneWindow 中 setContentView 的实现。
PhoneWindow
public class PhoneWindow extends Window implements MenuBuilder.Callback {
    ......
    // This is the view in which the window contents are placed. It is either
    // mDecor itself, or a child of mDecor where the contents go.
    ViewGroup mContentParent;

    @Override
    public void setContentView(int layoutResID) {
        if (mContentParent == null) {
            installDecor();
        } else if (!hasFeature(FEATURE_CONTENT_TRANSITIONS)) {
            mContentParent.removeAllViews();
        }

        if (hasFeature(FEATURE_CONTENT_TRANSITIONS)) {
            final Scene newScene = Scene.getSceneForLayout(mContentParent, layoutResID,
                    getContext());
            transitionTo(newScene);
        } else {
            mLayoutInflater.inflate(layoutResID, mContentParent);
        }
        mContentParent.requestApplyInsets();
        final Callback cb = getCallback();
        if (cb != null && !isDestroyed()) {
            cb.onContentChanged();
        }
        mContentParentExplicitlySet = true;
    }
   ......
}
从上面代码中,我们看到最终是通过mLayoutInflater(布局加载器)将我们自定义的布局加载到了mContentParent。从定义中我们发现 mContentParent 是一个 ViewGroup 类型,且其注释说明
mContentParent 在Window的内容区展示,且 mContentParent 是 mDecor本身或者是mDecor的一个子元素
mDecor 是什么呢?那句话什么意思呢?
DecorView
我们从代码中看到 当 mContentParent = null 时,调用了 installDecor() 方法。我们看installDecor()源码。
//###########################################################
//PhoneWindow
public class PhoneWindow extends Window implements MenuBuilder.Callback {
    ......
    // This is the top-level view of the window, containing the window decor.
    private DecorView mDecor;

    private void installDecor() {
        mForceDecorInstall = false;
        if (mDecor == null) {
            mDecor = generateDecor(-1);
            ......
        } else {
            mDecor.setWindow(this);
        }
        if (mContentParent == null) {
            mContentParent = generateLayout(mDecor);
            .......
        }
        ......
    }

    protected DecorView generateDecor(int featureId) {
        ......
        return new DecorView(context, featureId, this, getAttributes());
    }
    ......
}

//#######################################################
//DecorView 源码
public class DecorView extends FrameLayout implements RootViewSurfaceTaker, WindowCallbacks {
DecorView(Context context, int featureId, PhoneWindow window,
            WindowManager.LayoutParams params) {
        super(context);
        ......
    }
}
从上面代码中,我们发现 mDecor 是一个 DecorView 类型(注释:DecorView 是 Window中的顶级View),且DecorView 本身继承至 FrameLayout 。我们看到调用PhoneWinow#generateLayout(DecorView decor) 对 mContentParent 进行了赋值。我们打开 PhoneWinow#generateLayout(DecorView decor) 源码。
DecorView 与 mContentParent 的关系
//PhoneWindow 类
protected ViewGroup generateLayout(DecorView decor) {
      // Apply data from current theme.
      ......
      //根据主题样式设置 DecorView 的布局,样式
      //颜色,标题等
      if (...) {
           layoutResource = R.layout.XXXX;
      }
      mDecor.onResourcesLoaded(mLayoutInflater, layoutResource);
      ......
      //ID_ANDROID_CONTENT 特定的ID值
      ViewGroup contentParent = (ViewGroup)findViewById(ID_ANDROID_CONTENT);
      return contentParent;
}

// Window 类
public View findViewById(@IdRes int id) {
     //getDecorView()  返回前面的 mDecor
     return getDecorView().findViewById(id);
}
通过 generateLayout(DecorView decor)找到了 Window类的findViewById(@IdRes int id)。通过代码,我们可以很清楚的看到** mContentParent 是从 mDecor 布局中来的,且其ID为R.id.content。根据 mDecor 布局文件的不同,有无标题titleBar,mContentParent 是 mDecor本身或者是 mDecor 的一个子元素**。这也就解释了之前的问题。
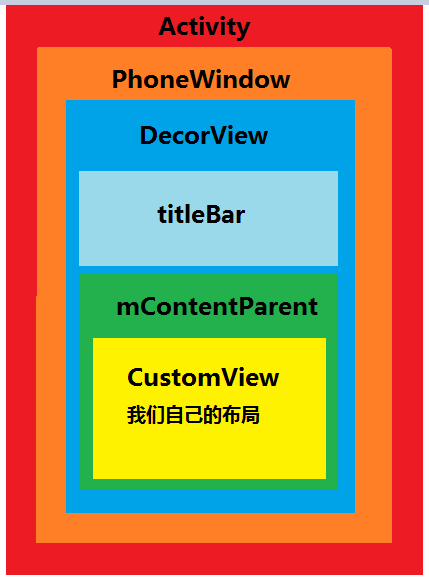
小结 :DecorView 是顶级 View,内部有 titlebar 和 contentParent 两个子元素,而我们自己设置的布局则是contentParent 里面的一个子元素。
DecorView 与 Window 的关系
从 DecorView 的注释中,我们可以猜想到:DecorView 最终被添加到了Window 上,DecorView 是 Window 上的顶级 View。
那么 DecorView是怎么添加到 Window 上的?什么时候添加上去的呢?
首先,我们需要了解 Activity组件的启功过程,大家可以看下老罗的这篇文章 Android应用程序启动过程源代码分析。
Activity组件在启动的过程中,会调用ActivityThread类的成员函数handleLaunchActivity,用来创建以及首次激活Activity组件,并完成了上面所述的DecorView创建动作,然后继续调用 ActivityThread#handleResumeActivity方法。我们看一下 handleResumeActivity 的代码:
final void handleResumeActivity(IBinder token,
            boolean clearHide, boolean isForward, boolean reallyResume, int seq, String reason) {
      ActivityClientRecord r = mActivities.get(token);
      ......
      if (r != null) {
            final Activity a = r.activity;
            if (r.window == null && !a.mFinished && willBeVisible) {
                r.window = r.activity.getWindow();
                View decor = r.window.getDecorView();
                decor.setVisibility(View.INVISIBLE);
                ViewManager wm = a.getWindowManager();
                WindowManager.LayoutParams l = r.window.getAttributes();
                a.mDecor = decor;
                ......
                if (a.mVisibleFromClient && !a.mWindowAdded) {
                    a.mWindowAdded = true;
                    wm.addView(decor, l);
                }
            }
      }
      ......
}
上面代码中,先获取 该Activity a 相关的 Decor对象、Window对象 以及 WindowManager对象。WindowManager 是一个接口类,其实现类为 WindowManagerImpl 。所以,调用了 WindowManagerImpl#addView 方法,然后将 DecorView 添加到了 Window上(当然,其过程不止这些,不比如调用 WindowManagerGlobal类、ViewRootImpl类等,这里不展开讲了,大家可以自己去看下源码)。
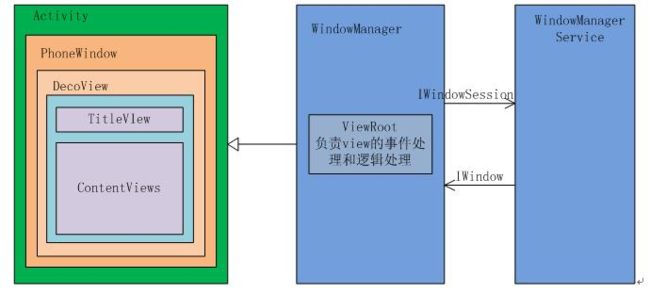
经过上面的层层分析,我们得到了一个 Android 的窗口层级关系图,如下:
补充: 添加 DecorView 到 Window
在 DecorView 与 Window 的关系 提到,在ActivityThread#handleResumeActivity方法中调用了**WindowManagerImpl#addView 方法,我们看下WindowManagerImpl#addView **的代码:
第一步:
    private final WindowManagerGlobal mGlobal = WindowManagerGlobal.getInstance();
    @Override
    public void addView(@NonNull View view, @NonNull ViewGroup.LayoutParams params) {
        applyDefaultToken(params);
        mGlobal.addView(view, params, mContext.getDisplay(), mParentWindow);
    }
我们继续查看 WindowManagerGlobal#addView代码:
第二步:
public void addView(View view, ViewGroup.LayoutParams params, Display display, Window parentWindow) {
 ...
 ViewRootImpl root = new ViewRootImpl(view.getContext(), display);
 view.setLayoutParams(wparams);
 mViews.add(view);
 mRoots.add(root);
 mParams.add(wparams);
 root.setView(view, wparams, panelParentView);
 ...
}
这个方法里创建一个ViewRootImpl,并将之前创建的DecoView作为参数传入。我们接着看ViewRootImpl 代码:
第三步:
/**
* 视图层次结构的顶部,在View和WindowManager之间实现所需的协议。
* 这实现大部分是{@link WindowManagerGlobal}的内部详细信息
*/
public final class ViewRootImpl implements ViewParent,
        View.AttachInfo.Callbacks, ThreadedRenderer.HardwareDrawCallbacks {
      ......
      public void setView(View view, WindowManager.LayoutParams attrs, View panelParentView) {
           synchronized (this) {
           if (mView == null) {
                 .............
                 //请求布局
                 requestLayout();
                 .............
           }
     }
    @Override
    public void requestLayout() {
        ......
        // 执行测量操作
         //执行布局操作
         //执行绘制操作
    }
}
ViewRootImpl是个ViewParent,它里面主要对DecorView进行了测量,布局,绘制等操作。当然,里面代码很多很复杂,我这里是简写流程,大家可以自己看下源码。
第四部:
通过IWindowSession 和 IWindow 接口 进行 WindowManager 和WindowManagerService的交互,实现Window和DecorView的绑定。
大家可以通过下面的文章进一步了解:
Activity中UI框架基本概念
Android应用程序窗口(Activity)与WindowManagerService服务的连接过程分析
结束语
看源码学习,可以让我们对Android 的各种知识了解的更深更透彻,(●'◡'●)!
文章中如有错误,欢迎大家指正!也欢迎大家一起讨论学习!:)


