CALayer简介####
The CALayer class manages image-based content and allows you to perform animations on that content. Layers are often used to provide the backing store for views but can also be used without a view to display content. A layer’s main job is to manage the visual content that you provide but the layer itself has visual attributes that can be set, such as a background color, border, and shadow. In addition to managing visual content, the layer also maintains information about the geometry of its content (such as its position, size, and transform) that is used to present that content onscreen. Modifying the properties of the layer is how you initiate animations on the layer’s content or geometry. A layer object encapsulates the duration and pacing of a layer and its animations by adopting the CAMediaTiming protocol, which defines the layer’s timing information.
If the layer object was created by a view, the view typically assigns itself as the layer’s delegate automatically, and you should not change that relationship. For layers you create yourself, you can assign a delegate object and use that object to provide the contents of the layer dynamically and perform other tasks. A layer may also have a layout manager object (assigned to the layoutManager property) to manage the layout of subviews separately.
这是官方文档对CALayer的解释,个人理解CALayer是用来绘制、渲染
图形的。我们利用drawRect:方法绘图的本质就是绘制到了UIView的layer上。
与UIView又有什么区别和联系呢?####
事实上使用Quartz 2D绘图时其实是在操作CALayer,UIView 下有个属性layer;这个layer层就是真正绘制UIView所要展示的东西。然而之所以要将CALayer封装成UIView则是为了给其添加事件响应。
因为CALayer是继承与NSObject的,所以他是不具备响应的。而UIView是继承与UIResponder的,UIResponder本身可以提供事件响应,再用CALayer给他绘制一个图像,那一个具有响应事件的对象就诞生了,他就是我们的UIView。
当我们创建一个UIView对象时,系统自动为我们创建一个CALayer对象,这个对象就是UIView的layer属性。
CALayer常用属性####
| 属性 | 说明 | 是否支持隐式动画 |
|---|---|---|
| anchorPoint | 和中心点position重合的一个点,称为“锚点”,锚点的描述是相对于x、y位置比例而言的默认在图像中心点(0.5,0.5)的位置 | 是 |
| backgroundColor | 图层背景颜色 | 是 |
| borderColor | 边框颜色 | 是 |
| borderWidth | 边框宽度 | 是 |
| bounds | 图层大小 | 是 |
| contents | 图层显示内容,例如可以将图片作为图层内容显示 | 是 |
| contentsRect | 图层显示内容的大小和位置 | 是 |
| cornerRadius | 圆角半径 | 是 |
| doubleSided | 图层背面是否显示,默认为YES | 否 |
| frame | 图层大小和位置,不支持隐式动画,所以CALayer中很少使用frame,通常使用bounds和position代替 | 否 |
| hidden | 是否隐藏 | 是 |
| mask | 图层蒙版 | 是 |
| maskToBounds | 子图层是否剪切图层边界,默认为NO | 是 |
| opacity | 透明度 ,类似于UIView的alpha | 是 |
| position | 图层原点位置,左上角的位置 | 是 |
| shadowColor | 阴影颜色 | 是 |
| shadowOffset | 阴影偏移量 | 是 |
| shadowOpacity | 阴影透明度,注意默认为0,如果设置阴影必须设置此属性 | 是 |
| shadowPath | 阴影的形状 | 是 |
| shadowRadius | 阴影模糊半径 | 是 |
| sublayers | 子图层 | 是 |
| sublayerTransform | 子图层形变 | 是 |
| transform | 图层形变 | 是 |
- 隐式属性动画的本质是这些属性的变动默认隐含了CABasicAnimation动画实现节。
- 在CALayer中很少使用frame属性,因为frame本身不支持动画效果,通常使用bounds和position代替。
- CALayer中透明度使用opacity表示而不是alpha;中心点使用position表示而不是center。
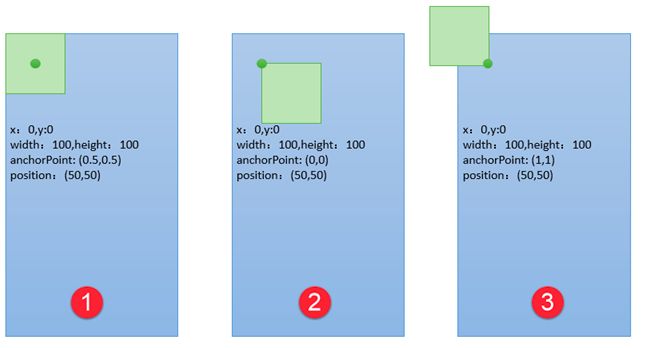
- anchorPoint属性是图层的锚点,范围在(01,01)表示在x、y轴的比例,这个点永远可以同position(中心点)重合,当图层中心点固定后,调整anchorPoint即可达到调整图层显示位置的作用(因为它永远和position重合)
为了进一步说明anchorPoint的作用,假设有一个层大小100*100,现在中心点位置(50,50),由此可以得出frame(0,0,100,100)。上面说过anchorPoint默认为(0.5,0.5),同中心点position重合,此时使用图形描述如图1;当修改anchorPoint为(0,0),此时锚点处于图层左上角,但是中心点poition并不会改变,因此图层会向右下角移动,如图2;然后修改anchorPoint为(1,1,),position还是保持位置不变,锚点处于图层右下角,此时图层如下图。
#import "ViewController.h"

#define WIDTH 50

@interface ViewController ()

@end

@implementation ViewController

- (void)viewDidLoad {
    [super viewDidLoad];
    // Do any additional setup after loading the view, typically from a nib.
    [self drawMyLayer];
}

//绘制图层
- (void)drawMyLayer{
    CGSize size = [UIScreen mainScreen].bounds.size;

    //获取根视图
    CALayer * layer = [[CALayer alloc]init];

    //设置背景颜色,由于QuartzCore是跨平台框架 无法直接使用UIColor
    layer.backgroundColor = [UIColor colorWithRed:0 green:146/255 blue:1.0 alpha:1.0].CGColor;

    //设置中心点
    layer.position = CGPointMake(size.width/2, size.height/2);

    //设置大小
    layer.bounds = CGRectMake(0, 0, WIDTH, WIDTH);

    //设置圆角
    layer.cornerRadius = WIDTH/2;

    /**设置阴影*/
    //设置阴影颜色
    layer.shadowColor = [UIColor redColor].CGColor;
    //设置阴影偏移量
    layer.shadowOffset = CGSizeMake(2, 2);
    //设置阴影透明度
    layer.shadowOpacity = 0.9;

    /**设置边框*/
    //设置边框颜色
    layer.borderColor = [UIColor whiteColor].CGColor;
    //设置边框宽度
    layer.borderWidth = 1;

    //设置锚点
    layer.anchorPoint = CGPointZero;

    [self.view.layer addSublayer:layer];

}

//点击放大
- (void)touchesEnded:(NSSet *)touches withEvent:(UIEvent *)event{
    UITouch * touch = [touches anyObject];
    CALayer * layer = [self.view.layer.sublayers lastObject];
    layer.backgroundColor = [UIColor greenColor].CGColor;
//    CGFloat width = layer.bounds.size.width;
//    if(width == WIDTH){
//        width = WIDTH * 4;
//    }else{
//        width = WIDTH;
//    }
//    layer.bounds = CGRectMake(0, 0, width, width);
    //函数返回一个CGPoint类型的值,表示触摸在view这个视图上的位置,这里返回的位置是针对view的坐标系的。调用时传入的view参数为空的话,返回的时触摸点在整个窗口的位置。
    layer.position = [touch locationInView:self.view];
    NSLog(@"%f %f",[touch locationInView:self.view].x,[touch locationInView:self.view].y);
//    layer.cornerRadius = width/2;
}

- (void)didReceiveMemoryWarning {
    [super didReceiveMemoryWarning];
    // Dispose of any resources that can be recreated.
}

@end
CALayer绘图####
图层绘图有两种方法,不管使用哪种方法绘制完必须调用图层的setNeedDisplay方法(注意是图层的方法,不是UIView的方法,前面我们介绍过UIView也有此方法)
- 通过图层代理drawLayer: inContext:方法绘制
- 通过自定义图层drawInContext:方法绘制
使用代理方法绘图#####
通过代理方法进行图层绘图只要指定图层的代理,然后在代理对象中重写*-(void)drawLayer:(CALayer )layer inContext:(CGContextRef)ctx方法即可。需要注意这个方法虽然是代理方法但是不用手动实现CALayerDelegate,因为CALayer定义中给NSObject做了分类扩展,所有的NSObject都包含这个方法。另外设置完代理后必须要调用图层的setNeedDisplay方法,否则绘制的内容无法显示。
Demo1 绘制一个圆形图层######
#import "ViewController.h"

#define PHONE_HEIGHT 150

//角度转弧度
#define DEGREES_TO_RADIANS(angle) ((angle) / 180.0 * M_PI)

@interface ViewController ()

@end

@implementation ViewController

- (void)viewDidLoad {
    [super viewDidLoad];
    // Do any additional setup after loading the view, typically from a nib.
    //自定义图层
    CALayer * layer = [[CALayer alloc]init];
    //设置图层的大小位置
    layer.bounds = CGRectMake(0, 0, PHONE_HEIGHT, PHONE_HEIGHT);
    //设置图层原点的位置
    layer.position = CGPointMake(160, 200);
    //设置图层的背景颜色
    layer.backgroundColor = [UIColor redColor].CGColor;
    //设置圆角
    layer.cornerRadius = PHONE_HEIGHT/2;
    //注意仅仅设置圆角,对于图形而言可以正常显示,但是对于图层中绘制的图片无法正确显示
    //如果想要正确显示则必须设置masksToBounds=YES,剪切子图层
    layer.masksToBounds = YES;
    //阴影效果无法和masksToBounds同时使用,因为masksToBounds的目的就是剪切外边框,
    //而阴影效果刚好在外边框
    //    layer.shadowColor=[UIColor grayColor].CGColor;
    //    layer.shadowOffset=CGSizeMake(2, 2);
    //    layer.shadowOpacity=1;
    //设置边框
    layer.borderColor = [UIColor whiteColor].CGColor;
    layer.borderWidth = 2;

    //设置图层代理
    layer.delegate = self;

    //调用图层setNeedDisplay 否则代理方法不会调用
    [layer setNeedsDisplay];

    //添加图层到根图层
    [self.view.layer addSublayer:layer];


}

#pragma mark 绘制图形、图像到图层,注意参数中的ctx是图层的图形上下文,其中绘图位置也是相对图层而言的
- (void)drawLayer:(CALayer *)layer inContext:(CGContextRef)ctx{
    //这个图层是上面定义的图层
    CGContextSaveGState(ctx);
    //CGContextScaleCTM 缩放函数
    //CGContextTranslateCTM 移动函数
    //CGContextRotateCTM 旋转加翻转函数

    //图像上下文形变 解决图片倒立的问题
    /*
        CGContextScaleCTM(ctx, 1, -1);
        CGContextTranslateCTM(ctx, 0, -PHONE_HEIGHT);
     */

    //图片旋转90度并翻转
    /*
        CGContextTranslateCTM(ctx, PHONE_HEIGHT, 0);
        CGContextRotateCTM(ctx,DEGREES_TO_RADIANS(90));
     */

    UIImage * image = [UIImage imageNamed:@"4444.png"];

    //注意这个位置是相对于图层而言的不是屏幕
    CGContextDrawImage(ctx, CGRectMake(0, 0, PHONE_HEIGHT, PHONE_HEIGHT), image.CGImage);

    CGContextRestoreGState(ctx);
}

- (void)didReceiveMemoryWarning {
    [super didReceiveMemoryWarning];
    // Dispose of any resources that can be recreated.
}


@end
如果不做任何操作是图片是倒立的如图2,设置缩放和移动位置使其正立如图1,设置旋转90度如图3

Demo2 绘制一个带有阴影圆形图层######
如果设置了masksToBounds=YES之后确实可以显示图片圆角效果,但遗憾的是设置了这个属性之后就无法设置阴影效果。因为masksToBounds=YES就意味着外边框不能显示,而阴影恰恰作为外边框绘制的,这样两个设置就产生了矛盾。要解决这个问题不妨换个思路:使用两个大小一样的图层,下面的图层负责绘制阴影,上面的图层用来显示图片。
#import "ViewController.h"

#define PHONE_HEIGHT 150

//角度转弧度
#define DEGREES_TO_RADIANS(angle) ((angle) / 180.0 * M_PI)

@interface ViewController ()

@end

@implementation ViewController

- (void)viewDidLoad {
    [super viewDidLoad];
    // Do any additional setup after loading the view, typically from a nib.
    //图层中心点
    CGPoint position = CGPointMake(160, 200);
    //设置图层大小
    CGRect bounds = CGRectMake(0, 0, PHONE_HEIGHT, PHONE_HEIGHT);
    //设置半径
    CGFloat cornerRadius = PHONE_HEIGHT/2;
    //设置边框宽度
    CGFloat borderWidth = 2;

    //阴影图层
    CALayer * layerShadow = [[CALayer alloc]init];
    layerShadow.bounds = bounds;
    layerShadow.position = position;
    layerShadow.cornerRadius = cornerRadius;
    //设置阴影的颜色、偏移量、阴影透明度
    layerShadow.shadowColor = [UIColor grayColor].CGColor;
    layerShadow.shadowOffset = CGSizeMake(2, 1);
    layerShadow.shadowOpacity = 1;
    //设置边框颜色
    layerShadow.borderColor = [UIColor whiteColor].CGColor;
    layerShadow.borderWidth = borderWidth;
    [self.view.layer addSublayer:layerShadow];

    //容器图层
    CALayer * layer = [[CALayer alloc]init];
    layer.bounds = bounds;
    layer.position = position;
    layer.backgroundColor = [UIColor redColor].CGColor;
    layer.cornerRadius = cornerRadius;
    layer.masksToBounds = YES;
    layer.borderColor = [UIColor whiteColor].CGColor;
    layer.borderWidth = borderWidth;

    //设置图层代理
    layer.delegate = self;

    //添加图层到根视图
    [self.view.layer addSublayer:layer];

    //调用图层setNeedDisplay ,否则代理方法不会被调用
    [layer setNeedsDisplay];
}

#pragma mark 绘制图形、图形到图层,注意参数中的ctx是图层的图形上下文 其中绘图位置也是相对图层而言
- (void)drawLayer:(CALayer *)layer inContext:(CGContextRef)ctx{
    CGContextSaveGState(ctx);

    //图形上下文形变,解决图片倒立的问题
    CGContextScaleCTM(ctx, 1, -1);
    CGContextTranslateCTM(ctx, 0, -PHONE_HEIGHT);

    UIImage * image = [UIImage imageNamed:@"4444.png"];
    CGContextDrawImage(ctx, CGRectMake(0, 0, PHONE_HEIGHT, PHONE_HEIGHT), image.CGImage);

    CGContextRestoreGState(ctx);
}

Demo3 使用性变函数是图层翻转######
从上面代码中大家不难发现使用Core Graphics绘制图片时会倒立显示,对图层的图形上下文进行了反转。在前一篇文章中也采用了类似的方法去解决这个问题,但是在那篇文章中也提到过如果直接让图像沿着x轴旋转180度同样可以达到正确显示的目的,只是当时的旋转靠图形上下文还无法绕x轴旋转。今天学习了图层之后,其实可以控制图层直接旋转而不用借助于图形上下文的形变操作,而且这么操作起来会更加简单和直观。对于上面的程序,只需要设置图层的transform属性即可。需要注意的是transform是CATransform3D类型,形变可以在三个维度上进行,使用方法和前面介绍的二维形变是类似的,而且都有对应的形变设置方法(如:CATransform3DMakeTranslation()、CATransform3DMakeScale()、CATransform3DMakeRotation())。下面的代码通过CATransform3DMakeRotation()方法在x轴旋转180度解决倒立问题:
#import "ViewController.h"

#define PHONE_HEIGHT 150

//角度转弧度
#define DEGREES_TO_RADIANS(angle) ((angle) / 180.0 * M_PI)

@interface ViewController ()

@end

@implementation ViewController

- (void)viewDidLoad {
    [super viewDidLoad];
    // Do any additional setup after loading the view, typically from a nib.
    CGPoint position = CGPointMake(160, 200);
    CGRect bounds = CGRectMake(0, 0, PHONE_HEIGHT, PHONE_HEIGHT);
    CGFloat cornerRadius = PHONE_HEIGHT/2;
    CGFloat borderWidth = 2;

    //阴影图层
    CALayer * layerShadow = [[CALayer alloc]init];
    layerShadow.bounds = bounds;
    layerShadow.position = position;
    layerShadow.cornerRadius = cornerRadius;
    layerShadow.shadowColor = [UIColor grayColor].CGColor;
    layerShadow.shadowOffset = CGSizeMake(2, 1);
    layerShadow.shadowOpacity = 1;
    layerShadow.borderColor = [UIColor whiteColor].CGColor;
    layerShadow.borderWidth = borderWidth;
    [self.view.layer addSublayer:layerShadow];

    //容器图层
    CALayer * layer = [[CALayer alloc]init];
    layer.bounds = bounds;
    layer.position = position;
    layer.backgroundColor = [UIColor redColor].CGColor;
    layer.cornerRadius = cornerRadius;
    layer.masksToBounds = YES;
    layer.borderColor = [UIColor whiteColor].CGColor;
    layer.borderWidth = borderWidth;

    /*
        ********************************平移变换*********************************
        返回一个平移变换的transform3D对象 tx,ty,tz对应x,y,z轴的平移
        CATransform3D CATransform3DMakeTranslation (CGFloat tx, CGFloat ty, CGFloat tz);

        在某个transform3D变换的基础上进行平移变换,t是上一个transform3D,其他参数同上
        CATransform3D CATransform3DTranslate (CATransform3D t, CGFloat tx, CGFloat ty, CGFloat tz);


        ********************************缩放变换*********************************
        x,y,z分别对应x轴,y轴,z轴的缩放比例
        CATransform3D CATransform3DMakeScale (CGFloat sx, CGFloat sy, CGFloat sz);

        在一个transform3D变换的基础上进行缩放变换,其他参数同上
        CATransform3D CATransform3DScale (CATransform3D t, CGFloat sx, CGFloat sy, CGFloat sz);


        ********************************旋转变换*********************************
        angle参数是旋转的角度,为弧度制 0-2π ,x,y,z决定了旋转围绕的中轴,取值为-1——1之间,例如(1,0,0),则是绕x轴旋转(0.5,0.5,0),则是绕x轴与y轴中间45度为轴旋转,依次进行计算
        CATransform3D CATransform3DMakeRotation (CGFloat angle, CGFloat x, CGFloat y, CGFloat z);

        在一个transform3D的基础上进行旋转变换,其他参数如上
        CATransform3D CATransform3DRotate (CATransform3D t, CGFloat angle, CGFloat x, CGFloat y, CGFloat z);


        ********************************旋转翻转变换*********************************
        将一个旋转的效果进行翻转
        CATransform3D CATransform3DInvert (CATransform3D t);

        NOTE:
            CATransform3D与CGAffineTransform的转换,CGAffineTransform
            是UIKit框架中一个用于变换的矩阵,其作用与CATransform类似,只是其
            可以直接作用于View,而不用作用于layer,这两个矩阵也可以进行转换

     */
    //利用图层形变解决图像倒立问题
    layer.transform = CATransform3DMakeRotation(M_PI, 1, 0, 0);

    //设置图层代理
    layer.delegate = self;

    //添加图层到根视图
    [self.view.layer addSublayer:layer];

    //设置图层setNeedDisplay,否则代理方法不会被调用
    [layer setNeedsDisplay];
}


#pragma mark 绘制图形、图像到图层,注意参数中的ctx时图层的图形上下文,其中绘图位置也是相对图层而言的
- (void)drawLayer:(CALayer *)layer inContext:(CGContextRef)ctx{
    //    NSLog(@"%@",layer);//这个图层正是上面定义的图层
    UIImage *image=[UIImage imageNamed:@"4444.png"];
    //注意这个位置是相对于图层而言的不是屏幕
    CGContextDrawImage(ctx, CGRectMake(0, 0, PHONE_HEIGHT, PHONE_HEIGHT), image.CGImage);
}
Demo4使用自定义图层绘图######
在自定义图层中绘图时只要自己编写一个类继承于CALayer然后在drawInContext:中绘图即可。同前面在代理方法绘图一样,要显示图层中绘制的内容也要调用图层的setNeedDisplay方法,否则drawInContext方法将不会调用。
前面的文章中曾经说过,在使用Quartz 2D在UIView中绘制图形的本质也是绘制到图层中,为了说明这个问题下面演示自定义图层绘图时没有直接在视图控制器中调用自定义图层,而是在一个UIView将自定义图层添加到UIView的根图层中(例子中的UIView跟自定义图层绘图没有直接关系)。从下面的代码中可以看到:UIView在显示时其根图层会自动创建一个CGContextRef(CALayer本质使用的是位图上下文),同时调用图层代理(UIView创建图层会自动设置图层代理为其自身)的draw: inContext:方法并将图形上下文作为参数传递给这个方法。而在UIView的draw:inContext:方法中会调用其drawRect:方法,在drawRect:方法中使用UIGraphicsGetCurrentContext()方法得到的上下文正是前面创建的上下文。
| 函数 | 用法 |
|---|---|
| CGContextRef context = UIGraphicsGetCurrentContext(); | 设置上下文 |
| CGContextMoveToPoint(context, x, y) | 开始画线, x,y 为开始点的坐标 |
| CGContextAddLineToPoint(context, x, y) | 画直线, x,y 为线条结束点的坐标 |
| CGContextAddEllipseInRect(context, rect |
画椭圆,rect为椭圆的外切矩形 |
| CGContextSetLineCap(context, tap) | 设置线条终点形状,tap是一个枚举变量< kCGLineCapButt 默认结束>、< kCGLineCapRound 圆角>、< kCGLineCapSquare 线头露出了的样式> |
| CGContextSetLineDash(context, phase, lengths, count) | //画虚线,可参考http://blog.csdn.net/zhangao0086/article/details/7234859 |
| CGContextAddRect(context, rect) | 画矩形 ,rect矩形坐标大小 |
| CGContextStrokeRect (context, rect) | 画矩形 ,rect矩形坐标大小 |
| CGContextStrokeRectWithWidth(context, rect, width) | 画矩形, rect 矩形的坐标大小,width矩形的边框宽度 |
| CGContextStrokeLineSegments | 一些直线 |
| CGContextAddArc(context, x, y, radius, startAngle, endAngle, clockwise) | x,y为圆点坐标,radius半径,startAngle为开始的弧度,endAngle为 结束的弧度,clockwise 0为顺时针,1为逆时针。 |
| CGContextAddArcToPoint(context, x1, y1, x2, y2, radius) | 画弧线,x1,y1跟某点(A)形成一条线的坐标p2,x2,y2结束坐标跟某点(A)形成一条线的p3,radius半径,得到圆心,设置内切圆弧 |
| CGContextSetShadowWithColor(context, offset,blur, color) | 设置阴影颜色,offset 阴影偏移量,blur透明度,color颜色 |
| CGContextSetRGBFillColor(context, red, green, blue ,alpha) | 设置填充颜色,r-g-b ,alpha 透明度 |
| CGContextSetRGBStrokeColor(context, red, green, blue ,alpha) | 设置画笔颜色,r-g-b ,alpha 透明度 |
| CGContextSetFillColorSpace | 空间填充颜色 |
| CGConextSetStrokeColorSpace | 设置画笔 空间颜色 |
| CGContextFillRect | 补充当前填充颜色的rect |
| CGContextSetAlaha | 透明度 |
| CGContextTranslateCTM | 改变画布位置 |
| CGContextSetLineWidth | 设置线的宽度 |
| CGContextAddRects | 画多个线 |
| CGContextAddQuadCurveToPoint | 画曲线 |
| CGContextStrokePath | 开始绘制图片 |
| CGContextDrawPath | 设置绘制模式 |
| CGContextClosePath | 封闭当前线路 |
| CGContextTranslateCTM(context, 0, rect.size.height); CGContextScaleCTM(context, 1.0, -1.0); | 反转画布 |
| CGContextSetInterpolationQuality | 背景内置颜色质量等级 |
| CGImageCreateWithImageInRect | 从原图片中取小图 |
| CGColorGetComponents() | 返回颜色的各个直 以及透明度 可用只读const float 来接收 是个数组 |
| CGContextEOFillPath | 使用奇偶规则填充当前路径 |
| CGContextFillPath | 使用非零绕数规则填充当前路径 |
| CGContextFillRect | 填充指定的矩形 |
| CGContextFillRects | 填充指定的一些矩形 |
| CGContextFillEllipseInRect | 填充指定矩形中的椭圆 |
| CGContextDrawPath | 两个参数决定填充规则 |
| kCGPathFill | 表示用非零绕数规则 |
| kCGPathEOFill | 表示用奇偶规则 |
| kCGPathFillStroke | 表示填充 |
| kCGPathEOFillStroke | 表示描线,不是填充 |
| CGContextSetBlendMode | 设置blend mode. |
| CGContextSaveGState | 保存blend mode. |
| CGContextRestoreGState | 在没有保存之前,用这个函数还原blend mode. |
在自定义图层中绘图时只要自己编写一个类继承于CALayer然后在drawInContext:中绘图即可。同前面在代理方法绘图一样,要显示图层中绘制的内容也要调用图层的setNeedDisplay方法,否则drawInContext方法将不会调用。
前面的文章中曾经说过,在使用Quartz 2D在UIView中绘制图形的本质也是绘制到图层中,为了说明这个问题下面演示自定义图层绘图时没有直接在视图控制器中调用自定义图层,而是在一个UIView将自定义图层添加到UIView的根图层中(例子中的UIView跟自定义图层绘图没有直接关系)。从下面的代码中可以看到:UIView在显示时其根图层会自动创建一个CGContextRef(CALayer本质使用的是位图上下文),同时调用图层代理(UIView创建图层会自动设置图层代理为其自身)的draw: inContext:方法并将图形上下文作为参数传递给这个方法。而在UIView的draw:inContext:方法中会调用其drawRect:方法,在drawRect:方法中使用UIGraphicsGetCurrentContext()方法得到的上下文正是前面创建的上下文。
YJSCLayer.m
#import "YJSCLayer.h"

@implementation YJSCLayer

- (void)drawInContext:(CGContextRef)ctx{
    NSLog(@"3-drawInContext:");
    NSLog(@"CGContext:%@",ctx);

    CGContextSetRGBFillColor(ctx, 135.0/255.0, 232.0/255.0, 84.0/255.0, 1);
    CGContextSetRGBStrokeColor(ctx, 135.0/255.0, 232.0/255.0, 84.0/255.0, 1);
    CGContextMoveToPoint(ctx, 94.5, 33.5);

    CGContextAddLineToPoint(ctx,104.02, 47.39);
    CGContextAddLineToPoint(ctx,120.18, 52.16);
    CGContextAddLineToPoint(ctx,109.91, 65.51);
    CGContextAddLineToPoint(ctx,110.37, 82.34);
    CGContextAddLineToPoint(ctx,94.5, 76.7);
    CGContextAddLineToPoint(ctx,78.63, 82.34);
    CGContextAddLineToPoint(ctx,79.09, 65.51);
    CGContextAddLineToPoint(ctx,68.82, 52.16);
    CGContextAddLineToPoint(ctx,84.98, 47.39);
    CGContextClosePath(ctx);


    CGContextDrawPath(ctx, kCGPathFillStroke);

}
FirstView.m
#import "FirstView.h"
#import "YJSCLayer.h"

@implementation FirstView

- (instancetype)initWithFrame:(CGRect)frame{
    NSLog(@"initwithFrame");
    if(self = [super initWithFrame:frame]){
        YJSCLayer * layer = [[YJSCLayer alloc]init];
        layer.bounds = CGRectMake(0, 0, 185, 185);
        layer.position = CGPointMake(160, 284);
        layer.backgroundColor = [UIColor colorWithRed:0 green:146/255.0 blue:1.0 alpha:1.0].CGColor;
        //显示图层
        [layer setNeedsDisplay];

        [self.layer addSublayer:layer];
    }
    return self;
}

- (void)drawRect:(CGRect)rect{
    NSLog(@"2-drawRect:");
    NSLog(@"CGContext:%@",UIGraphicsGetCurrentContext());//得到的当前图形上下文正是drawLayer中传递的
    [super drawRect:rect];
}

- (void)drawLayer:(CALayer *)layer inContext:(CGContextRef)ctx{
    NSLog(@"1-drawLayer:inContext:");
    NSLog(@"CGContext:%@",ctx);
    [super drawLayer:layer inContext:ctx];
}

@end
#import "ViewController.h"
#import "FirstView.h"

#define PHONE_HEIGHT 150

//角度转弧度
#define DEGREES_TO_RADIANS(angle) ((angle) / 180.0 * M_PI)

@interface ViewController ()

@end

@implementation ViewController

- (void)viewDidLoad {
    [super viewDidLoad];
    // Do any additional setup after loading the view, typically from a nib.
    FirstView * view = [[FirstView alloc]initWithFrame:[UIScreen mainScreen].bounds];
    view.backgroundColor = [UIColor colorWithRed:249.0/255.0 green:249.0/255.0 blue:249.0/255.0 alpha:1];

    [self.view addSubview:view];
}

- (void)didReceiveMemoryWarning {
    [super didReceiveMemoryWarning];
    // Dispose of any resources that can be recreated.
}


@end