一. 前言
这篇文章是我写的第一篇Swift UI相关的笔记吧。
这真的难搞哦,毕竟新出来的。国内文档真的是少之又少,国外的文档也真不多,基本搜出来的都是UIKit的。官方文档,也是一言难尽,基本就处于,我要实现一个功能,然后去搜一下各种帖子,筛选掉无用的帖子,找到有用的点,当然也是时常根本找不到有用的帖子,然后就要去油管上看各种教程,然后发现:哦!原来还有这个方法!接着去官方文档搜一下,看一下属性,自己调用调用......
光是这个core data我就折腾了近一周,最后发现,原来还是官方好呀.....
吐槽一下自学swift ui,现在进入正题了。
core data呢,是苹果官方的本地数据库,但是其存储的文件其实是sqlite文件。其可以通过icloud实现备份和同步,当然icloud我会额外写一篇文档来详细讲述的(又是一把辛酸泪...)。
二. 环境
如下是我当前的环境:
- 系统:macOS Big Sur 11.4
- Xcode:Version 12.5 (12E262)
- Swift:5.4
三. 操作步骤
1. 创建项目
在创建项目的时候,可以直接选择Use Core Data选项,xcode会直接在ContentView.swift中生成一个相关demo。
2. 查看相关文件
创建之后,查看文件目录,相对于不选择Use Core Data,会多出如下几个文件:
.xcdatamodeId - Persistence.swift
3. 创建core data表
点击
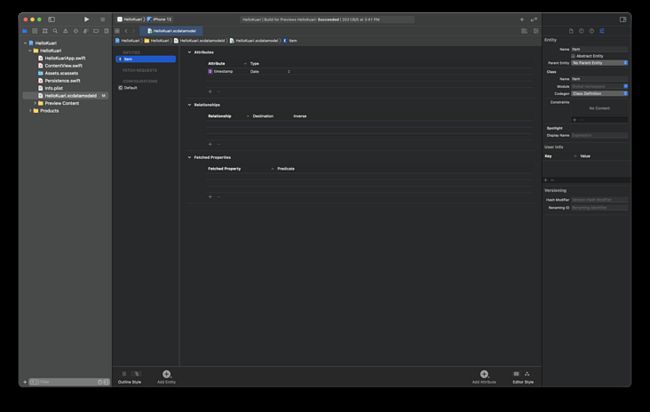
可以看到页面内有默认的CONFIGURATIONS为Default,默认的ENITITIES为Item,可以理解为分别对应sql中的库和表。
然后点击Item,可以看到其字段,有默认的timestamp字段。
若要新增ENTITIES(表),点击底部的Add Entity按钮即可。
若要新增Attributes(字段),点击右侧Attributes中的+即可,注意字段要选择类型。
比如,此处以默认的Item为例,新增username和age两个字段。
4. 代码层面操作core data
1)查看
@Environment(\.managedObjectContext) private var viewContext
@FetchRequest(
sortDescriptors: [NSSortDescriptor(keyPath: \Item.timestamp, ascending: true)],
animation: .default)
private var items: FetchedResults-
// body中便利items即可
2)新增
private func addItem() {
  withAnimation {
    let newItem = Item(context: viewContext)
    newItem.timestamp = Date()

    do {
      try viewContext.save()
    } catch {
      // Replace this implementation with code to handle the error appropriately.
      // fatalError() causes the application to generate a crash log and terminate. You should not use this function in a shipping application, although it may be useful during development.
      let nsError = error as NSError
      fatalError("Unresolved error \(nsError), \(nsError.userInfo)")
    }
  }
}
如上是xcode自动生成的新增函数,若是要自定义添加字段可以这样改动下:
// 此处按照如上添加Attributes修改,具体修改按照项目具体情况
private func addItem(username: String, age: Int16) {
  withAnimation {
    let newItem = Item(context: viewContext)
    newItem.username = username
    newItem.age = age
    newItem.timestamp = Date()

    do {
      try viewContext.save()
    } catch {
      // Replace this implementation with code to handle the error appropriately.
      // fatalError() causes the application to generate a crash log and terminate. You should not use this function in a shipping application, although it may be useful during development.
      let nsError = error as NSError
      fatalError("Unresolved error \(nsError), \(nsError.userInfo)")
    }
  }
}
3)删除
private func deleteItems(offsets: IndexSet) {
  withAnimation {
    offsets.map { items[$0] }.forEach(viewContext.delete)

    do {
      try viewContext.save()
    } catch {
      // Replace this implementation with code to handle the error appropriately.
      // fatalError() causes the application to generate a crash log and terminate. You should not use this function in a shipping application, although it may be useful during development.
      let nsError = error as NSError
      fatalError("Unresolved error \(nsError), \(nsError.userInfo)")
    }
  }
}
4)汇总
在默认生成代码中,有一个toolbar,其在macos中可以生效,但是在ios中只有EditionButton()可以使用,为了方便演示,此处新增一个Button来添加数据。
其次有点要声明下,在xcode中写代码时,右侧的canvas会实时渲染,列表中出现的数据并不是core data中的数据,而是默认生成的Persistence.swift中生成的演示数据,只能看看,不能当真。只有在模拟器/实体机编译运行时才能操作core data。
如下为修改过后的ContentView.swift文件:
//
// ContentView.swift
// HelloKuari
//
// Created by Kuari on 2021/6/5.
//
import SwiftUI
import CoreData
struct ContentView: View {
@Environment(\.managedObjectContext) private var viewContext
@FetchRequest(
sortDescriptors: [NSSortDescriptor(keyPath: \Item.timestamp, ascending: true)],
animation: .default)
private var items: FetchedResults-
var body: some View {
VStack {
List {
ForEach(items) { item in
Text("Tom: \(item.username!) age: \(item.age) time : \(item.timestamp!, formatter: itemFormatter)")
}
.onDelete(perform: deleteItems)
}
// 新增一个按钮来添加数据
Button(action: {
addItem(username: "tom", age: 12)
}, label: {
Text("Add Item")
})
}
}
private func addItem(username: String, age: Int16) {
withAnimation {
let newItem = Item(context: viewContext)
newItem.username = username
newItem.age = age
newItem.timestamp = Date()
do {
try viewContext.save()
} catch {
// Replace this implementation with code to handle the error appropriately.
// fatalError() causes the application to generate a crash log and terminate. You should not use this function in a shipping application, although it may be useful during development.
let nsError = error as NSError
fatalError("Unresolved error \(nsError), \(nsError.userInfo)")
}
}
}
private func deleteItems(offsets: IndexSet) {
withAnimation {
offsets.map { items[$0] }.forEach(viewContext.delete)
do {
try viewContext.save()
} catch {
// Replace this implementation with code to handle the error appropriately.
// fatalError() causes the application to generate a crash log and terminate. You should not use this function in a shipping application, although it may be useful during development.
let nsError = error as NSError
fatalError("Unresolved error \(nsError), \(nsError.userInfo)")
}
}
}
}
private let itemFormatter: DateFormatter = {
let formatter = DateFormatter()
formatter.dateStyle = .short
formatter.timeStyle = .medium
return formatter
}()
struct ContentView_Previews: PreviewProvider {
static var previews: some View {
ContentView().environment(\.managedObjectContext, PersistenceController.preview.container.viewContext)
}
}
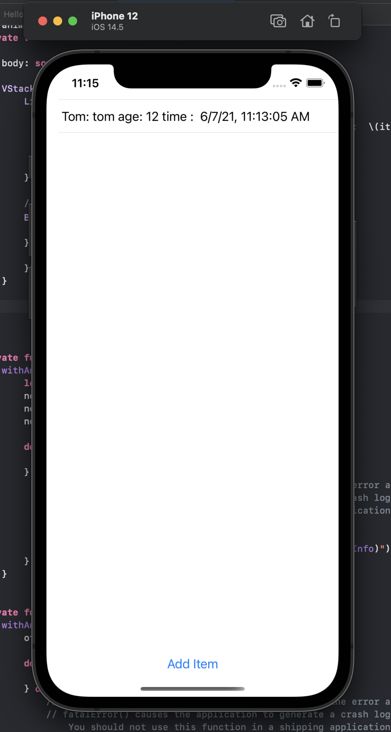
然后点击左侧顶部的运行按钮,编译运行。
一开始是空白一片,点击Add Item按钮之后,便会开始添加数据。
对于记录右滑即可删除,其为List的onDelete方法。
四. 原文链接
https://github.com/Kuari/Blog...
五. 结语
该文章是面向新手的,也是记录下我踩过的坑,因为目前文档匮乏,身边也没swift的开发小伙伴儿,只能靠自己摸索,若有大佬有更好的方法,真的还请不吝赐教。
后面持续记录踩坑中......


