django+celery+psutil+channels+elasticsearch实现监控实时告警功能--一次面试引发的学习经历
2019-07-25去参加了一个面试,面试过程持续了一个小时左右,聊的挺细的。也暴露出一些问题,我没有太深入的研究,导致某些大数据组件的优化方面没有回答上来。整体面试效果还可以吧。面试官对我还算是没有放弃,反复想验证我是否有较强的学习能力,临走时还给我布置了一个作业:
使用Celery (http://docs.celeryproject.org/en/latest/index.html)中周期性任务功能,通过Python第三方模块中的psutil (https://psutil.readthedocs.io/en/latest/)模块,对服务运行环境 (即:本机操作系统) 的运行进程的活动信息 (如:CPU 使用率、内存使用率、I/O 占比) 抓取,将历史抓取周期数据存放入 elasticsearch 中,通过Django 进行查询和展示,这里只需要使用Django 的 template 进行列表的查询和展示就行,并不需要进行图形化展示。
附加项:上述抓取的数据,通过配置文件对特定进程进行实时告警处理,当该进程的活动信息数据出现异常表象时 (如CPU 使用率超过阈值等情况) ,能够在 Celery 的 worker 中直接通过Django 的channels 模块推送给前台实现实时告警功能。
验收时间
建议一周,最迟两周提交验收结果
我当时还问了一嘴,是不是做不出来,就没有然后了。对方还是礼貌的回复,即使做不出来,还是可以有后续沟通的。但是我心里还是明白,这个作业是对方在考量我的能力。如果做不出来,丢人啊!因为面试时说了,自己做过一个运维管理系统,这要是做不出来,不得灰溜溜的啊,还咋见人啊。
拿到作业,我内心挺忐忑的,因为除了psutil外,其他的我都没接触过。对于未知的恐惧,瞬间暴露了出来,一方面是时间的期限,一方面是技术的未知,折磨啊。于是先对这个需求做了拆分,大致分了5部分,celery,psutil,elasticsearch,django读取es数据和channels。
当天大概查了一下celery的相关知识,不好理解啊。
周五,开始具体研究celery,怎么结合django啥的,当天基本没有收获,网上的资料真的是坑人啊,鱼龙混杂!
周六,我背负着巨大的压力,没有陪老婆和孩子,在家憋了一天,总算在晚上,实现了celery+psutil采集数据,但是因为elasticsearch我并不熟悉,所以为了结合django,我采用了mysql数据库作为后端存储。但是在实际使用过程中,虽然成功创建了django_celery_results_taskresult表,但是却无法向其中存储数据,难啊!!!后来终于找到了不向表中存储数据的原因,是因为我修改了settings中关于CELERY_RESULT_BACKEND,但是却没有重启celery worker,所以新的配置就一直没有生效,坑爹啊!
周天陪孩子玩了一天,晚上有时间了,又查了一下,也没啥收获。
周一,我开始投入时间做大量的尝试,但就是整不明白该表与django的orm如何关联上,下班时我问了django QQ群里的群主,对方简明几句就给出了我的答案:
直接可以这么引用model,这样就不用考虑如何将django_celery_results_taskresult表与自建的model相关联了,而是通过自带的方式,获取到对应的model:TaskResult。瞬间我就有感觉了,晚上回家直接就搞定了数据的解析工作,由string类型转换成了dict类型,并成功传到前台,显示了出来!
周二,有了之前的成功,我继续使用mysql数据库作为后端,开始研究channels,了解到channels是实现websocket的官方推荐方式,具体配置说明后续给出,难点就在于如何在consumers外向channels发送信息,这就要归功于channel_layer了!
周三,我在task中,return之前,对获取的数据做了异常判断,对于出现异常的数据,通过channel_layer发送回前端,前端收到websocket信息后,读取并展示出来了。我给面试官一个回复,说我已经实现了大体的功能,只是后端数据库我采用的是mysql,因为elasticsearch没有像mysql那样现成的engine,可以直接结合django使用。其实我的意思是,差不多就行了,没必要太纠结后端采用的到底是什么数据库。但是对方给我的回复是要用elasticsearch,我见对方没有松口的意思,我就提了一嘴,我看到网上有django-elasticsearch-dsl,对方说这个是可以的。好吧,那我就继续下去吧,这时,心里是有底的了,至少不会因为做不出来,而灰头土脸。
周四,我按照django-elasticsearch-dsl官方提供的方式,实现了简单的model创建,存储。但是如何结合celery backend设置的数据,展示到django前台,开始还没有搞清楚。但是好在自己的头脑还是灵活的,我先是通过kibana查看了elasticsearch中存储的数据格式,了解到index,type的概念就像对应的mysql的database和table一样,于是大胆的尝试写model,并修改对应的documents.py,最终真的跟我解析es中的field一样,跟model对应上了。
周五,我整理了文档和代码,还有requirements.txt,发回给了面试官。
心路历程就是这样的,做出来后,我真的很感激自己。从一无所知,到全部完成;从恐惧未知,到收获满满,我用了一周的时间,征服了恐惧,收获了知识,同时也再次验证了我之前说过的话,困难时刻,唯有自救,才能找到出路。如果遇到困难就退缩了,就放弃了,那根本不会有成功的时刻,面对未知和恐惧,只有不断的去探索,才能找到出路。
下面整理一下具体的操作过程:
1. celery部分
首先需要在settings中引入app和djcelery:

然后是创建celery.py,用来创建celery实例,内容为:
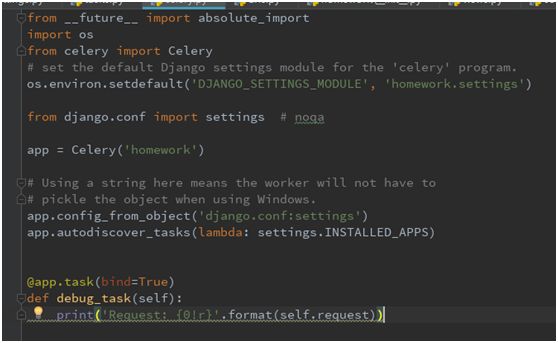
并在项目主目录下的__init__.py文件中添加如下,目的是让项目加载时自动加载celery,以便于后续可以在项目中直接使用celery命令启动worker和beat:

celery本身是独立于django的,即可以在django项目之外独立运行。当然也可以结合django一起使用,这样做可以充分利用django的优势,直接将个配置信息写到settings中,一目了然,如下写明了broker的地址,backend的地址,beat schedule,task等信息:

其中,task是指定了在agent.tasks文件中的scrapy_data方法,于是就需要在指定的app中,为celery创建task了,本次task就是通过psutil采集服务器的各项详细信息,并将采集到的数据返回,这里的返回是指celery配置的backend,如果是mysql,就存储到mysql数据库中;如果是elasticsearch,就保存到es中;当然也可以是redis或者干脆就不接收返回值:
@app.task
def scrapy_data():
hostname = socket.gethostname()
cpu = psutil.cpu_percent()
mem = psutil.virtual_memory().percent
net_in =psutil.net_io_counters().bytes_recv
net_out =psutil.net_io_counters().bytes_sent
# 在此判断各项指标是否超过阈值
# cpu阈值为:80; 内存阈值为:80;
cpu_limit = 80
mem_limit = 80
if cpu > cpu_limit:
current_time =datetime.datetime.now().strftime(
'%Y-%m-%d %H:%M:%S')
channel_layer =get_channel_layer()
group_name = "agent"
async_to_sync(channel_layer.group_send)(
"agents",
{
"type": "user.message",
"text": str(current_time)+" CPU利用率已超过: "+str(cpu_limit)+"%,当前CPU利用率为: "+str(cpu)+"%",
},
)
if mem > mem_limit:
current_time =datetime.datetime.now().strftime(
'%Y-%m-%d %H:%M:%S')
channel_layer =get_channel_layer()
group_name = "agent"
async_to_sync(channel_layer.group_send)(
"agent",
{
"type": "user.message",
"text": str(current_time)+" 内存利用率已超过: "+str(mem_limit)+"%,当前内存利用率为: "+str(mem)+"%",
},
)
return hostname,cpu,mem,net_in,net_out
本次我就是先配置了celery的backend为mysql,因为mysql与django orm可以很轻松的结合,拥有现成的engine。需要在settings中配置如下:
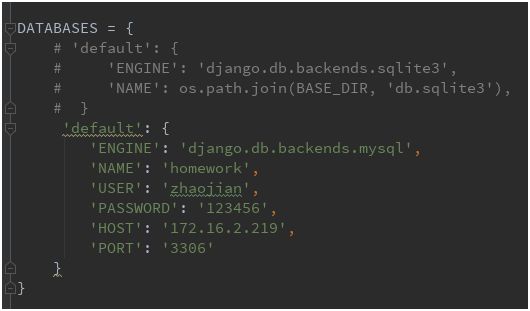
并指定backend,这里表示使用django配置的db:
CELERY_RESULT_BACKEND = 'django-db' #配置backend
最后别忘了生成数据库表:
python manage.py makemigrations
python manage.py migrate
顺利的话,就会在数据库中看到生成的表了:
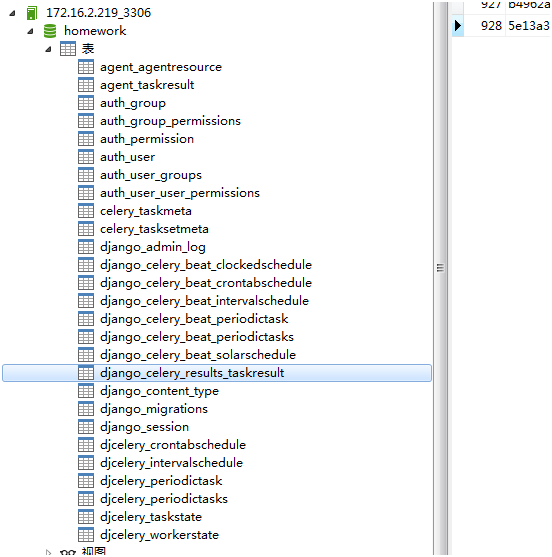
其中,django_celery_results_taskresult表就是默认创建的,用来存储celery抓取后的数据。
接下来就是验证celery worker和beat了:
在项目的主目录下,
启动celery worker:
celery -A homework worker-l info
启动celery beat:
celery -A homework beat-l info --scheduler django_celery_beat.schedulers:DatabaseScheduler
顺利的话,效果如下:

和

我在运行celery时,遇到了问题,最初我是想通过直接运行task文件中的方法,来启动celery worker的,但是因为tasks.py是在django项目中的,不允许以单个文件的形式单独运行,所以要不就是脱离开django框架,要不就是结合django框架使用。如果是脱离了django框架,那么虽然运行task简单了,但是运行beat就费劲了,所以还是想结合django框架,一起使用celery worker和beat。经过调试,最终是在项目的主目录下启动celery worker和beat,而不是具体到tasks中的方法。
这里需要注意的一点是,如果修改了settings中或者tasks中的内容,必须要重启celery worker,否则新的配置信息是无法生效的,我就在这吃亏了!!!
数据可以存储到mysql的django_celery_results_taskresult表了,但是怎么跟django orm结合,展示到前端页面上呢?又遇到了难题,如果是我自建的model,很容易对应orm,但是这个表是celery自动创建的,如何跟我需要的model字段对应上呢?这个问题排查了一天,也没有查出来。最终是通过问qq群里的大牛,得出了答案,原来django_celery_results自带了models,最终django_celery_results_taskresult表对应的model就是TaskResult:
通过这种方式就可以不费吹灰之力的得到该表中的数据了:

对于上述表,我最终只需要result这个字段中的数据,其他的对我来说都没用,所以我需要对数据做一下整理。首先是获取result字段的所有返回值,他们的类型是string的,所以得通过split等方法最终拿到每个字段,然后转变成dict格式的数据,最终存入list中,返回给前端:
#database为mysql的解析方式。CBV
class ScrapyDataView(View):
def get(self,request,*args,**kwargs):
#从mysql数据库中的django_celery_results_taskresult表中获取数据
results = TaskResult.objects.values_list('result', flat=True)
list = []
id =
0
for res in results:
id +=
1
dict = {}
print(res)
data = res.split(
',')
print(data[0][1:])
print(data[1].strip())
print(data[2].strip())
print(data[3].strip())
print(data[4][:-1].strip())
dict[
"id"] = id
dict[
"hostname"] = data[0][1:].strip()
dict[
"cpu"] = data[1].strip()
dict[
"mem"] = data[2].strip()
dict[
"net_in"] = data[3].strip()
dict[
"net_out"] = data[4][:-1].strip()
list.append(dict)
return render(request, 'list.html', {'object_list': list})
前端只需要负责展示出来就OK了:

2. channels部分
官网真是最好的选择啊:
https://channels.readthedocs.io/en/latest/installation.html
我之所以花费了很长的时间研究channels,就是因为误参考了很多文章,结果东拼西凑的都乱套了,肯定无法运行,最终还是老老实实的参照官网的做法,来配置channels!!!
Channels is available onPyPI - to install it, just run:
pipinstall-Uchannels
Once that’s done, you
should add channels to
your INSTALLED_APPSsetting:
INSTALLED_APPS =(
'django.contrib.auth',
'django.contrib.contenttypes',
'django.contrib.sessions',
'django.contrib.sites',
...
'channels',
)
Then, make a default
routing in myproject/routing.py:
from channels.routing importProtocolTypeRouter
application =ProtocolTypeRouter({
# Empty for now (http->django views is added by default)
})
And finally, set
your ASGI_APPLICATIONsettingto point to that routing object as your root application:
ASGI_APPLICATION = "myproject.routing.application"
From the command
line, cdintoa directory where you’d like to store your code, then run the followingcommand:
$ django-admin startproject mysite
This will create a mysitedirectoryin your current directory with the following contents:
mysite/
manage.py
mysite/
__init__.py
settings.py
urls.py
wsgi.py
Creating theChat app
We will put the code for the chat serverin its own app.
Make sure you’re in the same directory
as manage.pyand typethis command:
$ python3manage.py startapp chat
That’ll create a directory chat, which is laid out like this:
chat/
__init__.py
admin.py
apps.py
migrations/
__init__.py
models.py
tests.py
views.py
For the purposes of this tutorial, we
will only be working with chat/views.py and chat/__init__.py. So remove all other files from
the chatdirectory.
After removing unnecessary files,
the chatdirectory should look like:
chat/
__init__.py
views.py
We need to tell our project that
the chat app is installed. Edit the mysite/settings.py file and add 'chat' to the INSTALLED_APPSsetting. It’ll look like this:
# mysite/settings.py
INSTALLED_APPS = [
'chat',
'django.contrib.admin',
'django.contrib.auth',
'django.contrib.contenttypes',
'django.contrib.sessions',
'django.contrib.messages',
'django.contrib.staticfiles',
]
Add the indexview
We will now create the first view, anindex view that lets you type the name of a chat room to join.
Create a templates directory in your chat directory. Within the templates directory you have just created,
create another directory called chat, and within that create a file
called index.htmlto hold the template for the index view.
Your chat directory should now looklike:
chat/
__init__.py
templates/
chat/
index.html
views.py
Put the following code in chat/templates/chat/index.html:
Chat Rooms
What chat room would you like to enter?
document.querySelector('#room-name-input').focus();
document.querySelector('#room-name-input').onkeyup = function(e) {
if (e.keyCode === 13) { // enter, return
document.querySelector('#room-name-submit').click();
}
};
document.querySelector('#room-name-submit').onclick = function(e) {
var roomName =document.querySelector('#room-name-input').value;
window.location.pathname = '/chat/'+ roomName + '/';
};
Create the view function for the room
view. Put the following code in chat/views.py:
# chat/views.py
from django.shortcuts import render
def index(request):
return render(request, 'chat/index.html', {})
To call the view, we need to map it to aURL - and for this we need a URLconf.
To create a URLconf in the chat directory,
create a file called urls.py. Your app directory should now looklike:
chat/
__init__.py
templates/
chat/
index.html
urls.py
views.py
In the chat/urls.pyfile include the following code:
# chat/urls.py
from django.conf.urls import url
from . import views
urlpatterns = [
url(r'^$', views.index, name='index'),
]
The next step is to point the root
URLconf at the chat.urls module. In mysite/urls.py, add an import for django.conf.urls.include and insert an include() in the urlpatternslist, so you have:
# mysite/urls.py
from django.conf.urls import include, url
from django.contrib import admin
urlpatterns = [
url(r'^chat/', include('chat.urls')),
url(r'^admin/', admin.site.urls),
]
Let’s verify that the index view works.Run the following command:
$ python3manage.py runserver
You’ll see the following output on thecommand line:
Performing system checks...
System check identified no issues (0 silenced).
You have 13 unapplied migration(s). Your project may not work properly until you apply the migrations for app(s): admin, auth, contenttypes, sessions.
Run 'python manage.py migrate' to apply them.
February 18, 2018 - 22:08:39
Django version 1.11.10, using settings 'mysite.settings'
Starting development server at http://127.0.0.1:8000/
Quit the server with CONTROL-C.
自此,仅仅是按照官网搭建了一个普通的django项目和app,并且安装了channels模块和配置,但是却没有把channels与django挂上钩!
官网也是这么说的:
Integratethe Channels library
So far we’ve justcreated a regular Django app; we haven’t used the Channels library at all. Nowit’s time to integrate Channels.
Let’s start by creating
a root routing configuration for Channels. A Channels routing configurationissimilar to a Django URLconf in that it tells Channels what code to run when anHTTP request is received by the Channels server.
We’ll start with an
empty routing configuration. Create a file mysite/routing.pyandinclude the following code:
# mysite/routing.py
from channels.routing importProtocolTypeRouter
application =ProtocolTypeRouter({
# (http->django views is added by default)
})
Now add the Channels
library to the list of installed apps. Edit the mysite/settings.py file
and add 'channels' to
the INSTALLED_APPSsetting.It’ll look like this:
# mysite/settings.py
INSTALLED_APPS =[
'channels',
'chat',
'django.contrib.admin',
'django.contrib.auth',
'django.contrib.contenttypes',
'django.contrib.sessions',
'django.contrib.messages',
'django.contrib.staticfiles',
]
You’ll also need to
point Channels at the root routing configuration. Edit the mysite/settings.pyfileagain and add the following to the bottom of it:
# mysite/settings.py
# Channels
ASGI_APPLICATION = 'mysite.routing.application'
With Channels now in the
installed apps, it will take control of the runservercommand, replacingthe standard Django development server with the Channels development server.
Let’s ensure that theChannels development server is working correctly. Run the following command:
$ python3 manage.py runserver
You’ll see the followingoutput on the command line:
Performingsystemchecks...
Systemcheckidentifiednoissues(0silenced).
Youhave13unappliedmigration(s).Yourprojectmaynotworkproperlyuntilyouapplythemigrationsforapp(s):admin,auth,contenttypes,sessions.
Run 'python manage.py migrate'toapplythem.
February 18, 2018 - 22:16:23
Djangoversion1.11.10,usingsettings'mysite.settings'
StartingASGI/Channelsdevelopmentserverathttp://127.0.0.1:8000/
QuittheserverwithCONTROL-C.
2018-02-18 22:16:23,729 -INFO-server-HTTP/2supportnotenabled(installthehttp2andtlsTwistedextras)
2018-02-18 22:16:23,730 -INFO-server-Configuringendpointtcp:port=8000:interface=127.0.0.1
2018-02-18 22:16:23,731 -INFO-server-ListeningonTCPaddress127.0.0.1:8000
出现了上面标红的部分,才表明是django与channels关联上了!因为在settings中,添加上了ASGI_APPLICATION,并且指定了asgi模式下的routing文件。如果没有做上述配置,启动时提示的信息是:
Starting development server at http://0.0.0.0:8002/
我这次也是在这块吃了很大的一个亏,混乱的配置,让我根本就没有使django与channels挂上钩,所以websocket自然就无法建立连接了!排查来排查去,都找不到原因,后来看官网,才发现,原来是asgi没有关联上的问题。重新按照官网,稳稳当当的配置一遍后,就成功了,关联上了channels,加载了routing,就可以解析websocket的请求到consumers了:

这里要在app(agent)下创建consumers.py,用来解析websocket请求:
from asgiref.sync import async_to_sync
from channels.generic.websocket import WebsocketConsumer
from channels.layers import get_channel_layer
channel_layer = get_channel_layer()
# WebsocketConsumer
class EchoConsumer(WebsocketConsumer):
def connect(self):
self.group_name = "agent"
async_to_sync(self.channel_layer.group_add)(self.group_name, self.channel_name)
# 返回给receive方法处理
self.accept()
def receive(self, text_data):
async_to_sync(
self.channel_layer.group_send)(
self.group_name,
{
"type": "user.message",
"text": text_data,
},
)
def user_message(self, event):
# 消费
self.send(text_data=event["text"])
# self.send(text_data=json.dumps({'text':"hahaha"}))
def disconnect(self, close_code):
async_to_sync(
self.channel_layer.group_discard)(self.group_name, self.channel_name)
值得一提的是,处理websocket的方式,这里引入了get_channel_layer的概念,它就像是一个接口一样,让所有的websocket都抛到这个接口中去,然后将这个接口中的websocket发送给前端做websocket解析,而这个接口不是独有的,而是共有的。这就表明,不光是在consumers中可以使用get_channel_layer,consumers外也可以向该接口中抛websocket,连接该接口的前端页面上,就都可以展示出具体的数据。
为此,还需要在settings中添加如下配置,使用redis来缓存websocket,具体还需要添加channels-redis模块:
# django-channels配置CHANNEL_LAYERS = {
"default": {
"BACKEND": "channels_redis.core.RedisChannelLayer",
"CONFIG": {
"hosts": [("172.16.2.222", 6379)],
},
},
}
这里需要注意,websocket的发起,是从前端页面中的js开始的,并且前端页面与后端建立了长连接,负责等待后端发来的websocket并解析出来:
var socket = new WebSocket('ws://' + window.location.host + '/ws/');
socket.onopen = function open() {
console.
log('WebSockets connection created.');
// socket.send("Hello world!")
};
socket.onerror = function error() {
console.
log('WebSockets connection error.');
};
socket.onmessage = function message(e) {
console.
log('WebSockets connection message.');
console.log(e.data)
$(
'#terms').append(e.data).append("
")
}
;
if
(socket.readyState == WebSocket.OPEN) {
socket.
onopen();
}
当前端页面呗访问时,就会自动发送websocket连接请求,因为是ws类型,所以解析时不走普通的urls,而是之前配置好的routing:

并最终解析到EchoConsumer类中,进而成功建立websocket连接!
当task中设定了阈值,比如cpu超过80,就会触发channels,向前端页面发送告警信息,这就属于在consumer意外向websocket发送信息,所以就要用到get_channel_layer:
if cpu > cpu_limit:
current_time = datetime.datetime.now().strftime(
'%Y-%m-%d %H:%M:%S')
channel_layer = get_channel_layer()
group_name = "agent"
async_to_sync(channel_layer.group_send)(
"agents",
{
"type": "user.message",
"text": str(current_time)+" CPU利用率已超过: "+str(cpu_limit)+"%,当前CPU利用率为: "+str(cpu)+"%",
},
)
最终在前端的页面js中,可以接收到后端发来的websocket信息,并且追加到页面上:

3. elasticsearch部分
以上,除数据库外,已经完成了全部的需求。但是当想切换django的数据库engine为elasticsearch时,却发现,django根本就不支持elasticsearch engine。只支持sqlite3,mysql,postgresql和oracle。查询中,发现有个django-elasticsearch-dsl可以将django与elasticsearch相关联。于是就分两步走,一个是安装elasticsearch数据库,通过kibana验证数据已经存入;然后再通过django-elasticsearch-dsl操作elasticsearch读写。
需要注意,kibana的版本必须要与es的版本一致才行,所以从需要下载kibana 6.8.2,修改es的连接地址后,就可以正常连接了,在控制台上可以看到对应的index和type:

这里走了点弯路,先是使用了docker方式部署的elasticsearch 7.2,开始一切都顺利。将settings中的配置CELERY_RESULT_BACKEND调整为如下:
CELERY_RESULT_BACKEND = 'elasticsearch://172.16.2.221:9200/elastic4/doc'
但是当按照django-elasticsearch-dsl官方提供的方式执行:./manage.py
search_index --rebuild
创建index时,就报错。查找原因,发现是我使用的elasticsearch版本的问题。官方明确规定了:
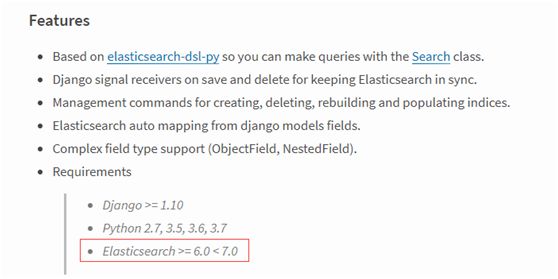
而我使用的es版本是7.2,所以出问题了。
补充一下:
django-elasticsearch-dsl官方地址:
https://pypi.org/project/django-elasticsearch-dsl/
InstallDjango Elasticsearch DSL:
pip install https://github.com/sabricot/django-elasticsearch-dsl/archive/6.4.1.tar.gz
Then add django_elasticsearch_dsltothe INSTALLED_APPS
You must
define ELASTICSEARCH_DSLinyour django settings.
For example:
ELASTICSEARCH_DSL={
'default': {
'hosts': 'localhost:9200'
},
}
ELASTICSEARCH_DSL is then passed to elasticsearch-dsl-py.connections.configure (see here).
Then for amodel:
# models.py
class Car(models.Model):
name=models.CharField()
color=models.CharField()
description=models.TextField()
type=models.IntegerField(choices=[
(1, "Sedan"),
(2, "Truck"),
(4, "SUV"),
])
To make this
model work with Elasticsearch, create a subclass of django_elasticsearch_dsl.Document, create a class Index inside the Document class to define your Elasticsearch indices, names,
settings etc and at last register the class using registry.register_document decorator.
It required to defined Documentclass in documents.pyin your app directory.
# documents.py
from django_elasticsearch_dsl importDocument
from django_elasticsearch_dsl.registries importregistry
from .models importCar
@registry.register_document
class CarDocument(Document):
class Index:
# Name of the Elasticsearch index
name='cars'
# See Elasticsearch Indices API reference for available settings
settings={'number_of_shards': 1,
'number_of_replicas': 0}
class Django:
model=Car# The model associated with this Document
# The fields of the model you want to be indexed in Elasticsearch
fields=[
'name',
'color',
'description',
'type',
]
# Ignore auto updating of Elasticsearch when a model is saved
# or deleted:
# ignore_signals = True
# Don't perform an index refresh after every update (overrides global setting):
# auto_refresh = False
# Paginate the django queryset used to populate the index with the specified size
# (by default there is no pagination)
# queryset_pagination = 5000
To create andpopulate the Elasticsearch index and mapping use the search_index command:
$ ./manage.py search_index --rebuild
Now, when youdo something like:
car=Car(
name="Car one",
color="red",
type=1,
description="A beautiful car"
)
car.save()
The object
will be saved in Elasticsearch too (using a signal handler). To get an elasticsearch-dsl-py Searchinstance, use:
s=CarDocument.search().filter("term",color="red")
# or
s=CarDocument.search().query("match",description="beautiful")
forhitins:
print(
"Car name : {}, description {}".format(hit.name,hit.description)
)
The previous
example returns a result specific to elasticsearch_dsl, but it is also possible to convert the elastisearch resultinto a real django queryset, just be aware that this costs a sql request toretrieve the model instances with the ids returned by the elastisearch query.
s=CarDocument.search().filter("term",color="blue")[:30]
qs=s.to_queryset()
# qs is just a django queryset and it is called with order_by to keep
# the same order as the elasticsearch result.
forcarinqs:
print(car.name)
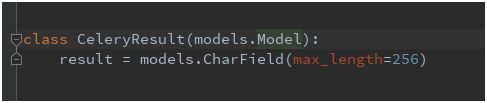
按照上述方法,我创建了一个model,只有一个result字段,因为我发现celery worker存储进来的数据,就只有result这一个字段,为了与es的model对应:
同时,创建documents.py:
@registry.register_document
class CeleryResultDocument(Document):
class Index:
# Name of the Elasticsearch index
name = 'elastic4'
# See Elasticsearch Indices API reference for available settings
settings = {'number_of_shards': 1,
'number_of_replicas': 0}
class Django:
model = CeleryResult
# The model associated with this Document
# The fields of the model you want to be indexed in Elasticsearch
fields = [
'result',
]
这里是将es的index(elastic4)与model(CeleryResult)关联起来。
成功后,就可以重建索引了:
./manage.py search_index --rebuild
如果重建索引,则es中对应数据库的内容就都没有了!!!这点需要注意!
还有一点需要注意,就是settings中配置的celery_result_backend配置为:elasticsearch://172.16.2.221:9200/elastic4/doc
这里如果不配置type名称,es就会默认创建一个。
这里相当于直接将数据存储到对应的es的elastic4数据库的doc表中。并且一个数据库只能有一个type(表)。如果设置向同一个数据库中的不同type下存储数据,就会引发异常报错,提示只能有一个type,不能同时存在两个type!
当一切问题都顺利解决后,就可以使用CeleryResultDocument来查询数据了,这里的逻辑不是django orm了,而是按照官网的方式,直接去es中查询数据出来。
#database为elasticsearch的解析方式。FBV
def user_list(request):
# s = CeleryResultDocument.search().filter("term", _type="doc")
#
默认只能展示10条数据,若想获得超过10条数据,则需要在此对from和size做设置
# [:100]表示从0开始取前100个数据
s = CeleryResultDocument.search().filter("term", _index="elastic4")[:100]
list= []
id =
0
for hit in s:
dict = {}
#将字符串转换成字典
dict = json.loads(hit.result)
#取出字典中的result的值,这些才是我需要的
resultList = dict.get("result")
id +=
1
#将获取到的数据封装成dict
dict['id'] = id
dict[
'hostname'] = resultList[0]
dict[
'cpu'] = resultList[1]
dict[
'mem'] = resultList[2]
dict[
'net_in'] = resultList[3]
dict[
'net_out'] = resultList[4]
list.append(dict)
context = {
'object_list': list}
return render(request, 'list.html',context)
固定写法,查出来的数据也是string类型,同样需要转换成dict,然后封装到list中,传回前台展示。值得注意的是这个切片处理:
s = CeleryResultDocument.search().filter("term", _index="elastic4")[:100]
如果不添加这个切片,前端只能默认显示10条数据,而这里做了切片后,就可以显示100条数据了。这真是最后一关啊!
最后的样子是这样的:

浏览器端展示的websocket信息:

数据是通过psutil采集的,celery负责异步调度周期性的执行数据抓取工作,同时对抓取的数据进行分析处理,如果超过阈值的,就通过channels实时发送给前端页面展示出来。
待扩展的功能:
jquery局部刷新数据功能,实现数据与异常并存。现在是如果刷新页面,之前的异常信息就不显示了,只能显示实时发送过来的。如果做成了局部数据刷新,那么二者就可以并存了。