原文python常用模块
稍作整理
1.time模块
常用表示时间方式: 时间戳,格式化的时间字符串,元组(struct_time)
1.UTC(Coordinated Universal Time,世界协调时)亦即格林威治天文时间,世界标准时间。在中国为UTC+8。DST(Daylight Saving Time)即夏令时。
2.时间戳(timestamp)的方式:通常来说,时间戳表示的是从1970年1月1日00:00:00开始按秒计算的偏移量。
3.元组(struct_time)方式:struct_time元组共有9个元素,返回struct_time的函数主要有gmtime(),localtime(),strptime()。
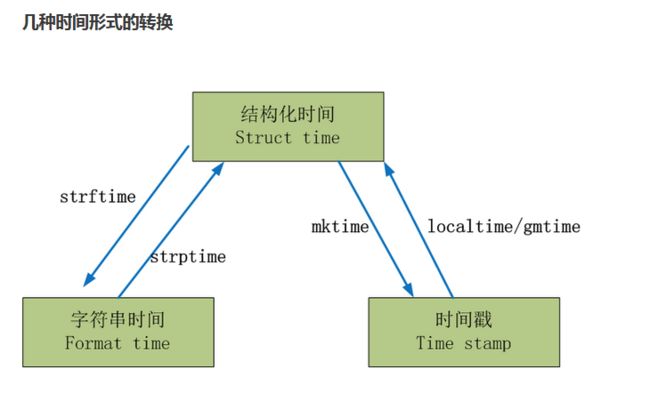 image.png
- 时间戳转换成struct_time
>>> import time
>>> time.time()
1513821691.159022
>>> time.gmtime()     # 转换的是UTC时间
time.struct_time(tm_year=2017, tm_mon=12, tm_mday=21, tm_hour=2, tm_min=1, tm_sec=40, tm_wday=3, tm_yday=355, tm_isdst=0)
>>> x = time.localtime()       #转换的是本地时间(UTC+8)
>>> print(x)
time.struct_time(tm_year=2017, tm_mon=12, tm_mday=21, tm_hour=10, tm_min=1, tm_sec=49, tm_wday=3, tm_yday=355, tm_isdst=0)

tm_wday(0-6)   星期一是0,星期天是6
- struct_time转换成时间戳
>>> time.mktime(x)        #x = time.localtime()
1513821709.0
3.struct_time转换成format_time
%a 本地(locale)简化星期名称
%A 本地完整星期名称
%b 本地简化月份名称
%B 本地完整月份名称
%c 本地相应的日期和时间表示
%d 一个月中的第几天(01 - 31)
%H 一天中的第几个小时(24小时制,00 - 23)
%I 第几个小时(12小时制,01 - 12)
%j 一年中的第几天(001 - 366)
%m 月份(01 - 12)
%M 分钟数(00 - 59)
%p 本地am或者pm的相应符 一
%S 秒(01 - 61) 二
%U 一年中的星期数。(00 - 53星期天是一个星期的开始。)第一个星期天之前的所有天数都放在第0周。
%w 一个星期中的第几天(0 - 6,0是星期天) 三
%W 和%U基本相同,不同的是%W以星期一为一个星期的开始。
%x 本地相应日期
%X 本地相应时间
%y 去掉世纪的年份(00 - 99)
%Y 完整的年份
%Z 时区的名字(如果不存在为空字符)
%% ‘%’字符
>>> import time
>>> time.time()
1513822266.5659332
>>> x = time.localtime()
>>> print(x)
time.struct_time(tm_year=2017, tm_mon=12, tm_mday=21, tm_hour=10, tm_min=11, tm_sec=31, tm_wday=3, tm_yday=355, tm_isdst=0)
>>>
>>> time.strftime("%Y%m%d %H:%M:%S",x)
'20171221 10:11:31'
>>>

#语法:
#strftime(format,[tuple])
- format_time转换成struct_time
>>> time.strftime("%Y%m%d %H:%M:%S",x)
'20171221 10:11:31'
>>>
>>>
>>> time.ct_time(tm_year=2017, tm_mon=12, tm_mday=21, tm_hour=10, tm_min=11, tm_sec=31, tm_wday=3, tm_yday=355, tm_isdst=-1)
用法:
strp('string',format
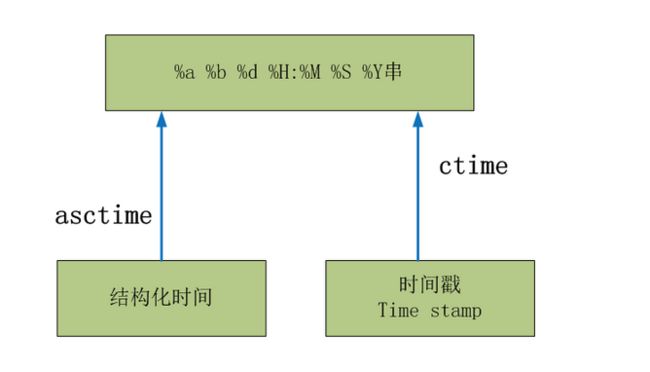
5.结构化时间转换成字符串时间
import time
x = time.localtime()
print(x)
print(time.asctime(x))

结果:
time.struct_time(tm_year=2017, tm_mon=12, tm_mday=21, tm_hour=10, tm_min=29, tm_sec=58, tm_wday=3, tm_yday=355, tm_isdst=0)

Thu Dec 21 10:29:58 2017
6.时间戳转换成字符串
>>> import time
>>> time.time()
1513823679.9577746
>>> print(time.ctime())
Thu Dec 21 10:34:50 2017
2.random模块
>>> import random
>>> random.random()    # 0~1 随机浮点数
0.6990063739837862
>>> random.randint(1,7)   #随机整数1~7
5
>>> random.randrange(1,7)   #随机整数,不包括7
4
>>> random.choice('hello world')   #获取一个随机元素
'l'
>>> random.choice(['1','2','3',])
'2'

>>> random.sample([1,2,3,4,5],3)
[1, 2, 4]
random.sample的函数原型为:random.sample(sequence, k),从指定
序列中随机获取指定长度的片
os模块
os.getcwd() #获取当前工作目录,即当前python脚本工作的目录路径

os.chdir()  #当前目录

os.chdir("dirname")  #改变当前脚本工作目录;相当于shell下cd    os.chdir(r"c:\Users")

os.curdir  #返回当前目录: ('.'),相当于shell下cd.

os.pardir # 获取当前目录的父目录字符串名:('..'),相当于shell下cd.. 返回上一层目录

os.makedirs('dirname1/dirname2')    #可生成多层递归目录      os.makedirs(r"c:\a\b\c")

os.removedirs('dirname1')    #若目录为空,则删除,并递归到上一级目录,如若也为空,则删除,依此类推      os.removedirs(r"c:\a\b\c")

os.mkdir('dirname')    #生成单级目录;相当于shell中mkdir dirname

os.rmdir('dirname')   # 删除单级空目录,若目录不为空则无法删除,报错;相当于shell中rmdir dirname

os.listdir('dirname')    #列出指定目录下的所有文件和子目录,包括隐藏文件,并以列表方式打印        os.listdir("c:\\test")

os.remove()  #删除一个文件                  os.remove(r"c:\oldboy.txt")

os.rename("oldname","newname")  #重命名文件/目录      os.rename("c:\\test","c:\\test2")

os.stat('path/filename') # 获取文件/目录信息          os.stat("c:\\test2")

os.sep    #输出操作系统特定的路径分隔符,win下为"\\",Linux下为"/"

os.linesep    #输出当前平台使用的行终止符,win下为"\r\n",Linux下为"\n"

os.pathsep    #输出用于分割文件路径的字符串

os.name    #输出字符串指示当前使用平台。win->'nt'; Linux->'posix'

os.system("bash command")  #运行shell命令,直接显示

os.environ  #获取系统环境变量

os.path.abspath(path)  #返回path规范化的绝对路径

os.path.split(path)  #将path分割成目录和文件名二元组返回

os.path.dirname(path)  #返回path的目录。其实就是os.path.split(path)的第一个元素

os.path.basename(path) # 返回path最后的文件名。如何path以/或\结尾,那么就会返回空值。即os.path.split(path)的第二个元素

os.path.exists(path)  #如果path存在,返回True;如果path不存在,返回False

os.path.isabs(path)  #如果path是绝对路径,返回True

os.path.isfile(path)  #如果path是一个存在的文件,返回True。否则返回False

os.path.isdir(path)  #如果path是一个存在的目录,则返回True。否则返回False

os.path.join(path1[, path2[, ...]])  #将多个路径组合后返回,第一个绝对路径之前的参数将被忽略

os.path.getatime(path)  #返回path所指向的文件或者目录的最后存取时间

os.path.getmtime(path)  #返回path所指向的文件或者目录的最后修改时间

os.path.getsize(path)  #返回path的大小
4.sys模块
sys.argv           命令行参数List,第一个元素是程序本身路径
sys.exit(n)        退出程序,正常退出时exit(0)
sys.version        获取Python解释程序的版本信息
sys.maxint         最大的Int值
sys.path           返回模块的搜索路径,初始化时使用PYTHONPATH环境变量的值
sys.platform       返回操作系统平台名称
5.shutil模块
高级的 文件、文件夹、压缩包 处理模块

shutil.copy(src, dst)
拷贝文件和权限

import shutil

shutil.copy('f1.log', 'f2.log')
shutil.copy2(src, dst)
拷贝文件和状态信息

shutil.copystat(src, dst)
仅拷贝状态的信息,包括:mode bits, atime, mtime, flags

shutil.copymode(src, dst)
仅拷贝权限。内容、组、用户均不变

shutil.copytree(src, dst, symlinks=False, ignore=None)
递归的去拷贝文件夹

shutil.rmtree(path[, ignore_errors[, onerror]])
递归的去删除文件
6.Json和pickle模块
什么是序列化?
我们把对象(变量)从内存中变成可存储或传输的过程称之为序列化
为什么要序列化?
1:持久保存状态
需知一个软件/程序的执行就在处理一系列状态的变化,在编程语言中,'状态'会以各种各样有结构的数据类型(也可简单的理解为变量)的形式被保存在内存中。
内存是无法永久保存数据的,当程序运行了一段时间,我们断电或者重启程序,内存中关于这个程序的之前一段时间的数据(有结构)都被清空了。
在断电或重启程序之前将程序当前内存中所有的数据都保存下来(保存到文件中),以便于下次程序执行能够从文件中载入之前的数据,然后继续执行,这就是序列化。
具体的来说,你玩使命召唤闯到了第13关,你保存游戏状态,关机走人,下次再玩,还能从上次的位置开始继续闯关。或如,虚拟机状态的挂起等。
2:跨平台数据交互
序列化之后,不仅可以把序列化后的内容写入磁盘,还可以通过网络传输到别的机器上,如果收发的双方约定好实用一种序列化的格式,那么便打破了平台/语言差异化带来的限制,实现了跨平台数据交互。
反过来,把变量内容从序列化的对象重新读到内存里称之为反序列化,即unpickling。
JSON和Python内置的数据类型对应如下:
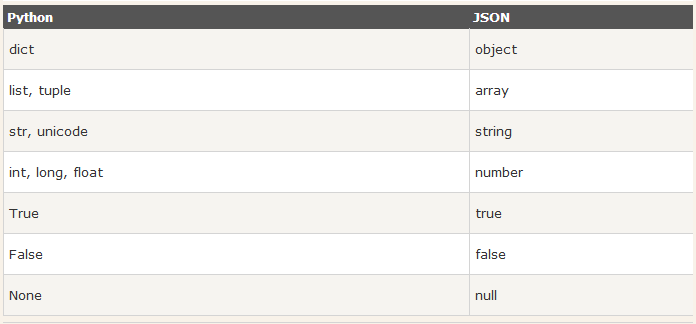 image.png
1 import json 2
 3 dic={'name':'alvin','age':23,'sex':'male'} 4 print(type(dic))#
 5
 6 j=json.dumps(dic) 7 print(type(j))#
 8
 9
10 f=open('序列化对象','w') 11 f.write(j)  #-------------------等价于json.dump(dic,f)
12 f.close() 13 #-----------------------------反序列化

14 import json 15 f=open('序列化对象') 16 data=json.loads(f.read())# 等价于data=json.load(f)

import json #dct="{'1':111}"#json 不认单引号 #dct=str({"1":111})#报错,因为生成的数据还是单引号:{'one': 1}
 dct='{"1":"111"}'
print(json.loads(dct)) #conclusion: # 无论数据是怎样创建的,只要满足json格式,就可以json.loads出来,不一定非要dumps的数据才能loads
代码")

实例

import json # 序列化
info = {'name':'derek','age':'22'}

with open('test','w') as f:
    f.write(json.dumps(info)) # 反序列化
with open('test','r') as f:
    info = json.loads(f.read()) print(info)
pickle (它只能用于Python)
 1 import pickle
 2
 3 dic={'name':'alvin','age':23,'sex':'male'}
 4
 5 print(type(dic))#
 6
 7 j=pickle.dumps(dic)
 8 print(type(j))#
 9
10
11 f=open('序列化对象_pickle','wb')#注意是w是写入str,wb是写入bytes,j是'bytes'
12 f.write(j)  #-------------------等价于pickle.dump(dic,f)
13
14 f.close()
15 #-------------------------反序列化
16 import pickle
17 f=open('序列化对象_pickle','rb')
18
19 data=pickle.loads(f.read())#  等价于data=pickle.load(f)
20
21
22 print(data['age'])
总结:
Json模块提供了四个功能:dumps、dump、loads、load
pickle模块提供了四个功能:dumps、dump、loads、load
dump()函数接受一个文件句柄和一个数据对象作为参数,把数据对象以特定的格式保存 到给定的文件中。当我们使用load()函数从文件中取出已保存的对象时,pickle知道如何恢复这些对象到它们本来的格式。
dumps()函数执行和dump() 函数相同的序列化。取代接受流对象并将序列化后的数据保存到磁盘文件,这个函数简单的返回序列化的数据。
loads()函数执行和load() 函数一样的反序列化。取代接受一个流对象并去文件读取序列化后的数据,它接受包含序列化后的数据的str对象, 直接返回的对象。
7.configparser模块
用于生成和修改常见配置文档
配置文件
[default]
serveraliveinterval = 45
compression = yes
compressionlevel = 9

[bitbucket.org]
user = hg

[topsecret.server.com]
port = 50022
forwardx11 = no
用python生成这样的一个配置文档
import configparser

config = configparser.ConfigParser()
config['default'] = {'ServerAliveInterval':'45',
                     'Compression':'yes',
                     'CompressionLevel':'9'}

config['bitbucket.org'] = {}
config['bitbucket.org']['User'] = 'hg'


config['topsecret.server.com'] = {'port':'50022',
                                'Forwardx11':'no'}

with open('example.ini','w') as configfile:
    config.write(configfile)
读取
import configparser

config = configparser.ConfigParser()
print(config.read('example.ini'))

#查看所有的标题
print(config.sections())
#['default', 'bitbucket.org', 'topsecret.server.com']

#查看标题section1下所有key=value的key
options = config.options('default')
print(options)
#['serveraliveinterval', 'compression', 'compressionlevel']

#查看标题section1下所有key=value的(key,value)格式
items_list = config.items('topsecret.server.com')
print(items_list)
#[('port', '50022'), ('forwardx11', 'no')]
增删改查
import configparser

config = configparser.ConfigParser()
config.read('example.ini',encoding = 'utf-8')

#删除整个标题
config.remove_section('bitbucket.org')

#删除标题下的option
config.remove_option('topsecret.server.com','port')

#添加一个标题
config.add_section('info')
#在标题下添加options
config.set('info','name','derek')

#判断是否存在
print(config.has_section('info'))        #True
print(config.has_option('info','name'))    #True

#将修改的内容存入文件
config.write(open('new_example.ini','w'))
#修改后的文件

[default]
serveraliveinterval = 45
compression = yes
compressionlevel = 9

[topsecret.server.com]
forwardx11 = no

[info]
name = derek
8.hashlib模块
hash:一种算法 ,3.x里代替了md5模块和sha模块,主要提供 SHA1, SHA224, SHA256, SHA384, SHA512 ,MD5 算法
三个特点:
1.内容相同则hash运算结果相同,内容稍微改变则hash值则变
2.不可逆推
3.相同算法:无论校验多长的数据,得到的哈希值长度固定。
 1 import hashlib
 2
 3 m=hashlib.md5()# m=hashlib.sha256()
 4
 5 m.update('hello'.encode('utf8'))
 6 print(m.hexdigest())  #5d41402abc4b2a76b9719d911017c592
 7
 8 m.update('alvin'.encode('utf8'))
 9
10 print(m.hexdigest())  #92a7e713c30abbb0319fa07da2a5c4af
11
12 m2=hashlib.md5()
13 m2.update('helloalvin'.encode('utf8'))
14 print(m2.hexdigest()) #92a7e713c30abbb0319fa07da2a5c4af
15
16 '''
17 注意:把一段很长的数据update多次,与一次update这段长数据,得到的结果一样
18 但是update多次为校验大文件提供了可能。
9.re模块

# 正则匹配
import re

# \w与\W 字母数字下划线
print(re.findall('\w', 'hello derek \n 123'))
print(re.findall('\W', 'hello derek \n 123'))
# ['h', 'e', 'l', 'l', 'o', 'd', 'e', 'r', 'e', 'k', '1', '2', '3']
# [' ', ' ', '\n', ' ']

# \s与\S  匹配任意空白字符
print(re.findall('\s', 'hello  egon  123'))  # [' ', ' ', ' ', ' ']
print(re.findall('\S', 'hello  egon  123'))  # ['h', 'e', 'l', 'l', 'o', 'e', 'g', 'o', 'n', '1', '2', '3']

# \n \t都是空,都可以被\s匹配
print(re.findall('\s', 'hello \n egon \t 123'))  # [' ', '\n', ' ', ' ', '\t', ' ']

# \n与\t
print(re.findall(r'\n', 'hello egon \n123'))  # ['\n']
print(re.findall(r'\t', 'hello egon\t123'))  # ['\n']

# \d与\D
print(re.findall('\d', 'hello egon 123'))  # ['1', '2', '3']
print(re.findall('\D', 'hello egon 123'))  # ['h', 'e', 'l', 'l', 'o', ' ', 'e', 'g', 'o', 'n', ' ']

# \A与\Z   \A  匹配字符串开始  \Z 匹配字符串结束
print(re.findall('\Ahe', 'hello egon 123'))  # ['he'],\A==>^
print(re.findall('123\Z', 'hello egon 123'))  # ['he'],\Z==>$

# ^与$
print(re.findall('^h', 'hello egon 123'))  # ['h']
print(re.findall('3$', 'hello egon 123'))  # ['3']

# 重复匹配:| . | * | ? | .* | .*? | + | {n,m} |
# .  匹配任意字符,除了换行符,除非re.DOTALL标记
print(re.findall('a.b', 'a1b'))  # ['a1b']
# a和b中间匹配任意一个字符
print(re.findall('a.b', 'a1b a*b a b aaab'))  # ['a1b', 'a*b', 'a b', 'aab']
print(re.findall('a.b', 'a\nb'))  # []
print(re.findall('a.b', 'a\nb', re.S))  # ['a\nb']
print(re.findall('a.b', 'a\nb', re.DOTALL))  # ['a\nb']同上一条意思一样
print(re.findall('a...b', 'a123b'))  # ['a123b']

# *匹配*号前的字符0次或多次
print(re.findall('ab*', 'bbbbbbb'))  # []
print(re.findall('ab*', 'a'))  # ['a']
print(re.findall('ab*', 'abbbb'))  # ['abbbb']
print(re.findall('ab*', 'abababbabbbb'))  # ['ab', 'ab', 'abb', 'abbbb']

# ?   匹配前一个字符1次或0次
print(re.findall('ab?', 'a'))  # ['a']
print(re.findall('ab?', 'abbb'))  # ['ab']
# 匹配所有包含小数在内的数字
print(re.findall('\d+\.?\d*', "asdfasdf123as1.13dfa12adsf1asdf3"))  # ['123', '1.13', '12', '1', '3']

# .*默认为贪婪匹配
print(re.findall('a.*b', 'a1b22222222b'))  # ['a1b22222222b']

# .*?为非贪婪匹配:推荐使用
print(re.findall('a.*?b', 'a1b22222222b'))  # ['a1b']

# +   匹配前一个字符1次或多次
print(re.findall('ab+', 'abbaabb'))  # ['abb', 'abb']
print(re.findall('ab+', 'abbb'))  # ['abbb']

# {n,m}  匹配前一个字符n到m次
print(re.findall('ab{2}', 'abbb'))  # ['abb']
print(re.findall('ab{2,4}', 'abbb'))  # ['abb']
print(re.findall('ab{1,}', 'abbb'))  # 'ab{1,}' ===> 'ab+'
print(re.findall('ab{0,}', 'abbb'))  # 'ab{0,}' ===> 'ab*'

# []
print(re.findall('a[1*-]b', 'a1b a*b a-b'))  # []内的都为普通字符了,且如果-没有被转意的话,应该放到[]的开头或结尾
print(re.findall('a[^1*-]b', 'a1b a*b a-b a=b'))  # []内的^代表的意思是取反,所以结果为['a=b']
print(re.findall('a[0-9]b', 'a1b a*b a-b a=b'))  # []内的^代表的意思是取反,所以结果为['a=b']
print(re.findall('a[a-z]b', 'a1b a*b a-b a=b aeb'))  # []内的^代表的意思是取反,所以结果为['a=b']
print(re.findall('a[a-zA-Z]b', 'a1b a*b a-b a=b aeb aEb'))  # []内的^代表的意思是取反,所以结果为['a=b']

# \# print(re.findall('a\\c','a\c')) #对于正则来说a\\c确实可以匹配到a\c,但是在python解释器读取a\\c时,会发生转义,然后交给re去执行,所以抛出异常
print(re.findall(r'a\\c', 'a\c'))  # r代表告诉解释器使用rawstring,即原生字符串,把我们正则内的所有符号都当普通字符处理,不要转义
print(re.findall('a\\\\c', 'a\c'))  # 同上面的意思一样,和上面的结果一样都是['a\\c']

# (): 匹配括号里面的内容
print(re.findall('ab+', 'ababab123'))  # ['ab', 'ab', 'ab']
print(re.findall('(ab)+123', 'ababab123'))  # ['ab'],匹配到末尾的ab123中的ab
print(re.findall('(?:ab)+123', 'ababab123'))  # findall的结果不是匹配的全部内容,而是组内的内容,?:可以让结果为匹配的全部内容

# |
print(re.findall('compan(?:y|ies)', 'Too many companies have gone bankrupt, and the next one is my company'))
一些方法
# ===========================re模块提供的方法介绍===========================
import re
#1
print(re.findall('e','alex make love') )   #['e', 'e', 'e'],返回所有满足匹配条件的结果,放在列表里
#2
print(re.search('e','alex make love').group()) #e,只到找到第一个匹配然后返回一个包含匹配信息的对象,该对象可以通过调用group()方法得到匹配的字符串,如果字符串没有匹配,则返回None。

#3
print(re.match('e','alex make love'))    #None,同search,不过在字符串开始处进行匹配,完全可以用search+^代替match

#4
print(re.split('[ab]','abcd'))     #['', '', 'cd'],先按'a'分割得到''和'bcd',再对''和'bcd'分别按'b'分割

#5
print('===>',re.sub('a','A','alex make love')) #===> Alex mAke love,不指定n,默认替换所有
print('===>',re.sub('a','A','alex make love',1)) #===> Alex make love
print('===>',re.sub('a','A','alex make love',2)) #===> Alex mAke love
print('===>',re.sub('^(\w+)(.*?\s)(\w+)(.*?\s)(\w+)(.*?)$',r'\5\2\3\4\1','alex make love')) #===> love make alex

print('===>',re.subn('a','A','alex make love')) #===> ('Alex mAke love', 2),结果带有总共替换的个数


#6
obj=re.compile('\d{2}')

print(obj.search('abc123eeee').group()) #12
print(obj.findall('abc123eeee')) #['12'],重用了obj
10.shelve模块
shelve模块比pickle模块简单,只有一个open函数,返回类似字典的对象,可读可写;key必须为字符串,而值可以是python所支持的数据类型
import shelve

f=shelve.open(r'sheve.txt')
# f['stu1_info']={'name':'egon','age':18,'hobby':['piao','smoking','drinking']}
# f['stu2_info']={'name':'gangdan','age':53}
# f['school_info']={'website':'http://www.pypy.org','city':'beijing'}

print(f['stu1_info']['hobby'])
f.close()
11.logging模块
很多程序都有记录日志的需求,并且日志中包含的信息即有正常的程序访问日志,还可能有错误、警告等信息输出,python的logging模块提供了标准的日志接口,你可以通过它存储各种格式的日志,logging的日志可以分为 debug、info、warning、error、critical5个级别
1.模块初始
import logging

logging.warning('wrong password more than 3 times')
logging.critical('server is down')
logging.error('error message')


结果:
WARNING:root:wrong password more than 3 times
CRITICAL:root:server is down
ERROR:root:error message
2.logging模块五个级别
