@TOC
实现方案:OAuth2.0+JWT+Spring Security
一、 SSO简介
1.1 单点登录定义
单点登录(Single sign on),英文名称缩写SSO,SSO的意思就是在多系统的环境中,登录单方系统,就可以在不用再次登录的情况下访问相关受信任的系统。也就是说只要登录一次单体系统就可以。
1.2 单点登录角色
单点登录一般包括下面三种角色:
①用户(多个);
②认证中心(一个);
③Web应用(多个)。
PS:这里所说的web应用可以理解为SSO Client,认证中心可以说是SSO Server。
1.3 单点登录分类
因为http协议是无状态的协议,所以要保持登录状态,必须要存储登录信息,按照存储方式,单点登录实现方式主要可以分为两种。
- 一种是基于Cookie的,这种比较常见,比如下文介绍的CAS也是基于Cookie的;
- 另外一种是基于Session的,其实理解起来就是会话共享,只有实现不同子系统之间的会话共享就能实现单点登录,详情可以参考我之前的博客,就是实现会话共享实现单点登录的,https://blog.csdn.net/u014427391/article/details/78653482
二、OAuth2.0
2.1 OAuth2.0简介
OAuth是一种开放协议, 允许用户让第三方应用以安全且标准的方式获取该用户在某一网站,移动或者桌面应用上存储的秘密的资源(如用户个人信息,照片,视频,联系人列表),而无需将用户名和密码提供给第三方应用。
官网:https://oauth.net/2/ ,官网只有英文版文档,您也可以参考翻译过来的文档,链接:OAuth2 RFC6749中文翻译
OAuth 1.0协议(RFC5849)作为一个指导性文档发布,是一个小社区的工作成果。
本标准化规范在OAuth 1.0的部署经验之上构建,也包括其他使用案例以及从更广泛的IETF社区收集到的可扩展性需求。
OAuth 2.0协议不向后兼容OAuth 1.0。这两个版本可以在网络上共存,实现者可以选择同时支持他们。
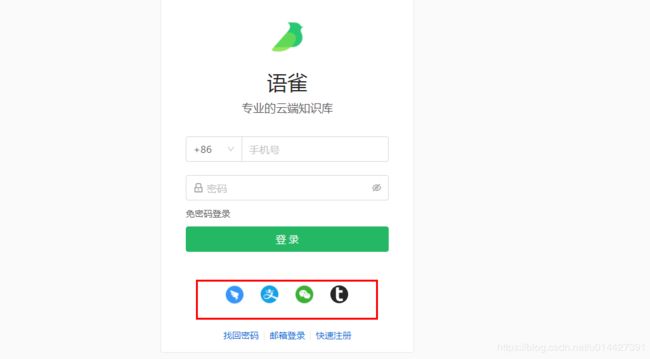
OAuth2.0在安全性方面做了比较大的提高,简单来说OAuth2.0就是一种授权协议,可以用来授权,顺便点个网站,如图这种微信、支付宝登录就是OAuth2.0的应用
2.2 OAuth2.0角色
OAuth2.0定义如下角色:
- 资源所有者(Resource Owner): 能够许可受保护资源访问权限的实体。当资源所有者是个人时,它作为最终用户被提及。
- 用户代理(User Agent): 指的的资源拥有者授权的一些渠道。一般指的是浏览器、APP
- 客户端(Client) 使用资源所有者的授权代表资源所有者发起对受保护资源的请求的应用程序。术语“客户端”并非特指任何特定的的实现特点(例如:应用程序是否在服务器、台式机或其他设备上执行)。
- 授权服务器(Authorization Server): 在成功验证资源所有者且获得授权后颁发访问令牌给客户端的服务器。
授权服务器和资源服务器之间的交互超出了本规范的范围。授权服务器可以和资源服务器是同一台服务器,也可以是分离的个体。一个授权服务器可以颁发被多个资源服务器接受的访问令牌。- 资源服务器(Resource Server): 托管受保护资源的服务器,能够接收和响应使用访问令牌对受保护资源的请求。
2.3 协议流程
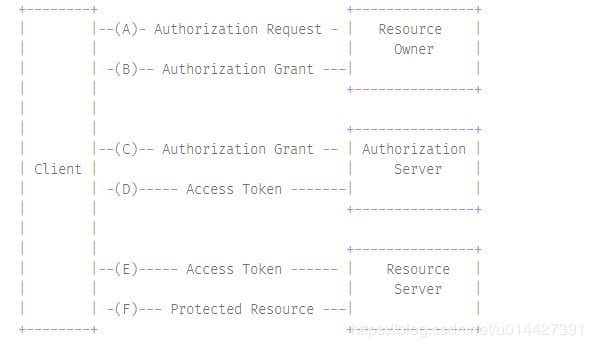
引用OAuth2 RFC6749中文翻译:
(A)客户端向从资源所有者请求授权。授权请求可以直接向资源所有者发起(如图所示),或者更可取的是通过作为中介的授权服务器间接发起。
(B)客户端收到授权许可,这是一个代表资源所有者的授权的凭据,使用本规范中定义的四种许可类型之一或 者使用扩展许可类型表示。授权许可类型取决于客户端请求授权所使用的方式以及授权服务器支持的类型。
(C)客户端与授权服务器进行身份认证并出示授权许可请求访问令牌。
(D)授权服务器验证客户端身份并验证授权许可,若有效则颁发访问令牌。
(E)客户端从资源服务器请求受保护资源并出示访问令牌进行身份验证。
(F)资源服务器验证访问令牌,若有效则满足该请求。
2.4 授权模式
OAuth2.0有4种授权模式:
- 授权码
- 隐式授权
- 资源所有者密码凭据
- 客户端凭据
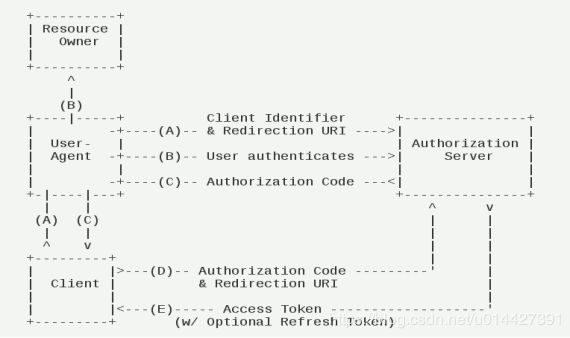
其中最常用的是授权码模式,授权模式的详细介绍可以参考阮一峰老师的:OAuth 2.0 的四种方式
官方的授权码模式流程图:
三、单点登录实现
3.1 环境准备
- IntelliJ IDEA
-
Maven3.+版本
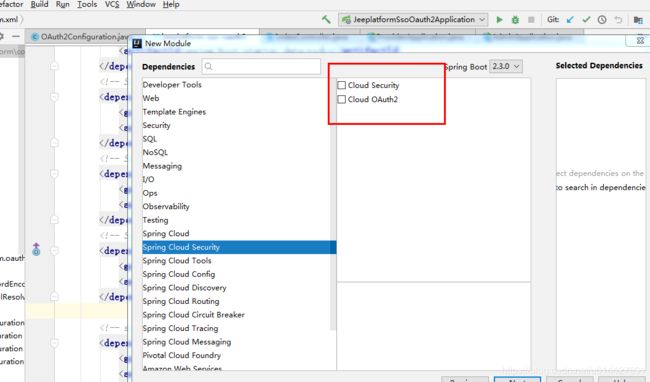
新建SpringBoot Initializer项目
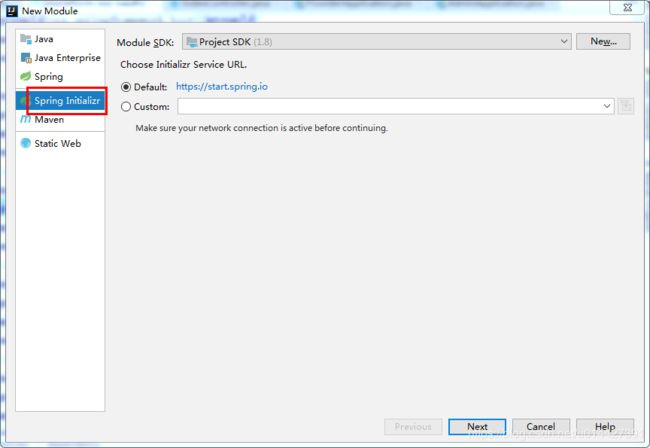 在这里插入图片描述

主要是想引入:
            org.springframework.cloud
            spring-cloud-starter-oauth2


            org.springframework.cloud
            spring-cloud-starter-security
schema脚本:官方提供的所有脚本:链接,官方脚本是HSQL数据库,所以我们改成mysql版,如参考代码:
-- used in tests that use MYSQL
CREATE TABLE oauth_client_details (
  client_id VARCHAR(128) PRIMARY KEY,
  resource_ids VARCHAR(128),
  client_secret VARCHAR(128),
  scope VARCHAR(128),
  authorized_grant_types VARCHAR(128),
  web_server_redirect_uri VARCHAR(128),
  authorities VARCHAR(128),
  access_token_validity INTEGER,
  refresh_token_validity INTEGER,
  additional_information VARCHAR(4096),
  ENABLE TINYINT(1) DEFAULT '1',
  autoapprove VARCHAR(128)
);

CREATE TABLE oauth_client_token (
  token_id VARCHAR(128),
  token BLOB,
  authentication_id VARCHAR(128) PRIMARY KEY,
  user_name VARCHAR(128),
  client_id VARCHAR(128)
);

CREATE TABLE oauth_access_token (
  token_id VARCHAR(128),
  token BLOB,
  authentication_id VARCHAR(128) PRIMARY KEY,
  user_name VARCHAR(128),
  client_id VARCHAR(128),
  authentication BLOB,
  refresh_token VARCHAR(128)
);


CREATE TABLE oauth_refresh_token (
  token_id VARCHAR(128),
  token BLOB,
  authentication BLOB
);


CREATE TABLE oauth_code (
  CODE VARCHAR(128), authentication BLOB
);

CREATE TABLE oauth_approvals (
    userId VARCHAR(128),
    clientId VARCHAR(128),
    scope VARCHAR(128),
    STATUS VARCHAR(10),
    expiresAt TIMESTAMP,
    lastModifiedAt TIMESTAMP DEFAULT CURRENT_TIMESTAMP
);

-- customized oauth_client_details table
CREATE TABLE ClientDetails (
  appId VARCHAR(128) PRIMARY KEY,
  resourceIds VARCHAR(128),
  appSecret VARCHAR(128),
  scope VARCHAR(128),
  grantTypes VARCHAR(128),
  redirectUrl VARCHAR(128),
  authorities VARCHAR(128),
  access_token_validity INTEGER,
  refresh_token_validity INTEGER,
  additionalInformation VARCHAR(4096),
  autoApproveScopes VARCHAR(128)
);
本博客只用到oauth_client_details 这张表
3.2 OAuth2.0授权服务器
3.2.1 新建SpringBoot项目
新建SpringBoot Initializer项目,可以命名为Oauth2-server


3.2.2 @EnableResourceServer注解
启动类加上@EnableResourceServer注解:
import org.springframework.boot.SpringApplication;
import org.springframework.boot.autoconfigure.SpringBootApplication;
import org.springframework.security.oauth2.config.annotation.web.configuration.EnableResourceServer;

@SpringBootApplication
@EnableResourceServer
public class JeeplatformSsoOauth2Application {

    public static void main(String[] args) {
        SpringApplication.run(JeeplatformSsoOauth2Application.class, args);
    }

}
3.2.3 OAuth2.0配置类
环境准备,要写点配置数据,如果要用内存方式,就在代码里实现
insert into `oauth_client_details` (`client_id`, `resource_ids`, `client_secret`, `scope`, `authorized_grant_types`, `web_server_redirect_uri`, `authorities`, `access_token_validity`, `refresh_token_validity`, `additional_information`, `autoapprove`) values('cms',NULL,'{noop}secret','all','authorization_code','http://localhost:8084/cms/login',NULL,'60','60',NULL,'true');
insert into `oauth_client_details` (`client_id`, `resource_ids`, `client_secret`, `scope`, `authorized_grant_types`, `web_server_redirect_uri`, `authorities`, `access_token_validity`, `refresh_token_validity`, `additional_information`, `autoapprove`) values('oa',NULL,'{noop}secret','all','authorization_code','http://localhost:8082/oa/login',NULL,'60','60',NULL,'true');
OAuth2.0配置类:
package org.muses.jeeplatform.oauth.configuration;

import org.springframework.beans.factory.annotation.Autowired;
import org.springframework.beans.factory.annotation.Qualifier;
import org.springframework.context.annotation.Bean;
import org.springframework.context.annotation.Configuration;
import org.springframework.http.HttpMethod;
import org.springframework.security.authentication.AuthenticationManager;
import org.springframework.security.core.userdetails.UserDetailsService;
import org.springframework.security.crypto.bcrypt.BCryptPasswordEncoder;
import org.springframework.security.oauth2.common.DefaultOAuth2AccessToken;
import org.springframework.security.oauth2.common.OAuth2AccessToken;
import org.springframework.security.oauth2.config.annotation.configurers.ClientDetailsServiceConfigurer;
import org.springframework.security.oauth2.config.annotation.web.configuration.AuthorizationServerConfigurerAdapter;
import org.springframework.security.oauth2.config.annotation.web.configuration.EnableAuthorizationServer;
import org.springframework.security.oauth2.config.annotation.web.configurers.AuthorizationServerEndpointsConfigurer;
import org.springframework.security.oauth2.config.annotation.web.configurers.AuthorizationServerSecurityConfigurer;
import org.springframework.security.oauth2.provider.OAuth2Authentication;
import org.springframework.security.oauth2.provider.token.DefaultTokenServices;
import org.springframework.security.oauth2.provider.token.TokenStore;
import org.springframework.security.oauth2.provider.token.store.JwtAccessTokenConverter;
import org.springframework.security.oauth2.provider.token.store.JwtTokenStore;

import javax.annotation.Resource;
import javax.sql.DataSource;
import java.util.Collections;
import java.util.HashMap;
import java.util.Map;
import java.util.concurrent.TimeUnit;

/**
 *
 *  OAuth2.0配置
 *
 *
 *
 * @author mazq
 * 修改记录
 *    修改后版本:     修改人:  修改日期: 2020/04/29 15:06  修改内容:
 *
 */
@Configuration
//开启授权服务
@EnableAuthorizationServer
public class OAuth2Configuration extends AuthorizationServerConfigurerAdapter {

    @Autowired
    private AuthenticationManager authenticationManager;
    @Resource(name = "userService")
    private UserDetailsService userDetailsService;

    @Autowired
    @Qualifier("dataSource")
    private DataSource dataSource;

    private static final String CLIENT_ID = "cms";
    private static final String SECRET_CHAR_SEQUENCE = "{noop}secret";
    private static final String SCOPE_READ = "read";
    private static final String SCOPE_WRITE = "write";
    private static final String TRUST = "trust";
    private static final String USER ="user";
    private static final String ALL = "all";
    private static final int ACCESS_TOKEN_VALIDITY_SECONDS = 2*60;
    private static final int FREFRESH_TOKEN_VALIDITY_SECONDS = 2*60;
    // 密码模式授权模式
    private static final String GRANT_TYPE_PASSWORD = "password";
    //授权码模式
    private static final String AUTHORIZATION_CODE = "authorization_code";
    //refresh token模式
    private static final String REFRESH_TOKEN = "refresh_token";
    //简化授权模式
    private static final String IMPLICIT = "implicit";
    //指定哪些资源是需要授权验证的
    private static final String RESOURCE_ID = "resource_id";

    @Override
    public void configure(ClientDetailsServiceConfigurer clients) throws Exception {
        /*clients
                // 使用内存存储
                .inMemory()
                //标记客户端id
                .withClient(CLIENT_ID)
                //客户端安全码
                .secret(SECRET_CHAR_SEQUENCE)
                //为true 直接自动授权成功返回code
                .autoApprove(true)
                .redirectUris("http://127.0.0.1:8084/cms/login") //重定向uri
                //允许授权范围
                .scopes(ALL)
                //token 时间秒
                .accessTokenValiditySeconds(ACCESS_TOKEN_VALIDITY_SECONDS)
                //刷新token 时间 秒
                .refreshTokenValiditySeconds(FREFRESH_TOKEN_VALIDITY_SECONDS)
                //允许授权类型
                .authorizedGrantTypes(GRANT_TYPE_PASSWORD , AUTHORIZATION_CODE , REFRESH_TOKEN , IMPLICIT);*/
        // 数据库保存配置信息到oauth_client_details表,schema参考sql/oauth_client_details
        clients.jdbc(dataSource);
    }

    @Override
    public void configure(AuthorizationServerEndpointsConfigurer endpoints) throws Exception {
        endpoints.tokenStore(jwtTokenStore()).authenticationManager(authenticationManager)
                .accessTokenConverter(accessTokenConverter())
                //必须注入userDetailsService否则根据refresh_token无法加载用户信息
                .userDetailsService(userDetailsService)
                //支持获取token方式
                .allowedTokenEndpointRequestMethods(HttpMethod.GET, HttpMethod.POST,HttpMethod.PUT,HttpMethod.DELETE,HttpMethod.OPTIONS)
                //刷新token
                .reuseRefreshTokens(true);
                //endpoints.tokenServices(createDefaultTokenServices());
        // 使用内存保存生成的token
        //endpoints.authenticationManager(authenticationManager).tokenStore(memoryTokenStore());
    }

    /**
     * 认证服务器的安全配置
     *
     * @param security
     * @throws Exception
     */
    @Override
    public void configure(AuthorizationServerSecurityConfigurer security) throws Exception {
        security
                //.realm(RESOURCE_ID)
                // 开启/oauth/token_key验证端口认证权限访问
                .tokenKeyAccess("isAuthenticated()")
                //  开启/oauth/check_token验证端口认证权限访问
                .checkTokenAccess("isAuthenticated()")
                //允许表单认证 在授权码模式下会导致无法根据code获取token
                .allowFormAuthenticationForClients();
    }

    @Bean
    public JwtAccessTokenConverter accessTokenConverter(){
        JwtAccessTokenConverter converter = new JwtAccessTokenConverter(){
            @Override
            public OAuth2AccessToken enhance(OAuth2AccessToken accessToken, OAuth2Authentication authentication) {
                String grantType = authentication.getOAuth2Request().getGrantType();
                //授权码和密码模式才自定义token信息
                if(AUTHORIZATION_CODE.equals(grantType) || GRANT_TYPE_PASSWORD.equals(grantType)) {
                    String userName = authentication.getUserAuthentication().getName();
                    // 自定义一些token 信息
                    Map additionalInformation = new HashMap(16);
                    additionalInformation.put("user_name", userName);
                    additionalInformation = Collections.unmodifiableMap(additionalInformation);
                    ((DefaultOAuth2AccessToken) accessToken).setAdditionalInformation(additionalInformation);
                }
                OAuth2AccessToken token = super.enhance(accessToken, authentication);
                return token;
            }
        };
        // 设置签署key
        converter.setSigningKey("bcrypt");
        return converter;
    }

    @Bean
    public TokenStore jwtTokenStore() {
        //基于jwt实现令牌(Access Token)保存
        return new JwtTokenStore(accessTokenConverter());
    }

//    @Bean
//    public TokenStore memoryTokenStore() {
//        // 最基本的InMemoryTokenStore生成token
//        return new InMemoryTokenStore();
//    }


}
3.2.4 SpringSecurity配置
package org.muses.jeeplatform.oauth.configuration;


import org.muses.jeeplatform.oauth.component.CustomPasswordEncoder;
import org.muses.jeeplatform.oauth.filter.SimpleCORSFilter;
import org.springframework.beans.factory.annotation.Autowired;
import org.springframework.boot.autoconfigure.EnableAutoConfiguration;
import org.springframework.context.annotation.Bean;
import org.springframework.context.annotation.Configuration;
import org.springframework.core.annotation.Order;
import org.springframework.security.authentication.AuthenticationManager;
import org.springframework.security.config.annotation.authentication.builders.AuthenticationManagerBuilder;
import org.springframework.security.config.annotation.method.configuration.EnableGlobalMethodSecurity;
import org.springframework.security.config.annotation.web.builders.HttpSecurity;
import org.springframework.security.config.annotation.web.builders.WebSecurity;
import org.springframework.security.config.annotation.web.configuration.EnableWebSecurity;
import org.springframework.security.config.annotation.web.configuration.WebSecurityConfigurerAdapter;
import org.springframework.security.core.userdetails.UserDetailsService;
import org.springframework.security.crypto.bcrypt.BCryptPasswordEncoder;
import org.springframework.security.crypto.password.PasswordEncoder;
import org.springframework.security.web.context.SecurityContextPersistenceFilter;


import javax.annotation.Resource;

/**
 *
 *
 *
 *
 *
 * @author mazq
 * 修改记录
 *    修改后版本:     修改人:  修改日期: 2020/04/30 15:58  修改内容:
 *
 */
@Configuration
@EnableWebSecurity
@Order(1)
//@EnableGlobalMethodSecurity(prePostEnabled = true)
//@EnableAutoConfiguration(exclude = {
//        org.springframework.boot.autoconfigure.security.servlet.SecurityAutoConfiguration.class })
public class SecurityConfiguration extends WebSecurityConfigurerAdapter {
    @Autowired
    private SimpleCORSFilter simpleCORSFilter;

    @Resource(name = "userService")
    private UserDetailsService userDetailsService;

    private static final String SECRET_CHAR_SEQUENCE = "secret";

    @Bean
    @Override
    public AuthenticationManager authenticationManagerBean() throws Exception {
        return super.authenticationManagerBean();
    }


    @Override
    protected void configure(AuthenticationManagerBuilder auth) throws Exception {    //auth.inMemoryAuthentication()
//        auth.inMemoryAuthentication()
//                .withUser("nicky")
//                .password("{noop}123")
//                .roles("admin");
        auth.userDetailsService(userDetailsService)
                .passwordEncoder(new CustomPasswordEncoder());
        auth.parentAuthenticationManager(authenticationManagerBean());

    }

    @Override
    public void configure(WebSecurity web) throws Exception {
        //解决静态资源被拦截的问题
        web.ignoring().antMatchers("/asserts/**");
        //web.ignoring().antMatchers("/favicon.ico");

    }

    @Override
    protected void configure(HttpSecurity http) throws Exception {
        http   // 配置登录页并允许访问
                .formLogin().loginPage("/login").permitAll()
                // 配置Basic登录
                //.and().httpBasic()
                // 配置登出页面
                .and().logout().logoutUrl("/logout").logoutSuccessUrl("/")
                .and().authorizeRequests().antMatchers("/oauth/**", "/login/**", "/logout/**").permitAll()
                // 其余所有请求全部需要鉴权认证
                .anyRequest().authenticated()
                // 关闭跨域保护;
                .and().csrf().disable();
        //http.addFilterBefore(simpleCORSFilter, SecurityContextPersistenceFilter.class);
    }

}
UserDetailsServiceImpl类:
package org.muses.jeeplatform.oauth.service;

import lombok.extern.slf4j.Slf4j;
import org.muses.jeeplatform.oauth.entity.User;
import org.muses.jeeplatform.oauth.mapper.UserMapper;
import org.springframework.beans.factory.annotation.Autowired;
import org.springframework.security.core.authority.SimpleGrantedAuthority;
import org.springframework.security.core.userdetails.UserDetails;
import org.springframework.security.core.userdetails.UserDetailsService;
import org.springframework.security.core.userdetails.UsernameNotFoundException;
import org.springframework.stereotype.Service;

import java.util.Arrays;
import java.util.List;

/**
 *
 *
 *
 *
 *
 * @author mazq
 * 修改记录
 *    修改后版本:     修改人:  修改日期: 2020/04/30 15:15  修改内容:
 *
 */
@Slf4j
@Service("userService")
public class UserDetailsServiceImpl implements UserDetailsService {

    @Autowired
    UserMapper userRepository;

    @Override
    public UserDetails loadUserByUsername(String username) throws UsernameNotFoundException {
        User user = userRepository.findByUsername(username);
        if(user == null){
            log.info("登录用户[{}]没注册!",username);
            throw new UsernameNotFoundException("登录用户["+username + "]没注册!");
        }
        return new org.springframework.security.core.userdetails.User(user.getUsername(), user.getPassword(), getAuthority());
    }

    private List getAuthority() {
        return Arrays.asList(new SimpleGrantedAuthority("ROLE_ADMIN"));
//        return Arrays.asList(Collections.emptyList());
    }
}
自定义加密,这里可以用MD5或者加盐方式,我写了个自定义加密类,为了方便测试,不做加密:
package org.muses.jeeplatform.oauth.component;

import org.springframework.security.crypto.password.PasswordEncoder;

/**
 *
 *   自定义PasswordEncoder
 *
 *
 *
 * @author mazq
 * 修改记录
 *    修改后版本:     修改人:  修改日期: 2020/04/24 17:02  修改内容:
 *
 */
public class CustomPasswordEncoder implements PasswordEncoder {

    @Override
    public String encode(CharSequence charSequence) {
        return charSequence.toString();
    }

    @Override
    public boolean matches(CharSequence charSequence, String s) {
        String encodeStr = charSequence.toString() + "";
        if (encodeStr.equals(s)) {
            return true;
        }
        return false;
    }
}
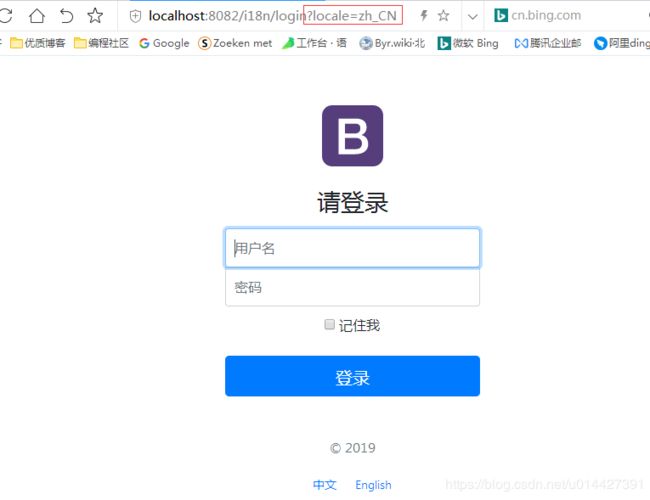
3.2.5 自定义登录页面
注意一定要定位GET的接口,因为OAuth2.0的认证接口也是/login,不过为POST方式
 @GetMapping(value = {"/login"})
    public ModelAndView toLogin(){
        ModelAndView modelAndView = new ModelAndView();
        modelAndView.setViewName("login");
        return modelAndView;
    }
登录页面,使用Themeleaf模板引擎,关键点,th:action="@{/login}" method="post",注意要用POST方式
Signin Template for Bootstrap
3.2.6 测试服务端
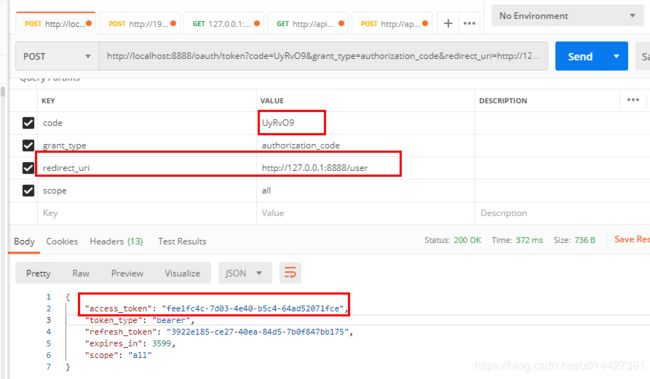
测试:授权接口
http://localhost:8888/oauth/authorize?client_id=cms&client_secret=secret&response_type=code
账号密码正确的,会返回重定向uri并带上授权码:
http://localhost:8084/cms/login?code=UyRvO9
获取token接口:
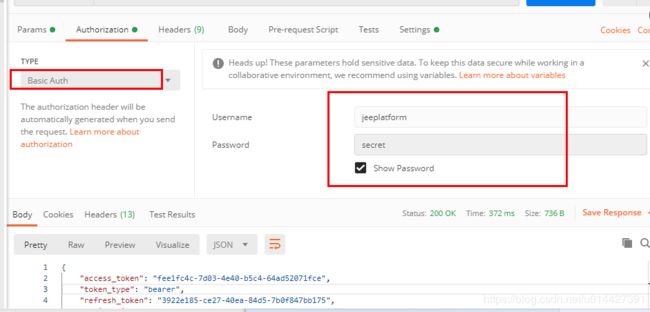
拿授权码去调token接口,获取token成功
使用JWT方式,token格式如图:
JWT:
{
    "access_token": "eyJhbGciOiJIUzI1NiIsInR5cCI6IkpXVCJ9.eyJleHAiOjE1ODk1MzQ5NzMsInVzZXJfbmFtZSI6Im5pY2t5IiwiYXV0aG9yaXRpZXMiOlsiUk9MRV9hZG1pbiJdLCJqdGkiOiJmMjM0M2Q0NC1hODViLTQyOGYtOWE1ZS1iNTE4NTAwNTM5ODgiLCJjbGllbnRfaWQiOiJvYSIsInNjb3BlIjpbImFsbCJdfQ.LWkN2gC2dBrGTn5uSPzfdW6yRj7jhlX87EE8scY02hI",
    "token_type": "bearer",
    "expires_in": 59,
    "scope": "all",
    "user_name": "nicky",
    "jti": "f2343d44-a85b-428f-9a5e-b51850053988"
}
3.3 OAuth2.0客户端对接
3.3.1 新建SpringBoot项目
新建SpringBoot Initializer项目,可以命名为Oauth2-Client1

3.3.2 application配置
security.oauth2.client.client-secret=secret
security.oauth2.client.client-id=cms
security.oauth2.client.scope=all
security.oauth2.client.user-authorization-uri=http://localhost:8888/oauth/authorize
security.oauth2.client.access-token-uri=http://localhost:8888/oauth/token
security.oauth2.resource.user-info-uri=http://localhost:8888/user
security.oauth2.client.use-current-uri=false
security.oauth2.client.pre-established-redirect-uri=http://localhost:8084/cms/login
security.oauth2.resource.token-info-uri= http://localhost:8888/oauth/check_token
security.oauth2.resource.jwt.key-uri=http://localhost:8888/oauth/token_key
security.oauth2.authorization.check-token-access= http://localhost:8888/oauth/check_token

server.port=8084
server.servlet.context-path=/cms

# 预防cookie冲突,设置cookie name
server.servlet.session.cookie.name=OAUTH2-CLIENT-SESSIONID
3.3.3 配置类实现
关键注解是@EnableOAuth2Sso,单点登录必须要加上
package org.muses.jeeplatform.cms.config;

import org.springframework.beans.factory.annotation.Autowired;
import org.springframework.boot.autoconfigure.security.oauth2.client.EnableOAuth2Sso;
import org.springframework.context.annotation.Configuration;
import org.springframework.security.config.annotation.method.configuration.EnableGlobalMethodSecurity;
import org.springframework.security.config.annotation.web.builders.HttpSecurity;
import org.springframework.security.config.annotation.web.configuration.WebSecurityConfigurerAdapter;
import org.springframework.security.oauth2.config.annotation.web.configuration.EnableResourceServer;

/**
 *
 *
 *
 *
 *
 * @author mazq
 * 修改记录
 *    修改后版本:     修改人:  修改日期: 2020/05/07 16:08  修改内容:
 *
 */
@Configuration
@EnableOAuth2Sso
//@EnableResourceServer
@EnableGlobalMethodSecurity(securedEnabled = true)
public class SecurityConfiguration extends WebSecurityConfigurerAdapter {


    @Override
    protected void configure(HttpSecurity http) throws Exception {
            http.logout().logoutSuccessUrl("http://localhost:8888/logout")
                    .and()
                    .authorizeRequests()
                    .anyRequest().authenticated()
                    .and()
                    .csrf().disable();

    }
}
3.3.4 单点登录测试
写个测试接口:
  @GetMapping("/getCurrentUser")
    public Object getCurrentUser(Authentication authentication) {
        return authentication;
    }
http://localhost:8084/cms/getCurrentUser
正常情况会跳转到登录页面,校验之后,会返回,要验证单点,要新建一个Client,然后写入配置数据:
insert into `oauth_client_details` (`client_id`, `resource_ids`, `client_secret`, `scope`, `authorized_grant_types`, `web_server_redirect_uri`, `authorities`, `access_token_validity`, `refresh_token_validity`, `additional_information`, `autoapprove`) values('oa',NULL,'{noop}secret','all','authorization_code','http://localhost:8082/oa/login',NULL,'60','60',NULL,'true');
同理进行测试,cms客户端已经登录的情况,OA客户端是不需要再登录的
四、参考博客资料
本博客代码例子下载:code download
http://www.ruanyifeng.com/blog/2019/04/oauth-grant-types.html
https://wiki.open.qq.com/wiki/website/OAuth2.0%E7%AE%80%E4%BB%8B
https://www.cnblogs.com/sky-chen/category/1418449.html
https://projects.spring.io/spring-security-oauth/docs/oauth2.html