上一篇文章我们讲解了通过命令行将一个Job提交到TaskManager的整体过程,但是我们中间忽略了一些细节,比如Job提交到集群的哪些节点,JobGraph是什么,它是如何生成的?JobClient又是如何将Job提交到集群中的等等,本文会为你一一解决这些问题。
Flink运行时环境
Flink运行时主要包含两种类型的处理器:
- JobManager: 主要负责协调分布式执行。调度任务,协调Checkpoint,协调故障时容错功能等。
- TaskManager: 执行数据流的Task(或更具体地说,子任务),并缓冲和交换数据流。
根据JobManager和TaskManager的分工和名称,应该可以很显然的看出JobClient提交Job到JobManager节点上,并通过它将子任务分配到TaskManager上执行。
交互模式提交Job
在通过命令行提交Job时,会调用CluterClient的run方法去执行提交逻辑,而且分为两种方式,交互模式和非交互模式:
    public JobSubmissionResult run(PackagedProgram prog, int parallelism) throws ProgramInvocationException, ProgramMissingJobException {
        Thread.currentThread().setContextClassLoader(prog.getUserCodeClassLoader());
        if (prog.isUsingProgramEntryPoint()) { // 如果包含入口类(非交互模式提交Job)

            // JobWithJars是一个Flink数据流计划,包含了jar中所有的类,以及用于加载用户代码的ClassLoader
            final JobWithJars jobWithJars;
            if (hasUserJarsInClassPath(prog.getAllLibraries())) {
                jobWithJars = prog.getPlanWithoutJars();
            } else {
                jobWithJars = prog.getPlanWithJars();
            }

            return run(jobWithJars, parallelism, prog.getSavepointSettings());
        } else if (prog.isUsingInteractiveMode()) { // 使用交互模式提交Job
            log.info("Starting program in interactive mode");

            final List libraries;
            if (hasUserJarsInClassPath(prog.getAllLibraries())) {
                libraries = Collections.emptyList();
            } else {
                libraries = prog.getAllLibraries();
            }

            ContextEnvironmentFactory factory = new ContextEnvironmentFactory(this, libraries,
                prog.getClasspaths(), prog.getUserCodeClassLoader(), parallelism, isDetached(),
                prog.getSavepointSettings());
            ContextEnvironment.setAsContext(factory);

            try {
                // 调用main方法
                prog.invokeInteractiveModeForExecution();
                if (lastJobExecutionResult == null && factory.getLastEnvCreated() == null) {
                    throw new ProgramMissingJobException("The program didn't contain a Flink job.");
                }
                if (isDetached()) {
                    // in detached mode, we execute the whole user code to extract the Flink job, afterwards we run it here
                    return ((DetachedEnvironment) factory.getLastEnvCreated()).finalizeExecute();
                } else {
                    // in blocking mode, we execute all Flink jobs contained in the user code and then return here
                    return this.lastJobExecutionResult;
                }
            } finally {
                ContextEnvironment.unsetContext();
            }
        } else {
            throw new ProgramInvocationException("PackagedProgram does not have a valid invocation mode.");
        }
    }
而实际中,大家可能都是采用交互模式提交作业,在提交的jar包中包含mainClass。以Flink的流处理示例WordCount为例:
    public static void main(String[] args) throws Exception {

        // Checking input parameters
        final ParameterTool params = ParameterTool.fromArgs(args);

        // set up the execution environment
        final StreamExecutionEnvironment env = StreamExecutionEnvironment.getExecutionEnvironment();

        // make parameters available in the web interface
        env.getConfig().setGlobalJobParameters(params);

        // get input data
        DataStream text;
        if (params.has("input")) {
            // read the text file from given input path
            text = env.readTextFile(params.get("input"));
        } else {
            System.out.println("Executing WordCount example with default input data set.");
            System.out.println("Use --input to specify file input.");
            // get default test text data
            text = env.fromElements(WordCountData.WORDS);
        }

        DataStream> counts =
        // split up the lines in pairs (2-tuples) containing: (word,1)
        text.flatMap(new Tokenizer())
        // group by the tuple field "0" and sum up tuple field "1"
                .keyBy(0).sum(1);

        // emit result
        if (params.has("output")) {
            counts.writeAsText(params.get("output"));
        } else {
            System.out.println("Printing result to stdout. Use --output to specify output path.");
            counts.print();
        }

        // execute program
        env.execute("Streaming WordCount");
    }
ClusterClient中的prog.invokeInteractiveModeForExecution();其实就是调用WordCount的main方法。main方法的逻辑很简单,分为两部分:构建和执行数据流。本节重点讲执行数据流,也就是最后一行的env.execute("Streaming WordCount");。
以本地流执行环境(LocalStreamEnvironment)来看一下execute方法执行了哪些逻辑
    @Override
    public JobExecutionResult execute(String jobName) throws Exception {
        // transform the streaming program into a JobGraph
        // 生成流图
        StreamGraph streamGraph = getStreamGraph();
        streamGraph.setJobName(jobName);

        // 将流图转换成作业图
        JobGraph jobGraph = streamGraph.getJobGraph();

        Configuration configuration = new Configuration();
        configuration.addAll(jobGraph.getJobConfiguration());

        configuration.setLong(TaskManagerOptions.MANAGED_MEMORY_SIZE, -1L);
        configuration.setInteger(ConfigConstants.TASK_MANAGER_NUM_TASK_SLOTS, jobGraph.getMaximumParallelism());

        // add (and override) the settings with what the user defined
        configuration.addAll(this.conf);

        if (LOG.isInfoEnabled()) {
            LOG.info("Running job on local embedded Flink mini cluster");
        }

        LocalFlinkMiniCluster exec = new LocalFlinkMiniCluster(configuration, true);
        try {
            exec.start();
            // 提交作业图
            return exec.submitJobAndWait(jobGraph, getConfig().isSysoutLoggingEnabled());
        }
        finally {
            transformations.clear();
            exec.stop();
        }
    }
可以看出主要分为三步:生成流图,生成作业图和提交Job。首先看下提交Job的逻辑
  @throws(classOf[JobExecutionException])
  def submitJobAndWait(
      jobGraph: JobGraph,
      printUpdates: Boolean)
    : JobExecutionResult = {
    submitJobAndWait(jobGraph, printUpdates, timeout)
  }
  @throws(classOf[JobExecutionException])
  def submitJobAndWait(
      jobGraph: JobGraph,
      printUpdates: Boolean,
      timeout: FiniteDuration)
    : JobExecutionResult = {

    val clientActorSystem = startJobClientActorSystem(jobGraph.getJobID)

    val userCodeClassLoader =
      try {
        createUserCodeClassLoader(
          jobGraph.getUserJars,
          jobGraph.getClasspaths,
          Thread.currentThread().getContextClassLoader)
      } catch {
        case e: Exception => throw new JobExecutionException(
          jobGraph.getJobID,
          "Could not create the user code class loader.",
          e)
      }

    try {
      JobClient.submitJobAndWait(
       clientActorSystem,
       configuration,
       highAvailabilityServices,
       jobGraph,
       timeout,
       printUpdates,
       userCodeClassLoader)
    } finally {
       if(!useSingleActorSystem) {
         // we have to shutdown the just created actor system
         shutdownJobClientActorSystem(clientActorSystem)
       }
     }
  }
通过执行链,可以看出最终还是会通过上文描述过的JobClient.submitJobAndWait(...)方法提交作业,这里不再赘述。JobClient会启动一个Actor System,虽然它不是Flink运行时的一部分,但是它可以断开连接,或者保持连接以接收进度报告。一个整体的Job提交图如下所示:

上面讲了提交作业的三步,第一和第二步分别是生成流图和作业图,下面我们分别看下流图和作业图 。
流图
StreamGraph(流图)是用来表示流的拓补结构的数据结构,它包含了生成JobGraph的必要信息。
流图是由节点和边组成的,分别对应数据结构StreamNode和StreamEdge。一个StreamGraph可能如下图所示:

下面我们看下StreamGraph是如何创建的,即
getStreamGraph()方法的逻辑。
    @Internal
    public StreamGraph getStreamGraph() {
        if (transformations.size() <= 0) {
            throw new IllegalStateException("No operators defined in streaming topology. Cannot execute.");
        }
        return StreamGraphGenerator.generate(this, transformations);
    }
    public static StreamGraph generate(StreamExecutionEnvironment env, List> transformations) {
        return new StreamGraphGenerator(env).generateInternal(transformations);
    }
    /**
     * This starts the actual transformation, beginning from the sinks.
     */
    private StreamGraph generateInternal(List> transformations) {
        for (StreamTransformation transformation: transformations) {
            transform(transformation);
        }
        return streamGraph;
    }
    /**
     * Transforms one {@code StreamTransformation}.
     *
     * This checks whether we already transformed it and exits early in that case. If not it
     * delegates to one of the transformation specific methods.
     */
    private Collection transform(StreamTransformation transform) {

        if (alreadyTransformed.containsKey(transform)) {
            return alreadyTransformed.get(transform);
        }

        LOG.debug("Transforming " + transform);

        if (transform.getMaxParallelism() <= 0) {

            // if the max parallelism hasn't been set, then first use the job wide max parallelism
            // from theExecutionConfig.
            int globalMaxParallelismFromConfig = env.getConfig().getMaxParallelism();
            if (globalMaxParallelismFromConfig > 0) {
                transform.setMaxParallelism(globalMaxParallelismFromConfig);
            }
        }

        // call at least once to trigger exceptions about MissingTypeInfo
        transform.getOutputType();

        Collection transformedIds;
        if (transform instanceof OneInputTransformation) {
            transformedIds = transformOneInputTransform((OneInputTransformation) transform);
        } else if (transform instanceof TwoInputTransformation) {
            transformedIds = transformTwoInputTransform((TwoInputTransformation) transform);
        } else if (transform instanceof SourceTransformation) {
            transformedIds = transformSource((SourceTransformation) transform);
        } else if (transform instanceof SinkTransformation) {
            transformedIds = transformSink((SinkTransformation) transform);
        } else if (transform instanceof UnionTransformation) {
            transformedIds = transformUnion((UnionTransformation) transform);
        } else if (transform instanceof SplitTransformation) {
            transformedIds = transformSplit((SplitTransformation) transform);
        } else if (transform instanceof SelectTransformation) {
            transformedIds = transformSelect((SelectTransformation) transform);
        } else if (transform instanceof FeedbackTransformation) {
            transformedIds = transformFeedback((FeedbackTransformation) transform);
        } else if (transform instanceof CoFeedbackTransformation) {
            transformedIds = transformCoFeedback((CoFeedbackTransformation) transform);
        } else if (transform instanceof PartitionTransformation) {
            transformedIds = transformPartition((PartitionTransformation) transform);
        } else if (transform instanceof SideOutputTransformation) {
            transformedIds = transformSideOutput((SideOutputTransformation) transform);
        } else {
            throw new IllegalStateException("Unknown transformation: " + transform);
        }

        // need this check because the iterate transformation adds itself before
        // transforming the feedback edges
        if (!alreadyTransformed.containsKey(transform)) {
            alreadyTransformed.put(transform, transformedIds);
        }

        if (transform.getBufferTimeout() > 0) {
            streamGraph.setBufferTimeout(transform.getId(), transform.getBufferTimeout());
        }
        if (transform.getUid() != null) {
            streamGraph.setTransformationUID(transform.getId(), transform.getUid());
        }
        if (transform.getUserProvidedNodeHash() != null) {
            streamGraph.setTransformationUserHash(transform.getId(), transform.getUserProvidedNodeHash());
        }

        if (transform.getMinResources() != null && transform.getPreferredResources() != null) {
            streamGraph.setResources(transform.getId(), transform.getMinResources(), transform.getPreferredResources());
        }

        return transformedIds;
    }
可以看出,核心的逻辑在transform(StreamTransformation transform)方法中,可能大家疑惑StreamTransformation是什么?StreamTransformation是DataStream创建操作的描述信息,每一个DataStream底层都有一个StreamTransformation,它是DataStream的原始信息。通过StreamTransformation就可以构建一副整体的StreamGraph。以OneInputTransformation为例,看下是如何进行transform操作的。
    /**
     * Transforms a {@code OneInputTransformation}.
     *
     * This recursively transforms the inputs, creates a new {@code StreamNode} in the graph and
     * wired the inputs to this new node.
     */
    private  Collection transformOneInputTransform(OneInputTransformation transform) {

        // 转换当前OneInputTransformation的输入StreamTransformation
        Collection inputIds = transform(transform.getInput());

        // the recursive call might have already transformed this
        if (alreadyTransformed.containsKey(transform)) {
            return alreadyTransformed.get(transform);
        }

        String slotSharingGroup = determineSlotSharingGroup(transform.getSlotSharingGroup(), inputIds);

        //添加 StreamGraph 节点
        streamGraph.addOperator(transform.getId(),
                slotSharingGroup,
                transform.getOperator(),
                transform.getInputType(),
                transform.getOutputType(),
                transform.getName());

        if (transform.getStateKeySelector() != null) {
            TypeSerializer keySerializer = transform.getStateKeyType().createSerializer(env.getConfig());
            streamGraph.setOneInputStateKey(transform.getId(), transform.getStateKeySelector(), keySerializer);
        }

        streamGraph.setParallelism(transform.getId(), transform.getParallelism());
        streamGraph.setMaxParallelism(transform.getId(), transform.getMaxParallelism());

        // 添加 StreamGraph 边
        for (Integer inputId: inputIds) {
            streamGraph.addEdge(inputId, transform.getId(), 0);
        }

        return Collections.singleton(transform.getId());
    }
逻辑很清晰,解析当前OneInputTransformation的输入StreamTransformation,根据OneInputTransformation的operator等信息构建StreamNode,然后根据解析的输入StreamTransformation的Id,构建StreamEdge。
在创建Stream,以及生成StreamGraph的过程中,涉及到较多的数据结构以及层次关系,以上述的WordCount示例中,通过text.flatMap(new Tokenizer())创建的流为例,具体的数据结构和层次如下图所示:

作业图
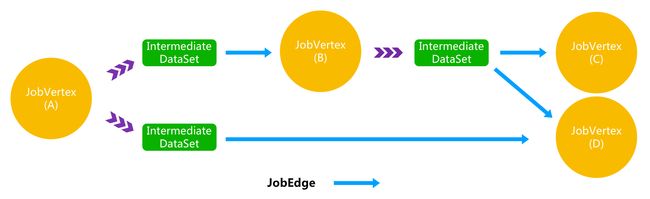
作业图(JobGraph)是唯一被Flink的数据流引擎所识别的表述作业的数据结构,也正是这一共同的抽象体现了流处理和批处理在运行时的统一。
相比流图(StreamGraph)以及批处理优化计划(OptimizedPlan),JobGraph发生了一些变化,已经不完全是“静态”的数据结构了,因为它加入了中间数据集(IntermediateDataSet)这一“动态”概念。
作业顶点(JobVertex)、中间数据集(IntermediateDataSet)、作业边(JobEdge)是组成JobGraph的基本元素。这三个对象彼此之间互为依赖:
- 一个JobVertex关联着若干个JobEdge作为输入端以及若干个IntermediateDataSet作为其生产的结果集;
- 一个IntermediateDataSet关联着一个JobVertex作为生产者以及若干个JobEdge作为消费者;
- 一个JobEdge关联着一个IntermediateDataSet可认为是源以及一个JobVertex可认为是目标消费者;
因此一个JobGraph可能的如下图所示: