上一篇写到Bootstrap类的启动流程,经过启动脚本,经历了一系列的初始化,类加载,最后通过不同的命令,执行到不同的操作,由于是启动过程,所以从执行load()方法开始。接下来我们简单梳理下load方法的主要流程和一些结构分析,从而了解到其中的启动流程,衍生出tomcat中主要的几个组件,以及这些组件之间的大概关系。为以后每个模块和组件的研究打下基础。
我们进入到daemon.load(args)方法,可以看到,也是使用反射调用了Catalina类的load(String args[])方法:
private void load(String[] arguments)
        throws Exception {

        // Call the load() method
        String methodName = "load";
        ...
       method.invoke(catalinaDaemon, param);
}
接下来进入到Catalina#load(String args[])
这个方法主要是对一些特殊命令进行处理,接下来便进入到重载的load()方法:
   /**
     * Start a new server instance.
     */
    public void load() {
        long t1 = System.nanoTime();
        ...
        ...
        // Create and execute our Digester
        Digester digester = createStartDigester();
        ...
        ...

        getServer().setCatalina(this);
        getServer().setCatalinaHome(Bootstrap.getCatalinaHomeFile());
        getServer().setCatalinaBase(Bootstrap.getCatalinaBaseFile());
        // Start the new server
        try {
            getServer().init();
        } catch (LifecycleException e) {
            if (Boolean.getBoolean("org.apache.catalina.startup.EXIT_ON_INIT_FAILURE")) {
                throw new java.lang.Error(e);
            } else {
                log.error("Catalina.start", e);
            }
        }
  }
这里只列出部分核心代码。
首先,使用Digester 工具预定义了一系列的conf/server.xml配置文件的解析规则,这个工具会在以后的章节中细说,这个工具主要是定义了xml转换为java对象的规则。
为了简洁,我将tomcat的默认配置文件的注释删掉了,如图:
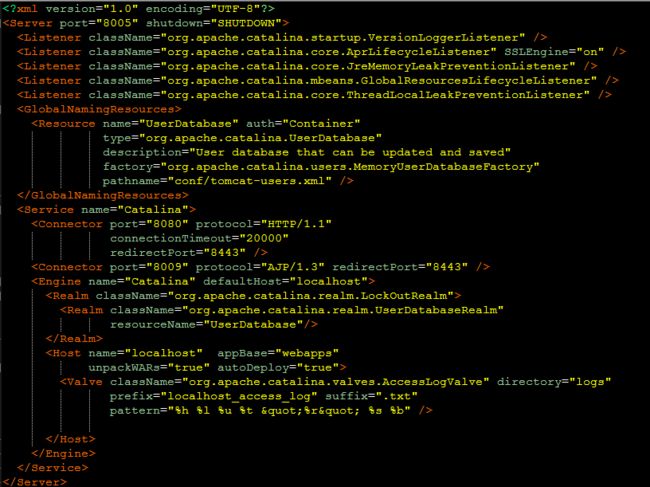
通过Digester ,可以将Catalina中的server属性创建为默认的StandardServer类,并将其中的属性依赖关系也通过xml创建了。
从配置文件可以看到,Server中包含了一组Listener,用来监听生命周期内的事件,这里用到了观察者模式来做事件通知操作,后续的章节中也会详细说明。
Server中又包括了一个Service标签,在使用Digester 时,创建了默认的StandardService类,Service中包含了两个Connector和一个Engine,再往里面就是Realm和Host、Valve。初步就是这么个结构,后续章节会详细解说这些组件间的关系和作用。
解析完server.xml文件后,将当前的Catalina对象的信息传给server属性,让它们互相拥有彼此的引用,然后调用server的init()方法。
StandardServer中并没有init方法,所以我根据其继承关系,找到了其父类LifecycleBase的init方法,代码如下:
    @Override
    public final synchronized void init() throws LifecycleException {
        if (!state.equals(LifecycleState.NEW)) {
            invalidTransition(Lifecycle.BEFORE_INIT_EVENT);
        }

        try {
            setStateInternal(LifecycleState.INITIALIZING, null, false);
            initInternal();
            setStateInternal(LifecycleState.INITIALIZED, null, false);
        } catch (Throwable t) {
            ExceptionUtils.handleThrowable(t);
            setStateInternal(LifecycleState.FAILED, null, false);
            throw new LifecycleException(
                    sm.getString("lifecycleBase.initFail",toString()), t);
        }
    }
为了防止其他线程同时调用这个方法,导致生命周期的状态不正常,这个方法加了关键字synchronized 。这个方法其实用了模板方法设计模式,留了一个initInternal抽象钩子方法让子类去实现。
setStateInternal方法设置了当前的state为初始化对应的状态,我们打开期内部,会在方法最后看到如下代码:
       String lifecycleEvent = state.getLifecycleEvent();
        if (lifecycleEvent != null) {
            fireLifecycleEvent(lifecycleEvent, data);
        }
   /**
     * Allow sub classes to fire {@link Lifecycle} events.
     *
     * @param type  Event type
     * @param data  Data associated with event.
     */
    protected void fireLifecycleEvent(String type, Object data) {
        LifecycleEvent event = new LifecycleEvent(this, type, data);
        for (LifecycleListener listener : lifecycleListeners) {
            listener.lifecycleEvent(event);
        }
    }
fireLifecycleEvent方法中其实就是通知所有的监听者本次发生了初始化的事件,监听者会根据event的类型进行不同的操作,在这里,各个Listener充当了观察者模式中的监听者,Server是监听目标,后续我们将会看到许多类似这样的写法。想深入观察者模式的请点击这里。
接下来我们再进入StandardServer的initInternal方法,代码如下:
   /**
     * Invoke a pre-startup initialization. This is used to allow connectors
     * to bind to restricted ports under Unix operating environments.
     */
    @Override
    protected void initInternal() throws LifecycleException {

        super.initInternal();

        // Register global String cache
        // Note although the cache is global, if there are multiple Servers
        // present in the JVM (may happen when embedding) then the same cache
        // will be registered under multiple names
        onameStringCache = register(new StringCache(), "type=StringCache");

        // Register the MBeanFactory
        MBeanFactory factory = new MBeanFactory();
        factory.setContainer(this);
        onameMBeanFactory = register(factory, "type=MBeanFactory");

        // Register the naming resources
        globalNamingResources.init();

        // Populate the extension validator with JARs from common and shared
        // class loaders
        if (getCatalina() != null) {
            ClassLoader cl = getCatalina().getParentClassLoader();
            // Walk the class loader hierarchy. Stop at the system class loader.
            // This will add the shared (if present) and common class loaders
            while (cl != null && cl != ClassLoader.getSystemClassLoader()) {
                if (cl instanceof URLClassLoader) {
                    URL[] urls = ((URLClassLoader) cl).getURLs();
                    for (URL url : urls) {
                        if (url.getProtocol().equals("file")) {
                            try {
                                File f = new File (url.toURI());
                                if (f.isFile() &&
                                        f.getName().endsWith(".jar")) {
                                    ExtensionValidator.addSystemResource(f);
                                }
                            } catch (URISyntaxException e) {
                                // Ignore
                            } catch (IOException e) {
                                // Ignore
                            }
                        }
                    }
                }
                cl = cl.getParent();
            }
        }
        // Initialize our defined Services
        for (int i = 0; i < services.length; i++) {
            services[i].init();
        }
    }
这里前面一大段是JMX中的注册MBean等操作,最后循环调用了它所有service的init方法。
同理进入到init方法,还是跟Server一样,又跳转到了LifecycleBase的init方法,同样地,也是进入到StandardService中的initInternal方法,代码如下:
/**
   * Invoke a pre-startup initialization. This is used to allow connectors
     * to bind to restricted ports under Unix operating environments.
     */
    @Override
    protected void initInternal() throws LifecycleException {

        super.initInternal();

        if (engine != null) {
            engine.init();
        }

        // Initialize any Executors
        for (Executor executor : findExecutors()) {
            if (executor instanceof JmxEnabled) {
                ((JmxEnabled) executor).setDomain(getDomain());
            }
            executor.init();
        }

        // Initialize mapper listener
        mapperListener.init();

        // Initialize our defined Connectors
        synchronized (connectorsLock) {
            for (Connector connector : connectors) {
                try {
                    connector.init();
                } catch (Exception e) {
                    String message = sm.getString(
                            "standardService.connector.initFailed", connector);
                    log.error(message, e);

                    if (Boolean.getBoolean("org.apache.catalina.startup.EXIT_ON_INIT_FAILURE"))
                        throw new LifecycleException(message);
                }
            }
        }
    }
首先调用了engine的init方法,在Digester 解析过程中配置了默认的StandardEngine,老规矩,从继承关系就可以肯定又是调用到了StandardEngine的initInternal这个钩子方法
@Override
    protected void initInternal() throws LifecycleException {
        // Ensure that a Realm is present before any attempt is made to start
        // one. This will create the default NullRealm if necessary.
        getRealm();
        super.initInternal();
    }
这里是为了避免realm对象为空,如果为null,会新建一个NullRealm对象来初始化。
然后调用了父类ContainerBase的initInternal方法,初始化了启动和停止的线程池startStopExecutor。
再回到StandardService中的initInternal方法,这里初始化了executors,等,最后初始化了connectors,也是默认的Connector类。
看到这里,我们结合server.xml,对于tomcat的初始化流程和一些组件的关系,应该有了一个初步的了解了