Flutter 系列文章连载~
- 《Flutter Android 工程结构及应用层编译源码深入分析》
- 《Flutter 命令本质之 Flutter tools 机制源码深入分析》
- 《Flutter 的 runApp 与三棵树诞生流程源码分析》
- 《Flutter Android 端 Activity/Fragment 流程源码分析》
- 《Flutter Android 端 FlutterInjector 及依赖流程源码分析》
- 《Flutter Android 端 FlutterEngine Java 相关流程源码分析》
- 《Flutter Android 端 FlutterView 相关流程源码分析》
- 《Flutter 绘制动机 VSYNC 流程源码全方位分析》
- 《Flutter 安卓 Platform 与 Dart 端消息通信方式 Channel 源码解析》
背景
前面系列文章我们分析了 FlutterActivity 等相关流程,知道一个 Flutter Android App 的本质是通过 FlutterView 进行渲染。当时由于篇幅限制,我们没有进入详细分析,这里作为一个专题进行简单分析。
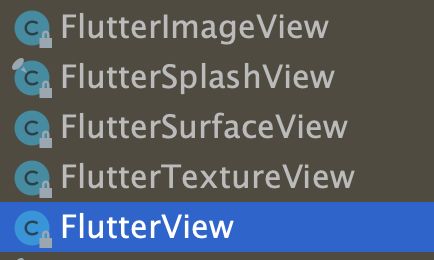
SDK 中同属于 FlutterView 体系的控件大致有如图这些:
下文主要围绕上图进行分析。
FlutterSplashView 相关分析
FlutterSplashView 的主要作用是在 FlutterView render 渲染出来之前显示一个SplashScreen(本质 Drawable)过渡图(可以理解成类似开屏图片)。这个控件的调用在前面《Flutter Android 端 Activity/Fragment 流程源码分析》文章中分析 FlutterActivityAndFragmentDelegate 时有看到过,在其 onCreateView 方法中先实例化了 FlutterSplashView,接着调用flutterSplashView.displayFlutterViewWithSplash(flutterView, host.provideSplashScreen()),然后把这个 FlutterSplashView 控件返回给 FlutterActivity 通过 setContentView 进行设置。下面是其相关流程主要源码:
final class FlutterSplashView extends FrameLayout {
  //......
  //步骤1、把给定的splashScreen显示在flutterView之上,直到flutterView的首帧渲染出来才过渡消失。
  public void displayFlutterViewWithSplash(
      @NonNull FlutterView flutterView, @Nullable SplashScreen splashScreen) {
    //步骤2、一堆重复调用的复位操作。
    if (this.flutterView != null) {
      this.flutterView.removeOnFirstFrameRenderedListener(flutterUiDisplayListener);
      removeView(this.flutterView);
    }
    if (splashScreenView != null) {
      removeView(splashScreenView);
    }

    //步骤3、把flutterView添加给当前FlutterSplashView,本质是一个FrameLayout。
    this.flutterView = flutterView;
    addView(flutterView);

    this.splashScreen = splashScreen;

    //步骤4、显示一个splash screen开屏图。
    if (splashScreen != null) {
      //步骤5、如果flutterView未渲染出来则条件成立。
      if (isSplashScreenNeededNow()) {
        Log.v(TAG, "Showing splash screen UI.");
        //步骤6、splashScreen是FlutterActivity中实现的DrawableSplashScreen。
        //DrawableSplashScreen中的Drawable本质来自清单文件meta-data中io.flutter.embedding.android.SplashScreenDrawable配置。
        //DrawableSplashScreen implements SplashScreen,所以就是DrawableSplashScreen的createSplashView方法。
        //因此splashScreenView是DrawableSplashScreenView,继承自ImageView,设置的图为Drawable。
        splashScreenView = splashScreen.createSplashView(getContext(), splashScreenState);
        //步骤7、把ImageView添加到FlutterSplashView中。
        //由于FlutterSplashView是FrameLayout,所以ImageView盖在步骤3的flutterView之上。
        addView(this.splashScreenView);
        //步骤8、给flutterView添加监听回调,等第一帧绘制时触发。
        //回调里面做的事本质就是从开屏过渡消失到flutterView显示出来。
        flutterView.addOnFirstFrameRenderedListener(flutterUiDisplayListener);
      } else if (isSplashScreenTransitionNeededNow()) {
        Log.v(TAG, "Showing an immediate splash transition to Flutter due to previously interrupted transition.");
        //步骤9、同步骤6、7做的事情。
        splashScreenView = splashScreen.createSplashView(getContext(), splashScreenState);
        addView(splashScreenView);
        //步骤10、由于是中间状态,所以不用监听,直接添加后就从开屏过渡消失到flutterView显示出来。
        transitionToFlutter();
      } else if (!flutterView.isAttachedToFlutterEngine()) {
        Log.v(TAG, "FlutterView is not yet attached to a FlutterEngine. Showing nothing until a FlutterEngine is attached.");
        //步骤11、如果这时候flutter引擎还没attach上。
        //那就监听attach,等attach上就开始追加开屏并显示,等到渲染第一帧开始就结束。
        flutterView.addFlutterEngineAttachmentListener(flutterEngineAttachmentListener);
      }
    }
  }

  //单纯的判断flutterView是否渲染出来,没出来就说明需要过渡界面。
  private boolean isSplashScreenNeededNow() {
    return flutterView != null
        && flutterView.isAttachedToFlutterEngine()
        && !flutterView.hasRenderedFirstFrame()
        && !hasSplashCompleted();
  }

  //判断是否上一个过渡动画开屏正在进行中。
  private boolean isSplashScreenTransitionNeededNow() {
    return flutterView != null
        && flutterView.isAttachedToFlutterEngine()
        && splashScreen != null
        && splashScreen.doesSplashViewRememberItsTransition()
        && wasPreviousSplashTransitionInterrupted();
  }
  //......
  //开屏过渡到flutterview显示
  private void transitionToFlutter() {
    //......
    //步骤12、splashScreen就是DrawableSplashScreen。
    //本质就是DrawableSplashScreenView(即ImageView)做一个默认500ms的alpha渐变透明动画。
    //动画完毕回调onTransitionComplete接口实现,从当前FrameLayout中删除开屏追加的ImageView,child只剩下FlutterView。
    splashScreen.transitionToFlutter(onTransitionComplete);
  }
  //......
  //等attach上后走进步骤1流程,不解释。
  @NonNull
  private final FlutterView.FlutterEngineAttachmentListener flutterEngineAttachmentListener =
      new FlutterView.FlutterEngineAttachmentListener() {
        @Override
        public void onFlutterEngineAttachedToFlutterView(@NonNull FlutterEngine engine) {
          flutterView.removeFlutterEngineAttachmentListener(this);
          displayFlutterViewWithSplash(flutterView, splashScreen);
        }
        //......
      };

  //flutterView的第一帧绘制时触发,本质就是从开屏过渡消失到flutterView显示出来。
  @NonNull
  private final FlutterUiDisplayListener flutterUiDisplayListener =
      new FlutterUiDisplayListener() {
        @Override
        public void onFlutterUiDisplayed() {
          if (splashScreen != null) {
            transitionToFlutter();
          }
        }
        //......
      };
  //动画做完就移除开屏view控件。
  @NonNull
  private final Runnable onTransitionComplete =
      new Runnable() {
        @Override
        public void run() {
          removeView(splashScreenView);
          //......
        }
      };
  //......
}
看完上面代码你也就明白为什么我们在 Android Studio 中查看 FlutterActivity 的安卓层级树时,只看到 Activity content 的 child 是 FlutterSplashView,FlutterSplashView 的 child 是 FlutterView,而 FlutterSplashView 的另一个 child DrawableSplashScreenView 不见的原因就是 500ms 动画之后被 remove 了。如下图:
FlutterTextureView 相关分析
在前面系列文章中分析 FlutterActivity 时我们知道,FlutterView 创建时依赖一个 FlutterTextureView 或者 FlutterSurfaceView,其判断条件的本质就是看 FlutterActivity 的 window 窗体背景是否透明(FlutterFragment 时通过 Arguments 的 flutterview_render_mode 参数来决定),不透明就是 surface,透明就是 texture。因此,我们这里就是针对其 window 透明场景来分析的。
//步骤13、在一个SurfaceTexture上绘制Flutter UI,就是单纯的渲染,不处理点击等各种事件。
//想要开始渲染,FlutterTextureView的持有者需要先调用attachToRenderer(FlutterRenderer)。
//同理,想要终止渲染,FlutterTextureView的持有者需要先调用detachFromRenderer()。
public class FlutterTextureView extends TextureView implements RenderSurface {
  //......
  //步骤14、主要是基于标准监听的connectSurfaceToRenderer和disconnectSurfaceFromRenderer操作。
  private final SurfaceTextureListener surfaceTextureListener =
      new SurfaceTextureListener() {
        @Override
        public void onSurfaceTextureAvailable(
            SurfaceTexture surfaceTexture, int width, int height) {
          //......
          if (isAttachedToFlutterRenderer) {
            connectSurfaceToRenderer();
          }
        }
        //......
        @Override
        public boolean onSurfaceTextureDestroyed(@NonNull SurfaceTexture surface) {
          //......
          if (isAttachedToFlutterRenderer) {
            disconnectSurfaceFromRenderer();
          }
          return true;
        }
      };

  //......

  //步骤15、在FlutterView的attachToFlutterEngine方法中被调用。
  //参数来自FlutterEngine的getRenderer(),类型是FlutterRenderer,里面本质是SurfaceTexture。
  public void attachToRenderer(@NonNull FlutterRenderer flutterRenderer) {
    //......
    connectSurfaceToRenderer();
    //......
  }

  //步骤16、在FlutterView的detachFromFlutterEngine方法中被调用。
  //与步骤15方法成对始终。
  public void detachFromRenderer() {
    //......
    disconnectSurfaceFromRenderer();
    //......
  }

  private void connectSurfaceToRenderer() {
    //......
    renderSurface = new Surface(getSurfaceTexture());
    flutterRenderer.startRenderingToSurface(renderSurface);
  }

  private void disconnectSurfaceFromRenderer() {
    //......
    flutterRenderer.stopRenderingToSurface();
    if (renderSurface != null) {
      renderSurface.release();
      renderSurface = null;
    }
  }
  //......
}
上面可以看到,FlutterTextureView 的本质就是一个标准的 TextureView,用法也完全一样,只是渲染数据是通过 FlutterJNI 进行 engine 与 Android Java 层传递而已。
FlutterSurfaceView 相关分析
与上面 FlutterTextureView 分析同理,FlutterSurfaceView 自然就是针对其 window 不透明场景来分析的。下面是类似上面概览源码:
//步骤17、在一个Surface上绘制Flutter UI,就是单纯的渲染,不处理点击等各种事件。
//想要开始渲染,FlutterSurfaceView的持有者需要先调用attachToRenderer(FlutterRenderer)。
//同理,想要终止渲染,FlutterSurfaceView的持有者需要先调用detachFromRenderer()。
public class FlutterSurfaceView extends SurfaceView implements RenderSurface {
  //......
  private final SurfaceHolder.Callback surfaceCallback =
      new SurfaceHolder.Callback() {
        @Override
        public void surfaceCreated(@NonNull SurfaceHolder holder) {
          //......
          connectSurfaceToRenderer();
        }
        //......
        @Override
        public void surfaceDestroyed(@NonNull SurfaceHolder holder) {
          //......
          disconnectSurfaceFromRenderer();
        }
      };

  public void attachToRenderer(@NonNull FlutterRenderer flutterRenderer) {
    //......
    connectSurfaceToRenderer();
  }

  public void detachFromRenderer() {
    //......
    disconnectSurfaceFromRenderer();
  }

  private void connectSurfaceToRenderer() {
    //......
    flutterRenderer.startRenderingToSurface(getHolder().getSurface());
  }

  private void disconnectSurfaceFromRenderer() {
    //......
    flutterRenderer.stopRenderingToSurface();
  }
  //......
}
可以看到,不多解释,和 FlutterSurfaceView 基本如出一辙。
FlutterRenderer 相关分析
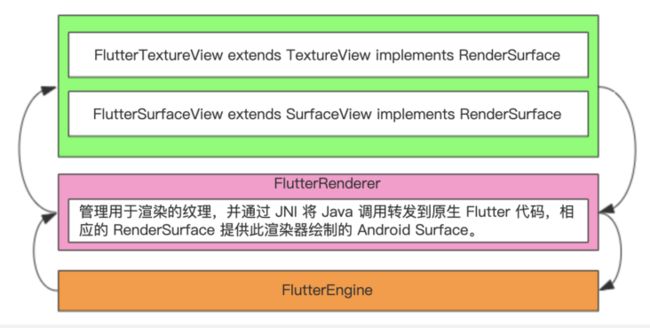
FlutterRenderer 的主要职责是通过 FlutterEngine 进行渲染关联处理,与原生平台提供的 FlutterSurfaceView、FlutterTextureView 进行纯 UI 渲染,将 Flutter 像素绘制到 Android 视图层次结构。
public class FlutterRenderer implements TextureRegistry {
  //......
  @NonNull private final FlutterJNI flutterJNI;
  @Nullable private Surface surface;
  //......
}
通过上面源码的两个属性成员就能看出来他的职责。结合上面小节可以得到一个如下职责抽象架构图:
FlutterView 相关分析
FlutterView 的作用是在 Android 设备上显示一个 Flutter UI,绘制内容来自于 FlutterEngine 提供。FlutterView 有两种不同的渲染模式(io.flutter.embedding.android.RenderMode#surface和io.flutter.embedding.android.RenderMode#texture),其中 surface 模式的性能比较高,但是在 z-index 上无法与其他 Android View 进行布局,没法进行 animated、transformed 变换;而 texture 模式虽然性能没有 surface 高,但是没有 surface 的那些缺点限制。一般尽可能选择 surface 模式,FlutterView 的默认构造器就是 surface 模式,FlutterActivity 的 window 不透明时默认也是 surface 模式,FlutterFragment 的默认无参数修改情况下也是 surface 模式,不信可以翻看本系列的前面相关文章。
下面我们先看下 FlutterView 的成员和构造初始化相关流程,如下代码片段:
public class FlutterView extends FrameLayout implements MouseCursorPlugin.MouseCursorViewDelegate {
  //用来真正渲染绘制视图的。
  @Nullable private FlutterSurfaceView flutterSurfaceView;
  @Nullable private FlutterTextureView flutterTextureView;
  @Nullable private FlutterImageView flutterImageView;
  @Nullable private RenderSurface renderSurface;
  @Nullable private RenderSurface previousRenderSurface;
  //......
  //用来处理Android View的input and events。
  @Nullable private MouseCursorPlugin mouseCursorPlugin;
  @Nullable private TextInputPlugin textInputPlugin;
  @Nullable private LocalizationPlugin localizationPlugin;
  @Nullable private AndroidKeyProcessor androidKeyProcessor;
  @Nullable private AndroidTouchProcessor androidTouchProcessor;
  @Nullable private AccessibilityBridge accessibilityBridge;

  //缺省构造函数,默认模式为surface,即FlutterSurfaceView渲染。
  public FlutterView(@NonNull Context context) {
    this(context, null, new FlutterSurfaceView(context));
  }
  //省略一堆各种参数的构造函数
  //......
  //本质就是指定一个RenderSurface,即如下三者之一。
  private void init() {
    if (flutterSurfaceView != null) {
      addView(flutterSurfaceView);
    } else if (flutterTextureView != null) {
      addView(flutterTextureView);
    } else {
      addView(flutterImageView);
    }

    //FlutterView自己需要能接收事件。
    setFocusable(true);
    setFocusableInTouchMode(true);
    if (Build.VERSION.SDK_INT >= Build.VERSION_CODES.O) {
      setImportantForAutofill(View.IMPORTANT_FOR_AUTOFILL_YES_EXCLUDE_DESCENDANTS);
    }
  }
  //......
}
通过上面代码我们可以知道,FlutterView 其实就是一个普通的 Android FrameLayout,其内部依据条件被 addView 了一个 View,这个 View 都实现自 RenderSurface 接口,也就是 FlutterSurfaceView、FlutterTextureView、FlutterImageView 之一,默认为 FlutterSurfaceView 而已。所以说真正绘制渲染 FlutterEngine 数据的不是 FlutterView,而是实现 RenderSurface 接口的控件,譬如 FlutterSurfaceView。整体 View 层级关系如下图:
构造完 FlutterView 实例后,我们通过前面的系列文章可以知道,在 FlutterActivityAndFragmentDelegate 的 onCreateView 方法返回给 FlutterActivity 一个 contentView 前 FlutterView 有通过自己的 attachToFlutterEngine 方法与 FlutterEngine 关联,所以我们看下这个关联方法(对应还有一个 detachFromFlutterEngine 方法进行取消关联):
public class FlutterView extends FrameLayout implements MouseCursorPlugin.MouseCursorViewDelegate {
  //......
  public void attachToFlutterEngine(@NonNull FlutterEngine flutterEngine) {
    //......
    //赋值flutterEngine。
    this.flutterEngine = flutterEngine;

    //从flutterEngine引擎获取flutterRenderer实例。
    FlutterRenderer flutterRenderer = this.flutterEngine.getRenderer();
    //renderSurface进行attachToRenderer,本质譬如就是FlutterSurfaceView的attachToRenderer方法。
    renderSurface.attachToRenderer(flutterRenderer);
    //初始化各种plugin。
    if (Build.VERSION.SDK_INT >= Build.VERSION_CODES.N) {
      //鼠标相关插件。
      mouseCursorPlugin = new MouseCursorPlugin(this, this.flutterEngine.getMouseCursorChannel());
    }
    //输入相关插件。
    textInputPlugin =
        new TextInputPlugin(this, this.flutterEngine.getTextInputChannel(), this.flutterEngine.getPlatformViewsController());
    //config本地变更等插件。
    localizationPlugin = this.flutterEngine.getLocalizationPlugin();
    //key及touch事件、accessibility辅助模式相关channel通道处理。
    androidKeyProcessor =
        new AndroidKeyProcessor(this, this.flutterEngine.getKeyEventChannel(), textInputPlugin);
    androidTouchProcessor =
        new AndroidTouchProcessor(this.flutterEngine.getRenderer(), /*trackMotionEvents=*/ false);
    accessibilityBridge =
        new AccessibilityBridge(
            this,
            flutterEngine.getAccessibilityChannel(),
            (AccessibilityManager) getContext().getSystemService(Context.ACCESSIBILITY_SERVICE),
            getContext().getContentResolver(),
            this.flutterEngine.getPlatformViewsController());
    accessibilityBridge.setOnAccessibilityChangeListener(onAccessibilityChangeListener);
    //各种平台相关事件初始调度。
    this.flutterEngine.getPlatformViewsController().attachAccessibilityBridge(accessibilityBridge);
    this.flutterEngine
        .getPlatformViewsController()
        .attachToFlutterRenderer(this.flutterEngine.getRenderer());

    textInputPlugin.getInputMethodManager().restartInput(this);

    sendUserSettingsToFlutter();
    localizationPlugin.sendLocalesToFlutter(getResources().getConfiguration());
    sendViewportMetricsToFlutter();

    flutterEngine.getPlatformViewsController().attachToView(this);
    //......
  }
}
可以看到,FlutterView 与 FlutterEngine 进行 attach 时主要做的事情就是回调设置、渲染关联、系统平台 plugin 初始化关联等。上面的各种 plugin 我们可以先不用关心细节,知道 attachToFlutterEngine 主要做这些事情即可,后面会专门分析。
接着我们按照标准 Android 平台的 View 主要方法进行分类分析,先看看 FlutterView 的 onConfigurationChanged 方法,如下:
public class FlutterView extends FrameLayout implements MouseCursorPlugin.MouseCursorViewDelegate {
  //......
  @Nullable private LocalizationPlugin localizationPlugin;

  @Override
  protected void onConfigurationChanged(@NonNull Configuration newConfig) {
    super.onConfigurationChanged(newConfig);
    //响应系统屏幕渲染或者配置发生变化,譬如分屏、暗黑、多语言啥的。
    if (flutterEngine != null) {
      Log.v(TAG, "Configuration changed. Sending locales and user settings to Flutter.");
      //调用LocalizationPlugin插件设置变更后新的Configuration。
      localizationPlugin.sendLocalesToFlutter(newConfig);
      //把变更发送到FlutterEngine去,通知引擎。
      sendUserSettingsToFlutter();
    }
  }

  void sendUserSettingsToFlutter() {
    //当前是不是暗黑模式。
    boolean isNightModeOn = (getResources().getConfiguration().uiMode & Configuration.UI_MODE_NIGHT_MASK == Configuration.UI_MODE_NIGHT_YES;
    SettingsChannel.PlatformBrightness brightness = isNightModeOn
            ? SettingsChannel.PlatformBrightness.dark : SettingsChannel.PlatformBrightness.light;
    //通过flutterEngine的SettingsChannel发送变更消息。
    flutterEngine
        .getSettingsChannel()
        .startMessage()
        .setTextScaleFactor(getResources().getConfiguration().fontScale)
        .setUse24HourFormat(DateFormat.is24HourFormat(getContext()))
        .setPlatformBrightness(brightness)
        .send();
  }
  //......
}
可以看到,当系统配置发生变更时 FlutterView 自己在安卓端其实不做什么事的,主要就是负责把事件通知到 flutterEngine 端去,然后 flutterEngine 再传递到 dart 响应,从而触发新的绘制刷新效果。
由于整体都是这个模式,所以 FlutterView 中的非典型方法我们不再分析,类比即可。下面我们看下事件是怎么派发的,如下:
@Override
public boolean dispatchKeyEvent(KeyEvent event) {
  //......
  return (isAttachedToFlutterEngine() && androidKeyProcessor.onKeyEvent(event))
      || super.dispatchKeyEvent(event);
}

@Override
public boolean onTouchEvent(@NonNull MotionEvent event) {
  //......
  return androidTouchProcessor.onTouchEvent(event);
}
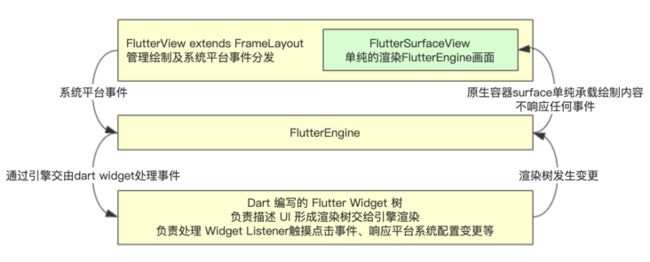
啥感觉?androidTouchProcessor 实例就是前面分析的 FlutterView 中 attachToFlutterEngine 方法里实例化的,本质就是通过 flutterEngine 的 KeyEventChannel 进行事件分发。到此也就应证了我们前面说的,FlutterView 只是一个在安卓端管理的 View,内部的渲染有专门的 View 负责,内部的事件全部通过原生分发到 flutterEngine 进行 dart 代码的触发处理,然后交回原生平台渲染。以 FlutterSurfaceView 为例整体交互流程图很像下面这样:
通过如上超级抽象图其实我们就大概明白了 Flutter 框架的精髓(当然,细节还是很复杂的),也印证了一个纯 Flutter Android App 在原生平台侧的层级结构是下面这样:
FlutterImageView 相关分析
分析完 FlutterRenderer、FlutterSurfaceView、FlutterTextureView 及 FlutterView 之后我们再来看看 FlutterImageView,其实他和上面的 FlutterSurfaceView 等工作流程很像,也是 FlutterView 内部的一种绘制成载体,只是有一些自己的独有特点。FlutterImageView 的主要作用是通过android.media.ImageReader把 Flutter UI 绘制到android.graphics.Canvas上。FlutterView 中 addView 为 FlutterImageView 的方式其实有两种,一种是前面介绍过的,通过 FlutterView 构造函数参数为 FlutterImageView 的方法实现,另一种是通过调用 FlutterView 中的 convertToImageView 方法实现。下面是 FlutterImageView 源码中的核心片段:
@TargetApi(19)
public class FlutterImageView extends View implements RenderSurface {
  //......
  //原生控件的绘制操作
  @Override
  protected void onDraw(Canvas canvas) {
    super.onDraw(canvas);
    //绘制前先更新bitmap数据源
    if (currentImage != null) {
      updateCurrentBitmap();
    }
    //把bitmap画到canvas上面
    if (currentBitmap != null) {
      canvas.drawBitmap(currentBitmap, 0, 0, null);
    }
  }

  @TargetApi(29)
  private void updateCurrentBitmap() {
    if (android.os.Build.VERSION.SDK_INT >= 29) {
      final HardwareBuffer buffer = currentImage.getHardwareBuffer();
      currentBitmap = Bitmap.wrapHardwareBuffer(buffer, ColorSpace.get(ColorSpace.Named.SRGB));
      buffer.close();
    } else {
      final Plane[] imagePlanes = currentImage.getPlanes();
      if (imagePlanes.length != 1) {
        return;
      }

      final Plane imagePlane = imagePlanes[0];
      final int desiredWidth = imagePlane.getRowStride() / imagePlane.getPixelStride();
      final int desiredHeight = currentImage.getHeight();

      if (currentBitmap == null
          || currentBitmap.getWidth() != desiredWidth
          || currentBitmap.getHeight() != desiredHeight) {
        currentBitmap =
            Bitmap.createBitmap(
                desiredWidth, desiredHeight, android.graphics.Bitmap.Config.ARGB_8888);
      }
      ByteBuffer buffer = imagePlane.getBuffer();
      buffer.rewind();
      currentBitmap.copyPixelsFromBuffer(buffer);
    }
  }
  //......
}
可以看到,FlutterImageView 是一个普通原生 View,也实现了 RenderSurface 接口从而实现类似 FlutterSurfaceView 的特性。它的存在主要是解决我们既需要渲染一个 Flutter UI 又想同时渲染一个 PlatformView(关于 PlatformView 我们后面会有专题文章)的场景,因为 PlatformView 默认实现是在原生 FlutterView 上进行 addView 操作,当我们想在 PlatformView 上继续盖一个 Flutter 自己渲染的控件就需要使用 FlutterImageView,通过 FlutterImageView 实现了 Surface(ImageReader) 和 Surface 的堆叠。
