Tensorflow学习:Tensorboard可视化-卷积神经网络CNN应用于手写数字识别(MNIST数据集分类)
Tensorflow学习:Tensorboard可视化-卷积神经网络CNN应用于手写数字识别(MNIST数据集分类)
import tensorflow as tf
from tensorflow.examples.tutorials.mnist import input_data

# 载入数据集
mnist = input_data.read_data_sets("MNST_data", one_hot=True)

# 每个批次的大小:一次性向神经网络中放入100张图片进行训练:以矩阵的形式放进去
batch_size = 100
# 计算一共多少个批次 //:整除
n_batch = mnist.train.num_examples // batch_size


# 定义一个函数:参数概要
def variable_summaries(var):
    with tf.name_scope('summaries'):
        mean = tf.reduce_mean(var)
        tf.summary.scalar('mean', mean)  # 平均值
        with tf.name_scope('stddev'):
            stddev = tf.sqrt(tf.reduce_mean(tf.square(var - mean)))
        tf.summary.scalar('stddev', stddev)  # 标准差
        tf.summary.scalar('max', tf.reduce_max(var))  # 最大值
        tf.summary.scalar('min', tf.reduce_min(var))  # 最小值
        tf.summary.histogram('histogram', var)  # 直方图


# 初始化权值
def weight_variable(shape):
    # 生成一个截断的正态分布
    initial = tf.truncated_normal(shape, stddev=0.1)
    return tf.Variable(initial)


# 初始化偏置值
def bias_variable(shape):
    initial = tf.constant(0.1, shape=shape)
    return tf.Variable(initial)


# 卷积层
def conv2d(x, W):
    '''conv2d:是一个二维的卷积操作,
    x:输入的tensor(数据),数据的形状[batch(批次的大小:100),in_height(长:输入层的长),
    in_width(宽:输入层的宽),in_channels(通道数,如果是黑白的照片就是1,如果是彩色的照片就是2)]
    W:滤波器或者说是卷积核,也是一个tensor(数据),形状[filter_height(滤波器的长),filter_width(滤波器的宽),
    in_channels(输入通道数),out_channels](输出通道数)
    strides:步长,strides[0]=strides[3]=1,strides[1]:代表x方向的步长,strides[2]代表y方向的步长
    padding:same,valid'''
    return tf.nn.conv2d(x, W, strides=[1, 1, 1, 1], padding='SAME')


# 池化层
def max_pool_2x2(x):
    '''输入的tensor(数据),数据的形状[batch(批次的大小:100),in_height(长:输入层的长),
    in_width(宽:输入层的宽),in_channels(通道数,如果是黑白的照片就是1,如果是彩色的照片就是2)]
    ksize:ksize[0]=ksize[3]=1,ksize[0]:x方向的大小,ksize[2]:y方向的大小
    strides:步长,strides[0]=strides[3]=1,strides[1]:代表x方向的步长,strides[2]代表y方向的步长
    padding:same,valid
    '''
    return tf.nn.max_pool(x, ksize=[1, 2, 2, 1], strides=[1, 2, 2, 1], padding='SAME')


# 定义命名空间
with tf.name_scope("input"):
    # 定义两个placeholder
    x = tf.placeholder(tf.float32, [None, 784], name="x_input")  # 28*28
    y = tf.placeholder(tf.float32, [None, 10], name="y_input")
    with tf.name_scope("x_image"):
        # 改变x(一维的)的格式,转化为4D的向量
        '''[batch,in_height,in_width,in_channels]:
        batch:一个批次的大小:前面设置的100,之后会赋值为100
        in_height,in_width:长宽,把784复原为原来28*28的二维的
        in_channels:(通道数,如果是黑白的照片就是1,如果是彩色的照片就是2)
        '''
        x_image = tf.reshape(x, [-1, 28, 28, 1], name="x_image")

with tf.name_scope("Conv1"):
    # 初始化第一个卷积层的权值和偏置值
    with tf.name_scope("W_conv1"):
        # 5*5的采样窗口,32个卷积核从1个(通道数:1表示黑白的)平面抽取特征,输出32个特征平面
        W_conv1 = weight_variable([5, 5, 1, 32])
    with tf.name_scope("b_conv1"):
        # 每一个卷积核一个偏置值
        b_conv1 = bias_variable([32])
    with tf.name_scope("h_conv1"):
        # 把x_image和权值向量进行卷积,再加上偏置值,然后应用于relu激活函数
        h_conv1 = tf.nn.relu(conv2d(x_image, W_conv1) + b_conv1)  # 第一个卷积层得到的结果
    with tf.name_scope("h_pool1"):
        # 把卷积得到的结果传入池化层:进行max-pooling操作,得到第一个经过池化操作得到的结果
        h_pool1 = max_pool_2x2(h_conv1)

with tf.name_scope("Conv2"):
    # 初始化第二个卷积层的权值和偏置值
    with tf.name_scope("W_conv2"):
        # 5*5的采样窗口,64个卷积核从32个平面抽取特征,输出64个特征平面
        W_conv2 = weight_variable([5, 5, 32, 64])
    with tf.name_scope("b_conv2"):
        # 每一个卷积核一个偏置值
        b_conv2 = bias_variable([64])
    with tf.name_scope("h_conv2"):
        # 把x_image和权值向量进行卷积,再加上偏置值,然后应用于relu激活函数
        h_conv2 = tf.nn.relu(conv2d(h_pool1, W_conv2) + b_conv2)  # 第二个卷积层得到的结果
    with tf.name_scope("h_pool2"):
        # 把卷积得到的结果传入池化层:进行max-pooling操作,得到第二个经过池化操作得到的结果
        h_pool2 = max_pool_2x2(h_conv2)

'''28*28的图片第一次卷积后还是28*28,第一次池化后变成14*14,
第二次卷积后还是14*14,第二次池化后变成:7*7,
通过上面的卷积和池化操作后,得到64张7*7的特征图(平面)'''
with tf.name_scope("fc1"):
    # 初始化第一个全连接层的权值
    with tf.name_scope("W_fc1"):
        # 上一层有7*7*64个神经元,全连接层有1024个神经元
        W_fc1 = weight_variable([7 * 7 * 64, 1024])
    with tf.name_scope("b_fc1"):
        # 该层有1024个神经元
        b_fc1 = bias_variable([1024])

    with tf.name_scope("h_pool2_flat"):
        # 把池化层2的输出扁平化为1维
        h_pool2_flat = tf.reshape(h_pool2, [-1, 7 * 7 * 64])
    with tf.name_scope("h_fc1"):
        # 第一个全连接层的输出
        h_fc1 = tf.nn.relu(tf.matmul(h_pool2_flat, W_fc1) + b_fc1)
    with tf.name_scope("keep_drop"):
        # keep_drop用来表示神经元的输出概率
        keep_drop = tf.placeholder(tf.float32)
    with tf.name_scope("h_fc1_drop"):
        h_fc1_drop = tf.nn.dropout(h_fc1, keep_drop)

with tf.name_scope("fc2"):
    # 初始化第二个全连接层:10代表10个分类标签
    with tf.name_scope("W_fc2"):
        W_fc2 = weight_variable([1024, 10])
    with tf.name_scope("b_fc2"):
        b_fc2 = bias_variable([10])
    with tf.name_scope("softmax"):
        # 计算输出:softmax转化为概率得到输出
        prediction = tf.nn.softmax(tf.matmul(h_fc1_drop, W_fc2) + b_fc2)

with tf.name_scope("cross_entropy"):
    # 交叉熵代价函数
    cross_entropy = tf.reduce_mean(tf.nn.softmax_cross_entropy_with_logits(labels=y, logits=prediction))
    tf.summary.scalar("cross_entropy", cross_entropy)
with tf.name_scope("train"):
    # 使用AdamOptimizer进行优化
    train_step = tf.train.AdamOptimizer(1e-4).minimize(cross_entropy)

with tf.name_scope("accuracy"):
    with tf.name_scope("correct_prediction"):
        # 结果存放在一个布尔类型的列表中:argmax:返回一维张量中最大的值得位置,同时也是标签值
        correct_prediction = tf.equal(tf.argmax(prediction, 1), tf.argmax(y, 1))
    with tf.name_scope("accuracy"):
        # 求准确率
        accuracy = tf.reduce_mean(tf.cast(correct_prediction, tf.float32))
        tf.summary.scalar("accuracy", accuracy)

# 合并所有的summary
merged = tf.summary.merge_all()

with tf.Session() as sess:
    # 变量初始化
    sess.run(tf.global_variables_initializer())
    train_writer = tf.summary.FileWriter('log/train', sess.graph)
    test_writer = tf.summary.FileWriter('log/test', sess.graph)
    # 迭代1000个周期
    for step in range(1001):
        # 训练模型
        batch_xs, batch_ys = mnist.train.next_batch(batch_size)
        sess.run(train_step, feed_dict={
     x: batch_xs, y: batch_ys, keep_drop: 0.5})
        # 训练一次后,记录训练集计算的参数
        summary = sess.run(merged, feed_dict={
     x: batch_xs, y: batch_ys, keep_drop: 1.0})
        train_writer.add_summary(summary, step)
        # 训练一次后,记录测试集计算的参数
        batch_xs, batch_ys = mnist.test.next_batch(batch_size)
        summary = sess.run(merged, feed_dict={
     x: batch_xs, y: batch_ys, keep_drop: 1.0})
        test_writer.add_summary(summary, step)

        # 每一百打印
        if step % 100 == 0:
            test_acc = sess.run(accuracy, feed_dict={
     x: mnist.test.images, y: mnist.test.labels, keep_drop: 1.0})
            train_acc = sess.run(accuracy, feed_dict={
     x: mnist.train.images[:10000], y: mnist.test.labels[:10000],
                                                      keep_drop: 1.0})
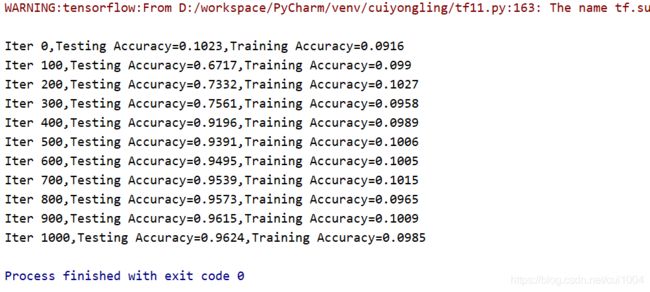
            print("Iter " + str(step) + ",Testing Accuracy=" + str(test_acc) + ",Training Accuracy=" + str(train_acc))
C:\Users\zhzsdiligence>d:

D:\>tensorboard --logdir=D:\workspace\PyCharm\venv\cuiyongling\log
d:\program files\python\lib\site-packages\numpy\_distributor_init.py:32: UserWarning: loaded more than 1 DLL from .libs:
d:\program files\python\lib\site-packages\numpy\.libs\libopenblas.NOIJJG62EMASZI6NYURL6JBKM4EVBGM7.gfortran-win_amd64.dll
d:\program files\python\lib\site-packages\numpy\.libs\libopenblas.PYQHXLVVQ7VESDPUVUADXEVJOBGHJPAY.gfortran-win_amd64.dll
  stacklevel=1)
2020-08-04 23:37:06.363678: W tensorflow/stream_executor/platform/default/dso_loader.cc:59] Could not load dynamic library 'cudart64_101.dll'; dlerror: cudart64_101.dll not found
2020-08-04 23:37:06.415190: I tensorflow/stream_executor/cuda/cudart_stub.cc:29] Ignore above cudart dlerror if you do not have a GPU set up on your machine.
Serving TensorBoard on localhost; to expose to the network, use a proxy or pass --bind_all
TensorBoard 2.3.0 at http://localhost:6006/ (Press CTRL+C to quit)
谷歌浏览器打开:http://localhost:6006/
准确率:

交叉熵损失函数:

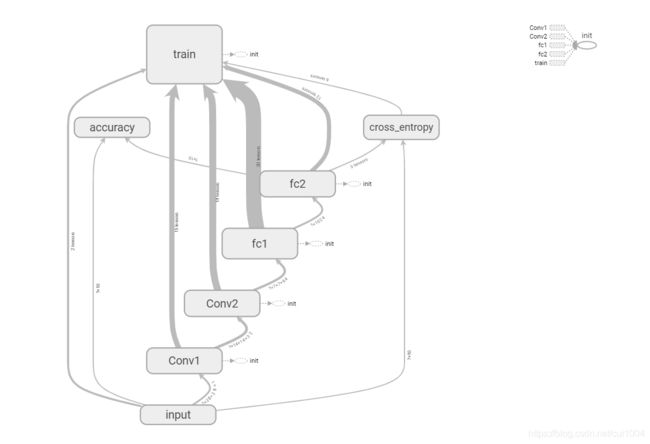
网络结构:

附件:
1、运行结果:链接: https://pan.baidu.com/s/1imozP7bKeEfGTkX1Szfz6A 提取码: mrps
2、MNIST数据集:链接: https://pan.baidu.com/s/1B_DxWdb5knAPAIclV_DIcQ 提取码: kxqj

