nginx安装、前后端分离部署流程
1. 笔记资料来源
笔记来源自 狂神的 nginx讲说 Nginx入门 和 程序羊的 保姆级教程
2. Nginx简介
1. 什么是Nginx?
Nginx (engine x)是一个高性能的HTTP和反向代理web服务器,同时也提供了IMAP/POP3/SMTP服务。Nginx是由伊戈尔·赛索耶夫为俄罗斯访问量第二的Rambleru站点(俄文:PaM6nep)开发的,第一个公开版本0.1.0发布于2004年10月4日。2011年6月1日,nginx 1.0.4发布。
其特点是占有内存少,并发能力强,事实上ngino的并发能力在同类型的网页服务器中表现较好,中国大陆使用nginx网站用户有:百度、京东、新浪、网易、腾讯、淘宝等。在全球活跃的网站中有12.18%的使用比率,大约为2220万个网站。
Nginx是一个安装非常的简单、配置文件非常简洁(还能够支持peri语法)、Bug非常少的服务。Nginx启动特别容易,并且几乎可以做到7*24不间断运行,即使运行数个月也不需要重新启动。你还能够不间断服务的情况下进行软件版本的升级。
Nginx代码完全用C语言从头写成。官方数据测试表明能够支持高达50,000个并发连接数的响应。
2. Nginx的作用
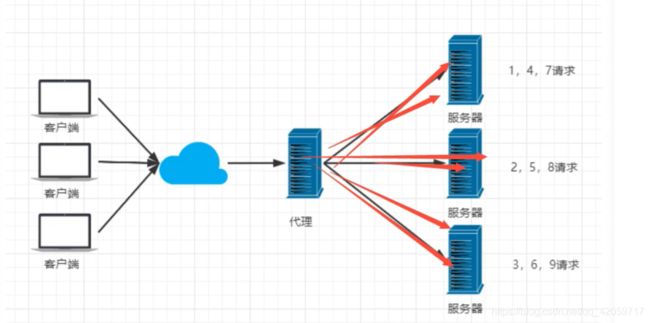
Http代理,反向代理:作为web服务器最常用的作用之一,尤其是反向代理
- 正向代理
- 反向代理
Nginx提供的负载均衡策略有两种,内置策略和扩展策略,
内置策略为轮询、加权轮询、 ip hash 、
扩展策略是由用户自己定义了
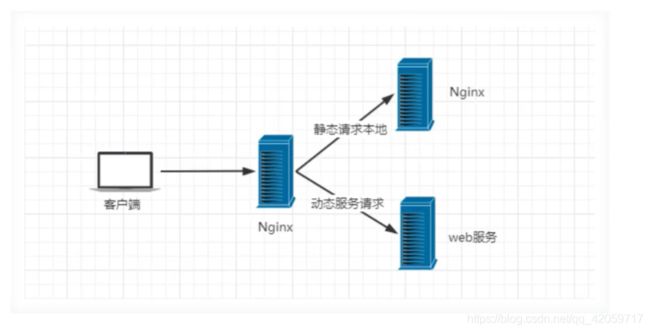
动静分离,在我们的软件开发中,有些请求是需要后台处理的,有些请求是不需要经过后台处理的(如: css、 html.jpg. js等等文件),这些不需要经过后台处理的文件称为静态文件。让动态网站里的动态网页根据一定规则把不变的资源和经常变的资源区分开来,动静资源做好了拆分以后,我们就可以根据静态资源的特点将其做缓存操作。提高资源响应的速度。
3. Nginx安装
1. Windows下安装
- 下载Nginx
下载地址 最好下载稳定版本的,可以下载 nginx/Window-1.16.1,下载成功之后解压就行了
链接: https://pan.baidu.com/s/1G7Qz1fy9jSSttiacpMIL_g 提取码: x4qg
- 直接双击nginx.exe,启动成功会一闪而过
- 使用cmd 启动nginx.exe
错误集锦
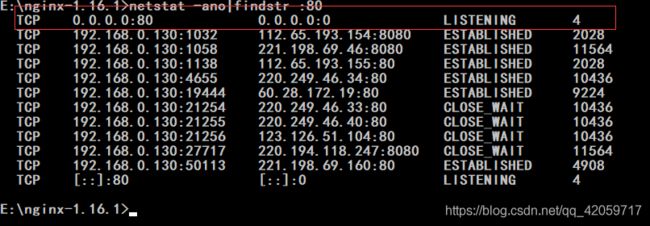
nginx: [emerg] bind() to 0.0.0.0:80 failed (10013: An attempt was made to access a socket in a way forbidden by its access permissions)
错误原因: 80端口被占用
解决办法
-
如果端口号是
4,是System进程占用80端口的话,需要进行关闭,否则直接使用taskkill /pid 4 /f关闭即可 -
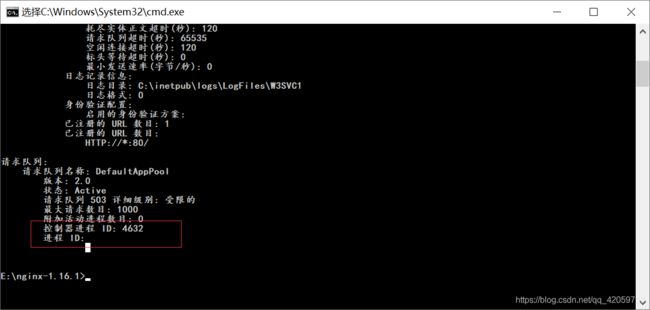
打开任务管理器,找到PID是
4632的进程关闭掉即可,或者是关闭系统的IIS Admin 服务 -
再次进入安装目录
nginx.exe运行nginx,没有任何提示信息访问localhost:80或者localhost出现下边的界面即可,因为 http默认端口是80,所以不加也可以
2. Linux下安装
下载地址 下载成功之后上传到linux中
scp niginx.tar.gz root@ip:/opt
-
查看是否安装nginx
whereis nginx,如果没提示信息就是没有安装 -
使用
tar -zxvf nginx.tar.gz解压 -
cd nginx查看目录,与window应该是一致的 -
在此目录下执行
./configure -
执行
make以及make install -
查看nginx配置目录
whereis nginx -
启动nginx
cd sbin #启动nginx,启动是没有任何提示信息的 ./nginx # 查询是否安装成功 ps -ef|grep nginx # 或者直接访问机器的ip地址,查看是否能出现欢迎页面结课 -
开放端口号
# 查看开放的端口号
firewall-cmd --list-all
#设置需要开放的端口号
firewall-cmd --add-service=http --permanent
firewall-cmd --add-port=80/tcp --permanent
#重启防火墙
firewall-cmd --reload
# 使用iptables 的方法请参考下边的 错误解决办法
# 阿里云或者是腾讯云服务器的话直接在安全组策略添加就行了
错误集锦
执行
./configure报错
Checking for C complier… not found
错误原因:没有安装C编译器
解决办法
yum -y install gccyum -y install gcc-c++yum -y install openssl openssl-devel
更多错误解决办法,请参考 Centos安装Nginx错误集锦
3. Nginx 常用命令
# 进入 nginx目录
cd /usr/local/nginx/sbin/
#启动
./nginx
#停止
./ngins -s stop
# 安全退出
./nginx -s quit
# 重新加载配置文件
./nginx -s reload
# 查看nginx进程
ps aux|grep nginx
4. Nginx配置
1. 配置文件
官方原来的配置文件
#user  nobody;
worker_processes  1;

#error_log  logs/error.log;
#error_log  logs/error.log  notice;
#error_log  logs/error.log  info;

#pid        logs/nginx.pid;
#################以上为nginx的全局配置################

#最大连接数
events {
    worker_connections  1024;
}


http {
    include       mime.types;
    default_type  application/octet-stream;

    #log_format  main  '$remote_addr - $remote_user [$time_local] "$request" '
    #                  '$status $body_bytes_sent "$http_referer" '
    #                  '"$http_user_agent" "$http_x_forwarded_for"';

    #access_log  logs/access.log  main;

    sendfile        on;
    #tcp_nopush     on;

    #keepalive_timeout  0;
    keepalive_timeout  65;

    #gzip  on;

    server {
        listen       80;
        server_name  localhost;

        #charset koi8-r;

        #access_log  logs/host.access.log  main;

        location / {
            root   html;
            index  index.html index.htm;
        }

        #error_page  404              /404.html;

        # redirect server error pages to the static page /50x.html
        #
        error_page   500 502 503 504  /50x.html;
        location = /50x.html {
            root   html;
        }

        # proxy the PHP scripts to Apache listening on 127.0.0.1:80
        #
        #location ~ \.php$ {
        #    proxy_pass   http://127.0.0.1;
        #}

        # pass the PHP scripts to FastCGI server listening on 127.0.0.1:9000
        #
        #location ~ \.php$ {
        #    root           html;
        #    fastcgi_pass   127.0.0.1:9000;
        #    fastcgi_index  index.php;
        #    fastcgi_param  SCRIPT_FILENAME  /scripts$fastcgi_script_name;
        #    include        fastcgi_params;
        #}

        # deny access to .htaccess files, if Apache's document root
        # concurs with nginx's one
        #
        #location ~ /\.ht {
        #    deny  all;
        #}
    }


    # another virtual host using mix of IP-, name-, and port-based configuration
    #
    #server {
    #    listen       8000;
    #    listen       somename:8080;
    #    server_name  somename  alias  another.alias;

    #    location / {
    #        root   html;
    #        index  index.html index.htm;
    #    }
    #}


    # HTTPS server
    #
    #server {
    #    listen       443 ssl;
    #    server_name  localhost;

    #    ssl_certificate      cert.pem;
    #    ssl_certificate_key  cert.key;

    #    ssl_session_cache    shared:SSL:1m;
    #    ssl_session_timeout  5m;

    #    ssl_ciphers  HIGH:!aNULL:!MD5;
    #    ssl_prefer_server_ciphers  on;

    #    location / {
    #        root   html;
    #        index  index.html index.htm;
    #    }
    #}

}
2. 自定义配置
主要用到的就是一下几个内容,修改完成之后使用
nginx -s reload重新加载 Nginx
#user  nobody;
worker_processes  1;

#error_log  logs/error.log;
#error_log  logs/error.log  notice;
#error_log  logs/error.log  info;

#pid        logs/nginx.pid;
########全局配置###########
events {
	# 最大连接数
	worker_connections 1024;
}
###http配置
http{
	upstream lesscoding{
		#负载均衡配置
		server 127.0.0.1:8080 weight=1;
		server 127.0.0.1:8081 weight=1;
	}
	server{
		listen       80;
        server_name  localhost;

        location / {
            root   html;
            index  index.html index.htm;
            proxy_pass http://lesscoding;
        }

		#匹配正则表达式的方式,请求中中带有 test 就会转发到这个地址,主要是PCRE的功劳
		location ~ /test/ {
            proxy_pass http://127.0.0.1:8080;
		}
        error_page   500 502 503 504  /50x.html;
        location = /50x.html {
            root   html;
        }
	}
	server{
		# 监听8081端口
		listen 8081;
		server_name localhost;
	}
}
3. 错误集锦
java.lang.IllegalArgumentException: The character [_] is never valid in a domain name.
解决办法: 检查nginx.conf 中的 upstream 后边跟的名字是否有非法字符 _
惨痛教训:更改文件之后一定要用 nginx -s stop关闭后重启,或者是 nginx -s reload刷新配置文件,而不是直接关闭命令窗口,否则就会出现莫名其妙的400错误
5. 前后端分离配置
什么是动静分离
Nginx 动静分离简单来说就是吧动态跟静态请求分开,不能理解成只是简单的把动态页面和静态页面物理分离,严格来说是把动态请求和静态请求分开,可以理解成 Nginx处理静态页面,Tomcat处理动态页面,大致可以分为两种
- 把静态资源放在单独的服务器上
- 前后端一起发布通过nginx分开
1. 前端打包
前端使用
npm run build(:prod) 打包,将生成的dist目录上传到服务器
- 修改
nginx.conf
#最上边的 user 修改为 root,但是也有人不建议用root账户,看个人需求吧
user root;
# 找到 server标签下边的 location
location / {
	root #上传之后的dist的路径;
	index index.html index.htm;
}
- 启动nginx
# 进入nginx安装目录
cd /usr/local/nginx/sbin
#运行nginx
./nginx
2. 后端打包
后端使用 maven 打包成 jar包直接运行或者是达成 war 包放在tomcat容器里边运行
打 war 包请参考 https://blog.csdn.net/qq_42059717/article/details/119718896
- 后端打包
mvn clean package
- 后端运行jar 包
nohup java -jar demo.jar & nohup.out
3. 修改nginx配置文件
这里不知道放什么,先放这个占着位置
- 修改配置文件
http{
	#权重越大,访问的几率越大
	upstream demo {
		server 127.0.0.1:8080 weight=1;
		server 127.0.0.1:8081 weight=10;
	}
	server{
		location / {
			root /root/workspace/demo/dost;
			index index.html index.htm;
		}

        location ~ /demo/ {
        	proxy_set_header Host $http_host;
			proxy_set_header X-Real-IP $remote_addr;
			proxy_set_header REMOTE-HOST $remote_addr;
			proxy_set_header X-Forwarded-For $proxy_add_x_forwarded_for;
			proxy_pass http://demo/; #直接写ip也行
		}
	}
}
- 重启nginx
# 进入 nginx安装目录
cd /usr/local/nginx/sbin
#重新加载配置文件
./nginx -s reload
4. 后端部署war包配置
- 将 war 包放到 tomcat目录下
#进入tomcat
cd /usr/local/tomcat/apache-tomcat
# 进入webapps目录
cd webapps/
# 复制文件到当前目录
cp /root/woekspeace/demo/demo.war ./
# 或者使用mv命令进行移动
mv /root.workspace/demo/demo.war ./
- 启动 tomcat
service tomcat start
这样之后必须要在端口号之后加上我们的目录名称才能够访问到我们的项目
- 修改 tomcat配置文件
#进入tomcat的配置目录
cd /usr/local/tomcat/apache-tomcat/conf
#编辑配置文件
vim server.xml
#输入/Host 或者是 ?Host快速定位
?Host
#按 i 进入编辑模式 在变迁内添加下列内容
<Context path="" docBase="/usr/local/src/apache-tomcat-7.0.106/webapps/demo" debug="0" privileged="true" reloadable="true"/>
# esc 退出编辑模式保存退出
:wq!
#重启tomcat
service tomcat stop
service tomcat start


