deeplearning.16浅层神经网络阶段性检测
建立浅层神经网络进行训练
-
-
- 安装包
- 加载和查看数据集
- 使用logistic回归测试分类效果
- 构建神经网络模型
-
- 定义神经网络结构
- 初始化模型的参数
- 循环正向传播函数
- 计算成本函数
- 反向传播函数
- 参数更新
- 整合
- 预测
- 正式运行
- 更改隐藏层节点数量查看影响
- 完整代码
-
安装包
导入作业过程中需要的所有软件包,在导入包之前,先下载一些准备资料,有两个文件,进入网页后,点击下载这两个文件。(下载链接),下载到我们的工程文件夹内,和下边要写的主文件同一目录下。

import numpy as np
import matplotlib.pyplot as plt
from testCases import *
import sklearn
import sklearn.datasets
import sklearn.linear_model
from planar_utils import plot_decision_boundary, sigmoid, load_planar_dataset, load_extra_datasets
加载和查看数据集
继续追加下列代码,然后出现一张图。使用matplotlib可视化数据集。 数据看起来像是带有一些红色(标签y = 0)和一些蓝色(y = 1)点的“花”。 我们的目标是建立一个适合该数据的分类模型。
X, Y = load_planar_dataset()
plt.scatter(X[0, :], X[1, :], c=Y, s=40, cmap=plt.cm.Spectral) #绘制散点图
# 上一语句如出现问题,请使用下面的语句:
# plt.scatter(X[0, :], X[1, :], c=np.squeeze(Y), s=40, cmap=plt.cm.Spectral) #绘制散点图
# 显示绘制的散点图
plt.show()
- 包含特征(x1,x2)的numpy数组(矩阵)X
- 包含标签(红色:0,蓝色:1)的numpy数组(向量)Y。、
继续深入观察我们的数据。追加下列代码,如下图所示,我们获得了数据的一些维度和数据的个数。
shape_X = X.shape
shape_Y = Y.shape
m = Y.shape[1]  # 训练集里面的数量

print ("X的维度为: " + str(shape_X))
print ("Y的维度为: " + str(shape_Y))
print ("数据集里面的数据有:" + str(m) + " 个")
使用logistic回归测试分类效果
追加下列代码,使用sklearn的内置函数来做到这一点, 运行下面的代码来训练数据集上的逻辑回归分类器。
clf = sklearn.linear_model.LogisticRegressionCV()
clf.fit(X.T,Y.T)
追加下列代码,绘制该模型的决策边界(即分类结果)。发现逻辑回归的准确性只有:47 % (正确标记的数据点所占的百分比)。准确性只有47%的原因是数据集不是线性可分的,所以逻辑回归表现不佳,现在我们正式开始构建神经网络。
plot_decision_boundary(lambda x: clf.predict(x), X, Y) #绘制决策边界
plt.title("Logistic Regression") #图标题
LR_predictions  = clf.predict(X.T) #预测结果
print ("逻辑回归的准确性: %d " % float((np.dot(Y, LR_predictions) +
		np.dot(1 - Y,1 - LR_predictions)) / float(Y.size) * 100) +
       "% " + "(正确标记的数据点所占的百分比)")
构建神经网络模型

提示:
建立神经网络的一般方法是:
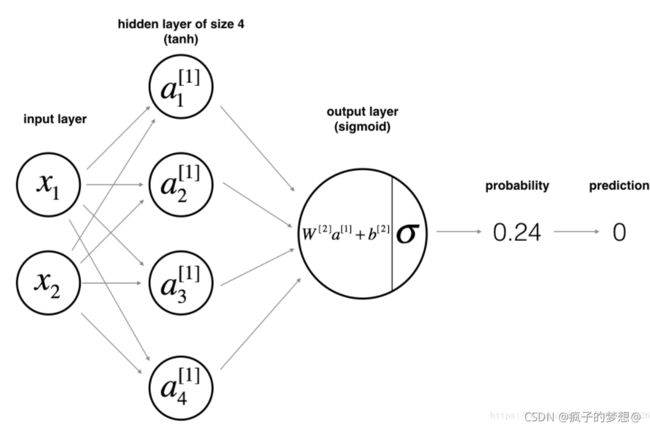
1.定义神经网络结构(输入单元数,隐藏单元数等)。
2.初始化模型的参数
3.循环:
- 实现前向传播
- 计算损失
- 后向传播以获得梯度
- 更新参数(梯度下降)
我们通常会构建辅助函数来计算第1-3步,然后将它们合并为nn_model()函数。一旦构建了nn_model()并学习了正确的参数,就可以对新数据进行预测。
定义神经网络结构
- n_x:输入层的大小
- n_h:隐藏层的大小(将其设置为4)
- n_y:输出层的大小
def layer_sizes(X , Y):
    """
    参数:
     X - 输入数据集,维度为(输入的数量,训练/测试的数量)
     Y - 标签,维度为(输出的数量,训练/测试数量)

    返回:
     n_x - 输入层的数量
     n_h - 隐藏层的数量
     n_y - 输出层的数量
    """
    n_x = X.shape[0] #输入层
    n_h = 4 #,隐藏层,硬编码为4
    n_y = Y.shape[0] #输出层

    return (n_x,n_h,n_y)
测试刚刚定义的神经网络结构函数
# 测试layer_sizes
print("=========================测试layer_sizes=========================")
# 其中layer_sizes_test_case()在我们的testCases.py中已经定义好了
X_asses , Y_asses = layer_sizes_test_case()
(n_x,n_h,n_y) =  layer_sizes(X_asses,Y_asses)
print("输入层的节点数量为: n_x = " + str(n_x))
print("隐藏层的节点数量为: n_h = " + str(n_h))
print("输出层的节点数量为: n_y = " + str(n_y))
初始化模型的参数
在这里,我们要实现函数initialize_parameters()。我们要确保我们的参数大小合适,如果需要的话,请参考上面的神经网络图。我们将会用随机值初始化权重矩阵,使用np.random.randn(a,b)* 0.01来随机初始化一个维度为(a,b)的权重矩阵。
将偏向量初始化为零,使用
np.zeros((a,b))初始化维度为(a,b)的零矩阵。
def initialize_parameters( n_x , n_h ,n_y):
    """
    参数:
        n_x - 输入层节点的数量
        n_h - 隐藏层节点的数量
        n_y - 输出层节点的数量

    返回:
        parameters - 包含参数的字典:
            W1 - 权重矩阵,维度为(n_h,n_x)
            b1 - 偏向量,维度为(n_h,1)
            W2 - 权重矩阵,维度为(n_y,n_h)
            b2 - 偏向量,维度为(n_y,1)

    """
    np.random.seed(2) #指定一个随机种子,以便你的输出与我的一样。
    W1 = np.random.randn(n_h,n_x) * 0.01
    b1 = np.zeros(shape=(n_h, 1))
    W2 = np.random.randn(n_y,n_h) * 0.01
    b2 = np.zeros(shape=(n_y, 1))

    #使用assert强制确保我的数据格式是正确的
    assert(W1.shape == ( n_h , n_x ))
    assert(b1.shape == ( n_h , 1 ))
    assert(W2.shape == ( n_y , n_h ))
    assert(b2.shape == ( n_y , 1 ))

    parameters = {
     "W1" : W1,
	              "b1" : b1,
	              "W2" : W2,
	              "b2" : b2 }

    return parameters
循环正向传播函数
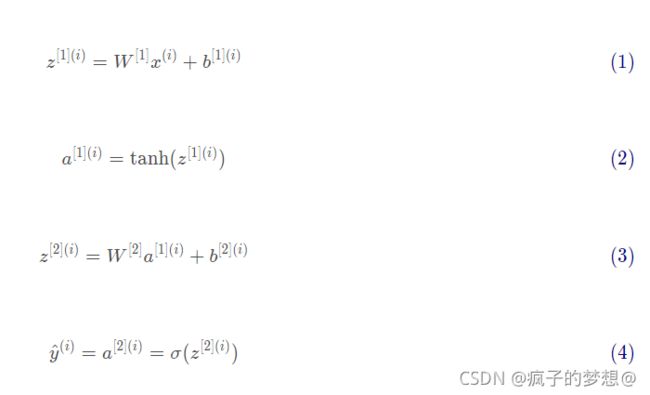
我们现在要实现前向传播函数forward_propagation()。我们可以使用sigmoid()函数,也可以使用numpy库中的np.tanh()函数。
步骤如下:
- 使用字典类型的parameters(它是initialize_parameters() 的输出)检索每个参数。
- 实现前向传播, 计算Z[1],A[1],Z[2],A[2]( 训练集里面所有例子的预测向量)。
- 反向传播所需的值存储在“cache”中,cache将作为反向传播函数的输入。
def forward_propagation( X , parameters ):
    """
    参数:
         X - 维度为(n_x,m)的输入数据。
         parameters - 初始化函数(initialize_parameters)的输出

    返回:
         A2 - 使用sigmoid()函数计算的第二次激活后的数值
         cache - 包含“Z1”,“A1”,“Z2”和“A2”的字典类型变量
     """
    W1 = parameters["W1"]
    b1 = parameters["b1"]
    W2 = parameters["W2"]
    b2 = parameters["b2"]
    #前向传播计算A2
    Z1 = np.dot(W1 , X) + b1
    A1 = np.tanh(Z1)
    Z2 = np.dot(W2 , A1) + b2
    A2 = sigmoid(Z2)
    #使用断言确保我的数据格式是正确的
    assert(A2.shape == (1,X.shape[1]))
    cache = {
     "Z1": Z1,
             "A1": A1,
             "Z2": Z2,
             "A2": A2}

    return (A2, cache)
计算成本函数
logprobs = np.multiply(np.log(A2),Y)
cost = - np.sum(logprobs)                # 不需要使用循环就可以直接算出来。
def compute_cost(A2,Y,parameters):
    """
    计算方程(6)中给出的交叉熵成本,

    参数:
         A2 - 使用sigmoid()函数计算的第二次激活后的数值
         Y - "True"标签向量,维度为(1,数量)
         parameters - 一个包含W1,B1,W2和B2的字典类型的变量

    返回:
         成本 - 交叉熵成本给出方程(13)
    """

    m = Y.shape[1]
    W1 = parameters["W1"]
    W2 = parameters["W2"]

    #计算成本
    logprobs = logprobs = np.multiply(np.log(A2), Y) + np.multiply((1 - Y), np.log(1 - A2))
    cost = - np.sum(logprobs) / m
    cost = float(np.squeeze(cost))

    assert(isinstance(cost,float))

    return cost
反向传播函数
通过使用在前向传播期间计算的缓存,可以实现反向传播。由于正在构建向量化的实现,因此我们将需要使用这下面的六个方程:

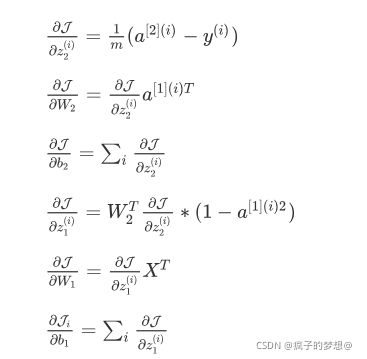
提示:要计算dZ1,首先需要计算g[1]’(z[1]),这里的g[1] (z)用的是tanh激活函数,如果a=g[1] (z), 所以g[1]’(z)=1-a^2。所以可以使用(1 - np.power(A1, 2))来计算g[1]’(z[1])。
def backward_propagation(parameters,cache,X,Y):
    """
    使用上述说明搭建反向传播函数。

    参数:
     parameters - 包含我们的参数的一个字典类型的变量。
     cache - 包含“Z1”,“A1”,“Z2”和“A2”的字典类型的变量。
     X - 输入数据,维度为(2,数量)
     Y - “True”标签,维度为(1,数量)

    返回:
     grads - 包含W和b的导数一个字典类型的变量。
    """
    m = X.shape[1]

    W1 = parameters["W1"]
    W2 = parameters["W2"]

    A1 = cache["A1"]
    A2 = cache["A2"]

    dZ2= A2 - Y
    dW2 = (1 / m) * np.dot(dZ2, A1.T)
    db2 = (1 / m) * np.sum(dZ2, axis=1, keepdims=True)
    dZ1 = np.multiply(np.dot(W2.T, dZ2), 1 - np.power(A1, 2))
    dW1 = (1 / m) * np.dot(dZ1, X.T)
    db1 = (1 / m) * np.sum(dZ1, axis=1, keepdims=True)
    grads = {
     "dW1": dW1,
             "db1": db1,
             "dW2": dW2,
             "db2": db2 }

    return grads
参数更新
def update_parameters(parameters,grads,learning_rate=1.2):
    """
    使用上面给出的梯度下降更新规则更新参数

    参数:
     parameters - 包含参数的字典类型的变量。
     grads - 包含导数值的字典类型的变量。
     learning_rate - 学习速率

    返回:
     parameters - 包含更新参数的字典类型的变量。
    """
    W1,W2 = parameters["W1"],parameters["W2"]
    b1,b2 = parameters["b1"],parameters["b2"]

    dW1,dW2 = grads["dW1"],grads["dW2"]
    db1,db2 = grads["db1"],grads["db2"]

    W1 = W1 - learning_rate * dW1
    b1 = b1 - learning_rate * db1
    W2 = W2 - learning_rate * dW2
    b2 = b2 - learning_rate * db2

    parameters = {
     "W1": W1,
                  "b1": b1,
                  "W2": W2,
                  "b2": b2}

    return parameters
整合
把定义的东西整合到nn_model()中,神经网络模型必须以正确的顺序使用先前的功能。
def nn_model(X,Y,n_h,num_iterations,print_cost=False):
    """
    参数:
        X - 数据集,维度为(2,示例数)
        Y - 标签,维度为(1,示例数)
        n_h - 隐藏层的数量
        num_iterations - 梯度下降循环中的迭代次数
        print_cost - 如果为True,则每1000次迭代打印一次成本数值

    返回:
        parameters - 模型学习的参数,它们可以用来进行预测。
     """

    np.random.seed(3) #指定随机种子
    n_x = layer_sizes(X, Y)[0]
    n_y = layer_sizes(X, Y)[2]

    parameters = initialize_parameters(n_x,n_h,n_y)
    W1 = parameters["W1"]
    b1 = parameters["b1"]
    W2 = parameters["W2"]
    b2 = parameters["b2"]

    for i in range(num_iterations):
        A2 , cache = forward_propagation(X,parameters)
        cost = compute_cost(A2,Y,parameters)
        grads = backward_propagation(parameters,cache,X,Y)
        parameters = update_parameters(parameters,grads,learning_rate = 0.5)

        if print_cost:
            if i%1000 == 0:
                print("第 ",i," 次循环,成本为:"+str(cost))
    return parameters
预测
使用模型通过构建predict()函数进行预测。使用正向传播来预测结果。
def predict(parameters,X):
    """
    使用学习的参数,为X中的每个示例预测一个类

    参数:
		parameters - 包含参数的字典类型的变量。
	    X - 输入数据(n_x,m)

    返回
		predictions - 我们模型预测的向量(红色:0 /蓝色:1)

     """
    A2 , cache = forward_propagation(X,parameters)
    predictions = np.round(A2)

    return predictions
正式运行
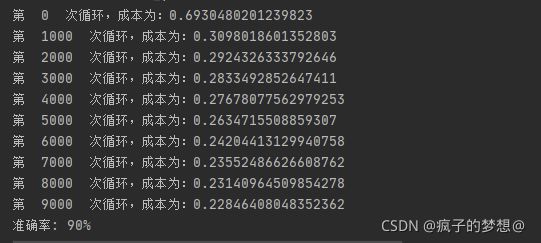
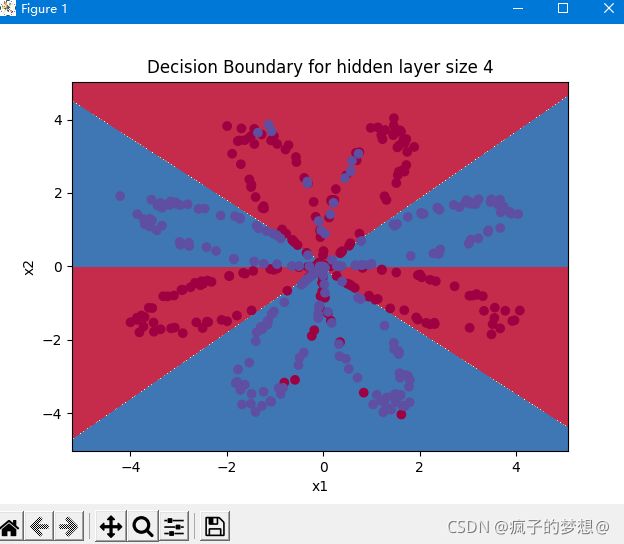
现在运行模型以查看其如何在二维数据集上运行。 运行以下代码以使用含有n_h个隐藏单元的单个隐藏层测试模型。可以看到以下输出,准确率为百分之90%。
parameters = nn_model(X, Y, n_h = 4, num_iterations=10000, print_cost=True)

#绘制边界
plot_decision_boundary(lambda x: predict(parameters, x.T), X, Y)
plt.title("Decision Boundary for hidden layer size " + str(4))
plt.show()
predictions = predict(parameters, X)
print ('准确率: %d' % float((np.dot(Y, predictions.T) + np.dot(1 - Y, 1 - predictions.T)) / float(Y.size) * 100) + '%')
更改隐藏层节点数量查看影响
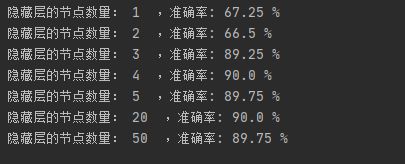
我们上面的实验把隐藏层定为4个节点,现在我们更改隐藏层里面的节点数量,看一看节点数量是否会对结果造成影响。输出结果如下,我们可以看到节点数量为5或者20是准确率最高的。
**注意:**做神经网络训练时,会期望一边执行程序,一边能看到相应的loss变化。执行类似上述功能的代码时,plt.show()之后的代码在关闭figure之后才会继续执行,这样就会导致我们训练被中断,在代码中的体现为“print(x)”在plt.show()显示的figure图像窗口关闭后才会被执行。使用plt.savefig(),可以把每个epoch-loss图保存到本地,而不中断程序。
例如:
import matplotlib.pyplot as plt

epoch = [0,1,2]
loss = [0,1,0]

plt.plot(epoch,loss)
epoch = len(loss)
filePath = './checkpoints/lossMap/' + str(epoch) + '_loss'
plt.savefig(filePath)
下列代码是更改节点数量查看影响的代码
plt.figure(figsize=(16, 32))
hidden_layer_sizes = [1, 2, 3, 4, 5, 20, 50] #隐藏层数量
for i, n_h in enumerate(hidden_layer_sizes):
    plt.subplot(5, 2, i + 1)
    plt.title('Hidden Layer of size %d' % n_h)
    parameters = nn_model(X, Y, n_h, num_iterations=5000)
    plot_decision_boundary(lambda x: predict(parameters, x.T), X, Y)
    plt.show()
    predictions = predict(parameters, X)
    accuracy = float((np.dot(Y, predictions.T) + np.dot(1 - Y, 1 - predictions.T)) / float(Y.size) * 100)
    print ("隐藏层的节点数量: {}  ,准确率: {} %".format(n_h, accuracy))
说明:
- 较大的模型(具有更多隐藏的单元)能够更好地拟合训练集,直到最终最大的模型过拟合数据为止。
- 隐藏层的最佳大小似乎在n_h = 5左右。的确,此值似乎很好地拟合了数据,而又不会引起明显的过度拟合。
- 学习使用正则化,可以帮助构建更大的模型(例如n_h = 50)而不会过度拟合。
完整代码
# 引入所用的库
import numpy as np
import matplotlib.pyplot as plt
from testCases import *
import sklearn
import sklearn.datasets
import sklearn.linear_model
from planar_utils import plot_decision_boundary, sigmoid, load_planar_dataset, load_extra_datasets

# 设置一个固定的随机种子,以保证接下来的步骤中我们的结果是一致的
np.random.seed(1)
# 加载和查看数据集
X, Y = load_planar_dataset()
# 绘制散点图
# plt.scatter(X[0, :], X[1, :], c=Y, s=40, cmap=plt.cm.Spectral)

# 上一语句如出现问题,请使用下面的语句绘制散点图:
plt.scatter(X[0, :], X[1, :], c=np.squeeze(Y), s=40, cmap=plt.cm.Spectral)
# 显示绘制的散点图
plt.show()

# 了解数据属性
shape_X = X.shape
shape_Y = Y.shape
m = Y.shape[1]  # 训练集里面的数量

print("X的维度为: " + str(shape_X))
print("Y的维度为: " + str(shape_Y))
print("数据集里面的数据有:" + str(m) + " 个")
# 使用sklearn的内置函数来来训练数据集上的逻辑回归分类器。
clf = sklearn.linear_model.LogisticRegressionCV()
clf.fit(X.T,Y.T)
# 【把逻辑回归分类器的分类绘制出来:
# 绘制决策边界
# plot_decision_boundary(lambda x: clf.predict(x), X, Y)
# 图标题
# plt.title("Logistic Regression")
# 预测结果
# LR_predictions= clf.predict(X.T)
#print("逻辑回归的准确性: %d " % float((np.dot(Y, LR_predictions) + np.dot(1 - Y,1 - LR_predictions)) / float(Y.size) * 100)
#      + "%" + "(正确标记的数据点所占的百分比)")】

# 构建神经网络
# 定义神经网络结构
def layer_sizes(X, Y):
    """
    参数:
     X - 输入数据集,维度为(输入的数量,训练/测试的数量)
     Y - 标签,维度为(输出的数量,训练/测试数量)

    返回:
     n_x - 输入层的数量
     n_h - 隐藏层的数量
     n_y - 输出层的数量
    """
    n_x = X.shape[0]  # 输入层
    n_h = 4  # ,隐藏层,硬编码为4
    n_y = Y.shape[0]  # 输出层
    return (n_x,n_h,n_y)
# 测试layer_sizes
print("=========================测试layer_sizes=========================")
# 其中layer_sizes_test_case()在我们的testCases.py中已经定义好了
X_asses , Y_asses = layer_sizes_test_case()
(n_x,n_h,n_y) =  layer_sizes(X_asses,Y_asses)
print("输入层的节点数量为: n_x = " + str(n_x))
print("隐藏层的节点数量为: n_h = " + str(n_h))
print("输出层的节点数量为: n_y = " + str(n_y))

# 初始化模型参数
def initialize_parameters(n_x, n_h, n_y):
    """
    参数:
        n_x - 输入层节点的数量
        n_h - 隐藏层节点的数量
        n_y - 输出层节点的数量

    返回:
        parameters - 包含参数的字典:
            W1 - 权重矩阵,维度为(n_h,n_x)
            b1 - 偏向量,维度为(n_h,1)
            W2 - 权重矩阵,维度为(n_y,n_h)
            b2 - 偏向量,维度为(n_y,1)

    """
    np.random.seed(2)  # 指定一个随机种子,以便你的输出与我们的一样。
    W1 = np.random.randn(n_h, n_x) * 0.01
    b1 = np.zeros(shape=(n_h, 1))
    W2 = np.random.randn(n_y, n_h) * 0.01
    b2 = np.zeros(shape=(n_y, 1))

    # 使用断言确保我的数据格式是正确的
    assert (W1.shape == (n_h, n_x))
    assert (b1.shape == (n_h, 1))
    assert (W2.shape == (n_y, n_h))
    assert (b2.shape == (n_y, 1))

    parameters = {
     "W1": W1,
                  "b1": b1,
                  "W2": W2,
                  "b2": b2}

    return parameters

# 循环前向传播
def forward_propagation(X, parameters):
    """
    参数:
         X - 维度为(n_x,m)的输入数据。
         parameters - 初始化函数(initialize_parameters)的输出

    返回:
         A2 - 使用sigmoid()函数计算的第二次激活后的数值
         cache - 包含“Z1”,“A1”,“Z2”和“A2”的字典类型变量
     """
    W1 = parameters["W1"]
    b1 = parameters["b1"]
    W2 = parameters["W2"]
    b2 = parameters["b2"]
    # 前向传播计算A2
    Z1 = np.dot(W1, X) + b1
    A1 = np.tanh(Z1)
    Z2 = np.dot(W2, A1) + b2
    A2 = sigmoid(Z2)
    # 使用assert确保我的数据格式是正确的
    assert (A2.shape == (1, X.shape[1]))
    cache = {
     "Z1": Z1,
             "A1": A1,
             "Z2": Z2,
             "A2": A2}
    return (A2, cache)

# 成本函数计算
def compute_cost(A2, Y, parameters):
    """
    计算方程(6)中给出的交叉熵成本,

    参数:
         A2 - 使用sigmoid()函数计算的第二次激活后的数值
         Y - "True"标签向量,维度为(1,数量)
         parameters - 一个包含W1,B1,W2和B2的字典类型的变量

    返回:
         成本 - 交叉熵成本给出方程(13)
    """

    m = Y.shape[1]
    W1 = parameters["W1"]
    W2 = parameters["W2"]

    # 计算成本
    logprobs = logprobs = np.multiply(np.log(A2), Y) + np.multiply((1 - Y), np.log(1 - A2))
    cost = - np.sum(logprobs) / m
    cost = float(np.squeeze(cost))

    assert (isinstance(cost, float))

    return cost
# 反向传播函数
def backward_propagation(parameters, cache, X, Y):
    """
    使用上述说明搭建反向传播函数。

    参数:
     parameters - 包含我们的参数的一个字典类型的变量。
     cache - 包含“Z1”,“A1”,“Z2”和“A2”的字典类型的变量。
     X - 输入数据,维度为(2,数量)
     Y - “True”标签,维度为(1,数量)

    返回:
     grads - 包含W和b的导数一个字典类型的变量。
    """
    m = X.shape[1]

    W1 = parameters["W1"]
    W2 = parameters["W2"]

    A1 = cache["A1"]
    A2 = cache["A2"]

    dZ2 = A2 - Y
    dW2 = (1 / m) * np.dot(dZ2, A1.T)
    db2 = (1 / m) * np.sum(dZ2, axis=1, keepdims=True)
    dZ1 = np.multiply(np.dot(W2.T, dZ2), 1 - np.power(A1, 2))
    dW1 = (1 / m) * np.dot(dZ1, X.T)
    db1 = (1 / m) * np.sum(dZ1, axis=1, keepdims=True)
    grads = {
     "dW1": dW1,
             "db1": db1,
             "dW2": dW2,
             "db2": db2}

    return grads
# 参数更新
def update_parameters(parameters, grads, learning_rate=1.2):
    """
    使用上面给出的梯度下降更新规则更新参数

    参数:
     parameters - 包含参数的字典类型的变量。
     grads - 包含导数值的字典类型的变量。
     learning_rate - 学习速率

    返回:
     parameters - 包含更新参数的字典类型的变量。
    """
    W1, W2 = parameters["W1"], parameters["W2"]
    b1, b2 = parameters["b1"], parameters["b2"]

    dW1, dW2 = grads["dW1"], grads["dW2"]
    db1, db2 = grads["db1"], grads["db2"]

    W1 = W1 - learning_rate * dW1
    b1 = b1 - learning_rate * db1
    W2 = W2 - learning_rate * dW2
    b2 = b2 - learning_rate * db2

    parameters = {
     "W1": W1,
                  "b1": b1,
                  "W2": W2,
                  "b2": b2}

    return parameters

# 整合
def nn_model(X, Y, n_h, num_iterations, print_cost=False):
    """
    参数:
        X - 数据集,维度为(2,示例数)
        Y - 标签,维度为(1,示例数)
        n_h - 隐藏层的数量
        num_iterations - 梯度下降循环中的迭代次数
        print_cost - 如果为True,则每1000次迭代打印一次成本数值

    返回:
        parameters - 模型学习的参数,它们可以用来进行预测。
     """

    np.random.seed(3)  # 指定随机种子
    n_x = layer_sizes(X, Y)[0]
    n_y = layer_sizes(X, Y)[2]

    parameters = initialize_parameters(n_x, n_h, n_y)
    W1 = parameters["W1"]
    b1 = parameters["b1"]
    W2 = parameters["W2"]
    b2 = parameters["b2"]

    for i in range(num_iterations):
        A2, cache = forward_propagation(X, parameters)
        cost = compute_cost(A2, Y, parameters)
        grads = backward_propagation(parameters, cache, X, Y)
        parameters = update_parameters(parameters, grads, learning_rate=0.5)

        if print_cost:
            if i % 1000 == 0:
                print("第 ", i, " 次循环,成本为:" + str(cost))
    return parameters

# 预测
# 通过前向传播预测
def predict(parameters, X):
    """
    使用学习的参数,为X中的每个示例预测一个类

    参数:
		parameters - 包含参数的字典类型的变量。
	    X - 输入数据(n_x,m)

    返回
		predictions - 我们模型预测的向量(红色:0 /蓝色:1)

     """
    A2, cache = forward_propagation(X, parameters)
    predictions = np.round(A2)

    return predictions

# 运行
parameters = nn_model(X, Y, n_h = 4, num_iterations=10000, print_cost=True)

#绘制边界
plot_decision_boundary(lambda x: predict(parameters, x.T), X, Y)
plt.title("Decision Boundary for hidden layer size " + str(4))
plt.show()

predictions = predict(parameters, X)
print('准确率: %d' % float((np.dot(Y, predictions.T) + np.dot(1 - Y, 1 - predictions.T)) / float(Y.size) * 100) + '%')

# 更改隐藏层的节点数量,查看影响。
plt.figure(figsize=(16, 32))
hidden_layer_sizes = [1, 2, 3, 4, 5, 20, 50] #隐藏层数量
for i, n_h in enumerate(hidden_layer_sizes):
    plt.subplot(5, 2, i + 1)
    plt.title('Hidden Layer of size %d' % n_h)
    parameters = nn_model(X, Y, n_h, num_iterations=5000)
    plot_decision_boundary(lambda x: predict(parameters, x.T), X, Y)
    plt.show()
    predictions = predict(parameters, X)
    accuracy = float((np.dot(Y, predictions.T) + np.dot(1 - Y, 1 - predictions.T)) / float(Y.size) * 100)
    print ("隐藏层的节点数量: {}  ,准确率: {} %".format(n_h, accuracy))


