该文章描述了一个基于SpringBoot程序的支付宝支付demo,由于是个人开发者而非企业,因此设计到的技术较为简单,功能也有局限,适合初学者入门学习【我自己就是哈哈哈】
准备工作
流程简介
该图截取于支付宝开放平台官网,描述了消费者和商户【开发者】服务器和支付宝服务间的请求流程,可以看到用户是通过商户的服务器进行发送支付请求,再由消费者输入相关用户登录信息和支付信息【该流程商户服务器无法干预和监听】,用户和支付宝方的结果会由支付宝服务器通知回商户服务器,商户服务器可以编写对应的逻辑去处理。
获取相关支付秘钥信息
由于是个人开发,没有企业的营业执照,因此自己采取的是使用沙箱模型进行支付宝模拟,对应的,支付宝扫码软件需要是沙箱版的支付宝,沙箱支付宝下载地址:支付宝
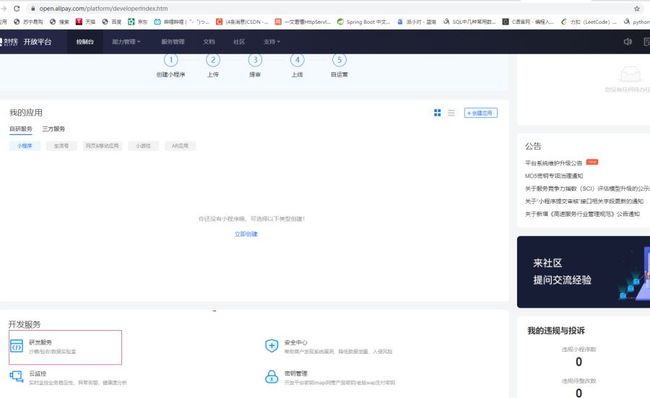
首先登陆蚂蚁金服开放平台,登录后进入管理中心
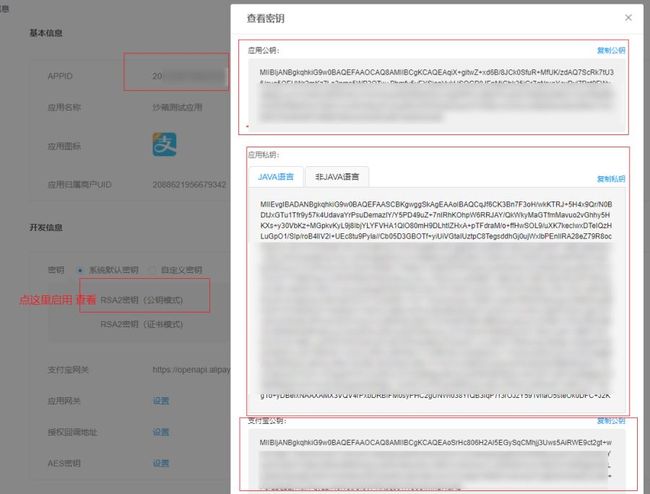
登录后点击该服务,进入后可以查看到属于自己的沙箱测试账号和一些公钥私钥等信息
com.alipay.sdk alipay-sdk-java 4.17.5.ALL com.google.zxing core 3.3.0 com.google.zxing javase 3.3.0
这些信息很重要,我们可以在配置类中去定义配置这些信息,这里给出一个支付宝官方给出的配置类。
import java.io.FileWriter;
import java.io.IOException;
public class AlipayConfig {
//↓↓↓↓↓↓↓↓↓↓请在这里配置您的基本信息↓↓↓↓↓↓↓↓↓↓↓↓↓↓↓
// 应用ID,您的APPID,收款账号既是您的APPID对应支付宝账号
public static String app_id = "你的APPID";
// 商户私钥,您的PKCS8格式RSA2私钥
public static String merchant_private_key = "你的私钥";
// 支付宝公钥,查看地址:https://openhome.alipay.com/platform/keyManage.htm 对应APPID下的支付宝公钥。
public static String alipay_public_key="你的应用公钥";
// 下面是两个回调地址,指支付成功后用户会跳转到哪些页面,不填也可以
// 服务器异步通知页面路径 需http://格式的完整路径,不能加?id=123这类自定义参数,必须外网可以正常访问
public static String notify_url = "http://工程公网访问地址/alipay.trade.page.pay-JAVA-UTF-8/notify_url.jsp";
// 页面跳转同步通知页面路径 需http://格式的完整路径,不能加?id=123这类自定义参数,必须外网可以正常访问
public static String return_url = "http://工程公网访问地址/alipay.trade.page.pay-JAVA-UTF-8/return_url.jsp";
// 签名方式
public static String sign_type = "RSA2";
// 字符编码格式
public static String charset = "UTF-8";
// 沙箱支付宝网关 正式支付网关是 https://openapi.alipay.com/gateway.do 千万不要混淆了
public static String gatewayUrl = "https://openapi.alipaydev.com/gateway.do";
// 支付宝网关
public static String log_path = "C:\\";
// json格式
public static String format = "json";
//↑↑↑↑↑↑↑↑↑↑请在这里配置您的基本信息↑↑↑↑↑↑↑↑↑↑↑↑↑↑↑
/**
* 写日志,方便测试(看网站需求,也可以改成把记录存入数据库)
* @param sWord 要写入日志里的文本内容
*/
public static void logResult(String sWord) {
FileWriter writer = null;
try {
writer = new FileWriter(log_path + "alipay_log_" + System.currentTimeMillis()+".txt");
writer.write(sWord);
} catch (Exception e) {
e.printStackTrace();
} finally {
if (writer != null) {
try {
writer.close();
} catch (IOException e) {
e.printStackTrace();
}
}
}
}
}
代码编写
支付请求链接
上述准备工作配置完之后,就可以编写controller了,在该controller中,许多信息都杂糅在了一起,实际上这些步骤可能需要拆分成多个步骤才是更合理的,这里仅仅为了代码演示方便而放在一起。
import com.alipay.api.AlipayApiException;
import com.alipay.api.AlipayClient;
import com.alipay.api.DefaultAlipayClient;
import com.alipay.api.request.AlipayTradePagePayRequest;
import com.fasterxml.jackson.databind.ObjectMapper;
import org.springframework.data.domain.Pageable;
import lombok.RequiredArgsConstructor;
import org.springframework.http.HttpStatus;
import org.springframework.http.ResponseEntity;
import org.springframework.security.access.prepost.PreAuthorize;
import org.springframework.stereotype.Controller;
import org.springframework.validation.annotation.Validated;
import org.springframework.web.bind.annotation.*;
import io.swagger.annotations.*;
import java.io.IOException;
import java.util.HashMap;
import java.util.Map;
import java.util.UUID;
import javax.servlet.ServletException;
import javax.servlet.http.HttpServletRequest;
import javax.servlet.http.HttpServletResponse;
/**
* @website https://el-admin.vip
* @author nijunwei
* @date 2021-10-18
**/
@Controller
@RequestMapping("/api/test")
public class TestController {
@GetMapping("/transcation")
public void doPost (HttpServletRequest httpRequest,
HttpServletResponse httpResponse) throws ServletException, IOException {
AlipayClient alipayClient = new DefaultAlipayClient( AlipayConfig.gatewayUrl , AlipayConfig.app_id, AlipayConfig.merchant_private_key,AlipayConfig.format , AlipayConfig.charset, AlipayConfig.alipay_public_key, AlipayConfig.sign_type); //获得初始化的AlipayClient
AlipayTradePagePayRequest alipayRequest = new AlipayTradePagePayRequest(); //创建API对应的request
//商户订单号,商户网站订单系统中唯一订单号,必填
String out_trade_no = UUID.randomUUID().toString().substring(0,13);
//付款金额,必填
String total_amount = new String("88.88");
//订单名称,必填
String subject="冬天的第一杯奶茶";
//商品描述,可空
String body = new String("我的你的什么?你是我的优乐美");
String bizContent="{\"out_trade_no\":\""+ out_trade_no +"\","
+ "\"total_amount\":\""+ total_amount +"\","
+ "\"subject\":\""+ subject +"\","
+ "\"body\":\""+ body +"\","
+ "\"product_code\":\"FAST_INSTANT_TRADE_PAY\"}";
alipayRequest.setBizContent(bizContent);
// alipayRequest.setBizContent(json);
String form= "" ;
try {
form = alipayClient.pageExecute(alipayRequest).getBody(); //调用SDK生成表单
} catch (AlipayApiException e) {
e.printStackTrace();
}
// 页面刷新会客户端
httpResponse.setCharacterEncoding("UTF-8");
httpResponse.setContentType("text/html;charset=UTF-8");
httpResponse.getWriter().write(form); //直接将完整的表单html输出到页面
httpResponse.getWriter().flush();
httpResponse.getWriter().close();
}
}
几个比较值得注意的参数,其余的请求体参数可以在支付宝开放平台查询完整的参数含义
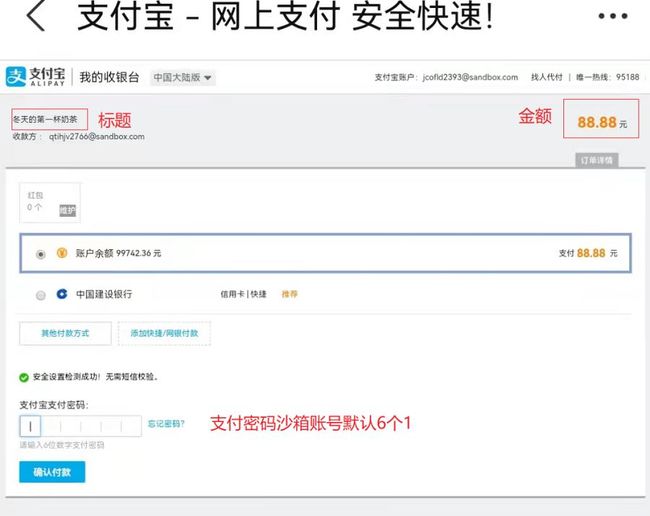
out_tarde_no:支付单号,用于辨别是否重复确认,支付宝那边会有一套机制防止用户重复支付一个单号的订单。
total_amount:支付金额,单位为元,可达到小数点后两位,如88.88表示88元8角8分。
subject:支付时显示订单标题
body:商品的信息描述
product_code:此处固定为FAST_INSTANT_TRADE_PAY,对于其他代码的含义可查看官方文档
使用沙箱支付宝请求该链接后页面如下,不同页面是不同请求地址的,但大致流程与原理一致。
使用沙箱支付宝进入该连接就可以了,例如
http://localhost:8000/api/test/transcation
二维码生成
那么外部该如何访问呢?使用支付宝的扫码功能可以很好的解决这个问题
一个生成QRCode的工具类如下
import java.io.ByteArrayOutputStream;
import java.io.IOException;
import java.nio.file.FileSystems;
import java.nio.file.Path;
import com.google.zxing.BarcodeFormat;
import com.google.zxing.WriterException;
import com.google.zxing.client.j2se.MatrixToImageWriter;
import com.google.zxing.common.BitMatrix;
import com.google.zxing.qrcode.QRCodeWriter;
public class QRCodeGeneratorUtil {
// 暂定图片路径
private static final String QR_CODE_IMAGE_PATH = "D:\\eladmin\\eladmin\\QRCodePics\\test.png";
private static void generateQRCodeImage(String text, int width, int height, String filePath) throws WriterException, IOException {
QRCodeWriter qrCodeWriter = new QRCodeWriter();
BitMatrix bitMatrix = qrCodeWriter.encode(text, BarcodeFormat.QR_CODE, width, height);
Path path = FileSystems.getDefault().getPath(filePath);
MatrixToImageWriter.writeToPath(bitMatrix, "PNG", path);
}
public static void main(String[] args) {
try {
generateQRCodeImage("http://192.168.137.1:8000/api/test/transcation", 350, 350, QR_CODE_IMAGE_PATH);
} catch (WriterException e) {
System.out.println("Could not generate QR Code, WriterException :: " + e.getMessage());
} catch (IOException e) {
System.out.println("Could not generate QR Code, IOException :: " + e.getMessage());
}
}
}
主方法中生成了一张信息为
http://192.168.137.1:8000/api/test/transcation
长宽为350的二维码,扫描该二维吗即可访问其中的信息【会直接向该链接发生请求】
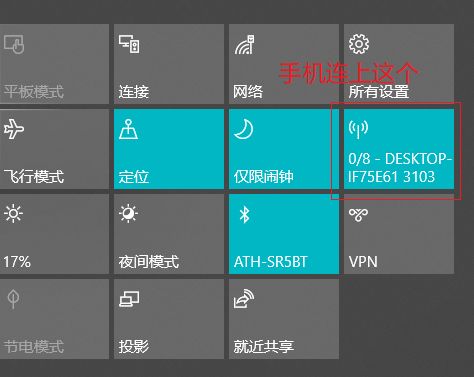
其中,请求的ip地址如果部署在公网可以访问的服务器,那么直接使用手机上的沙箱支付宝扫描即可。如果没有公网的服务器【如阿里云】那么可以让手机和电脑置于同一局域网然后内网访问,或者使用电脑自带的热点功能,开启后让手机连接。
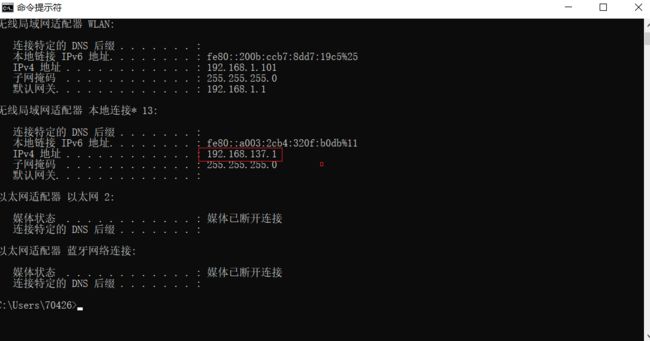
然后打开cmd,查看局域网内网络配置,输入ipconfig查看,如果是linux,则ifconfig
可以看到是192.168.137.1这个地址,这和上面我那段代码是一样的,因此选取该IP地址即可在内网进行访问,达到模拟的效果,支付宝扫码时便可向SpringBoot程序发送请求,然后传到支付宝端,处理请求后传回html页面,直接返回给客户端。
到此这篇关于SpringBoot实现简易支付宝网页支付的文章就介绍到这了,更多相关SpringBoot支付宝网页支付内容请搜索脚本之家以前的文章或继续浏览下面的相关文章希望大家以后多多支持脚本之家!


