PCL中点云关键点提取
PCL中点云关键点提取
- 1 关键点概念及相关算法
-
- 1.1 NARF关键点
- 1.2 Harris关键点
- 1.3 PCL中keypoints模块及类介绍
- 2 关键点入门级实例解析
-
- 2.1 如何从深度图像中提取NARF关键点
- 2.2 SIFT关键点提取
- 2.3 Harris关键点提取
- 3 关键点精通级实例解析:基于对应点分类的对象识别
关键点也称为兴趣点,它是2D图像、3D点云或曲面模型上,可以通过定义检测标准来获取的具有稳定性、区别性的点集。从技术上来说,关键点的数量相比于原始点云或图像的数据量小很多,它与局部特征描述子结合在一起,组成关键点描述子,常用来形成原始数据的紧凑表示,而且不失代表性与描述性,从而可以加快后续识别、追踪等对数据的处理速度。关键点提取是2D与3D信息中不可或缺的关键技术。
本篇文章首先对PCL中涉及的点云关键点提取方法的概念进行简介,其次对PCL中的keypoints相关模块及类进行简单介绍,最后通过实例来展示如何对PCL中的keypoints模块进行灵活运用。
1 关键点概念及相关算法
1.1 NARF关键点
NARF(Normal Aligned Radial Feature)关键点是为了从深度图像中识别物体而提出来的,关键点探测的重要一步是减少特征提取时的搜索空间,把重点放在重要的结构上,对NARF关键点提取过程有以下要求:提取的过程必须将边缘及物体表面变化信息考虑在内;关键点的位置必须稳定,可以被重复探测,即使换了不同的视角;关键点所在的位置必须有稳定的支持区域,可以计算描述子并进行唯一的法向量估计。为了满足以上要求,提出以下探测步骤来进行关键点提取:
(1)遍历每个深度图像点,通过寻找在近邻区域有深度突变的位置进行边缘检测。
(2)遍历每个深度图像点,根据近邻区域的表面变化决定一种测度表面变化的系数,以及变化的主方向。
(3)根据第二步找到的主方向计算兴趣值,表征该方向与其他方向的不同,以及该处表面的变化情况,即该点有多稳定。
(4)对兴趣值进行平滑过滤。
(5)进行无最大值压缩找到最终的关键点,即为NARF关键点。
1.2 Harris关键点
Harris关键点检测算法于1988年由Chris Harris和Mike Stephens提出,也称为Plessey关键点检测算法,是早期经典的一种关键点检测算法。公式1为Harris矩阵,Harris关键点检测通过计算图像点的Harris矩阵和矩阵对应的特征值来判断是否为关键点。如果Harris矩阵的两个特征值都很大,则该点是关键点。在应用中。一般可用公式2来代替Harris矩阵的特征值的计算。当 m k > 0 m_{k}>0 mk>0 时,则判断该点为关键点。
A = [ I x I y ] [ I x I y ] T = [ I x 2 I x I y I y I x I y 2 ] (1) A=\begin{bmatrix}I_{x}\\I_{y}\end{bmatrix} \begin{bmatrix}I_{x}\\I_{y}\end{bmatrix}^{T}=\begin{bmatrix} I_{x}^{2} & I_{x}I_{y}\\ I_{y}I_{x} & I_{y}^{2} \end{bmatrix} \tag{1} A=[IxIy][IxIy]T=[Ix2IyIxIxIyIy2](1)
m k = d e t ( A ) − k t r 2 ( A ) (2) m_{k}=det(A)-ktr^{2}(A) \tag{2} mk=det(A)−ktr2(A)(2)
这里 A A A表示点的Harris矩阵, d e t ( A ) det(A) det(A) 表示Harris矩阵的行列式, t r ( A ) tr(A) tr(A) 表示Harris矩阵的迹。 I x I_{x} Ix、 I y I_{y} Iy分别为像素点在 x x x、 y y y 方向上的梯度。Harris关键点检测只对图像旋转变换保持较好的检测重复率,但不适合尺度变化的关键点检测。
点云中的3D Harris关键点检测借鉴了2D Harris关键点检测的思想,不过3D Harris关键点使用的是点云表面法向量的信息,而不是2D Harris关键点检测使用的图像梯度。
1.3 PCL中keypoints模块及类介绍
PCL中的pcl_keypoints库目前提供了几种常用的关键点检测算法,随着其快速的开发,将来会有更多算法加入。pcl_keypoints模块利用了大概19个类实现了利用几种关键点检测算法相关的数据结构与检测算法,其依赖于Common、Search、KdTree、Octree、Range Image、Features、Filters模块。类和函数的具体说明可以参考官网。
2 关键点入门级实例解析
2.1 如何从深度图像中提取NARF关键点
本小节将展示如何从深度图像中提取NARF关键点。可执行程序能够加载原始点云数据(如果没有的话就创建随机点云),提取上面的特征点,并且用图像和3D显示方式进行可视化,从而可以直观的观察到关键点的位置和数量。
首先创建一个工作空间narf_keypoint_extraction,然后再在工作空间创建一个文件夹src用于存放源代码:
mkdir -p narf_keypoint_extraction/src
接着,在narf_keypoint_extraction/src路径下,创建一个文件并命名为narf_keypoint_extraction.cpp,拷贝如下代码:
#include \n\n"
<< "Options:\n"
<< "-------------------------------------------\n"
<< "-r angular resolution in degrees (default " <<angular_resolution<<")\n"
<< "-c coordinate frame (default " << (int)coordinate_frame<<")\n"
<< "-m Treat all unseen points as maximum range readings\n"
<< "-s support size for the interest points (diameter of the used sphere - "
<< "default "<<support_size<<")\n"
<< "-h this help\n"
<< "\n\n";
}
int main (int argc, char** argv)
{
/* 解析命令行参数 */
if (pcl::console::find_argument (argc, argv, "-h") >= 0)
{
printUsage (argv[0]);
return 0;
}
if (pcl::console::find_argument (argc, argv, "-m") >= 0)
{
setUnseenToMaxRange = true;
std::cout << "Setting unseen values in range image to maximum range readings.\n";
}
int tmp_coordinate_frame;
if (pcl::console::parse (argc, argv, "-c", tmp_coordinate_frame) >= 0)
{
coordinate_frame = pcl::RangeImage::CoordinateFrame (tmp_coordinate_frame);
std::cout << "Using coordinate frame "<< (int)coordinate_frame<<".\n";
}
if (pcl::console::parse (argc, argv, "-s", support_size) >= 0)
std::cout << "Setting support size to "<<support_size<<".\n";
if (pcl::console::parse (argc, argv, "-r", angular_resolution) >= 0)
std::cout << "Setting angular resolution to "<<angular_resolution<<"deg.\n";
angular_resolution = pcl::deg2rad (angular_resolution);
/* 读取pcd文件;如果没有指定文件,就创建样本点 */
pcl::PointCloud<PointType>::Ptr point_cloud_ptr (new pcl::PointCloud<PointType>);
pcl::PointCloud<PointType>& point_cloud = *point_cloud_ptr;
pcl::PointCloud<pcl::PointWithViewpoint> far_ranges;
Eigen::Affine3f scene_sensor_pose (Eigen::Affine3f::Identity ());
std::vector<int> pcd_filename_indices = pcl::console::parse_file_extension_argument (argc, argv, "pcd");
if (!pcd_filename_indices.empty ())
{
std::string filename = argv[pcd_filename_indices[0]];
if (pcl::io::loadPCDFile (filename, point_cloud) == -1)
{
std::cerr << "Was not able to open file \""<<filename<<"\".\n";
printUsage (argv[0]);
return 0;
}
scene_sensor_pose = Eigen::Affine3f (Eigen::Translation3f (point_cloud.sensor_origin_[0],
point_cloud.sensor_origin_[1],
point_cloud.sensor_origin_[2])) *
Eigen::Affine3f (point_cloud.sensor_orientation_);
std::string far_ranges_filename = pcl::getFilenameWithoutExtension (filename)+"_far_ranges.pcd";
if (pcl::io::loadPCDFile (far_ranges_filename.c_str (), far_ranges) == -1)
std::cout << "Far ranges file \""<<far_ranges_filename<<"\" does not exists.\n";
}
else
{
setUnseenToMaxRange = true;
std::cout << "\nNo *.pcd file given => Generating example point cloud.\n\n";
for (float x=-0.5f; x<=0.5f; x+=0.01f)
{
for (float y=-0.5f; y<=0.5f; y+=0.01f)
{
PointType point; point.x = x; point.y = y; point.z = 2.0f - y;
point_cloud.points.push_back (point);
}
}
point_cloud.width = point_cloud.size (); point_cloud.height = 1;
}
/* 从点云数据,创建深度图像 */
float noise_level = 0.0;
float min_range = 0.0f;
int border_size = 1;
pcl::RangeImage::Ptr range_image_ptr (new pcl::RangeImage);
pcl::RangeImage& range_image = *range_image_ptr;
range_image.createFromPointCloud (point_cloud, angular_resolution, pcl::deg2rad (360.0f), pcl::deg2rad (180.0f),
scene_sensor_pose, coordinate_frame, noise_level, min_range, border_size);
range_image.integrateFarRanges (far_ranges);
if (setUnseenToMaxRange)
range_image.setUnseenToMaxRange ();
/* 打开3D可视化窗口,并添加点云 */
pcl::visualization::PCLVisualizer viewer ("3D Viewer");
viewer.setBackgroundColor (1, 1, 1);
pcl::visualization::PointCloudColorHandlerCustom<pcl::PointWithRange> range_image_color_handler (range_image_ptr, 0, 0, 0);
viewer.addPointCloud (range_image_ptr, range_image_color_handler, "range image");
viewer.setPointCloudRenderingProperties (pcl::visualization::PCL_VISUALIZER_POINT_SIZE, 1, "range image");
//viewer.addCoordinateSystem (1.0f, "global");
//PointCloudColorHandlerCustom point_cloud_color_handler (point_cloud_ptr, 150, 150, 150);
//viewer.addPointCloud (point_cloud_ptr, point_cloud_color_handler, "original point cloud");
viewer.initCameraParameters ();
//setViewerPose (viewer, range_image.getTransformationToWorldSystem ());
/* 显示深度图像 */
pcl::visualization::RangeImageVisualizer range_image_widget ("Range image");
range_image_widget.showRangeImage (range_image);
/* 提取NARF关键点 */
pcl::RangeImageBorderExtractor range_image_border_extractor;    // 创建深度图像的边界提取器,用于提取NARF关键点
pcl::NarfKeypoint narf_keypoint_detector (&range_image_border_extractor);   // 创建NARF对象
narf_keypoint_detector.setRangeImage (&range_image);
narf_keypoint_detector.getParameters ().support_size = support_size;
//narf_keypoint_detector.getParameters ().add_points_on_straight_edges = true;
//narf_keypoint_detector.getParameters ().distance_for_additional_points = 0.5;

pcl::PointCloud<int> keypoint_indices;              // 用于存储关键点的索引
narf_keypoint_detector.compute (keypoint_indices);  // 计算NARF关键点
std::cout << "Found "<<keypoint_indices.size ()<<" key points.\n";
/* 在range_image_widget中显示关键点 */
//for (std::size_t i=0; i
//range_image_widget.markPoint (keypoint_indices[i]%range_image.width,
//keypoint_indices[i]/range_image.width);
/* 在3D viwer窗口中显示关键点 */
pcl::PointCloud<pcl::PointXYZ>::Ptr keypoints_ptr (new pcl::PointCloud<pcl::PointXYZ>);
pcl::PointCloud<pcl::PointXYZ>& keypoints = *keypoints_ptr;
keypoints.resize (keypoint_indices.size ());
for (std::size_t i=0; i<keypoint_indices.size (); ++i)
keypoints[i].getVector3fMap () = range_image[keypoint_indices[i]].getVector3fMap ();
pcl::visualization::PointCloudColorHandlerCustom<pcl::PointXYZ> keypoints_color_handler (keypoints_ptr, 0, 255, 0);
viewer.addPointCloud<pcl::PointXYZ> (keypoints_ptr, keypoints_color_handler, "keypoints");
viewer.setPointCloudRenderingProperties (pcl::visualization::PCL_VISUALIZER_POINT_SIZE, 7, "keypoints");
while (!viewer.wasStopped ())
{
range_image_widget.spinOnce (); // 处理GUI事件
viewer.spinOnce ();
pcl_sleep(0.01);
}
}
【解释说明】
首先,我们进行命令行解析,然后,读取点云(或者如果没有提供,则创建一个点云),最后,创建深度图像并使其可视化。关键的部分如下:
/* 提取NARF关键点 */
pcl::RangeImageBorderExtractor range_image_border_extractor; // 创建深度图像的边界提取器,用于提取NARF关键点
pcl::NarfKeypoint narf_keypoint_detector (&range_image_border_extractor); // 创建NARF对象
narf_keypoint_detector.setRangeImage (&range_image);
narf_keypoint_detector.getParameters ().support_size = support_size;
//narf_keypoint_detector.getParameters ().add_points_on_straight_edges = true;
//narf_keypoint_detector.getParameters ().distance_for_additional_points = 0.5;
pcl::PointCloud<int> keypoint_indices; // 用于存储关键点的索引
narf_keypoint_detector.compute (keypoint_indices); // 计算NARF关键点
std::cout << "Found "<<keypoint_indices.size ()<<" key points.\n";
这里创建了一个RangeImageBorderExtractor 对象,它是用来进行边缘提取的,因为NARF的第一步就是需要探测出深度图像的边缘,本例中我们只使用RangeImageBorderExtractor 对象的默认参数,然后创建NarfKeypoint对象,把RangeImageBorderExtractor 对象和深度图像传递给它,设置所支持的范围(搜索空间球体的半径,它指定计算感兴趣值的测度时所使用的邻域范围),注释掉的部分包含一些可以设置的其他参数,用户可更改体验关键点结果的变化。接下来创建用于存储关键点的索引对象,然后计算关键点,最后输出找到的关键点的数目。剩下的代码仅仅将结果用深度图像widget和3D窗口来可视化。
【编译和运行程序】
在工作空间根目录narf_keypoint_extraction下,编写CMakeLists.txt文件如下:
cmake_minimum_required(VERSION 2.6 FATAL_ERROR)

project(narf_keypoint_extraction)

find_package(PCL 1.3 REQUIRED)
include_directories(${
     PCL_INCLUDE_DIRS})
link_directories(${
     PCL_LIBRARY_DIRS})
add_definitions(${
     PCL_DEFINITIONS})
add_executable(${
     PROJECT_NAME}_node src/narf_keypoint_extraction.cpp)
target_link_libraries(${
     PROJECT_NAME}_node ${
     PCL_LIBRARIES})
在工作空间根目录narf_keypoint_extraction下创建一个build文件夹,用于存放编译过程中产生的文件,然后执行编译:
mkdir build
cd build
cmake ..
make
此时,会在build文件夹下生成一个可执行文件narf_keypoint_extraction_node,运行该可执行文件:
./narf_keypoint_extraction_node -m
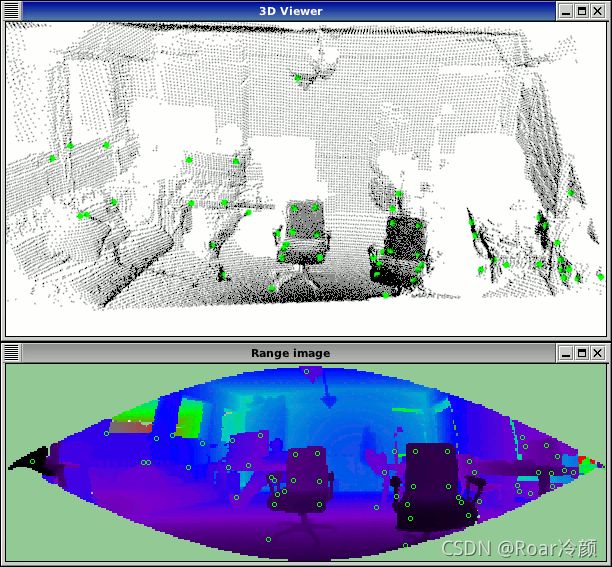
这将使用一个自动生成的、矩形状浮点型点云,在角落的特征点可以检测到,参数-m是必需的,因为矩形周边的区域对模拟的深度图像是不可见区域,因此系统不能够对它进行正常检测,选项-m把不可见区域变成最大范围读数,这样使得系统能够使用这些边界,从而探测矩形的角点,运行结果如下所示,图中分别为由程序生成的矩形点云对应的深度图像以及探测得到的NARF关键点示意图,NARF关键点用较大的绿色点显示。


也可以在运行可执行文件时,加上现有的原始点云文件,如下所示:
$ ./narf_keypoint_extraction_node <point_cloud.pcd>
此时,输出结果大致如下所示,与无点云输入时的情况基本一样,只是点云和对应的关键点不同而已。
2.2 SIFT关键点提取
SIFT,即尺度不变特征变换(Scale-invariant feature transform),最初用于图像处理领域的一种描述。这种描述具有尺度不变性,可在图像中检测出关键点,是一种局部特征描述子,后来被引入3D点云领域用于关键点的检测。
首先创建一个工作空间Siftdetect,然后再在工作空间创建一个文件夹src用于存放源代码:
mkdir -p Siftdetect/src
接着,在Siftdetect/src路径下,创建一个文件并命名为Siftdetect.cpp,拷贝如下代码:
#include 【解释说明】
首先需要包含SIFT关键点估计类头文件:
#include 输入待估计关键点的点云,创建SIFT关键点估计对象,设置输入点云。然后创建一个空的kd-tree对象,并把它传递给SIFT关键点估计对象,基于已知的输入数据集,建立kd-tree。
pcl::SIFTKeypoint<pcl::PointXYZ, pcl::PointWithScale> sift; //创建sift关键点检测对象
pcl::PointCloud<pcl::PointWithScale> result;
sift.setInputCloud(cloud_xyz);                              //设置输入点云
pcl::search::KdTree<pcl::PointXYZ>::Ptr tree(new pcl::search::KdTree<pcl::PointXYZ> ());    //创建一个空的kd树对象tree
sift.setSearchMethod(tree);                                 //把kd树对象传递给sift检测对象
接下来,设置SIFT关键点检测对象相关的参数,setScales函数用于指定搜索关键点的尺度范围。SIFTKeypoint类setScales函数的原型为void setScales(float min_scale, int nr_octaves, int nr_scales_per_octave),其中参数min_scale用于设置尺度空间中最小尺度的标准偏差,参数nr_octaves是高斯金字塔中组(Octave)的数目,参数nr_scales_per_octave是每组(Octave)计算的尺度(scale)数目。setMinimumContrast函数用于设置关键点检测的阈值。关于组(Octave)、尺度(scale)等SIFT关键点的概念可以参考加拿大教授David G.Lowe的文章<。
sift.setMinimumContrast(min_contrast);                      //设置限制关键点检测的阈值
sift.compute(result);                                       //执行sift关键点检测,保存结果在result
为了后期处理与显示的需要,需要将SIFT关键点检测结果转化为点类型为pcl::PointXYZ的数据:
pcl::PointCloud<pcl::PointXYZ>::Ptr cloud_temp (new pcl::PointCloud<pcl::PointXYZ>);
copyPointCloud(result, *cloud_temp);                        //将点类型pcl::PointWithScale的数据转换为点类型pcl::PointXYZ的数据
【编译和运行程序】
在工作空间根目录Siftdetect下,编写CMakeLists.txt文件如下:
cmake_minimum_required(VERSION 2.8 FATAL_ERROR)

project(Siftdetect)

find_package(PCL 1.7 REQUIRED)
include_directories(${
     PCL_INCLUDE_DIRS})
link_directories(${
     PCL_LIBRARY_DIRS})
add_definitions(${
     PCL_DEFINITIONS})
add_executable (${
     PROJECT_NAME}_node src/Siftdetect.cpp)
target_link_libraries (${
     PROJECT_NAME}_node ${
     PCL_LIBRARIES})
在工作空间根目录Siftdetect下创建一个build文件夹,用于存放编译过程中产生的文件,然后执行编译:
mkdir build
cd build
cmake ..
make
此时,会在build文件夹下生成一个可执行文件Siftdetect_node,运行该可执行文件:
./Siftdetect_node 0.01 6 4 0.01
利用上述参数运行之后的结果如下图所示,图中的蓝色点为SIFT关键点检测对象。

2.3 Harris关键点提取
本小节将演示如何检测点云的3D Harris角点。Harris算子是常见的特征检测算子,既可以提取角点也可以提取边缘点。与2D Harris角点检测原理不同,3D Harris角点检测利用的是点云法向量的信息。
首先创建一个工作空间Harrisdetect,然后再在工作空间创建一个文件夹src用于存放源代码:
mkdir -p Harrisdetect/src
接着,在Harrisdetect/src路径下,创建一个文件并命名为Harrisdetect.cpp,拷贝如下代码:
#include ::LOWE);
harris_detector->compute (*Harris_keypoints);
cout<< "Harris_keypoints的大小是" << Harris_keypoints->size() <<endl;
writer.write<pcl::PointXYZI> ("Harris_keypoints.pcd", *Harris_keypoints, false);
pcl::visualization::PCLVisualizer visu3("clouds");
visu3.setBackgroundColor(255,255,255);
visu3.addPointCloud (Harris_keypoints, ColorHandlerT3 (Harris_keypoints, 0.0, 0.0, 255.0), "Harris_keypoints");
visu3.setPointCloudRenderingProperties(pcl::visualization::PCL_VISUALIZER_POINT_SIZE,8,"Harris_keypoints");
visu3.addPointCloud(input_cloud,"input_cloud");
visu3.setPointCloudRenderingProperties(pcl::visualization::PCL_VISUALIZER_COLOR,0,0,0,"input_cloud");
visu3.spin ();
}
【解释说明】
首先需要包含Harris角点估计类头文件:
#include 首先输入待估计关键点的点云,创建Harris关键点估计对象,并创建Harris_keypoints对象用于保存Harris关键点。此处注意PCL的point类型设置为pcl::PointXYZI,即除了x、y、z坐标外还必须包含强度信息。
pcl::PointCloud<pcl::PointXYZI>::Ptr Harris_keypoints (new pcl::PointCloud<pcl::PointXYZI> ());
pcl::HarrisKeypoint3D<pcl::PointXYZ,pcl::PointXYZI,pcl::Normal>* harris_detector = new pcl::HarrisKeypoint3D<pcl::PointXYZ,pcl::PointXYZI,pcl::Normal>;
接下来设置Harris特征检测对象参数,setRadius函数用于设置法向量估计的半径,setRadiusSearch函数用于设置关键点估计的近邻搜索半径,用户可以根据输入待测关键点点云的尺度,设置上述参数。
harris_detector->setRadius(r_normal);
harris_detector->setRadiusSearch(r_keypoint);
harris_detector->setInputCloud (input_cloud);
利用Harris特征检测类计算Harris关键点,并将其与输入场景点云一起可视化。
harris_detector->compute (*Harris_keypoints);
pcl::visualization::PCLVisualizer visu3("clouds");
visu3.setBackgroundColor(255,255,255);
visu3.addPointCloud (Harris_keypoints, ColorHandlerT3 (Harris_keypoints, 0.0, 0.0, 255.0), "Harris_keypoints");
visu3.setPointCloudRenderingProperties(pcl::visualization::PCL_VISUALIZER_POINT_SIZE,8,"Harris_keypoints");
visu3.addPointCloud(input_cloud,"input_cloud");
visu3.setPointCloudRenderingProperties(pcl::visualization::PCL_VISUALIZER_COLOR,0,0,0,"input_cloud");
visu3.spin ();
【编译和运行程序】
在工作空间根目录Harrisdetect下,编写CMakeLists.txt文件如下:
cmake_minimum_required(VERSION 2.8 FATAL_ERROR)
project(Harrisdetect)

find_package(PCL 1.7 REQUIRED)
include_directories(${
     PCL_INCLUDE_DIRS})
link_directories(${
     PCL_LIBRARY_DIRS})
add_definitions(${
     PCL_DEFINITIONS})
add_executable (${
     PROJECT_NAME}_node src/Harrisdetect.cpp)
target_link_libraries (${
     PROJECT_NAME}_node ${
     PCL_LIBRARIES})
在工作空间根目录Harrisdetect下创建一个build文件夹,用于存放编译过程中产生的文件,然后执行编译:
mkdir build
cd build
cmake ..
make
此时,会在build文件夹下生成一个可执行文件Harrisdetect_node,运行该可执行文件:
./Harrisdetect_node 0.1 0.1
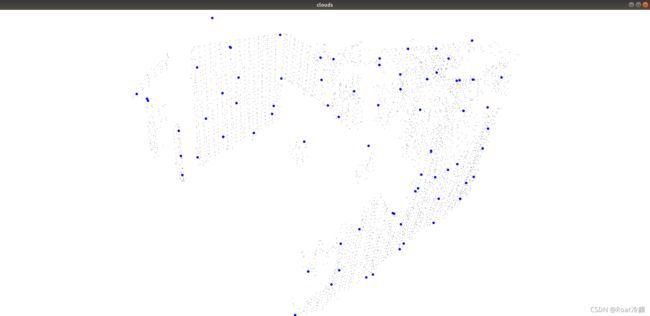
将法向量估计半径和关键点估计半径都设置为0.1,运行之后的结果如下图所示,图中蓝色点为Harris关键点检测结果。
3 关键点精通级实例解析:基于对应点分类的对象识别
本小节来学习如何使用对应点聚类算法(Correspondence Grouping Algorithms)来对利用特征匹配得到场景中的对应点对聚类为待识别模型实例。该算法输出的每个聚类,代表场景中的一个模型实例假设,同时,对应一个变换矩阵,是该模型实例假设对应的位姿估计。
首先创建一个工作空间correspondence_grouping,然后再在工作空间创建一个文件夹src用于存放源代码:
mkdir -p correspondence_grouping/src
接着,在correspondence_grouping/src路径下,创建一个文件并命名为correspondence_grouping.cpp,拷贝如下代码:
#include 【解释说明】
下列函数用于实施所给点云的空间分辨率计算,算出输入点云的每个点与其邻近点距离的平均值。
double computeCloudResolution (const pcl::PointCloud<PointType>::ConstPtr &cloud)
{

    double res = 0.0;
    int n_points = 0;
    int nres;
    std::vector<int> indices (2);
    std::vector<float> sqr_distances (2);
    pcl::search::KdTree<PointType> tree;
    tree.setInputCloud (cloud);

    for (size_t i = 0; i < cloud->size (); ++i)
    {

        if (! pcl_isfinite ((*cloud)[i].x))
        {

            continue;
        }
        //Considering the second neighbor since the first is the point itself.
        nres = tree.nearestKSearch (i, 2, indices, sqr_distances);
        if (nres == 2)
        {

            res += sqrt (sqr_distances[1]);
            ++n_points;
        }
    }
    if (n_points != 0)
    {

        res /= n_points;
    }
    return res;
}
首先,程序解析命令行参数,利用用户所给的文件名,在存储空间载入模型和场景点云。
parseCommandLine (argc, argv);

pcl::PointCloud<PointType>::Ptr model (new pcl::PointCloud<PointType> ());
pcl::PointCloud<PointType>::Ptr model_keypoints (new pcl::PointCloud<PointType> ());
pcl::PointCloud<PointType>::Ptr scene (new pcl::PointCloud<PointType> ());
pcl::PointCloud<PointType>::Ptr scene_keypoints (new pcl::PointCloud<PointType> ());
pcl::PointCloud<NormalType>::Ptr model_normals (new pcl::PointCloud<NormalType> ());
pcl::PointCloud<NormalType>::Ptr scene_normals (new pcl::PointCloud<NormalType> ());
pcl::PointCloud<DescriptorType>::Ptr model_descriptors (new pcl::PointCloud<DescriptorType> ());
pcl::PointCloud<DescriptorType>::Ptr scene_descriptors (new pcl::PointCloud<DescriptorType> ());

/* 加载原始点云数据 */
if (pcl::io::loadPCDFile (model_filename_, *model) < 0)
{

    std::cout << "Error loading model cloud." << std::endl;
    showHelp (argv[0]);
    return (-1);
}
if (pcl::io::loadPCDFile (scene_filename_, *scene) < 0)
{

    std::cout << "Error loading scene cloud." << std::endl;
    showHelp (argv[0]);
    return (-1);
}
use_cloud_resolution_是利用-r选项控制,如果设置为真,所有参数将与点云分辨率相乘得到最终使用的参数。
if (use_cloud_resolution_)
{

    float resolution = static_cast<float> (computeCloudResolution (model));
    if (resolution != 0.0f)
    {

        model_ss_   *= resolution;
        scene_ss_   *= resolution;
        rf_rad_     *= resolution;
        descr_rad_  *= resolution;
        cg_size_    *= resolution;
    }

    std::cout << "Model resolution:       " << resolution << std::endl;
    std::cout << "Model sampling size:    " << model_ss_ << std::endl;
    std::cout << "Scene sampling size:    " << scene_ss_ << std::endl;
    std::cout << "LRF support radius:     " << rf_rad_ << std::endl;
    std::cout << "SHOT descriptor radius: " << descr_rad_ << std::endl;
    std::cout << "Clustering bin size:    " << cg_size_ << std::endl << std::endl;
}
接下来,利用NormalEstimationOMP方法,计算场景和模型的每一个点的法向量,计算法向量时,对于每一个点利用10个临近点,该临近点设置的数量是一个经验值,已被证实可被较好的应用于Kinect等获取的数据分辨率,但对于非常稠密的点云数据来说,可以用近邻半径来控制或者其他参数,很大程度上取决于数据。
/* 计算场景和模型的每一个点的法向量 */
pcl::NormalEstimationOMP<PointType, NormalType> norm_est;
norm_est.setKSearch (10);   // 10比较适合Kinect等获取的数据,其他稠密的点云,需要读者测试
norm_est.setInputCloud (model);
norm_est.compute (*model_normals);

norm_est.setInputCloud (scene);
norm_est.compute (*scene_normals);
为了获取较为稀疏的关键点,对点云进行下采样,为了实施关键点匹配以确定对应点对集合,这些关键点与后续的3D描述子相关联。用于均匀采样的半径可以通过命令行,以--scene_ss和--model_ss选项设置,或者使用默认值0.03。
pcl::PointCloud<int> sampled_indices;

pcl::UniformSampling<PointType> uniform_sampling;
uniform_sampling.setInputCloud (model);
uniform_sampling.setRadiusSearch (model_ss_);
uniform_sampling.filter(*model_keypoints);
std::cout << "Model total points: " << model->size () << "; Selected Keypoints: " << model_keypoints->size () << std::endl;

uniform_sampling.setInputCloud (scene);
uniform_sampling.setRadiusSearch (scene_ss_);
uniform_sampling.filter(*scene_keypoints);
std::cout << "Scene total points: " << scene->size () << "; Selected Keypoints: " << scene_keypoints->size () << std::endl;
为模型和场景的每个关键点建立特征描述子,计算每个模型和场景的关键点的3D描述子。在本例中,使用SHOTEstimationOMP方法计算SHOT描述子,其中descr_rad_是SHOT特征描述子的参数,该参数通过用户通过descr_rad_进行设置,其影响该局部描述子的描述区域范围的大小。
/* 计算每个模型和场景的关键点的3D描述子 */
pcl::SHOTEstimationOMP<PointType, NormalType, DescriptorType> descr_est;
descr_est.setRadiusSearch (descr_rad_);	// 其影响该局部描述子的描述区域范围的大小

descr_est.setInputCloud (model_keypoints);
descr_est.setInputNormals (model_normals);
descr_est.setSearchSurface (model);
descr_est.compute (*model_descriptors);

descr_est.setInputCloud (scene_keypoints);
descr_est.setInputNormals (scene_normals);
descr_est.setSearchSurface (scene);
descr_est.compute (*scene_descriptors);
然后,我们在模型描述子点云和场景描述子点云之间,确定对应点对集合。为了高效实现该目的,程序构造模型描述子点云的KdTreeFLANN,在欧式空间中,对于和场景描述子点云中每个点进行有效最近邻搜索,然后添加场景描述子点云中的最近邻点到搜索点的对应点向量中(仅当两个描述子足够相似,比如它们的平方距离小于某个阈值,在本例中设置为0.25)。
/* 利用Kd树结构找到模型与场景的对应点 */
pcl::CorrespondencesPtr model_scene_corrs (new pcl::Correspondences ());

pcl::KdTreeFLANN<DescriptorType> match_search;
match_search.setInputCloud (model_descriptors);

/* 对于每个场景的特征点描述子,寻找模型特征点描述子的最近邻点,并将其加入对应点向量 */
for (size_t i = 0; i < scene_descriptors->size (); ++i)
{

    std::vector<int> neigh_indices (1);
    std::vector<float> neigh_sqr_dists (1);
    if (!pcl_isfinite (scene_descriptors->at (i).descriptor[0]))    // 忽然无效值
    {

        continue;
    }
    int found_neighs = match_search.nearestKSearch (scene_descriptors->at (i), 1, neigh_indices, neigh_sqr_dists);
    if(found_neighs == 1 && neigh_sqr_dists[0] < 0.25f) // 当描述子平方距离小于0.25,添加匹配点,SHOT描述子本身设计使其距离保持在0-1之间
    {

        pcl::Correspondence corr (neigh_indices[0], static_cast<int> (i), neigh_sqr_dists[0]);
        model_scene_corrs->push_back (corr);
    }
}
该程序的最后阶段是对先前获取的对应点对集合进行聚类处理,默认算法设置为Hough 3D Grouping,该算法基于Hough投票过程(Hough Voting Process)。请注意,该算法需要将局部参考坐标系(LRF)作为参数传递,其与每个关键点相关联。在本例中,在调用Hough聚类算法之前,利用BOARDLocalReferenceFrameEstimation类,来进行局部参考坐标系(LRF)的计算,其参数rf_rad_通过选项--rf_rad_设置,该参数是估计局部参考坐标系时当前点的邻域搜索半径。
if (use_hough_) /* 使用Hough聚类算法 */
{

    /* 利用Hough算法,需要计算关键点的局部参考坐标系 */
    pcl::PointCloud<RFType>::Ptr model_rf (new pcl::PointCloud<RFType> ());
    pcl::PointCloud<RFType>::Ptr scene_rf (new pcl::PointCloud<RFType> ());

    pcl::BOARDLocalReferenceFrameEstimation<PointType, NormalType, RFType> rf_est;
    rf_est.setFindHoles (true);
    rf_est.setRadiusSearch (rf_rad_);           // 估计局部参考坐标系时当前点的邻域搜索半径

    rf_est.setInputCloud (model_keypoints);
    rf_est.setInputNormals (model_normals);
    rf_est.setSearchSurface (model);
    rf_est.compute (*model_rf);

    rf_est.setInputCloud (scene_keypoints);
    rf_est.setInputNormals (scene_normals);
    rf_est.setSearchSurface (scene);
    rf_est.compute (*scene_rf);

    /* Clustering聚类化 */
    pcl::Hough3DGrouping<PointType, PointType, RFType, RFType> clusterer;
    clusterer.setHoughBinSize (cg_size_);       // Hough空间的采样间隔,本例为0.01
    clusterer.setHoughThreshold (cg_thresh_);   // 在Hough空间确定是否有实例存在的最小票数阈值,本例为5
    clusterer.setUseInterpolation (true);       // 设置是否对投票在Hough空间进行插值计算
    clusterer.setUseDistanceWeight (false);     // 设置在投票时是否将对应点之间的距离作为权重参与计算

    clusterer.setInputCloud (model_keypoints);  // 设置模型关键点,注意用setInputCloud
    clusterer.setInputRf (model_rf);            // 设置模型对应的LRF
    clusterer.setSceneCloud (scene_keypoints);  // 设置场景关键点,注意setSceneCloud
    clusterer.setSceneRf (scene_rf);            // 设置场景对应的LRF
    clusterer.setModelSceneCorrespondences (model_scene_corrs); // 设置模型与场景的对应点对集合

    clusterer.recognize (rototranslations, clustered_corrs);    // 计算结果包含变换矩阵和对应点聚类结果
}
注意,在调用聚类算法之前,也可以不必计算LRFs,Hough 3D Grouping会自行计算。这种情况仅发生在没有通过setInputRf或setSceneRf设置LRFs而直接调用识别或聚类方法的时候。在这种情况下,用户必须利用setLocalRfSearchRadius方法,设置LRF的半径值,作为聚类算法的额外参数。
通过选择命令行选项--algorithm,读者可以选择使用几何一致性聚类(GeometricConsistencyGrouping)算法来进行对应点对聚类。利用该算法,LRF是不需要的,所以可以直接计算该算法类的实例,传递相应的参数,如设置检查几何一致性时的空间分辨率和认为存在实例时允许的最小聚类数量,并调用识别算法。
pcl::GeometricConsistencyGrouping<PointType, PointType> gc_clusterer;
gc_clusterer.setGCSize (cg_size_);          // 设置检查几何一致性时的空间分辨率
gc_clusterer.setGCThreshold (cg_thresh_);   // 设置最小的聚类数量

gc_clusterer.setInputCloud (model_keypoints);   // 设置模型关键点,注意用setInputCloud
gc_clusterer.setSceneCloud (scene_keypoints);   // 设置场景关键点,注意用setSceneCloud
gc_clusterer.setModelSceneCorrespondences (model_scene_corrs);

gc_clusterer.recognize (rototranslations, clustered_corrs); // 计算结果包含变换矩阵和对应点聚类结果
注意,识别算法返回一个Eigen::Matrix4f类型的矩阵向量,该矩阵向量代表场景中找到模型的每个实例的变换矩阵(旋转矩阵+平移向量);识别算法还返回对应的支持每个模型实例的对应点对聚类,以向量形式保存,该向量的每个元素依次都是对应点对的集合,这些集合代表与场景中具体模型实例相关联的对应点。
如果读者仅需要聚类后的对应点(clustered Correspondences),打算以不同的方式使用它们,读者可以使用cluster成员函数,而不是recognize函数,这样就只获得对应点对聚类结果,并没有对应的变化矩阵。接下来进行输出和可视化,首先在终端中输出场景中找到的每个模型实例,转换矩阵和从聚类方法中提取的对应点的数量。
/* 输出结果 */
std::cout << "Model instances found: " << rototranslations.size () << std::endl;    // 注意每个实例对应一个变换矩阵
for (size_t i = 0; i < rototranslations.size (); ++i)
{

    std::cout << "\n    Instance " << i + 1 << ":" << std::endl;
    std::cout << "        Correspondences belonging to this instance: " << clustered_corrs[i].size () << std::endl;

    /* 打印旋转矩阵和平移向量 */
    Eigen::Matrix3f rotation = rototranslations[i].block<3,3>(0, 0);
    Eigen::Vector3f translation = rototranslations[i].block<3,1>(0, 3);

    printf ("\n");
    printf ("            | %6.3f %6.3f %6.3f | \n", rotation (0,0), rotation (0,1), rotation (0,2));
    printf ("        R = | %6.3f %6.3f %6.3f | \n", rotation (1,0), rotation (1,1), rotation (1,2));
    printf ("            | %6.3f %6.3f %6.3f | \n", rotation (2,0), rotation (2,1), rotation (2,2));
    printf ("\n");
    printf ("        t = < %0.3f, %0.3f, %0.3f >\n", translation (0), translation (1), translation (2));
}
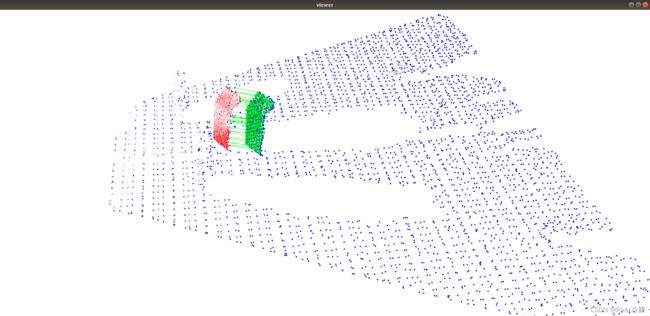
程序接下来在PCL Visualizer窗口展示输入场景的点云,其中被识别出来的模型实例的点云设置为红色,如果命令行选项有-k,则开启关键点可视化,关键点被设置为蓝色点,同时显示模型和场景,场景中识别出来的模型实例仍然用红色显示;如果命令行选项有-c,则开启对应点显示,支持模型实例的对应点对将用绿色线条相连接显示。
【编译和运行程序】
在工作空间根目录Harrisdetect下,编写CMakeLists.txt文件如下:
cmake_minimum_required(VERSION 2.8 FATAL_ERROR)
project(Harrisdetect)

find_package(PCL 1.7 REQUIRED)
include_directories(${
     PCL_INCLUDE_DIRS})
link_directories(${
     PCL_LIBRARY_DIRS})
add_definitions(${
     PCL_DEFINITIONS})
add_executable (${
     PROJECT_NAME}_node src/Harrisdetect.cpp)
target_link_libraries (${
     PROJECT_NAME}_node ${
     PCL_LIBRARIES})
在工作空间根目录correspondence_grouping下创建一个build文件夹,用于存放编译过程中产生的文件,然后执行编译:
mkdir build
cd build
cmake ..
make
此时,会在build文件夹下生成一个可执行文件correspondence_grouping_node,运行该可执行文件:
./correspondence_grouping_node milk_pose_changed.pcd milk_cartoon_all_small_clorox.pcd --algorithm GC -k -c
运行之后的结果如下所示,在可视化窗口中可以看到识别结果,场景中被识别的模型结果用红色表示。第一个参数为待识别的模型PCD文件,第二个参数为场景的PCD文件,这两个参数是必须的。其他选项有:-k可视化构造对应点时用到的关键点;-c可视化支持实例假设的对应点对;-r为使用点云数据分辨率,如果选择该选项,其他参数的值就会使用与点云分辨率相乘的结果,并非用户直接设置的值;--algorithm选择对应点的聚类方法,可选Hough或GC,默认的是Hough,Hough算法是一种聚类(clustering)算法,其基于3D霍夫投票框架(3D Hough voting scheme)[具体描述见文献F. Tombari and L. Di Stefano: “Object recognition in 3D scenes with occlusions and clutter by Hough voting“, 4th Pacific-Rim Symposium on Image and Video Technology, 2010],GC算法是一种几何一致性聚类(clustering)算法,其确保对应点对的简单几何约束,例如对应点的欧式距离内部一致性约束[具体描述见文献H. Chen and B. Bhanu: "3D free-form object recognition in range images using local surface patches ", Pattern Recognition Letters, vol. 28, no. 10, pp. 1252-1262, 2007. ];--model_ss模型下采样半径,默认为0.01;--scene_ss 场景的下采样半径,默认为0.03; --rf_rad 局部参考坐标系的半径,默认为0.15;--descr_rad 特征描述子的半径,默认为0.02;--cg_size Hough时对应Hough空间分辨率,GC时对应GC空间分辨率,默认为0.01;--cg_thresh认为存在实例时最小对应点对数目或者可以说是允许的最小聚类大小,默认为5。

读者可以采用不同的参数进行测试,由于该算法只是对相同的实例进行识别,所以使用范围较小,并且很容易受到获取模型和获取场景时的角度等的影响。基于Hough的结果不同,主要因为其用到了LRF参数,该参数依赖于法线等估计。官方提供的实例中,测试模型是直接从测试场景中分割得到的,因此效果较好。读者可以用自己的数据调整参数,对该算法做更多深入的研究。

