ubuntu lnmp环境搭建 LNMP(Ubuntu 20.04 + Nginx + PHP 7.1 + Mysql5.7)
ubuntu lnmp环境搭建 LNMP(Ubuntu 20.04 + Nginx + PHP 7.1 + Mysql5.7)
一、Ubuntu 20.04配置
先用命令查看ubuntu 是否安装ssh-server
ps -e|grep ssh
如果没有显示sshd,说明未安装ssh-server
安装ssh-server
sudo apt-get install openssh-server
启动ssh-server
/etc/init.d/ssh start
二、安装Nginx
先更新资源列表
sudo apt-get update
下面开始安装
sudo apt-get install nginx
补充说明
Nginx 网站目录是 /var/www/html
将项目代码放在这个文件夹下(类似apache/htdocs)
Nginx 网站配置文件位置是 /etc/nginx/sites-available/default
启动Nginx服务
sudo service nginx start
用命令查看状态
sudo lsof -i:80
也可以在虚拟机上的浏览器输入127.0.0.1可以看见Nginx页面
输入 ifconfig 查看ip 在虚拟机外访问也能看到

二、安装PHP7.1 和 PHP扩展
安装命令
sudo apt-add-repository ppa:ondrej/php
sudo apt-get update
sudo apt-get install php7.1 php7.1-fpm
如果提示:
add-apt-repository: command not found
则运行下面命令即可:
sudo apt-get install software-properties-common python-software-properties
查看版本
php -v
sam@sam-linux:/etc/nginx$ php -v
PHP 7.1.26-1+ubuntu16.04.1+deb.sury.org+1 (cli) (built: Jan 11 2019 14:13:16) ( NTS )
Copyright (c) 1997-2018 The PHP Group
Zend Engine v3.1.0, Copyright (c) 1998-2018 Zend Technologies
with Zend OPcache v7.1.26-1+ubuntu16.04.1+deb.sury.org+1, Copyright (c) 1999-2018, by Zend Technologies
三、配置Nginx和PHP-FPM
PHP-FPM 与 Nginx 通信方式有两种:
一种是基于TCP的 Internet domain socket 方式,一种是 UNIX domain socket 方式。
UNIX domain socket 可以使同一台操作系统上的两个或多个进程进行数据通信。 UNIX domain socket 的接口和 Internet domain socket 很像,但它不使用网络底层协议来通信。
服务器压力不大的情况下,这两种方式性能差别不大,但在压力比较满的时候,用UNIX domain socket方式,效果确实比较好。
先配置Nginx
sudo vim /etc/nginx/sites-available/default
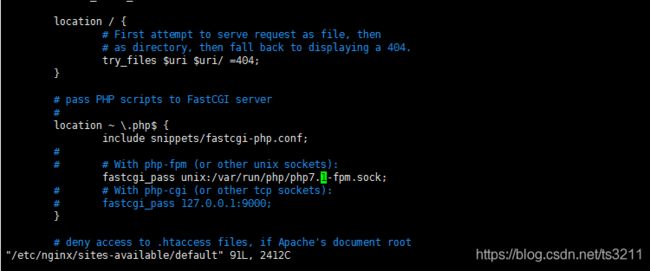
注意:
我们安装的是php7.1,但nginx里缺省值是php7.0-fpm.sock.如果它们不一致,则不能解析php页面,nginx 出现502 bad gateway 错误提示,nginx log日志出现错误
2019/02/15 15:38:36 [crit] 24161#24161: *1 connect() to unix:/run/php/php7.0-fpm.sock failed (2: No such file or directory) while connecting to upstream, client: 192.168.1.110, server: _, request: "GET /test.php HTTP/1.1", upstream: "fastcgi://unix:/run/php/php7.0-fpm.sock:", host: "192.168.1.21"
接着配置PHP-FPM
sudo vim /etc/php/7.1/fpm/pool.d/www.conf

我这个地方没动 原来就这样…
最后分别启动Nginx和PHP-FPM
sudo /etc/init.d/nginx restart
sudo /etc/init.d/php7.1-fpm restart
测试一下:
进入 /var/www/html 目录下 创建文件test.php
cd /var/www/html
sudo vim test.php
保存后退出在浏览器中访问 127.0.0.1/test.php
或者在虚拟机外访问 192.168.1.234/test.php (192.168.1.234 为虚拟机ip)
四、安装MySQL5.7
命令
sudo apt-get install mysql-server mysql-client
运行命令来测试mysql是否能成功运行。
$ mysql -uroot -p您的密码
首次安装密码应该是空的
五、安装PHPmysql 扩展用来连接数据库
命令
sudo apt-get install php7.1-mysql
写个程序测试一下,在刚才写的test.php后面加上一段数据库连接代码(可以用mysqli或者PDO但是不要用mysql,因为PHP7不支持mysql)
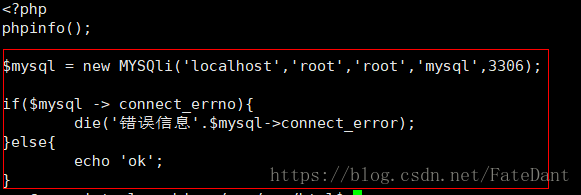
转(修改) : https://www.cnblogs.com/samits/articles/10384481.html