opencv中Canny边缘检测算法
Canny算子
canny边缘检测算子是John F.Canny于 1986 年开发出来的一个多级边缘检测算法。更为重要的是 Canny 创立了边缘检测计算理论(Computational theory ofedge detection),解释了这项技术是如何工作的。Canny边缘检测算法以Canny的名字命名,被很多人推崇为当今最优的边缘检测的算法。
其中,Canny 的目标是找到一个最优的边缘检测算法,让我们看一下最优边缘检测的三个主要评价标准:
- 好的检测 - 算法能够尽可能多地标识出图像中的实际边缘。
- 好的定位 - 标识出的边缘要与实际图像中的实际边缘尽可能接近。
- 最小响应 - 图像中的边缘只能标识一次,并且可能存在的图像噪声不应标识为边缘。
为了满足这些要求Canny使用了变分法,这是一种寻找满足特定功能的函数的方法。最优检测使用四个指数函数项的和表示,但是它非常近似于高斯函数的一阶导数。
Canny算法的步骤
1.消除噪声
任何边缘检测算法都不可能在未经处理的原始数据上很好地处理,所以第一步是对原始数据与高斯平滑模板作卷积,得到的图像与原始图像相比有些轻微的模糊(blurred)。这样,单独的一个像素噪声在经过高斯平滑的图像上变得几乎没有影响。高斯滤波主要使图像变得平滑(模糊),同时也有可能增大了边缘的宽度。
2.寻找图像中的亮度梯度 ( 计算梯度值和梯度方向)
图像中的边缘可能会指向不同的方向,所以Canny算法使用4个mask检测水平、垂直以及对角线方向的边缘。原始图像与每个mask所作的卷积都存储起来。对于每个点我们都标识在这个点上的最大值以及生成的边缘的方向。这样我们就从原始图像生成了图像中每个点亮度梯度图以及亮度梯度的方向。
3. 过滤非最大值
在高斯滤波过程中,边缘有可能被放大了。这个步骤使用一个规则来过滤不是边缘的点,使边缘的宽度尽可能为1个像素点:如果一个像素点属于边缘,那么这个像素点在梯度方向上的梯度值是最大的。否则不是边缘,将灰度值设为0。
4. 使用上下阀值来检测边缘
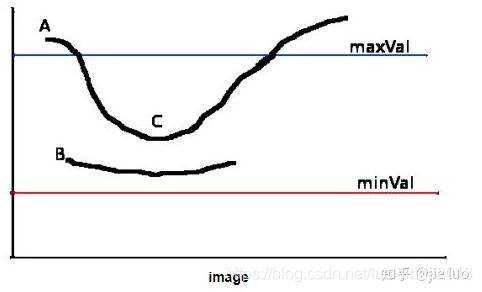
一般情况下,使用一个阀值来检测边缘,但是这样做未免太武断了。如果能够使用启发式的方法确定一个上阀值和下阀值,位于下阀值之上的都可以作为边缘,这样就可能提高准确度。
它的步骤是这样的。
它设置两个阀值(threshold),分别为maxVal和minVal。其中大于maxVal的都被检测为边缘,而低于minval的都被检测为非边缘。对于中间的像素点,如果与确定为边缘的像素点邻接,则判定为边缘;否则为非边缘。
Canny算法包含许多可以调整的参数,它们将影响到算法的计算时间与实效。
- 高斯滤波器的大小:第一步所用的平滑滤波器将会直接影响Canny算法的结果。较小的滤波器产生的模糊效果也较少,这样就可以检测较小、变化明显的细线。较大的滤波器产生的模糊效果也较多,将较大的一块图像区域涂成一个特定点的颜色值。这样带来的结果就是对于检测较大、平滑的边缘更加有用,例如彩虹的边缘。
- 阈值:使用两个阈值比使用一个阈值更加灵活,但是它还是有阈值存在的共性问题。设置的阈值过高,可能会漏掉重要信息;阈值过低,将会把枝节信息看得很重要。很难给出一个适用于所有图像的通用阈值。目前还没有一个经过验证的实现方法。
对于Canny函数的使用,推荐的高低阈值比在2:1到3:1之间。
OpenCV中Canny函数详解
函数原型:
CV_EXPORTS_W void Canny( InputArray image, OutputArray edges,
                         double threshold1, double threshold2,
                         int apertureSize = 3, bool L2gradient = false );
@brief Finds edges in an image using the Canny algorithm
The function finds edges in the input image and marks them in the output map edges using the
Canny algorithm. The smallest value between threshold1 and threshold2 is used for edge linking. The
largest value is used to find initial segments of strong edges. See
@param image 8-bit input image.
@param edges output edge map; single channels 8-bit image, which has the same size as image .
@param threshold1 first threshold for the hysteresis procedure.
@param threshold2 second threshold for the hysteresis procedure.
@param apertureSize aperture size for the Sobel operator.
@param L2gradient a flag, indicating whether a more accurate should be used to calculate the image gradient magnitude (
L2gradient=true ), or whether the default \f$L_1\f$ norm \f$=|dI/dx|+|dI/dy|\f$ is enough (
L2gradient=false ).
*/
CV_EXPORTS_W void Canny( InputArray image, OutputArray edges,
double threshold1, double threshold2,
int apertureSize = 3, bool L2gradient = false );
- 第一个参数,InputArray类型的image,输入图像,即源图像,填Mat类的对象即可,且需为单通道8位图像。
- 第二个参数,OutputArray类型的edges,输出的边缘图,需要和源图片有一样的尺寸和类型。
- 第三个参数,double类型的threshold1,第一个滞后性阈值。
- 第四个参数,double类型的threshold2,第二个滞后性阈值。
- 第五个参数,int类型的apertureSize,表示应用Sobel算子的孔径大小,其有默认值3。
- 第六个参数,bool类型的L2gradient,一个计算图像梯度幅值的标识,有默认值false。
需要注意的是,这个函数阈值1和阈值2两者的小者用于边缘连接,而大者用来控制强边缘的初始段,推荐的高低阈值比在2:1到3:1之间。
/** \overload重载
Finds edges in an image using the Canny algorithm with custom image gradient.
@param dx 16-bit x derivative of input image (CV_16SC1 or CV_16SC3).
@param dy 16-bit y derivative of input image (same type as dx).
@param edges output edge map; single channels 8-bit image, which has the same size as image .
@param threshold1 first threshold for the hysteresis procedure.
@param threshold2 second threshold for the hysteresis procedure.
@param L2gradient a flag, indicating whether a more accurate should be used to calculate the image gradient magnitude (
L2gradient=true ), or whether the defaultis enough (L2gradient=false ).
*/
CV_EXPORTS_W void Canny( InputArray dx, InputArray dy,
OutputArray edges,
double threshold1, double threshold2,
bool L2gradient = false );
//-----------------------------------【头文件包含部分】---------------------------------------
//            描述:包含程序所依赖的头文件
//----------------------------------------------------------------------------------------------
#include
#include
#include

//-----------------------------------【命名空间声明部分】---------------------------------------
//            描述:包含程序所使用的命名空间
//-----------------------------------------------------------------------------------------------
using namespace cv;
//-----------------------------------【main( )函数】--------------------------------------------
//            描述:控制台应用程序的入口函数,我们的程序从这里开始
//-----------------------------------------------------------------------------------------------
int main()
{
	//载入原始图
	Mat src = imread("5.jpg");  //工程目录下应该有一张名为1.jpg的素材图
	Mat src1 = src.clone();

	//显示原始图
	imshow("【原始图】Canny边缘检测", src);

	//----------------------------------------------------------------------------------
	//	一、最简单的canny用法,拿到原图后直接用。
	//----------------------------------------------------------------------------------
	cvtColor(src, src, COLOR_BGR2GRAY);
	Canny(src, src, 150, 100, 3);
	imshow("【效果图】Canny边缘检测", src);


	//----------------------------------------------------------------------------------
	//	二、高阶的canny用法,转成灰度图,降噪,用canny,最后将得到的边缘作为掩码,拷贝原图到效果图上,得到彩色的边缘图
	//----------------------------------------------------------------------------------
	Mat dst, edge, gray;

	// 【1】创建与src同类型和大小的矩阵(dst)
	dst.create(src1.size(), src1.type());

	// 【2】将原图像转换为灰度图像
	cvtColor(src1, gray, COLOR_BGR2GRAY);

	// 【3】先用使用 3x3内核来降噪
	blur(gray, edge, Size(3, 3));

	// 【4】运行Canny算子
	Canny(edge, edge, 3, 9, 3);

	//【5】将g_dstImage内的所有元素设置为0
	dst = Scalar::all(0);

	//【6】使用Canny算子输出的边缘图g_cannyDetectedEdges作为掩码,来将原图g_srcImage拷到目标图g_dstImage中
	src1.copyTo(dst, edge);

	//【7】显示效果图
	imshow("【效果图】Canny边缘检测2", dst);


	waitKey(0);

	return 0;
}
参考文章:
OpenCV边缘检测
Canny边缘检测算法原理及其VC实现详解(一)


