Linux:K8S搭建LNMP部署WordPress博客系统
K8S搭建LNMP部署WordPress博客系统
LNMP的搭建是学习linux的入门架构,下面我来使用K8S搭建LNMP部署WordPress博客系统。
说一下主要的思路,其实搭建的方法有很多,我使用的是首先分别制作已经配置好配置文件的镜像,再用K8S直接运行起来,这种方法的灵活性一般,但是思路易于理解。
实验环境:
k8s-master 192.168.186.10
k8s-node1 192.168.186.11
k8s-node2 192.168.186.12
k8s-node3 192.168.186.13
nfs 192.168.186.161
制作镜像:
(以下所有的基础镜像都是基于我个人的基础镜像仓库的镜像,可以直接使用。)
(如果对制作镜像没兴趣,可以直接看到k8s部分,直接用yaml文件创建即可。)
- 制作nginx镜像
nginx不需要什么特定的配置,只需要在配置文件中加一个location,将php页面交给php处理即可
可以先yum安装一个nginx,复制其配置文件做模板,然后再给镜像使用,配置文件更改如下:
...
location / {

                root   html;
                index  index.php;
            }
location ~ \.php$ {

                root html;
                fastcgi_pass 127.0.0.1:9000;
                fastcgi_index index.php;
                fastcgi_param SCRIPT_FILENAME /usr/share/nginx/html$fastcgi_script_name;
                include fastcgi_params;
        }
...
将配置文件改好之后,放在跟Dockerfile等级的目录,以下是nginx的Dockerfile
FROM registry.cn-shenzhen.aliyuncs.com/jay23/centos_yum:v1.0
RUN yum -y install nginx;chown -R nginx.nginx /usr/share/nginx/html/
COPY nginx.conf /etc/nginx/
CMD nginx -g "daemon off;"
- 制作PHP镜像
下面是PHP的Dockerfile
FROM registry.cn-shenzhen.aliyuncs.com/jay23/centos_yum:v1.0
RUN yum -y install php-fpm php-mysqlnd;useradd nginx -s /sbin/nologin;\
    sed -ri 's/(^user.*)(apache)/\1nginx/g' /etc/php-fpm.d/www.conf;\
    sed -ri 's/(^group.*)(apache)/\1nginx/g' /etc/php-fpm.d/www.conf;\
    sed -ri 's/(^pm.start_servers.*)([0-9]+)/\110/g' /etc/php-fpm.d/www.conf;\
    sed -ri 's/(^pm.min_spare_servers.*)([0-9]+)/\110/g' /etc/php-fpm.d/www.conf;\
    sed -ri 's/(^listen = )(.*)/\1127.0.0.1:9000/g' /etc/php-fpm.d/www.conf;\
    mkdir /run/php-fpm;\
    yum clean all
CMD php-fpm -F
- 制作MariaDB镜像
下面是MariaDB的Dockerfile
FROM registry.cn-shenzhen.aliyuncs.com/jay23/centos_yum:v1.0
COPY entrypoint.sh /usr/sbin/
RUN yum -y install mariadb-server;yum clean all
VOLUME /var/lib/mysql/
CMD ["mysqld_safe"]
ENTRYPOINT ["entrypoint.sh"]
这镜像有点特别,需要一个脚本,脚本要和Dockerfile放在同一目录,内容如下:
[root@node-1 mysql]# cat entrypoint.sh
#!/bin/bash
mysql_install_db --user=mysql --datadir=/var/lib/mysql --basedir=/usr/
$@ &
sleep 8
mysqladmin -uroot password 123
mysql -uroot -p123 -e "grant all on *.* to root@\"%\" identified by \"123\""
mysql -uroot -p123 -e "create database wordpress"
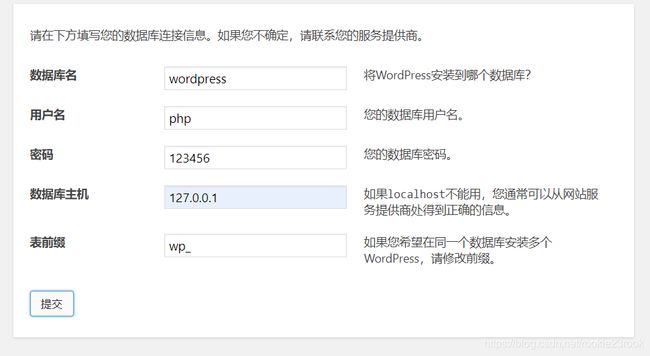
mysql -uroot -p123 -e "grant all on wordpress.* to 'php'@'127.0.0.1' identified by '123456'"
mysql -uroot -p123 -e "flush privileges"
mysql -uroot -p123 -e "delete from mysql.user where password=\"\""
wait
以上就是三个镜像的制作过程,有些细节没有写出来,如果没有接触Docker的朋友可能看不懂,有问题可以留言。以上所有的镜像都上传到了我的阿里云镜像仓库,而且是公开的,随时可以使用。
搭建NFS
搭建NFS,因为后面要将Pod挂载到NFS上面,将网页文件直接放在NFS主机上。
(具体的搭建过程在这里就不展开了,我之前的文章已经介绍了,有需要可以查看)
K8S
yaml文件如下:
---
apiVersion: apps/v1
kind: Deployment
metadata:
  name: nginx-php
spec:
  selector:
    matchLabels:
      test: ng-ph
  replicas: 3
  template:
    metadata:
      labels:
        test: ng-ph
    spec:
      containers:
      - name: nginx
        image: registry.cn-shenzhen.aliyuncs.com/jay23/nginx-k8s:v11.0
        volumeMounts:
        - mountPath: /usr/share/nginx/html
          name: shared-nginx-php
        ports:
        - containerPort: 80
          hostPort: 38080
      - name: mariadb
        image: registry.cn-shenzhen.aliyuncs.com/jay23/k8s_mariadb:v7.0
      - name: php
        image: registry.cn-shenzhen.aliyuncs.com/jay23/k8s_php:v7.0
        volumeMounts:
        - mountPath: /usr/share/nginx/html
          name: shared-nginx-php
      volumes:
      - name: shared-nginx-php
        nfs:
          server: 192.168.186.161
          path: /nfs_share
这个yaml文件将会创建3个副本,挂载nginx的根目录到nfs主机,并且做了nginx的端口映射。
[root@master yaml]# kubectl apply -f nginx_php.yaml
deployment.apps/nginx-php created
[root@master yaml]# kubectl get po  -o wide
NAME                         READY   STATUS    RESTARTS   AGE   IP             NODE     NOMINATED NODE   READINESS GATES
nginx-php-799d8bcc57-4rmkc   3/3     Running   0          16s   10.244.1.77    node-1   <none>           <none>
nginx-php-799d8bcc57-hq77m   3/3     Running   0          16s   10.244.3.100   node-3   <none>           <none>
nginx-php-799d8bcc57-rdwq5   3/3     Running   0          16s   10.244.2.110   node-2   <none>           <none>
在nfs服务器端进行如下操作:
[root@nfs ~]# tar xf /root/wordpress-4.7.2-zh_CN.tar.gz -C /nfs_share/
[root@nfs ~]# mv /nfs_share/wordpress/* /nfs_share/
此时在浏览器输入任意一个节点的IP:38080,就能进行wordpress 的安装。
(最好等待所有pod都完全running起来再操作!)
数据库信息如下:

这样通过K8S部署wordpress就完成了!