阿里云centos 部署python flask应用(centos+python3+nginx+flask+uwsgi+supervisor)
首先了解这几个东西的作用
- Flask 是一个 Web 应用框架,框架的作用在于处理 request 和 reponse,使用的是 Python 自带的 simple HTTPServer 创建的,在安全性和效率上都是不行的,而uWSGI 是一个全功能的 HTTP 服务器,他要做的就是把 HTTP 协议转化成语言支持的网络协议。比如把 HTTP 协议转化成 WSGI 协议,让 Python 可以直接使用。 uwsgi 是一种 uWSGI 的内部协议,使用二进制方式和其他应用程序进行通信。
- Supervisor 我现在有一个进程需要每时每刻不断的跑,但是这个进程又有可能由于各种原因有可能中断。当进程中断的时候我希望能自动重新启动它,此时,我就需要使用到了Supervisor,supervisor管理进程,是通过fork/exec的方式将这些被管理的进程当作supervisor的子进程来启动,所以我们只需要将要管理进程的可执行文件的路径添加到supervisor的配置文件中就好了。此时被管理进程被视为supervisor的子进程,若该子进程异常中断,则父进程可以准确的获取子进程异常中断的信息,通过在配置文件中设置autostart=ture,可以实现对异常中断的子进程的自动重启
- Nginx最普遍的说法是 Nginx 对于处理静态文件更有优势,性能更好。其实如果是小网站,没有静态文件需要处理,只用 uWSGI 也是可以的,但加上 Nginx 这一层,优势可以很具体:
对于运维来说比较方便,如果服务器被某个 IP 攻击,在 Nginx 配置文件黑名单中添加这个 IP 即可,如果只用 uWSGI,那么就需要在代码中修改了。另一方面,Nginx 是身经百战的 Web 服务器了,在表现上 uWSGI 显得更专业,比如说 uWSGI 在早期版本里是不支持 https 的,可以说 Nginx 更安全。
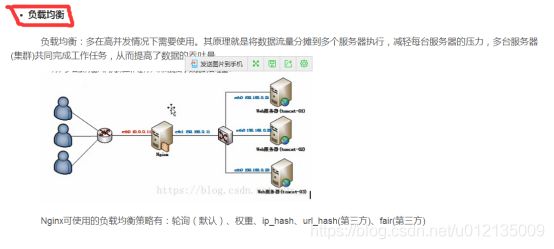
Nginx 的特点是能够做负载均衡和 HTTP 缓存,如果不止一台服务器,Nginx 基本就是必选项了,通过 Nginx,将资源可以分配给不同的服务器节点,只有一台服务器,也能很好地提高性能,因为 Nginx 可以通过 headers 的Expires or E-Tag,gzip 压缩等方式很好地处理静态资源,毕竟是 C 语言写的,调用的是 native 的函数,针对 I/O做了优化,对于动态资源来说,Nginx 还可以实现缓存的功能,配合 CDN 优化(这是 uWSGI 做不到的)。Nginx 支持epoll/kqueue 等高效网络库,能够很好地处理高并发短连接请求,性能比 uWSGI 不知道高到哪里去了。
如果服务器主机上运行了PHP,Python 等语言写的多个应用,都需要监听80端口,这时候 Nginx 就是必选项了。因为我们需要一个转发的服务。


大致访问操作是这样

框架和功能介绍完毕了,现在开始我们的安装。安装环境是阿里云的Centos,后面用到的端口需要提前在阿里云服务器的防火墙里面先打开端口。
1、安装python3并与python2共存
1.1 python检测
centos7默认安装了 python2.7.5 因为一些命令要用它比如yum,它使用的是python2.7.5。
使用 python -V 命令查看一下是否安装Python。
[root@localhost bin]# python -V
Python 2.7.5
然后使用命令 which python 查看一下Python可执行文件的位置。
[root@localhost bin]# which python
/usr/bin/python
[root@localhost bin]# cd /usr/bin/
[root@localhost bin]# ll py*
lrwxrwxrwx. 1 root root    7 4月   8 2017 python -> python2
lrwxrwxrwx. 1 root root    9 4月   8 2017 python2 -> python2.7
-rwxr-xr-x. 1 root root 7136 6月  18 2014 python2.7
python 指向的是python2.7。因为我们要安装python3版本,所以python要指向python3才行。
先yum安装必要的包,用于下载编译python3。
[root@localhost bin]# yum install zlib-devel bzip2-devel openssl-devel ncurses-devel sqlite-devel readline-devel tk-devel gcc make
安装后防止错误,先做备份:
[root@localhost bin]# mv python python.bak
[root@localhost bin]# ll pytho*
lrwxrwxrwx. 1 root root    9 4月   8 2017 python2 -> python2.7
-rwxr-xr-x. 1 root root 7136 6月  18 2014 python2.7
lrwxrwxrwx. 1 root root    7 4月   8 2017 python.bak -> python2
1.2 安装python3
获取安装包。
[root@localhost ~]# wget https://www.python.org/ftp/python/3.6.4/Python-3.6.4.tar.xz
解压。
[root@localhost ~]# tar -xvJf Python-3.6.4.tar.xz
切进目录。
[root@localhost ~]# cd Python-3.6.4/
编译,安装。
[root@localhost Python-3.6.4]# ./configure prefix=/usr/local/python3
[root@localhost Python-3.6.4]# make && make install
安装完毕,/usr/local/目录下就会有python3了。
[root@localhost Python-3.6.4]# cd /usr/local/python3/
[root@localhost python3]# ll
总用量 4
drwxr-xr-x 2 root root 4096 3月  21 18:37 bin
drwxr-xr-x 3 root root   23 3月  21 18:37 include
drwxr-xr-x 4 root root   60 3月  21 18:37 lib
drwxr-xr-x 3 root root   16 3月  21 18:37 share
然后我们可以添加软链到执行目录下/usr/bin。
[root@localhost Python-3.6.4]# ln -s /usr/local/python3/bin/python3 /usr/bin/python
同时pip也建立一个软连接。
[root@localhost bin]# ln -s /usr/local/python3/bin/pip3 /usr/bin/pip
然后软连接创建完成,查看当前python版本。
[root@localhost python3]# python -V
Python 3.6.4
[root@localhost python3]# python2 -V
Python 2.7.5
[root@localhost python3]# cd /usr/bin/
[root@localhost bin]# ll python*
lrwxrwxrwx  1 root root   30 3月  21 18:40 python -> /usr/local/python3/bin/python3
lrwxrwxrwx. 1 root root    9 4月   8 2017 python2 -> python2.7
-rwxr-xr-x. 1 root root 7136 6月  18 2014 python2.7
最后因为执行yum需要python2的版本,所以我们还要修改yum的配置。
[root@localhost bin]# vim /usr/bin/yum
把#!/usr/bin/python 修改为 #!/usr/bin/python2
同理。
[root@localhost bin]# vim /usr/libexec/urlgrabber-ext-down
这样python3版本就安装完成,同时python2也存在。
2、uwigi安装
curl http://uwsgi.it/install | bash -s default /usr/local/uwsgi
3、nginx安装
[root@localhost src]# wget http://nginx.org/download/nginx-1.10.2.tar.gz
[root@localhost src]# tar zxvf nginx-1.10.2.tar.gz
[root@localhost src]# cd nginx-1.10.2
[root@localhost nginx-1.10.2]# ./configure && make && make install
查找安装路径
whereis nginx
把安装路劲添加到环境变量
vim ~/.bashrc
加上一句上面找到的nginx的路径
export PATH=$PATH:/usr/local/nginx/sbin/
保存并退出
source ~/.bashrc
在执行service nginx start|stop|reload 的时候报错:Failed to reload nginx.service: Unit not found
是因为nginx没有有添加到系统服务,手动手动添加一个即可
详细操作:http://www.zhuhongliang.com/archives/238
4、集成
4.1 nginx+uwsgi配置
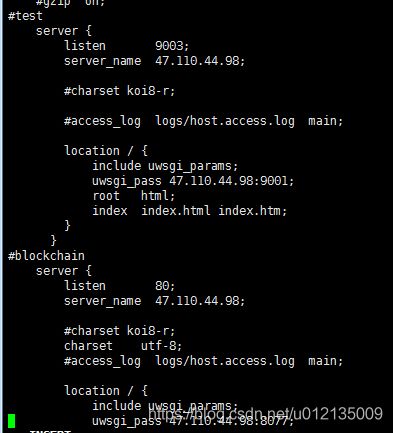
/usr/local/nginx/conf/nginx.conf

里面两个服务做了转发test 和blockchain
http://47.110.44.98:9003/ 可以直接访问test 被代理到内部的9001
test监听的9003 转发给内部的9001,blockchain监听的外部80端口转发给内部的8077
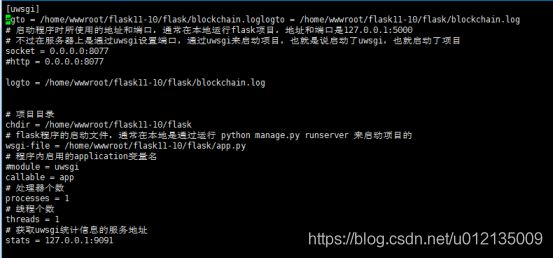
下面uwsgi跑起来,编辑配置文件,那里创建都行,我是直接放在flask项目目录下创建uwsgi.ini内容如下:
/home/wwwroot/flask11-10/flask/blockchain.ini

这里的socket就是上面nginx反向代理到内部的端口,如果是uwsgi外网访问则是需要http
4.2 flask项目
先下载flask
[root@localhost flask]# pip install flask
[root@localhost flask]# pwd
/home/wwwroot/flask
5 安装配置supervisor
5.1 安装supervisor
尝试直接安装,成功后可直接到配置下一节。
[root@localhost flask]# yum install supervisor
如果有问题
[root@localhost bin]# easy_install supervisor
5.2 配置supervisor
因为上面的包是安装在py2里面的,所以不能直接跑。
编辑下/usr/bin/supervisord。
#!/usr/bin/python 改成 #!/usr/bin/python2
同理修改这几个命令文件:/usr/bin/echo_supervisord_conf、/usr/bin/supervisorctl
[root@localhost bin]# supervisord -h
至此大概说完,下面开始配置supervisord。
1、创建默认的配置文件。
[root@localhost bin]# echo_supervisord_conf > /etc/supervisord.conf
修改/etc/supervisord.conf文件
直接找到最下面的这个。
[include]                                   # 这里的‘;’注释去掉
;files = relative/directory/*.ini
files = /etc/supervisor/conf.d/*.conf       # 这里加入自定义的配置文件文件路径
创建自定义文件配置文件夹
[root@localhost etc]# mkdir -p supervisor/conf.d
[root@localhost etc]# cd supervisor/conf.d
[root@localhost conf.d]# vim uwsgi.conf
; ================================
;  uwsgi supervisor
; ================================
[program:uwsgi]
command=/usr/bin/uwsgi --ini /home/wwwroot/flask/uwsgi.ini
directory=/home/wwwroot/flask
user=root
stdout_logfile=/var/log/flask/uwsgi_out.log
stderr_logfile=/var/log/flask/uwsgi_err.log
autostart=true
autorestart=true
startsecs=10
priority=997
都设置完了,下面跑起来吧。
[root@localhost supervisor]# killall supervisord# -c指定配置文件路径,-n可前台运行,方便自己调试,具体自己去看官档
[root@localhost supervisor]# /usr/bin/supervisord -c /etc/supervisord.conf
然后看看跑起来没。
[root@localhost supervisor]# ps -aux | grep supervisord
[root@localhost supervisor]# ps -aux | grep uwsgi
然后客户端可以直接运行会出现命令行调试。
[root@localhost supervisor]# supervisorctl
uwsgi                            RUNNING   pid 16556, uptime 0:26:03
/etc/supervisord.conf 这是我的配置

可以访问http://47.110.44.98:9002/

supervisor管理项目可宕机自动重启服务,可设置开机自启动,批量管理服务
/etc/supervisor/conf.d

/usr/bin/supervisord -c /etc/supervisord.conf 启动supervisord来管理的项目,这里就是test和blockchain
启动多个Flask进程,可以参考
http://www.cnblogs.com/oulala/p/9641715.html