简介
BlockScout是一个Elixir应用程序,允许用户搜索以太坊网络(包括所有叉子和侧链)上的交易,查看账户和余额以及验证智能合约。BlockScout为用户提供了一个全面,易于使用的界面,以查看,确认和检查EVM(以太坊虚拟机)区块链上的交易。这包括POA网络,xDai链,以太坊经典和其他以太坊测试网,专用网络和侧链。
当前可用的全功能区块浏览器(Etherscan,Etherchain,Blockchair)是无法独立验证的封闭系统。随着以太坊侧链在私人和公共场所中不断扩散,需要透明,开源的工具来分析和验证交易。
BlockScout安装难点在于,基础环境依赖复杂。需要多种基本环境支持。且需要连接外网安装依赖。
需要环境:
| 组件要求版本 | 安装版本 | 获取方式 |
| Erlang/OTP 24 | esl-erlang_24.1-1 | https://packages.erlang-solutions.com/erlang/rpm/centos/7/x86_64/esl-erlang_24.1-1~centos~7_amd64.rpm |
| Elixir 1.12 | 1.12.2 | https://github.com/elixir-lang/elixir/releases/download/v1.12.2/Precompiled.zip |
| PostgresSQL 10.3+ 11,12,13 | PostgresSQL 12 | https://download.postgresql.org/pub/repos/yum/reporpms/EL-7-x86_64/pgdg-redhat-repo-latest.noarch.rpm |
| PostGIS | PostGIS30_12 | yum -y install postgis30_12.x86_64 |
| Nodejs14.x.x |
nodejs v14.0.0 | https://nodejs.org/dist/v14.0.0/node-v14.0.0-linux-x64.tar.xz |
| RUST | 最新版本 | https://sh.rustup.rs |
| Automake | 最新 | yum源 |
| Libtool | 最新 | yum源 |
| Inotify-tools | 最新 | yum源 |
| GCC | 最新 | yum源 |
| GMP | 最新 | yum源 |
| Make | 最新 | yum源 |
软件安装:
部署环境:
阿里云、百度云
OS版本:centos7.9
BlockScount:v3.7.3-beta
Erlang安装:
#下载软件包
https://packages.erlang-solutions.com/erlang/rpm/centos/7/x86_64/esl-erlang_24.1-1~centos~7_amd64.rpm

#安装依赖
yum -y update
yum -y install wxGTK-devel unixODBC-devel

#安装erlang
yum -y install esl-erlang_24.1-1~centos~7_amd64.rpm
查看安装是否成功
Elixir安装
Elixir是一种动态的功能语言,旨在用于构建可伸缩和可维护的应用程序。有关Elixir,安装和文档的更多信息, 请访问Elixir的网站。
Elixir和Erlang版本是对应的,请勿随意改变安装的版本哦~
根据上述表格提供的下载源下载对应版本的rpm包,之后通过如下命令进行操作:
#下载elixir
wget https://github.com/elixir-lang/elixir/releases/download/v1.12.2/Precompiled.zip

#解压缩
yum -y install zip
unzip Precompiled.zip -D /opt/elixir/
配置环境变量
 1 vim /etc/profile
 2 # 键入vim /etc/profile 在末尾添加如下内容
 3
 4 export PATH="$PATH:/opt/elixir/bin"
 5
 6 # 生效环境变量
 7
 8 source /etc/profile
 9
10 # 或者使用
11 . /etc/profile
验证是否安装成功
PostgresSQL安装
PostgreSQL是一个功能强大的开源对象关系数据库系统,经过30多年的积极开发,在可靠性,功能健壮性和性能方面赢得了极高的声誉。
当前版本BlockScout要求PostgresSQL必须是10.3+以上版本,这里选择安装最新的12版进行安装演示。
进入官方下载页,根据你的系统选择环境,如果你和笔者是相同环境,请依次将Select version选中为12、将Select platform选中为CentOS7、将Select architecture选中为x86_64,最终将生成安装指令:
 1 yum install https://download.postgresql.org/pub/repos/yum/reporpms/EL-7-x86_64/pgdg-redhat-repo-latest.noarch.rpm
 2
 3 # 安装RPM存储库
 4 yum install postgresql12
 5
 6 # 安装客户端软件包
 7 yum install postgresql12-server
 8
 9 # 初始化数据库
10 /usr/pgsql-12/bin/postgresql-12-setup initdb
11
12 # 设置PostgreSQL服务为开机启动
13 systemctl enable postgresql-12
14
15 # 启动PostgreSQL服务
16 systemctl start postgresql-12
17
18 # 配置环境变量,/usr/pgsql-12/bin 是默认安装目录
19 export PATH="/usr/pgsql-12/bin:$PATH"
20 export LD_LIBRARY_PATH="/usr/pgsql-12/lib"
数据库初始配置
PostgreSQL安装成功之后,会默认创建一个名为postgres的Linux用户,初始化数据库后,会有名为postgres的数据库,来存储数据库的基础信息,例如用户信息等等,相当于MySQL中默认的名为mysql数据库。
postgres数据库中会初始化一名超级用户 postgres。
为了方便我们使用postgres账号进行管理,我们可以修改该账号的密码。
 1 # 切换到postgres账户
 2 su postgres
 3
 4 # 进入SQL Shell
 5 psql
 6
 7 # 键入如下指令,修改密码,笔者将密码修改为123456。
 8 ALTER USER postgres WITH PASSWORD '123456';
 9
10 # 键入 “\q”退出SQL Shell,键入exit登出postgres账户
11 \q
12
13 exit
修改数据库访问权限
此外我们还需要修改数据的访问权限:
 1 vim /var/lib/pgsql/12/data/pg_hba.conf
 2 ......
 3 # TYPE  DATABASE        USER            ADDRESS                 METHOD
 4
 5 # "local" is for Unix domain socket connections only
 6 local   all             all                                     md5
 7 # IPv4 local connections:
 8 host    all             all             127.0.0.1/32            md5
 9 # IPv6 local connections:
10 host    all             all             ::1/128                 md5
11 # Allow replication connections from localhost, by a user with the
12 # replication privilege.
13 #local   replication     all                                     peer
14 #host    replication     all             127.0.0.1/32            ident
15 #host    replication     all             ::1/128                 ident
16 host    all              all             0.0.0.0/0               md5
设置允许远程访问数据库:
vi /var/lib/pgsql/12/data/postgresql.conf
# - Connection Settings -

listen_addresses = '*'                  # what IP address(es) to listen on;
                                        # comma-separated list of addresses;
                                        # defaults to 'localhost'; use '*' for all
                                        # (change requires restart)
port = 5432                             # (change requires restart)
最后我们重启数据库:
systemctl restart postgresql-12
安装PostGIS
为了避免部署BlockScout过程中创建表示出现的ERROR: could not open extension control异常,我们需要为PostgreSQL安装PostGIS拓展插件。
不同PostgreSQL版本需要安装的PostGIS版本也不相同,请参考映射表格进行安装。
#安装
yum -y install postgis30_12.x86_64
开启插件
 1 # 切换到postgres账户
 2 su postgres
 3
 4 # 进入SQL Shell
 5 psql
 6
 7
 8 #开启postgis插件
 9
10 // 开启pgsql的插件
11 postgres=# create extension postgis;
12 postgres=# create extension postgis_topology;
13 postgres=# create extension fuzzystrmatch;
14 postgres=# create extension address_standardizer;
15 postgres=# create extension address_standardizer_data_us;
16 postgres=# create extension postgis_tiger_geocoder;
17 //查看版本,验证安装是否成功
18 postgres=# SELECT PostGIS_full_version();
19
20 systemctl restart postgresql-12
21 # 最后,测试一下是否修改成功,键入密码
22 psql -h 127.0.0.1 -p 5432 -U postgres
安装NodeJs
#下载nodejs
wget https://nodejs.org/dist/v14.0.0/node-v14.0.0-linux-x64.tar.xz

#解压缩
tar -xf node-v14.0.0-linux-x64.tar.xz

#移动重命名
mv node-v14.0.0 node

创建软连接
ln -s /usr/local/node/bin/node /usr/bin/node
ln -s /usr/local/node/bin/npm /usr/bin/npm

# 设置环境变量,请根据你的安装目录进行设置 可临时生效或配置进全局
export PATH="$PATH:/usr/local/node/bin"
测试是否成功
node -v
npm -v
安装基础依赖
安装Automake

yum --enablerepo=epel group install -y "Development Tools"
安装Libtool

 yum install -y libtool
安装Inotify-tools

yum install inotify-tools
安装GCC Compiler

yum install -y gcc-c++
安装GMP

yum --enablerepo=epel install -y gmp-devel
安装Make

yum install make
#配置主机host文件
127.0.0.1       localhost blockscout blockscout.local

255.255.255.255 broadcasthost

::1             localhost blockscout blockscout.local
安装Rust
curl https://sh.rustup.rs -sSf | sh
source $HOME/.cargo/env
初始化BlockScout
手动部署
1、拉取源码:
连接外网代理地址如:

   export http_proxy=http://180.76.1.XX:8118
export https_proxy=http://180.76.1.XX:8118
git clone https://github.com/poanetwork/blockscout

cd blockscout
2、添加数据库连接环境变量:
export DATABASE_URL="postgresql://postgres:[email protected]:5432/blockscout"

export DB_HOST=127.0.0.1
export DB_PASSWORD=123456
export DB_PORT=5432
export DB_USERNAME=postgres
3、添加secret_key_base环境变量:
export SECRET_KEY_BASE="VTIB3uHDNbvrY0+60ZWgUoUBKDn9ppLR8MI4CpRz4/qLyEFs54ktJfaNT6Z221No"
或者你也可以先生成一个新的secret_key_base,生成过程中请耐心等待:
# mix 由elixir提供,请务必保证elixir成功安装
mix phx.gen.secret
若服务器在内陆,可能会出现获取依赖超时现象,自然报错后请重试!
4、如果您以前已经部署过,请从先前的版本中删除静态资产:
mix phx.digest.clean
5、配置客户端连接
BlockScout目前支持Parity(默认),Geth和Ganache三种形式的客户端连接,这里我们使用infura.io提供的免费API,如果你还没有infura.io可以去https://infura.io/申请。
export ETHEREUM_JSONRPC_VARIANT=geth
export ETHEREUM_JSONRPC_HTTP_URL="https://ropsten.infura.io/v3/ed0e4d0e188240e7a0eeb68664000000"
单击了解BlockScout的更多环境变量配置参考。
6、安装Mix依赖,并对其进行编译并编译应用程序:
 1 mix do deps.get, local.rebar --force, deps.compile, compile
 2
 3 # 或者你也可以将其拆解开之后执行,这样有助于你更细错误信息
 4
 5 mix do deps.get
 6
 7 mix do local.rebar --force
 8
 9 mix do deps.compile
10
11 mix do compile
再次进行友谊提醒,若服务器在内陆,可能会出现获取依赖超时现象,自然报错后请重试!
需连接外网代理,如依赖还报超时。需将依赖时间适当调长。
7、删除、创建和迁移数据库
mix do ecto.drop, ecto.create, ecto.migrate
请注意,ecto.drop将从数据库中删除所有数据。如果您不想丢失所有数据,请不要在生产中执行它!
8、安装Node.js依赖
chmod -R 777 blockscout/

cd /soft/blockscout-master/apps/block_scout_web/assets

sudo npm install && node_modules/webpack/bin/webpack.js --mode production

cd /soft/blockscout-master/apps/explorer

npm install
9、建立用于部署的静态资产
cd /soft/blockscout

mix phx.digest

#如提示缺少目录 为可预知范围内正常报错
10、启用HTTPS。Phoenix服务器仅与HTTPS一起运行。
cd /soft/blockscout/apps/block_scout_web

mix phx.gen.cert blockscout blockscout.local
11、返回到源码根目录并启动Phoenix Server
cd /soft/blockscout
mix phx.server
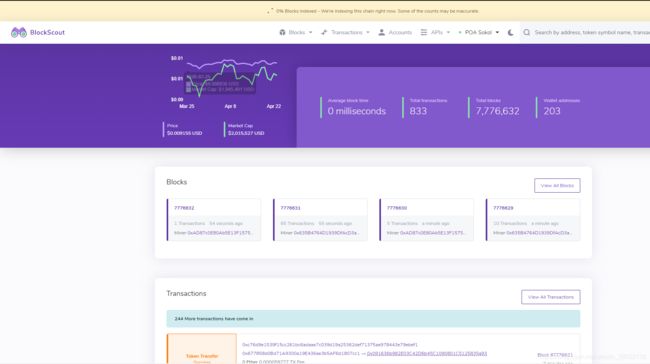
最后,在浏览器输入http://172.16.0.49:4000/见到如下界面则表示部署成功:
参考:
https://docs.blockscout.com/for-developers/information-and-settings/requirements
https://blog.csdn.net/weixin_38652136/article/details/105724016


