Java中顺序表及链表详解
目录
- 一、线性表
- 二、顺序表
-
- 应用示例:实现一个动态顺序表
- 2.1打印顺序表
- 2.2获取顺序表长度
- 2.3在 pos 位置新增元素
- 2.4判定是否包含某个元素
- 2.5查找某个元素对应的位置
- 2.6获取pos位置的元素
- 2.7给 pos 位置的元素设为/更新 value
- 2.8删除第一次出现的关键字key
- 2.9清空顺序表
- 三、链表
-
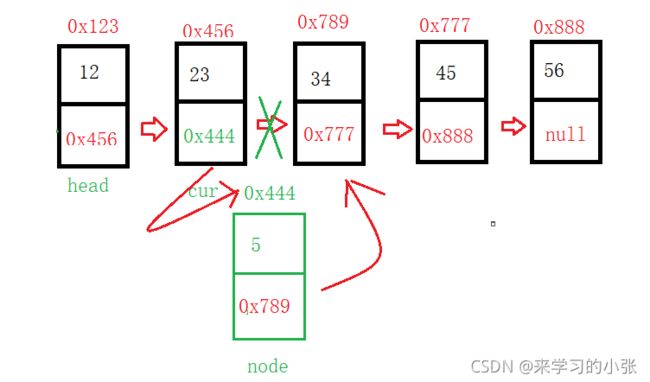
- 3.1创建一个节点
- 3.2遍历节点
- 3.3查找是否在单链表当中包含关键字key
- 3.4得到单链表的长度
- 3.5头插法
- 3.6尾插法
- 3.7任意位置插入,第一个数据节点为0号下标
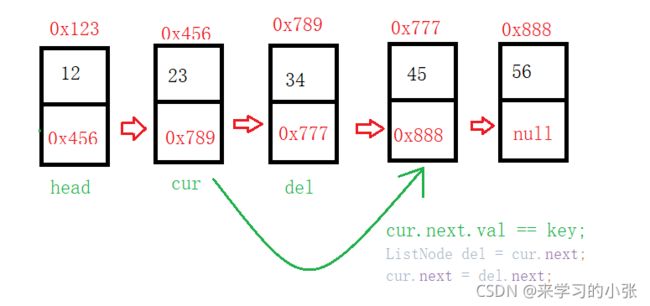
- 3.8删除第一次出现关键字为key的节点
- 3.9删除所有值为key的节点
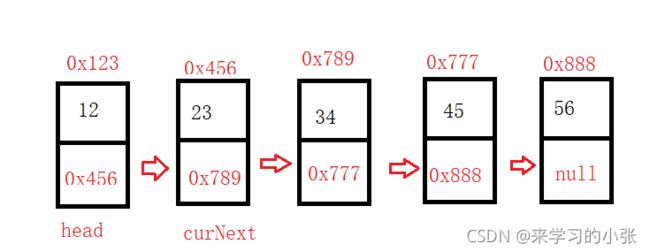
- 3.10清空链表
一、线性表
线性表(linear list)是n个具有相同特性的数据元素的有限序列。 线性表是一种在实际中广泛使用的数据结构,常见的线性表:顺序表、链表、栈、队列、字符串…
线性表在逻辑上是线性结构,也就说是连续的一条直线。但是在物理结构上并不一定是连续的,线性表在物理上存储时,通常以数组和链式结构的形式存储。
二、顺序表
顺序表是用一段物理地址连续的存储单元依次存储数据元素的线性结构,一般情况下采用数组存储。在数组上完成数据的增删查改。
采用顺序表的形式,可以写到类里面,将来就可以面向对象了。
顺序表一般可以分为:
- 静态顺序表:使用定长数组存储。
- 动态顺序表:使用动态开辟的数组存储。
静态顺序表适用于确定知道需要存多少数据的场景.
静态顺序表的定长数组导致N定大了,空间开多了浪费,开少了不够用,相比之下动态顺序表更灵活, 根据需要动态的分配空间大小。
应用示例:实现一个动态顺序表
定义一个MyArrayList类,里面的成员变量有两个:elem、usedSize,还有一个构造方法,并在构造方法里面定义一个长度为10的数组。并在测试类中new一个MyArrayList对象。此时其底层结构如下图所示:
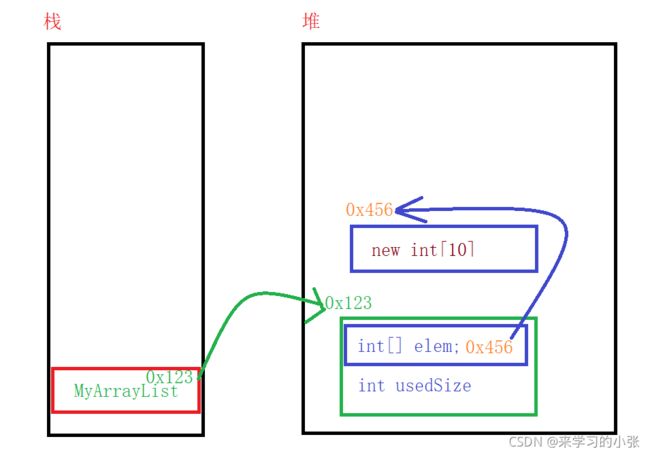
栈里面存放的MyArrayList引用指向堆里面的对象elem、usedSize,elem又在堆上new了一个长度为10的数组。
代码示例:
public class MyArrayList{

    public int[] elem;
    public int usedSize;//表示当前有效数据个数

    public MyArrayList(){

        this.elem = new int[10];
    }
2.1打印顺序表
代码示例:
 // 打印顺序表
    public void display() {

        for (int i = 0; i < this.usedSize; i++) {

            System.out.print(this.elem[i] +" ");
        }
        System.out.println();
    }
2.2获取顺序表长度
代码示例:
// 获取顺序表长度
    public int size() {

        return this.usedSize;
    }
2.3在 pos 位置新增元素
具体思想如下:
首先判断pos位置是否合法,如果pos小于0或者pos大于数组有效元素的个数,则认为该位置不合法,直接结束该语句。
然后,再判断该数组是否已经满了,如果现存有效元素个数与数组长度相等,就表明该数组已经满了,则这时就需要用到 Arrays.copyOf()函数来进行扩容,将数组长度扩大为原来的两倍。
最后,通过for循环来进行数组元素的移动,从有效元素位置开始,到要添加元素的pos位置,挨将前一个元素移动到后一个元素位置,直到移动到pos位置,然后将此位置赋值为要新增的data元素,最后再将有效元素的个数加1。
具体代码实现如下:
 public void add(int pos, int data){

 	if(pos < 0 || pos > usedSize){

 		System.out.println("pos位置不合法");
		return;
	}
	if(isFull()){

		this.elem = Arrays.copyOf(this.elem,this.elem.length * 2);
	}
	for(int i = this.usedSize - 1;i >= pos;i--){

		this.elem[i+1] = this.elem[i];
	}
	this.elem[pos] = data;
	this.usedSize++;
 }
 public boolean isFull(){

	return this.usedSize == this.elem.length;
}
2.4判定是否包含某个元素
代码示例:
public boolean contains(int toFind) {

        for (int i = 0; i < this.usedSize; i++) {

            if (this.elem[i] == toFind){

                return true;
            }
        }
        return false;
    }
2.5查找某个元素对应的位置
代码示例:
 public int search(int toFind) {

        for (int i = 0; i < this.usedSize; i++) {

            if (this.elem[i] == toFind){

                return i;
            }
        }
        return -1;
    }
2.6获取pos位置的元素
代码示例:
 public int getPos(int pos) {

    if (pos < 0 || pos >= this.usedSize){

        System.out.println("pos位置不合法");
        return -1;
    }
        if (isEmpty()){

            System.out.println("顺序表为空");
            return -1;
        }
        return this.elem[pos];
    }
    public boolean isEmpty(){

        return this.usedSize == 0;
    }
2.7给 pos 位置的元素设为/更新 value
代码示例:
 public void setPos(int pos, int value) {

        if (pos < 0 || pos >= this.usedSize){

            System.out.println("pos位置不合法");
            return;
        }
        if (isEmpty()){

            System.out.println("顺序表为空");
            return;
        }
        this.elem[pos] = value;
    }
2.8删除第一次出现的关键字key
首先,判断顺序表示是否为空。
然后,应用5中得search()函数来查找要删除的元素,如果数组中没有要删除的数组,则直接结束该语句。
最后,如果找到了要删除的元素,则利用for循环从要删除元素位置开始,到有效元素个数-1位置截止,依次将后一个元素赋值给前一个元素,最后将有效元素个数减1。
代码示例:
 public void remove(int toRemove) {

        if (isEmpty()){

            System.out.println("顺序表为空");
            return;
        }
       int index = search(toRemove);
        if (index == -1){

            System.out.println("没有要删除的数字");
            return;
        }
        for (int i = index; i < this.usedSize - 1; i++) {

            this.elem[i] = this.elem[i + 1];
        }
        this.usedSize--;
    }
2.9清空顺序表
代码示例:
public void clear() {

        this.usedSize = 0;//简单类型

        //如果是引用数据类型,就要将所有的数据都要置为空
        /*for (int i = 0; i < usedSize; i++) {
            this.elem[i] == null;
        }
 		this.usedSize = 0;
		*/
    }
三、链表
链表是一种物理存储结构上非连续存储结构,数据元素的逻辑顺序是通过链表中的引用链接次序实现的。
链表的结构非常多样,以下情况组合起来就有8种链表结构:
- 单向、双向
- 带头、不带头
- 循环、非循环
这里主要讲解单向、不带头、非循环及双向、不带头、非循环。
链表是由一个一个的节点组成,节点中包括:val数据域及next域存放下一个节点的地址。每一个节点都有一个地址。每个节点中的next域就存放着下一个节点的地址。
head里面存放的就是第一个节点(头节点)的地址,head.next存储的就是下一个节点的地址。
head叫做头节点,最后一个节点叫做尾节点。尾节点的的next域为null。
链表的结构可以用画图的方式表示如下:
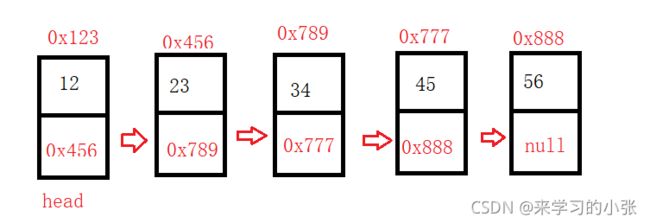
上图所画链表为单向不带头非循环链表。
具体代码实现如下:
//ListNode代表一个节点
class ListNode{

    public int val;
    public ListNode next; //存储的是节点的地址

	//有参构造
    public ListNode(int val){

        this.val = val;
    }
}
3.1创建一个节点
代码示例:
public class MyLinkedList {

    public ListNode head;//链表的头引用

    //创建一个节点
    public void createList(){

        ListNode listNode1 = new ListNode(12);
        ListNode listNode2 = new ListNode(23);
        ListNode listNode3 = new ListNode(34);
        ListNode listNode4 = new ListNode(45);
        ListNode listNode5 = new ListNode(56);

        listNode1.next = listNode2;
        listNode2.next = listNode3;
        listNode3.next = listNode4;
        listNode4.next = listNode5;

        this.head = listNode1;//定义头结点指向第一个节点的位置
    }
3.2遍历节点
代码示例:
public void display(){

        ListNode cur = this.head;//定义一个cur节点指向头节点
        while (cur != null){

            System.out.print(cur.val+" ");
            cur = cur.next;
        }
        System.out.println();
    }
3.3查找是否在单链表当中包含关键字key
代码示例:
 public boolean contains(int key){

        ListNode cur = this.head;
        while (cur != null){

            if(cur.val == key){

                return true;
            }
            cur = cur.next;
        }
        return false;
    }
3.4得到单链表的长度
代码示例:
    public int size() {

        int count = 0;
        ListNode cur = this.head;
        while (cur != null) {

            count++;
            cur = cur.next;
        }
        return count;
    }
3.5头插法
代码示例:
public void addFirst(int data){

        ListNode node = new ListNode(data);//定义一个新的node节点
        node.next = head;
        head = node;
        /*if (this.head == null){
            this.head = node;
        }else{
            node.next = head;
            head = node;
        }*/
    }
切记:绑定位置的时候,一定要先绑定后面。
public class TestDemo {

    public static void main(String[] args) {

        MyLinkedList myLinkedList = new MyLinkedList();
        myLinkedList.addFirst(12);
        myLinkedList.addFirst(23);
        myLinkedList.addFirst(34);
        myLinkedList.addFirst(45);
        myLinkedList.addFirst(56);
        }
  }
3.6尾插法
代码示例:
public class TestDemo {

public void addLast(int data){

        ListNode node = new ListNode(data);
        if(this.head == null){

	 		this.head = node;
		}else{

		ListNode cur = head.next;
		while(cur.next != null){

			cur = cur.next
			}
			cur.next = node;
		}
}
测试代码如下:
public static void main(String[] args) {

        MyLinkedList myLinkedList = new MyLinkedList();
        myLinkedList.addLast(12);
        myLinkedList.addLast(23);
        myLinkedList.addLast(34);
        myLinkedList.addLast(45);
        myLinkedList.addLast(56);
	}
}
3.7任意位置插入,第一个数据节点为0号下标
/**
     * 要插入到目标位置,必须先找到目标位置的前一个位置
     * 找到index-1位置的节点的地址
     * @param index
     * @return
     */
    public ListNode findIndex(int index){

        ListNode cur = this.head;
        while (index - 1 != 0){

            cur = cur.next;
            index--;
        }
        return cur;
    }
    //任意位置插入,第一个数据节点为0号下标
    public void addIndex(int index,int data){

        if (index < 0 || index > size()){

            System.out.println("index位置不合法");
            return;
        }
        if (index == 0){

            addFirst(data);// 头插
            return;
        }
        if (index == size()){

            addLast(data); //尾插
            return;
        }
        ListNode cur = findIndex(index);//要插入位置的前一个节点
        ListNode node = new ListNode(data); //要插入的节点
        node.next = cur.next;
        cur.next = node;
    }
3.8删除第一次出现关键字为key的节点
 //找到要删除的关键字key的前驱
    public ListNode searchPerv(int key){

        ListNode cur = this.head;
        while (cur.next != null){

            if (cur.next.val == key){

                return cur;
            }
            cur = cur.next;
        }
        return null;
    }
    //删除第一次出现关键字为key的节点
    public void remove(int key){

        if (this.head == null){

            System.out.println("单链表为空,不能删除");
            return;
        }
        if (this.head.val == key){

            this.head = this.head.next;
            return;
        }
        ListNode cur = searchPerv(key);
        if (cur == null){

            System.out.println("没有要删除的节点!!!");
            return;
        }
        ListNode del = cur.next;
        cur.next = del.next;
 }
3.9删除所有值为key的节点
public ListNode removeAllKey(int key){

        if (this.head == null){

            return null;
        }
        ListNode prev = this.head;
        ListNode cur = this.head.next;
        while (cur != null){

            if(cur.val == key){

                prev.next = cur.next;
                cur = cur.next;
            }else {

                prev = cur;
                cur = cur.next;
            }
        }
        //最后判断头节点是否是要删除的key
        if (this.head.val == key){

            head = head.next;
        }
        return this.head;
    }
3.10清空链表
public void clear(){

//        this.head = null;
    while (this.head != null){

        ListNode curNext = head.next;
        this.head.next = null;
        this.head = curNext;
        }
    }
以上。


