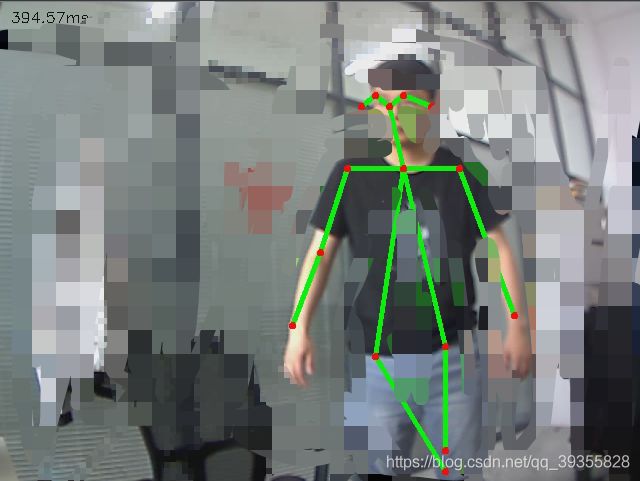
opencv+python+OpenPose姿态实时识别
opencv+python+OpenPose 姿态实时识别
1.姿态识别
标记 颈、肩、肘、腕、腰、膝、踝 等特征点进行姿态识别,这些关节都有一定程度的自由度。
2.OPenPose
OpenPose人体姿态识别项目是美国卡耐基梅隆大学(CMU)基于卷积神经网络和监督学习并以caffe为框架开发的开源库。可以实现人体动作、面部表情、手指运动等姿态估计。适用于单人和多人,具有极好的鲁棒性。是世界上首个基于深度学习的实时多人二维姿态估计应用,基于它的实例如雨后春笋般涌现。人体姿态估计技术在体育健身、动作采集、3D试衣、舆情监测等领域具有广阔的应用前景。(这段话参考: Github开源人体姿态识别项目OpenPose中文文档 - 简书 (jianshu.com) )

github地址: https://github.com/CMU-Perceptual-Computing-Lab/openpose
主要方法如下:
- (1) 读取模型、预测的图片,进行神经网络的预测,获取预测结果
- (2) 关键点的检测
- (3) 利用PAFs,找到有效的关键点对
- (4) 将点对组合成正确的人体骨骼图
3.人体姿态识别
使用opencv自带的分类器,先检测到人脸,然后才开始OPenPose的模型检测,这样,就能实现调用摄像头或者视频中的人脸的实时检测。
# -*-coding: utf-8 -*-
import cv2 as cv
import os
import glob

BODY_PARTS = {
     "Nose": 0, "Neck": 1, "RShoulder": 2, "RElbow": 3, "RWrist": 4,
              "LShoulder": 5, "LElbow": 6, "LWrist": 7, "RHip": 8, "RKnee": 9,
              "RAnkle": 10, "LHip": 11, "LKnee": 12, "LAnkle": 13, "REye": 14,
              "LEye": 15, "REar": 16, "LEar": 17, "Background": 18}

POSE_PAIRS = [["Neck", "RShoulder"], ["Neck", "LShoulder"], ["RShoulder", "RElbow"],
              ["RElbow", "RWrist"], ["LShoulder", "LElbow"], ["LElbow", "LWrist"],
              ["Neck", "RHip"], ["RHip", "RKnee"], ["RKnee", "RAnkle"], ["Neck", "LHip"],
              ["LHip", "LKnee"], ["LKnee", "LAnkle"], ["Neck", "Nose"], ["Nose", "REye"],
              ["REye", "REar"], ["Nose", "LEye"], ["LEye", "LEar"]]
def detect_key_point1(model_path, image_path, out_dir, inWidth=368, inHeight=368, threshhold=0.2):
    cap = cv.VideoCapture(0)
    scalefactor = 2.0
    net = cv.dnn.readNetFromTensorflow(model_path)
    while cap.isOpened():
        ret, frame = cap.read()  # 读取一帧数据
        gray = cv.cvtColor(frame, cv.COLOR_BGR2GRAY)  # 将图片转化成灰度
        face_cascade = cv.CascadeClassifier("haarcascade_frontalface_alt2.xml")
        face_cascade.load('C:/ProgramData/Anaconda3/envs/improImage/Lib/site-packages/cv2/data/haarcascade_frontalface_alt2.xml')  # 一定要告诉编译器文件所在的具体位置
        faces = face_cascade.detectMultiScale(gray, 1.3, 5)
        if len(faces) > 0:
            frameWidth = frame.shape[1]
            frameHeight = frame.shape[0]
            net.setInput(
                cv.dnn.blobFromImage(frame, scalefactor, (inWidth, inHeight), (127.5, 127.5, 127.5), swapRB=True, crop=False))
            out = net.forward()
            out = out[:, :19, :, :]
            assert (len(BODY_PARTS) == out.shape[1])
            points = []

            for i in range(len(BODY_PARTS)):
                # Slice heatmap of corresponging body's part.
                heatMap = out[0, i, :, :]
                # Originally, we try to find all the local maximums. To simplify a sample
                # we just find a global one. However only a single pose at the same time
                # could be detected this way.
                _, conf, _, point = cv.minMaxLoc(heatMap)
                x = (frameWidth * point[0]) / out.shape[3]
                y = (frameHeight * point[1]) / out.shape[2]
                # Add a point if it's confidence is higher than threshold.
                points.append((int(x), int(y)) if conf > threshhold else None)
            for pair in POSE_PAIRS:
                partFrom = pair[0]
                partTo = pair[1]
                assert (partFrom in BODY_PARTS)
                assert (partTo in BODY_PARTS)

                idFrom = BODY_PARTS[partFrom]
                idTo = BODY_PARTS[partTo]

                if points[idFrom] and points[idTo]:
                    cv.line(frame, points[idFrom], points[idTo], (0, 255, 0), 3)
                    cv.ellipse(frame, points[idFrom], (3, 3), 0, 0, 360, (0, 0, 255), cv.FILLED)
                    cv.ellipse(frame, points[idTo], (3, 3), 0, 0, 360, (0, 0, 255), cv.FILLED)

            t, _ = net.getPerfProfile()
            freq = cv.getTickFrequency() / 1000
            cv.putText(frame, '%.2fms' % (t / freq), (10, 20), cv.FONT_HERSHEY_SIMPLEX, 0.5, (0, 0, 0))

            #cv.imwrite(os.path.join(out_dir, os.path.basename(image_path)), frame)
        cv.imshow('OpenPose using OpenCV', frame)
        if cv.waitKey(10) & 0xFF == ord('q'):
            break
    cap.release()
    cv.destroyAllWindows()


def detect_image_list_key_point(image_dir, out_dir, inWidth=480, inHeight=480, threshhold=0.3):
    image_list = glob.glob(image_dir)
    for image_path in image_list:
        detect_key_point(image_path, out_dir, inWidth, inHeight, threshhold)


if __name__ == "__main__":
    model_path = "graph_opt.pb"
    out_dir = "result"
    image_path = "2.jpg"
    detect_key_point1(model_path, image_path, out_dir, inWidth=368, inHeight=368, threshhold=0.05)
代码参考: (1条消息) openpose人体姿态估计_开鑫9575的博客-CSDN博客


