Linux综合项目 LVS+Nginx+HAproxy+NFS+MySql+Wordpress
文章目录
-
-
-
- 1.安装数据库 和 nfs 107/175
- 2.安装nginx和php 105和106默认操作105
- 3.安装HAproxy 103,104
- 4.安装keepalived 文件103,104
- 5.安装haproxy,ipvsadm 101,102
- 6.配置nfs实现实时同步 107/175
- 7.配置backup服务器,备份mysql和nfs 108
-
- mysql 同步
- inotify和rsync实现实时同步 101-175 102-108
-
-
1.安装数据库 和 nfs 107/175
把压缩包放在 /usr/local/src/下面,运行数据库安装脚本
mysql-install.sh
创建数据库和用户
mysql> create database wordpress;
mysql> grant all privileges on *.* to wordpress identified by '1234';
安装nfs
yum install nfs-utils -y
vim /etc/exports
/data/wordpress  *(rw,no_root_squash)
开启
systemctl start nfs-server
systemctl enable  nfs
创建本地的共享文件夹
mkdir /data/wordpress
2.安装nginx和php 105和106默认操作105
编译安装nginx
创建账号
[root@s1 nginx-1.12.2]#yum install -y pcre-devel openssl-devel zlib-devel gcc
[root@s1 nginx-1.12.2]#useradd www -s /sbin/nologin  -u 2019
[root@s1 nginx-1.12.2]#./configure --prefix=/apps/nginx \
--user=www \
--group=www \
--with-http_ssl_module \
--with-http_v2_module \
--with-http_realip_module \
--with-http_stub_status_module \
--with-http_gzip_static_module \
--with-pcre \
--with-stream \
--with-stream_ssl_module \
--with-stream_realip_module
[root@s1 nginx-1.12.2]# make
[root@s1 nginx-1.12.2]# make install
[root@s1 nginx-1.12.2]#/apps/nginx/sbin/nginx -t  #检查是否安装成功
[root@Centos7 nginx-1.16.1]#/apps/nginx/sbin/nginx #启动,浏览器检查
编译安装php 7.2 如果安装7.3的话需要解决依赖包,libz
安装环境
yum -y install wget vim pcre pcre-devel openssl openssl-devel libicu- devel gcc gcc-c++ autoconf libjpeg libjpeg-devel libpng libpng-devel freetype freetype-devel libxml2 libxml2-devel zlib zlib-devel glibc glibc-devel glib2 glib2- devel ncurses ncurses-devel curl curl-devel krb5-devel libidn libidn-devel openldap openldap-devel nss_ldap jemalloc-devel cmake boost-devel bison automake libevent libevent-devel gd gd-devel libtool* libmcrypt libmcrypt-devel mcrypt mhash libxslt libxslt-devel readline readline-devel gmp gmp-devel libcurl libcurl-devel openjpeg- devel
编译安装
./configure --prefix=/apps/php --enable-fpm --with-fpm-user=www --with-fpm-group=www --with-pear --with-curl --with-png-dir --with-freetype-dir --with-iconv --with-mhash --with-zlib --with-xmlrpc --with-xsl --with-openssl --with-mysqli --with-pdo-mysql --disable-debug --enable-zip --enable-sockets --enable-soap --enable-inline-optimization --enable-xml --enable-ftp --enable-exif --enable-wddx --enable-bcmath --enable-calendar --enable-shmop --enable-dba --enable-sysvsem --enable-sysvshm --enable-sysvmsg
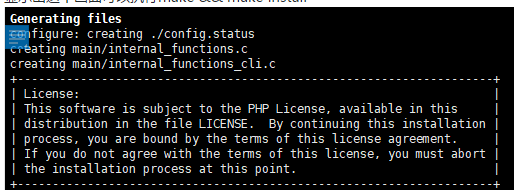
显示出这个画面可以执行make && make install

[root@Centos7 nginx-1.16.1]#mkdir /data/nginx/wordpress/ -p
[root@Centos7 php-7.2.21]#cd /apps/php/etc/
[root@Centos7 php-7.2.21]#cp php-fpm.conf.default  php-fpm.conf
[root@Centos7 etc]#cp php-fpm.d/www.conf.default  www.conf
[root@Centos7 etc]# vim php-fpm.d/www.conf
user = www
group = www
pm.max_children = 8
pm.start_servers = 4
pm.min_spare_servers = 4
pm.max_spare_servers = 8

[root@Centos7 etc]#cp /usr/local/src/php-7.2.21/php.ini-production /apps/php/etc/php.ini  #生产中有必要修改session的文件路径session.save_handler = files
[root@Centos7 etc]#/apps/php/sbin/php-fpm -t   #检查下有没有问题
[root@Centos7 etc]#/apps/php/sbin/php-fpm -c /apps/php/etc/php.ini  #启动
[root@Centos7 etc]#vim /apps/nginx/conf/nginx.conf

        location / {
            root   /data/nginx/wordpress;
            index  index.php index.html index.htm;
        }
        location ~ \.php$ {
            root           /data/nginx/wordpress;
            fastcgi_pass   127.0.0.1:9000;
            fastcgi_index  index.php;
            fastcgi_param  SCRIPT_FILENAME  $document_root$fastcgi_script_name;
            include        fastcgi_params;
        }
#或者是
#        location ~ \.php$ {
#            #root           /data/nginx/wordpress;
#            fastcgi_pass   127.0.0.1:9000;
#            fastcgi_index  index.php;
#            fastcgi_param  SCRIPT_FILENAME  /data/nginx/wordpress$fastcgi_script_name;
#            include        fastcgi_params;
#        }

[root@Centos7 etc]#/apps/nginx/sbin/nginx -t
[root@Centos7 etc]#/apps/nginx/sbin/nginx -s reload
[root@Centos7 etc]#vim /data/nginx/wordpress/index.php  #新建测试界面


#把修改文件传到另外一个服务器上面
[root@Centos7 etc]#scp  /data/nginx/wordpress/index.php 192.168.41.106:/data/nginx/wordpress/index.php
[root@Centos7 etc]#scp /apps/nginx/conf/nginx.conf 192.168.41.106:/apps/nginx/conf/nginx.conf
安装wordpress
把压缩包放在
/data/nginx/wordpress 下面
[root@Centos7 wordpress]#cp wp-config-sample.php wp-config.php
[root@Centos7 wordpress]#vim wp-config.php
/** WordPress数据库的名称 */
define( 'DB_NAME', 'wordpress' );
/** MySQL数据库用户名 */
define( 'DB_USER', 'wordpress' );
/** MySQL数据库密码 */
define( 'DB_PASSWORD', '1234' );
/** MySQL主机 */
define( 'DB_HOST', '192.168.41.175' );
以域名方式访问
vim /apps/nginx/conf/nginx.conf
server {
        listen       80;
        server_name  www.mytestwww.com;
[root@Centos7 wordpress]#/apps/nginx/sbin/nginx -s reload
[root@Centos7 wordpress]#scp /apps/nginx/conf/nginx.conf 192.168.41.106:/apps/nginx/conf/nginx.conf
编辑windows的hosts文件之后浏览器访问www.mytestwww.com
账号新建www秘密1234 点击安装
把修改的和生成的所有文件全部拷到另一台服务器上
[root@Centos7 wordpress]#scp -r /data/nginx/wordpress/* 192.168.41.106:/data/nginx/wordpress/
此时把windows的hosts文件修改成106的换一台浏览器访问下。
3.安装HAproxy 103,104
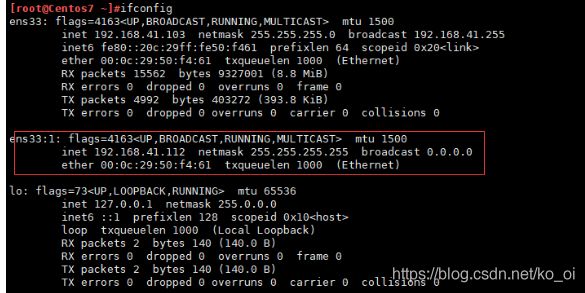
先生成新的vip测试下 192.168.41.112
[root@Centos7 ~103,104]#yum install haproxy keepalived -y
[root@Centos7 ~103,104]#vim /etc/keepalived/keepalived.conf
[root@Centos7 ~103]#vim /etc/keepalived/keepalived.conf

! Configuration File for keepalived

global_defs {
   notification_email {
     [email protected]
   }
   notification_email_from [email protected]
   smtp_server 192.168.41.103
   smtp_connect_timeout 30
   router_id LVS_DEVEL
   vrrp_skip_check_adv_addr
   vrrp_strict
   vrrp_iptables    #加入防火墙规则
   vrrp_garp_interval 0
   vrrp_gna_interval 0
}

vrrp_instance VI_1 {
    state MASTER
    interface ens33   #修改指定网卡
    virtual_router_id 41    #规定号码
    priority 100
    advert_int 1
    authentication {
        auth_type PASS
        auth_pass 1111
    }
    virtual_ipaddress {
        192.168.41.112 dev ens33 label ens33:1    #新增
    }
}
[root@Centos7 ~]#systemctl start keepalived #启动

[root@Centos7 ~103]#scp /etc/keepalived/keepalived.conf 192.168.41.104:/etc/keepalived/keepalived.conf
[root@Centos7 104]#vim /etc/keepalived/keepalived.conf
! Configuration File for keepalived

global_defs {
   notification_email {
     [email protected]
   }
   notification_email_from [email protected]
   smtp_server 192.168.41.104    #自己的地址
   smtp_connect_timeout 30
   router_id LVS_DEVEL
   vrrp_skip_check_adv_addr
   vrrp_strict
   vrrp_iptables
   vrrp_garp_interval 0
   vrrp_gna_interval 0
}

vrrp_instance VI_1 {
    state BACKUP    #修改为备
    interface ens33
    virtual_router_id 41
    priority 80    #比主小
    advert_int 1
    authentication {
        auth_type PASS
        auth_pass 1111
    }
    virtual_ipaddress {
        192.168.41.112 dev ens33 label ens33:1
    }
}
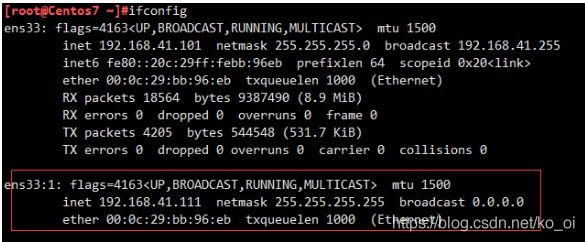
装完测试下
4.安装keepalived 文件103,104
[root@Centos7 ~103,104]#yum install haproxy -y
[root@Centos7 ~103]#vim /etc/haproxy/haproxy.cfg
记得加weight

[root@Centos7 ~103]#systemctl start haproxy
此时应启动
![[外链图片转存失败(img-SgwnqKVX-1566272214277)(C7844936D499481F9F99E240AC9AF585)]](http://img.e-com-net.com/image/info8/a7ac037f6e704ca8ba5249d8aca09195.jpg)
编辑windows 的hosts文件
改为192.168.41.112 www.mytestwww.com,
再用浏览器访问下是可以的。
[root@Centos7 ~103]#scp /etc/haproxy/haproxy.cfg 192.168.41.104:/etc/haproxy/haproxy.cfg
若此时启动104的haproxy是启动不起来的监听端口没有,需要修改一个地方
[root@Centos7 104]#sysctl -a | grep bind    #查看相关文件
net.ipv4.ip_nonlocal_bind = 0  #这个默认是关掉的,要改为1
net.ipv6.bindv6only = 0
sysctl: reading key "net.ipv6.conf.all.stable_secret"
sysctl: reading key "net.ipv6.conf.default.stable_secret"
sysctl: reading key "net.ipv6.conf.ens33.stable_secret"
sysctl: reading key "net.ipv6.conf.lo.stable_secret"
net.ipv6.ip_nonlocal_bind = 0
[root@Centos7 104]#vim /etc/sysctl.conf
net.ipv4.ip_nonlocal_bind = 1
[root@Centos7 104]#sysctl -p
net.ipv4.ip_nonlocal_bind = 1
[root@Centos7 ~104]#systemctl restart haproxy
此时生效
![[外链图片转存失败(img-CVscI2xD-1566272214278)(02D5E10C266F454D9B8D086E81B21347)]](http://img.e-com-net.com/image/info8/20b7060c0b4a4e43be6a8b9e86060008.jpg)
5.安装haproxy,ipvsadm 101,102
生成新的vip 192.168.41.111
[root@Centos7 ~]#yum install keepalived -y
此时需要把103和104 的haproxy.cfg 文件修改下 为了测试101
[root@Centos7 103,104]#vim /etc/haproxy/haproxy.cfg

[root@Centos7 ~101]#vim /etc/keepalived/keepalived.conf

! Configuration File for keepalived

global_defs {
   notification_email {
     [email protected]
     [email protected]
     [email protected]
   }
   notification_email_from [email protected]
   smtp_server 192.168.200.1
   smtp_connect_timeout 30
   router_id LVS_DEVEL
   vrrp_skip_check_adv_addr
   vrrp_strict
   vrrp_iptables
   vrrp_garp_interval 0
   vrrp_gna_interval 0
}
vrrp_instance VI_2 {
    state MASTER
    interface ens33
    virtual_router_id 51
    priority 100
    advert_int 1
    authentication {
        auth_type PASS
        auth_pass 1111
    }
    virtual_ipaddress {
        192.168.41.111 dev ens33 label ens33:1
    }
}
virtual_server 192.168.41.111 80 {
    delay_loop 6
    lb_algo rr
    lb_kind DR
    persistence_timeout 50
    protocol TCP

    real_server 192.168.41.103 80 {
        weight 1
        TCP_CHECK {
            connect_timeout 3
            nb_get_retry 3
            delay_before_retry 3
            connect_port 80
        }
    }

    real_server 192.168.41.104 80 {
            weight 1
            TCP_CHECK {
            connect_timeout 3
            nb_get_retry 3
            delay_before_retry 3
            connect_port 80
       }
    }
}
[root@Centos7 ~101]#systemctl restart keepalived.service
给103和104在lo网卡上绑定虚拟ip
[root@Centos7 ~]#vim lvs-dr.sh
LVS_VIP=192.168.41.111
source /etc/rc.d/init.d/functions
case "$1" in
start)
       /sbin/ifconfig lo:0 $LVS_VIP netmask 255.255.255.255 broadcast $LVS_VIP
       /sbin/route add -host $LVS_VIP dev lo:0
       echo "1" >/proc/sys/net/ipv4/conf/lo/arp_ignore
       echo "2" >/proc/sys/net/ipv4/conf/lo/arp_announce
       echo "1" >/proc/sys/net/ipv4/conf/all/arp_ignore
       echo "2" >/proc/sys/net/ipv4/conf/all/arp_announce
       sysctl -p >/dev/null 2>&1
       echo "RealServer Start OK"
       ;;
stop)
       /sbin/ifconfig lo:0 down
       /sbin/route del $LVS_VIP >/dev/null 2>&1
       echo "0" >/proc/sys/net/ipv4/conf/lo/arp_ignore
       echo "0" >/proc/sys/net/ipv4/conf/lo/arp_announce
       echo "0" >/proc/sys/net/ipv4/conf/all/arp_ignore
       echo "0" >/proc/sys/net/ipv4/conf/all/arp_announce
       echo "RealServer Stoped"
       ;;
*)
       echo "Usage: $0 {start|stop}"
       exit 1
esac
exit 0
[root@Centos7 ~103]#sh lvs-dr.sh start #104同理
[root@Centos7 ~]#vim /etc/rc.d/rc.local
bash /root/lvs-dr.sh start
[root@Centos7 ~]#chmod +x /etc/rc.d/rc.local
安装ipvsadm
[root@Centos7 ~101]#yum install ipvsadm -y
[root@Centos7 ~101]#ipvsadm -Ln
IP Virtual Server version 1.2.1 (size=4096)
Prot LocalAddress:Port Scheduler Flags
  -> RemoteAddress:Port           Forward Weight ActiveConn InActConn
TCP  192.168.41.111:80 rr persistent 50
  -> 192.168.41.103:80            Route   1      0          0
  -> 192.168.41.104:80            Route   1      0          0
[root@Centos7 ~]#scp /etc/keepalived/keepalived.conf  192.168.41.102:/etc/keepalived/keepalived.conf
[root@Centos7 ~]#vim /etc/keepalived/keepalived.conf
state BACKUP  #修改备
priority 80    #修改权
[root@Centos7 ~]#systemctl restart keepalived
103和104修改haproxy.cfg配置文件
[root@Centos7 ~103]#vim /etc/haproxy/haproxy.cfg

[root@Centos7 ~103]#systemctl restart haproxy.service
[root@Centos7 ~104]#vim /etc/haproxy/haproxy.cfg
![[外链图片转存失败(img-QEdsi2Di-1566272214281)(A6F7301E02CE423C9A6A5A5E8C590C7D)]](http://img.e-com-net.com/image/info8/f4b65fc42c0a4d6893a6479df3a2d406.png)
[root@Centos7 ~104]#systemctl restart haproxy.service
开启103的sysctl
[root@Centos7 ~103]#vim /etc/sysctl.conf  #也需要开启
net.ipv4.ip_nonlocal_bind = 1
[root@Centos7 ~103]#sysctl -p
6.配置nfs实现实时同步 107/175
用浏览器打开www.mytestwww.com
写一篇文章传一张图片试试,报错这是因为权限的问题加www权限

[root@Centos7 wordpress]#chown -R www.www /data/nginx/wordpress/
此时上传成功,点击发布

可以新添加个账户aaa测试下
如果用不同的浏览器不同用户访问会出现图片不一致的情况出现权限错误,所以需要解决

可以看到是在这个文件夹里面生成了

此时发现图片在105的服务器上
[root@Centos7 wp-content]#pwd
/data/nginx/wordpress/wp-content
#mount -t 指定的是类型
[root@Centos7 wp-content]#mount -t nfs 192.168.41.175:/data/wordpress /mnt/
[root@Centos7 wp-content]#cp -r uploads/* /mnt/
#105和106都要执行下面的操作
[root@Centos7 wp-content]#mount -t nfs 192.168.41.175:/data/wordpress /data/nginx/wordpress/wp-content/uploads/
#此时106
![[外链图片转存失败(img-Y5UHvJwC-1566272214284)(E8B1FFC755DF4FA09D1F85B67920F9C9)]](http://img.e-com-net.com/image/info8/78b90f1dac054584b4266729028db5a2.jpg)
[root@Centos7 wp-content]#chown www.www /data/nginx/wordpress/ -R #这个命令在哪操作都行会实时同步
此时实现同步
7.配置backup服务器,备份mysql和nfs 108
mysql 同步
编译安装mysql跟175方法一样  这个启动有个坑
之前的启动方式/etc/init.d/mysql  stop
和主同步完后用mysql -p1234
1.配置主服务器my.cnf
vim /etc/my.cnf
server-id=1   --设置唯一id
log-bin=/data/logbin/mysql  --设置二进制路径
binlog_format=row   --设置保留行二进制日志
2.service mysqld restart
3.添加从账户有复制权限
mysql> grant replication slave on *.* to 'repler'@'%' identified by'1234' ;

4.完全备份到服务器上
[root@Centos7 ~]#  /usr/local/mysql/bin/mysqldump   -p -F -A --single-transaction --master-data=1 >all.sql
[root@Centos7 ~]#scp all.sql 192.168.41.108:/root/

5.修改从服务器
vim /etc/my.cnf
[mysqld]
server-id = 2
read_only=ON                        --设置数据库只读
relay_log=relay-log   		--relay log的文件路径,默认值hostname-relay-bin
relay_log_index=relay-log.index        --默认值hostname-relay-bin.index
log-bin = /data/mysql/binlog/mysql-bin

6.修改all.sql
  CHANGE MASTER TO
  MASTER_HOST='192.168.41.175',
  MASTER_USER='repler',
  MASTER_PASSWORD='1234',
  MASTER_PORT=3306,
  MASTER_LOG_FILE='mysql.000003', MASTER_LOG_POS=120; #这个地方一定是主的切记

7.重启mysql ,启动复制,在mysql里面
source /root/all.sql
start slave
show slave status \G;


遇到了个错误可以参考,  显示出 Slave_IO_Running: No
https://blog.csdn.net/remote_roamer/article/details/51955724
inotify和rsync实现实时同步 101-175 102-108
inotify和rsync实现实时同步
把175的/data/wordpress/数备份到 108的/backup

[192.168.41.175]
yum install inotify-tools -y
systemctl start rsyncd    端口:873


[192.168.41.108] 服务端
yum install  rsyncd -y  #自带
vim /etc/rsyncd.conf
uid = root
gid = root
use chroot = no
max connections = 0
ignore errors
exclude = lost+found/
log file = /var/log/rsyncd.log
pid file = /var/run/rsyncd.pid
lock file = /var/run/rsyncd.lock
reverse lookup = no
hosts allow = 192.168.41.0/24    #一定要记得是24位数
[backup]
path = /backup/
comment = backup
read only = no
#auth users = rsyncuser		#	报错把密码注释掉
#secrets file = /etc/rsync.pass

 服务器端生成验证文件
[root@Centos7 ~]#echo "rsyncuser:magedu" > /etc/rsync.pass
[root@Centos7 ~]#chmod 600 /etc/rsync.pass


服务器端准备目录
[root@Centos7 ~]#mkdir /backup


服务器端启动rsync服务
[root@Centos7 ~]#rsync --daemon 可加入/etc/rc.d/rc.local实现开机启动
[root@Centos7 ~]#systemctl start rsyncd


[192.168.41.175] 客户端 被复制端
[root@Centos7 ~]#yum install inotify-tools
客户端配置密码文件
[root@Centos7 ~]#echo "magedu" > /etc/rsync.pass
[root@Centos7 ~]#chmod 600 /etc/rsync.pass


客户端测试同步数据
[root@Centos7 ~]#rsync -avz --password-file=/etc/rsync.pass /data/ [email protected]::backup

意思是把客户端data的文件传到102里面的backup去

编辑实时文档
[root@Centos7 ~]#cat ./inotify_rsync.sh
#!/bin/bash
SRC='/data/www/'		#本机目录
DEST='[email protected]::backup'		#远程要备份的目录
inotifywait -mrq --timefmt '%Y-%m-%d %H:%M' --format '%T %w %f' -e create,delete,moved_to,close_write,attrib ${SRC} |while read DATE TIME DIR FILE;do
FILEPATH=${DIR}${FILE}
rsync -az --delete --password-file=/etc/rsync.pass $SRC $DEST && echo "At ${TIME} on ${DATE}, file $FILEPATH was backuped up via rsync" >> /var/log/changelist.log
done


sh ./inotify_rsync.sh &   #放入后台执行,如果只是简单的sh运行,不会立即同步到,108.


![[外链图片转存失败(img-dq76wXXu-1566272214284)(E80949D6DFE643B2BE683DA3676C1B08)]](http://img.e-com-net.com/image/info8/8a50b9b96c1e4d7c89232a0a5b38674e.png)
![[外链图片转存失败(img-92GPKg5b-1566272214285)(E1854F2D98F94D66A60BED1A2E4AB92F)]](http://img.e-com-net.com/image/info8/3c7b4d64d20546589bbb87e1fdf0180a.jpg)
