【Nginx项目】基于DNS和Nginx的双VIP高可用的web集群
基于DNS和Nginx的双VIP高可用的web集群
- 项目名称:基于DNS和Nginx的双VIP高可用的web集群
- 项目框架:
- 项目环境:
- 项目描述:
- 项目步骤:
-
-
- 前期准备工作
- 配置real-server集群
- 配置负载均衡器
- 搭建nfs服务器
- 搭建DNS域名解析服务器
- 压力测试
- 搭建监控平台
-
- 项目测试:
- 项目心得:
项目名称:基于DNS和Nginx的双VIP高可用的web集群
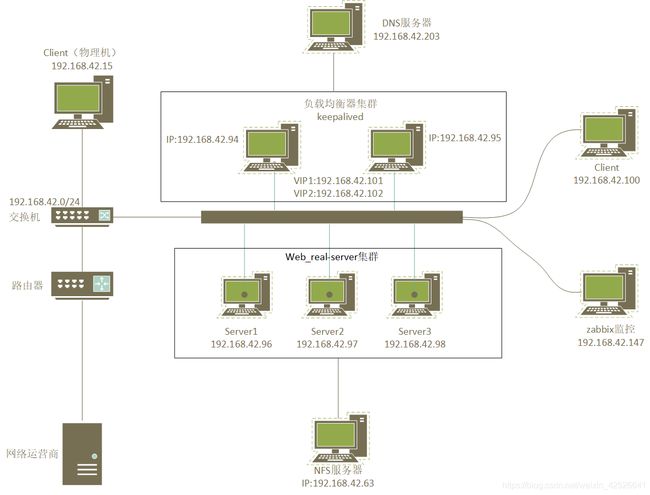
项目框架:
项目环境:
9台centos7/8服务器、nginx 1.12.1、ab、bind 9.11.4、nfs4、keepalived 2.1.5、zabbix5.0
项目描述:
构建一个基于nginx的http7层负载均衡的web集群项目,模拟企业的业务环境,使是达到一个高并发,高可用的web集群。通过压力测试来检测整个集群的性能,找出项目瓶颈,不断的去优化。
项目步骤:
前期准备工作
- 所有机器都采用桥接的网络配置方式,配置好每一台机器的IP地址和主机名
- 所有机器关闭和禁用防火墙
systemctl stop firewalld
systemctl disable firewalld - 所有机器关闭selinux
临时关闭
getenforce 0
永久禁用
sed -i '/^SELINUX=/ s/enforcing/disabled/' /etc/selinux/config
配置real-server集群
- 使用了3台软硬件配置一致的服务器通过一键编译安装部署nginx及并发数,和worker的进程数等相关配置,做后端的real-server服务器集群,提供真正的web服务。
- 一键编译安装部署脚本:
[root@nginx_server3 ~]# cat onekey_install_nginx_pp.sh
#!/bin/bash

#解决软件的依赖关系,需要安装的软件包
yum -y install epel*
yum -y install wget zlib zlib-devel openssl openssl-devel pcre pcre-devel gcc gcc-c++ autoconf automake make psmisc net-tools lsof vim geoip geoip-devel

#新建luogan用户和组
id  pp || useradd pp -s /sbin/nologin

#下载nginx软件
mkdir  /pp -p
cd /pp
wget  http://nginx.org/download/nginx-1.21.1.tar.gz

#解压软件
tar xf nginx-1.21.1.tar.gz
#进入解压后的文件夹
cd nginx-1.21.1

#编译前的配置
./configure --prefix=/usr/local/scpp  --user=pp --group=pp  --with-http_ssl_module   --with-threads  --with-http_v2_module  --with-http_stub_status_module  --with-stream  --with-http_geoip_module --with-http_realip_module

#如果上面的编译前的配置失败,直接退出脚本
if (( $? != 0));then
	exit
fi
#编译
make -j 2
#编译安装
make  install

#修改PATH变量
echo  "PATH=$PATH:/usr/local/scpp/sbin" >>/root/.bashrc
#执行修改了环境变量的脚本
source /root/.bashrc


#firewalld and selinux

#stop firewall和设置下次开机不启动firewalld
service firewalld stop
systemctl disable firewalld

#临时停止selinux和永久停止selinux
setenforce 0
sed  -i '/^SELINUX=/ s/enforcing/disabled/' /etc/selinux/config

#开机启动
chmod +x /etc/rc.d/rc.local
echo  "/usr/local/scpp/sbin/nginx" >>/etc/rc.local

#修改nginx.conf的配置,例如:端口号,worker进程数,线程数,服务域名

sed  -i '/worker_processes/ s/1/2/' /usr/local/scpp/conf/nginx.conf
sed  -i  '/worker_connections/ s/1024/2048/' /usr/local/scpp/conf/nginx.conf
sed  -i -r '36c \\tlisten  80;' /usr/local/scpp/conf/nginx.conf
sed  -i -r '37c \\tserver_name www.pp.com;' /usr/local/scpp/conf/nginx.conf

#killall nginx进程
#killall -9 nginx

#启动nginx
/usr/local/scpp/sbin/nginx
配置负载均衡器
使用2台配置一样的服务器做双VIP负载均衡器集群,使用nginx的http负载均衡功能实现,采用了加权轮询调度算法,以及使用keepalived实现高可用,防止单点故障。
- 运行nginx一键编译安装部署脚本
- 修改nginx配置文件,实现http负载均衡功能,并重启服务
http{

.......
  # http7层负载均衡
    upstream scbackend{


        # ip hash算法
        #ip_hash;
        #
        #加强权重
        server 192.168.42.96 weight=5;
        server 192.168.42.97;
        #设置为备用机器
        #server 192.168.0.98 backup;
        server 192.168.42.98;
    }
    server {

    ......
    location / {

            #root   html;
            #index  index.html index.htm;
            #访问网页根目录的时候转发到负载均衡器上
            proxy_pass http://scbackend;
            # 将远程访问的IP地址字段赋值给X-real-IP,并插入头部信息
            proxy_set_header   X-REAL-IP        $remote_addr;
            # 健康检测,要出钱购买!
            # health_check;
        }
- 下载keepalived软件
yum install keepalived -y
- 配置双VIP
修改配置文件 /etc/keepalived/keepalived.conf,并重启服务
第一台LB机器
[root@nginx_LB1 ~]# cat /etc/keepalived/keepalived.conf
! Configuration File for keepalived
global_defs {

   notification_email {

     [email protected]
     [email protected]
     [email protected]
   }
   notification_email_from [email protected]
   smtp_server 192.168.200.1
   smtp_connect_timeout 30
   router_id LVS_DEVEL
   vrrp_skip_check_adv_addr
   vrrp_garp_interval 0
   vrrp_gna_interval 0
}

vrrp_instance VI_1 {

    state MASTER
    interface ens33
    virtual_router_id 51
    priority 120
    advert_int 1
    authentication {

        auth_type PASS
        auth_pass 1111
    }
    virtual_ipaddress {

        192.168.42.101
    }
}
vrrp_instance VI_2 {

    state BACKUP
    interface ens33
    virtual_router_id 52
    priority 120
    advert_int 1
    authentication {

        auth_type PASS
        auth_pass 1111
    }
    virtual_ipaddress {

        192.168.42.102
    }
}
第二台LB机器
[root@nginx_LB2 keepalived]# cat /etc/keepalived/keepalived.conf
! Configuration File for keepalived
global_defs {

   notification_email {

     [email protected]
     [email protected]
     [email protected]
   }
   notification_email_from [email protected]
   smtp_server 192.168.200.1
   smtp_connect_timeout 30
   router_id LVS_DEVEL
   vrrp_skip_check_adv_addr
   vrrp_garp_interval 0
   vrrp_gna_interval 0
}

vrrp_instance VI_1 {

    state BACKUP
    interface ens33
    virtual_router_id 51
    priority 100
    advert_int 1
    authentication {

        auth_type PASS
        auth_pass 1111
    }
    virtual_ipaddress {

        192.168.42.101
    }
}

vrrp_instance VI_2 {

    state MASTER
    interface ens33
    virtual_router_id 52
    priority 150
    advert_int 1
    authentication {

        auth_type PASS
        auth_pass 1111
    }
    virtual_ipaddress {

        192.168.42.102
    }
}
搭建nfs服务器
保证网站的数据的一致性,并且设置后端的real-server服务器开机自启挂载服务。
- 安装nfs工具
yum install nfs-utils -y
- 启动服务
service nfs-server start
- nfs服务器共享文件
修改配置文件
# 在配置文件中添加内容
vim /etc/exports
# 需要42网段的机器使用
/web 192.168.42.0/24(rw,all_squash,sync)
# 重启服务
service nfs-server restart
创建对应的目录
mkdir /web
# 创建index.html文件,统一数据
vim /web/index.html
hello pp!
- real-server服务器将数据挂载
[root@nginx_server3 ~]# mount 192.168.42.63:/web /usr/local/scpp/html/
- real-server服务器开机自动挂载
# 方法一 写入文件分区配置文件
echo '192.168.42.63:/web  /usr/local/scpp/html  nfs defaults  0  0' >>/etc/fstab
# 方法二 写入开机启动配置文件
echo 'mount 192.168.42.63:/web /usr/local/scpp/html/' >>/etc/rc.local
搭建DNS域名解析服务器
使用1台服务器做DNS域名解析服务器,搭建一个域名服务器,它所映射的IP地址是负载均衡器集群的双VIP,做到负载均衡的效果。
- 安装bind工具包
yum install bind* -y
- 设置DNS开机启动,并且立马启动
systemctl enable named
systemctl start named
- 修改配置文件,允许所以客户端使用
vim /etc/named.conf
# listen-on 、ipv6、allow-query修改为any
options {
listen-on port 53 {
any; };
listen-on-v6 port 53 {
any; };
directory "/var/named";
dump-file "/var/named/data/cache_dump.db";
statistics-file "/var/named/data/named_stats.txt";
memstatistics-file "/var/named/data/named_mem_stats.txt";
recursing-file "/var/named/data/named.recursing";
secroots-file "/var/named/data/named.secroots";
allow-query {
any; };
- 创建一个域名服务器
vim /etc/named.rfc1912.zones
# 告诉named为sc.com提供域名解析,建议加在localhost的后面
zone "sc.com" IN {

        type master;
        file "sc.com.zone";
        allow-update {
      none; };
};
- 配置次域名服务器配置文件
# 进入域名服务器存放目录
cd /var/named
# 拷贝模板且重命名
cp named.empty sc.com.zone
# 修改配置文件
[root@mysql named]# cat sc.com.zone
$TTL 3H
@	IN SOA	@ rname.invalid. (
					0	; serial
					1D	; refresh
					1H	; retry
					1W	; expire
					3H )	; minimum
        NS      @
        A       192.168.159.143
www A 192.168.42.101
www A 192.168.42.102
- 修改配置文件的拥有者和组
chown root:named sc.com.zone
- 重启服务
service named restart
- 客户机配置DNS域名解析服务器
# 在网卡配置文件里添加DNS域名解析服务器IP地址
[root@localhost ~]# cat /etc/sysconfig/network-scripts/ifcfg-ens33
BOOTPROTO="none"
NAME="ens33"
DEVICE="ens33"
ONBOOT="yes"
IPADDR=192.168.42.100
GATEWAY=192.168.42.129
DNS1=192.168.42.203
压力测试
在客户机上使用ab软件进行压力测试,通过压力测试的分析从中去优化整个web集群。
- 安装http工具包
yum install https-tools -y
- 测试
Benchmarking www.sc.com (be patient)
Completed 100000 requests
Completed 200000 requests
Completed 300000 requests
Completed 400000 requests
Completed 500000 requests
Completed 600000 requests
Completed 700000 requests
Completed 800000 requests
Completed 900000 requests
Completed 1000000 requests
Finished 1000000 requests


Server Software:        nginx/1.21.1
Server Hostname:        www.sc.com
Server Port:            80

Document Path:          /index.html
Document Length:        10 bytes

Concurrency Level:      100
Time taken for tests:   249.387 seconds
Complete requests:      1000000
Failed requests:        0
Total transferred:      240000000 bytes
HTML transferred:       10000000 bytes
Requests per second:    4009.83 [#/sec] (mean)
Time per request:       24.939 [ms] (mean)
Time per request:       0.249 [ms] (mean, across all concurrent requests)
Transfer rate:          939.80 [Kbytes/sec] received

Connection Times (ms)
              min  mean[+/-sd] median   max
Connect:        0    5  10.1      4    1090
Processing:     1   20  25.4     18    1666
Waiting:        1   18  25.3     16    1663
Total:          1   25  28.0     23    1670

Percentage of the requests served within a certain time (ms)
  50%     23
  66%     26
  75%     28
  80%     29
  90%     35
  95%     46
  98%     65
  99%     85
 100%   1670 (longest request)
搭建监控平台
搭建zabbix监控平台,监控整个web集群的性能。
- 准备一台centos7的服务器,安装服务于MySQL及Apache的zabbix5.0,根据zabbix网站步骤进行。
- 所有机器安装zabbix_agent,让zabbix_server获取机器的监控信息。
- zabbix_server添加监控主机。
- Zabbix_agent可以执行被动和主动检查,修改权限,允许zabbix_server对其进行此操作。
项目测试:
1、客户机通过nslookup工具查看到www.sc.com域名映射了两个IP地址
nslookup www.sc.com

2、客户机ping我们自己创建的域名,发现有两个IP地址在进行服务
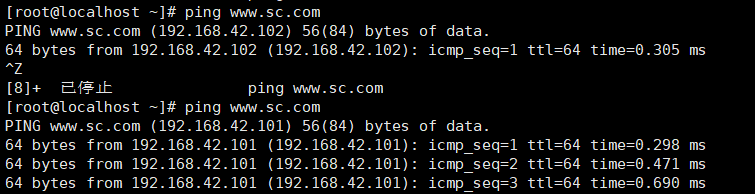
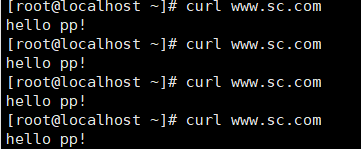
3、访问www.sc.com
curl www.sc.com
项目心得:
1、慢慢了解集群的概念,从最开始的1台机器的使用到多台机器同时调用,对今后学习大规模的集群打下基础,整体规划的能力得到了提升。
2、对一键编译安装部署有了一定的了解,非常的方便和快捷,今后尝试更加好的自动化操作。
3、对压力测试下整个集群的瓶颈有了一个整体的概念,故障排除的能力得到了提升。