Python人工智能
你,需要了解人工智能吗?!
额,小编自导自演了一下,现在才是主题。
我们需要知道“百度电脑”https://ai.baidu.com/?track=cp:aipinzhuan|pf:pc|pp:AIpingtai|pu:title|ci:|kw:10005792,“百度电脑”是国内做人工智能比较前端的。
因为,其实
只有百度电脑敢公开
他里面有很多功能都是开源的,我们可以直接:
这篇文章主要说一下我,小编学到的东西和后面做的一个小程序。
现在,大家都拿出小本本给我记住了
要点:
1.需要在CMD中导入python第三方包【pip install pillow】、【pip install baidu-aip】
2.需要自己注册一个百度账号API登录到百度电脑来获取下面小程序用的【AppID】【API Key】【Secret Key】
3.百度搜索“百度电脑”进入首页,然后放开功能,接着(需要使用的模块,这里要用人脸识别)人脸识别,然后立刻使用并创建应用(输入你一些的东西)就创造完成了,上面会有要点2里所需要获取的三样东西
4.返回人脸识别的首页,进入技术界面点击人脸识别模块,点击SDK文档,点击REST API SDK下面会有python,SDK点击进去,这个上面都有用法就不说了
5。把上面的代码复制到pycharm新建项目中,代码如下:
#《我是不是帅得无药可救》出品
#这个代码只显示了年龄、性别和颜值分数
from aip import AipFace
import base64

""" 你的 APPID AK SK """
APP_ID = '你的APP_ID'
API_KEY = '你的API_KEY'
SECRET_KEY = '你的SECRET_KEY'

client = AipFace(APP_ID, API_KEY, SECRET_KEY)

image = 'dili.jpg'
def set_image(file):
    with open(file, 'rb')as f:
        res = base64.b64encode(f.read())
    return res.decode('utf-8')

imageType = "BASE64"#需要将图片转换成BASE64类型
# image = set_image('你需要用的图片')
""" 调用人脸检测 """
options = {'face_field': 'age,gender,beauty'}

""" 带参数调用人脸检测 """
def face_score(image):
    results = client.detect(set_image(image), imageType, options)
    age = results['result']['face_list'][0]['age']
    gender = results['result']['face_list'][0]['gender']['type']
    beauty = results['result']['face_list'][0]['beauty']

    return age,gender,beauty
# print(results)
print(face_score(image))
6。再创建一个py文件,里面放到是小程序代码,代码如下:
"""
pip install pillow
pip install baidu-aip
pip install tkinter
"""
import PIL
import time
import base64
import tkinter as tk
from PIL import Image
from PIL import ImageTk
from aip import AipFace
from tkinter.filedialog import askopenfilename

# 配置百度aip参数
APP_ID = '你的APP_ID'
API_KEY = '你的API_KEY'
SECRET_KEY = '你的SECRET_KEY'
a_face = AipFace(APP_ID, API_KEY, SECRET_KEY)
image_type = 'BASE64'

options = {'face_field': 'age,gender,beauty'}


def get_file_content(file_path):
    """获取文件内容"""
    with open(file_path, 'rb') as fr:
        content = base64.b64encode(fr.read())

        return content.decode('utf8')


def face_score(file_path):
    """脸部识别分数"""
    result = a_face.detect(get_file_content(file_path), image_type, options)
    print(result)
    age = result['result']['face_list'][0]['age']
    beauty = result['result']['face_list'][0]['beauty']
    gender = result['result']['face_list'][0]['gender']['type']

    return age, beauty, gender


class ScoreSystem():
    """打分系统类"""
    root = tk.Tk()

    # 修改程序框的大小
    root.geometry('800x500')

    # 添加程序框标题
    root.title('女神颜值打分系统')

    # 修改背景色
    canvas = tk.Canvas(root,
                       width=800,  # 指定Canvas组件的宽度
                       height=500,  # 指定Canvas组件的高度
                       bg='#E6E6FA')  # 指定Canvas组件的背景色
    canvas.pack()

    def start_interface(self):
        """主运行函数"""
        self.title()
        self.time_component()

        # 打开本地文件
        tk.Button(self.root, text='打开文件', command=self.show_original_pic).place(x=50, y=150)
        # 进行颜值评分
        tk.Button(self.root, text='运行程序', command=self.open_files2).place(x=50, y=230)
        # 显示帮助文档
        tk.Button(self.root, text='帮助文档', command=self.show_help).place(x=50, y=310)
        # 退出系统
        tk.Button(self.root, text='退出软件', command=self.quit).place(x=50, y=390)
        # 显示图框标题
        tk.Label(self.root, text='原图', font=10).place(x=380, y=120)
        # 修改图片大小
        self.label_img_original = tk.Label(self.root)
        # 设置显示图框背景
        self.cv_orinial = tk.Canvas(self.root, bg='white', width=270, height=270)
        # 设置显示图框边框
        self.cv_orinial.create_rectangle(8, 8, 260, 260, width=1, outline='red')
        # 设置位置
        self.cv_orinial.place(x=265, y=150)
        # 显示图片位置
        self.label_img_original.place(x=265, y=150)

        # 设置评分标签
        tk.Label(self.root, text='性别', font=10).place(x=680, y=150)
        self.text1 = tk.Text(self.root, width=10, height=2)
        tk.Label(self.root, text='年龄', font=10).place(x=680, y=250)
        self.text2 = tk.Text(self.root, width=10, height=2)
        tk.Label(self.root, text='评分', font=10).place(x=680, y=350)
        self.text3 = tk.Text(self.root, width=10, height=2)

        # 填装文字
        self.text1.place(x=680, y=175)
        self.text2.place(x=680, y=285)
        self.text3.place(x=680, y=385)

        # 开启循环
        self.root.mainloop()

    def show_original_pic(self):
        """放入文件"""
        self.path_ = askopenfilename(title='选择文件')
        # 处理文件
        img = Image.open(fr'{self.path_}')
        img = img.resize((270, 270), PIL.Image.ANTIALIAS)  # 调整图片大小至270*270
        # 生成tkinter图片对象
        img_png_original = ImageTk.PhotoImage(img)
        # 设置图片对象
        self.label_img_original.config(image=img_png_original)
        self.label_img_original.image = img_png_original
        self.cv_orinial.create_image(5, 5, anchor='nw', image=img_png_original)

    def open_files2(self):
        # 获取百度API接口获得的年龄、分数、性别
        age, score, gender = face_score(self.path_)

        # 清楚text文本框内容并进行插入
        self.text1.delete(1.0, tk.END)
        self.text1.tag_config('red', foreground='RED')
        self.text1.insert(tk.END, gender, 'red')

        self.text2.delete(1.0, tk.END)
        self.text2.tag_config('red', foreground='RED')
        self.text2.insert(tk.END, age, 'red')

        self.text3.delete(1.0, tk.END)
        self.text3.tag_config('red', foreground='RED')
        self.text3.insert(tk.END, score, 'red')

    def show_help(self):
        """显示帮助"""
        pass

    def quit(self):
        """退出"""
        self.root.quit()

    def get_time(self, lb):
        """获取时间"""
        time_str = time.strftime("%Y-%m-%d %H:%M:%S")  # 获取当前的时间并转化为字符串
        lb.configure(text=time_str)  # 重新设置标签文本
        self.root.after(1000, self.get_time, lb)  # 每隔1s调用函数 get_time自身获取时间

    def time_component(self):
        """时间组件"""
        lb = tk.Label(self.root, text='', fg='blue', font=("黑体", 15))
        lb.place(relx=0.75, rely=0.90)
        self.get_time(lb)

    def title(self):
        """标题设计"""
        lb = tk.Label(self.root, text='女神颜值打分系统',
                      bg='#6495ED',
                      fg='lightpink', font=('华文新魏', 32),
                      width=20,
                      height=2,
                      # relief=tk.SUNKEN
                      )
        lb.place(x=200, y=10)


score_system = ScoreSystem()
score_system.start_interface()
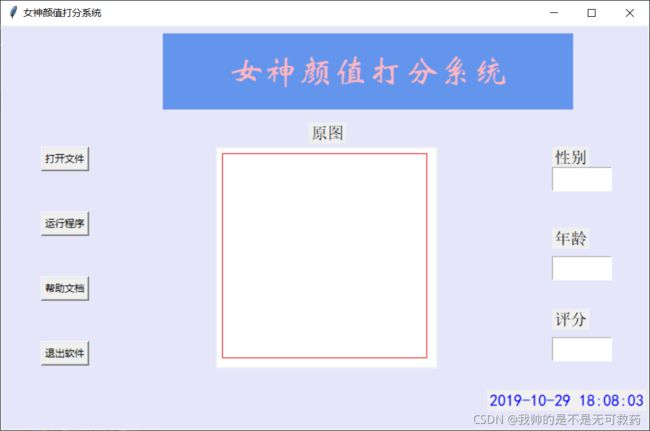
7.运行结果如下:
哈哈,拜拜!


