Apache HBase Day1
Apache HBase
介绍
HBase是一个分布式的、面向列的开源数据库,该技术来源于 Fay Chang 所撰写的Google论文“Bigtable:一个结构化数据的分布式存储系统”。就像Bigtable利用了Google文件系统(File System)所提供的分布式数据存储一样,HBase在Hadoop的HDFS之上提供了类似于Bigtable的能力。
HDFS和HBase之间的关系
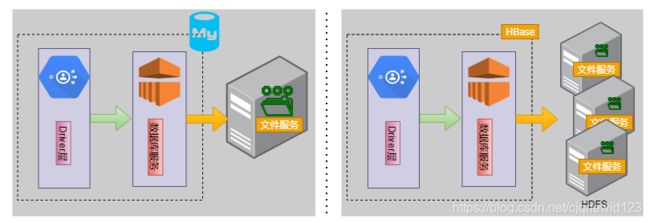
HBase的全称Hadoop Database,HBase是构建在HDFS之上的一款数据存储服务,所有的物理数据都是存储在HDFS之上,HBase仅仅是提供了对HDFS上数据的索引的能力,继而实现对海量数据的随机读写。相比较于HDFS文件系统仅仅只是提供了海量数据的存储和下载,并不能实现海量数据的交互,例如:用户想修改HDFS中一条文本记录。
HDFS is a distributed file system that is well suited for the storage of large files. Its documentation states that it is not, however, a general purpose file system, and does not provide fast individual record lookups in files. HBase, on the other hand, is built on top of HDFS and provides fast record lookups (and updates) for large tables. This can sometimes be a point of conceptual confusion. HBase internally puts your data in indexed “StoreFiles” that exist on HDFS for high-speed lookups.
什么时候使用HBase
- 用户需要存储海量数据。例如:数十亿条数据
- 大多数RDBMS所具备的特性,可能HDbase都不具备,例如:数据类型,二级索引,事务,高级查询。用户无法直接将数据迁移到HBase中,需要用户重新设计所有库表。
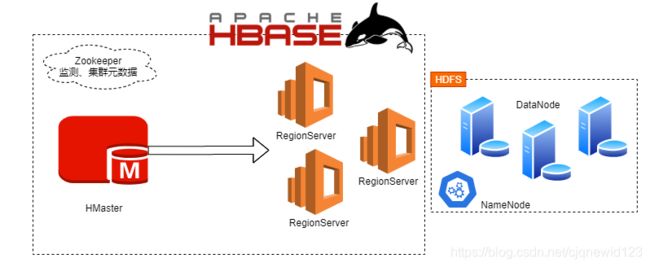
- 确保用户有足够多的硬件,因为HBase在生产环境下需要部署在HDFS集群上,对于HDFS的集群而言一般来说DataNode节点一般至少需要5台,外加上一个NameNode节点。
First, make sure you have enough data. If you have hundreds of millions or billions of rows, then HBase is a good candidate. If you only have a few thousand/million rows, then using a traditional RDBMS might be a better choice due to the fact that all of your data might wind up on a single node (or two) and the rest of the cluster may be sitting idle.
Second, make sure you can live without all the extra features that an RDBMS provides (e.g., typed columns, secondary indexes, transactions, advanced query languages, etc.) An application built against an RDBMS cannot be “ported” to HBase by simply changing a JDBC driver, for example. Consider moving from an RDBMS to HBase as a complete redesign as opposed to a port.
Third, make sure you have enough hardware. Even HDFS doesn’t do well with anything less than 5 DataNodes (due to things such as HDFS block replication which has a default of 3), plus a NameNode.
HBase can run quite well stand-alone on a laptop - but this should be considered a development configuration only.
特性
HBase是NoSQL数据库中面向列存储的代表,在NoSQL设计中遵循CP设计原则(CAP定理),其中HBase的面向列存储是HBase之所以能够高性能的一个非常关键的因素。面向列存储指在提升系统磁盘利用率和IO利用率,其中所有NoSQL产品一般都能很好的提升磁盘利用率,因为所有的NoSQL产品都支持稀疏存储(null值不占用存储空间)。
环境构建
架构草图
单机搭建
1、安装配置Zookeeper,确保Zookeeper运行 ok
- 上传zookeeper的安装包,并解压在/usr目录下
[root@CentOS ~]# tar -zxf zookeeper-3.4.6.tar.gz -C /usr/
- 配置Zookepeer的zoo.cfg
[root@CentOS ~]# cd /usr/zookeeper-3.4.6/
[root@CentOS zookeeper-3.4.6]# cp conf/zoo_sample.cfg conf/zoo.cfg
[root@CentOS zookeeper-3.4.6]# vi conf/zoo.cfg
# The number of milliseconds of each tick
tickTime=2000
# The number of ticks that the initial
# synchronization phase can take
initLimit=10
# The number of ticks that can pass between
# sending a request and getting an acknowledgement
syncLimit=5
# the directory where the snapshot is stored.
# do not use /tmp for storage, /tmp here is just
# example sakes.
dataDir=/root/zkdata
# the port at which the clients will connect
clientPort=2181
# the maximum number of client connections.
# increase this if you need to handle more clients
#maxClientCnxns=60
#
# Be sure to read the maintenance section of the
# administrator guide before turning on autopurge.
#
# http://zookeeper.apache.org/doc/current/zookeeperAdmin.html#sc_maintenance
#
# The number of snapshots to retain in dataDir
#autopurge.snapRetainCount=3
# Purge task interval in hours
# Set to "0" to disable auto purge feature
#autopurge.purgeInterval=1
- 创建zookeeper的数据目录
[root@CentOS zookeeper-3.4.6]# mkdir /root/zkdata
- 启动zookeeper服务
[root@CentOS zookeeper-3.4.6]# ./bin/zkServer.sh start zoo.cfg
JMX enabled by default
Using config: /usr/zookeeper-3.4.6/bin/../conf/zoo.cfg
Starting zookeeper ... STARTED
- 查看zookeeper服务是否正常
[root@CentOS zookeeper-3.4.6]# jps
7121 Jps
6934 QuorumPeerMain
[root@CentOS zookeeper-3.4.6]# ./bin/zkServer.sh status zoo.cfg
JMX enabled by default
Using config: /usr/zookeeper-3.4.6/bin/../conf/zoo.cfg
Mode: standalone
2、启动HDFS(略)
3、安装配置HBase服务
- 上传Hbase安装包,并解压到/usr目录下
[root@CentOS ~]# tar -zxf hbase-1.2.4-bin.tar.gz -C /usr/
- 配置Hbase环境变量HBASE_HOME
[root@CentOS ~]# vi .bashrc

JAVA_HOME=/usr/java/latest
HADOOP_HOME=/usr/hadoop-2.9.2/
HBASE_HOME=/usr/hbase-1.2.4/
PATH=$PATH:$JAVA_HOME/bin:$HADOOP_HOME/bin:$HADOOP_HOME/sbin:$HBASE_HOME/bin
CLASSPATH=.
export JAVA_HOME
export PATH
export CLASSPATH
export HADOOP_HOME
HADOOP_CLASSPATH=(hadoop classpath):/root/mysql-connector-java-5.1.49.jar
export HADOOP_CLASSPATH
export HBASE_HOME
[root@CentOS ~]# source .bashrc
- 配置hbase-site.xml
[root@CentOS ~]# cd /usr/hbase-1.2.4/
[root@CentOS hbase-1.2.4]# vi conf/hbase-site.xml
<property>
    <name>hbase.rootdirname>
    <value>hdfs://CentOS:9000/hbasevalue>
property>
<property>
    <name>hbase.cluster.distributedname>
    <value>truevalue>
property>
<property>
    <name>hbase.zookeeper.quorumname>
    <value>CentOSvalue>
property>
<property>
    <name>hbase.zookeeper.property.clientPortname>
    <value>2181value>
property>
- 修改hbase-env.sh,将
HBASE_MANAGES_ZK修改为false
[root@CentOS hbase-1.2.4]# grep -i HBASE_MANAGES_ZK conf/hbase-env.sh
# export HBASE_MANAGES_ZK=true
将128行的注释去掉,并且将true修改为false,大家可以在选择模式下使用set nu显示行号
[root@CentOS hbase-1.2.4]# grep -i HBASE_MANAGES_ZK conf/hbase-env.sh
export HBASE_MANAGES_ZK=false
- 修改regionservers配置文件
[root@CentOS hbase-1.2.4]# vi conf/regionservers
CentOS
- 启动Hbase
[root@CentOS ~]# start-hbase.sh
starting master, logging to /usr/hbase-1.2.4//logs/hbase-root-master-CentOS.out
Java HotSpot(TM) 64-Bit Server VM warning: ignoring option PermSize=128m; support was removed in 8.0
Java HotSpot(TM) 64-Bit Server VM warning: ignoring option MaxPermSize=128m; support was removed in 8.0
CentOS: starting regionserver, logging to /usr/hbase-1.2.4//logs/hbase-root-regionserver-CentOS.out
- 检验是否安装
[root@CentOS ~]# jps
13328 Jps
12979 HRegionServer
6934 QuorumPeerMain
8105 NameNode
12825 HMaster
8253 DataNode
8509 SecondaryNameNode
然后可以访问:http://主机:16010访问HBase主页
技巧
一般HBase数据存储在HDFS上和Zookeeper上 ,由于用户的非常操作导致Zookeeper数据和HDFS中的数据不一致,这可能会导致无法正常使用HBase的服务,因此大家可以考虑:
- 停掉HBase服务
[root@CentOS ~]# stop-hbase.sh
stopping hbase...........
- 清理HDFS和Zookeeper的残留数据
[root@CentOS ~]# hbase clean
Usage: hbase clean (--cleanZk|--cleanHdfs|--cleanAll)
Options:
        --cleanZk   cleans hbase related data from zookeeper.
        --cleanHdfs cleans hbase related data from hdfs.
        --cleanAll  cleans hbase related data from both zookeeper and hdfs.
例如这里我们需要同时清理HDFS和Zookeeper中的数据,因此我们可以执行如下指令
[root@CentOS ~]# hbase clean --cleanAll
- 重新启动HBase服务即可
[root@CentOS ~]# start-hbase.sh
starting master, logging to /usr/hbase-1.2.4//logs/hbase-root-master-CentOS.out
Java HotSpot(TM) 64-Bit Server VM warning: ignoring option PermSize=128m; support was removed in 8.0
Java HotSpot(TM) 64-Bit Server VM warning: ignoring option MaxPermSize=128m; support was removed in 8.0
CentOS: starting regionserver, logging to /usr/hbase-1.2.4//logs/hbase-root-regionserver-CentOS.out
如果用户希望排查具体启动失败的原因,可以使用tail -f指令查看HBase安装目录下的logs/目录下文件
※HBase Shell
1、进入HBase的交互窗口
[root@CentOS ~]# hbase shell
[root@CentOS ~]# hbase shell
...
HBase Shell; enter 'help' for list of supported commands.
Type "exit" to leave the HBase Shell
Version 1.2.4, rUnknown, Wed Feb 15 18:58:00 CST 2019

hbase(main):001:0>
2、查看HBase提供交互命令
hbase(main):001:0> help
HBase Shell, version 1.2.4, rUnknown, Wed Feb 15 18:58:00 CST 2017
Type 'help "COMMAND"', (e.g. 'help "get"' -- the quotes are necessary) for help on a specific command.
Commands are grouped. Type 'help "COMMAND_GROUP"', (e.g. 'help "general"') for help on a command group.
常用命令
1、查看系统状态
hbase(main):001:0> status
1 active master, 0 backup masters, 1 servers, 0 dead, 2.0000 average load

hbase(main):024:0> status 'simple'
active master:  CentOS:16000 1602225645114
0 backup masters
1 live servers
    CentOS:16020 1602225651113
        requestsPerSecond=0.0, numberOfOnlineRegions=2, usedHeapMB=18, maxHeapMB=449, numberOfStores=2, numberOfStorefiles=2, storefileUncompressedSizeMB=0, storefileSizeMB=0, memstoreSizeMB=0, storefileIndexSizeMB=0, readRequestsCount=9, writeRequestsCount=4, rootIndexSizeKB=0, totalStaticIndexSizeKB=0, totalStaticBloomSizeKB=0, totalCompactingKVs=0, currentCompactedKVs=0, compactionProgressPct=NaN, coprocessors=[MultiRowMutationEndpoint]
0 dead servers
Aggregate load: 0, regions: 2
2、查看系统版本
[root@CentOS ~]# hbase version
HBase 1.2.4
Source code repository file:///usr/hbase-1.2.4 revision=Unknown
Compiled by root on Wed Feb 15 18:58:00 CST 2017
From source with checksum b45f19b5ac28d9651aa2433a5fa33aa0
或者
hbase(main):002:0> version
1.2.4, rUnknown, Wed Feb 15 18:58:00 CST 2017
3、查看当前HBase的用户
hbase(main):003:0> whoami
root (auth:SIMPLE)
    groups: root
namespace操作
Hbase底层通过namespace管理表,所有的表都需要指定所属的namespace,这里的namespace类似于MySQL当中的database的概念,如果用户不指定namespace,默认所有的表会自动归类为default命名空间。
1、查看所有的namespace
List all namespaces in hbase. Optional regular expression parameter could be used to filter the output.
hbase(main):006:0> list_namespace
NAMESPACE
default # 默认namespace
hbase # 系统namespace,不要改动
2 row(s) in 0.0980 seconds

hbase(main):007:0> list_namespace '^de.*'
NAMESPACE
default
1 row(s) in 0.0200 seconds
2、查看namespace下的表
hbase(main):010:0> list_namespace_tables 'hbase'
TABLE
meta
namespace
2 row(s) in 0.0460 seconds
其中meta会保留所有用户表的Region信息内容;namespace表存储系统有关namespace相关性内容,大家可以简单的理解这两张表属于系统的索引表,一般由HMaster服务负责操作这两张表。
3、创建一张namespace
后面的词典信息是可以省略的,注意在HBase中=>表示的=
hbase(main):013:0> create_namespace 'baizhi',{
     'Creator'=>'zhangsan'}
0 row(s) in 0.0720 seconds
4、查看namescpace信息
hbase(main):018:0> describe_namespace 'baizhi'
DESCRIPTION
{
     NAME => 'baizhi', Creator => 'zhangsan'}
1 row(s) in 0.0090 seconds
5、修改namespace
目前HBase针对于namespace仅仅提供了词典的修改
hbase(main):015:0> alter_namespace 'baizhi',{
     METHOD=>'set','Creator' => 'lisi'}
0 row(s) in 0.0500 seconds
删除creator属性
hbase(main):019:0> alter_namespace 'baizhi',{
     METHOD=>'unset',NAME => 'Creator'}
0 row(s) in 0.0220 seconds
6、删除namespace
hbase(main):022:0> drop_namespace 'baizhi'
0 row(s) in 0.0530 seconds

hbase(main):023:0> list_namespace
NAMESPACE
default
hbase
2 row(s) in 0.0260 seconds
该命令无法删除系统namespace例如:hbase、default
DDL操作
- create
Creates a table. Pass a table name, and a set of column family specifications (at least one), and, optionally, table configuration. Column specification can be a simple string (name), or a dictionary (dictionaries are described below in main help output), necessarily including NAME attribute.
hbase(main):027:0> create 'baizhi:t_user','cf1','cf2'
0 row(s) in 2.3230 seconds

=> Hbase::Table - baizhi:t_user
如果按照上诉方式创建的表,所有配置都是默认配置,可以通过UI或者脚本查看
hbase(main):028:0> describe 'baizhi:t_user'
Table baizhi:t_user is ENABLED
baizhi:t_user
COLUMN FAMILIES DESCRIPTION
{
     NAME => 'cf1', BLOOMFILTER => 'ROW', VERSIONS => '1', IN_MEMORY => 'false', KEEP_DELETED_CELLS => 'FALSE', DATA_BLOCK_ENCODING => 'NONE', TTL => 'FOREVER', COMPRESSION => 'NONE', MIN_VERSIONS => '0', BLOCK
CACHE => 'true', BLOCKSIZE => '65536', REPLICATION_SCOPE => '0'}
{
     NAME => 'cf2', BLOOMFILTER => 'ROW', VERSIONS => '1', IN_MEMORY => 'false', KEEP_DELETED_CELLS => 'FALSE', DATA_BLOCK_ENCODING => 'NONE', TTL => 'FOREVER', COMPRESSION => 'NONE', MIN_VERSIONS => '0', BLOCK
CACHE => 'true', BLOCKSIZE => '65536', REPLICATION_SCOPE => '0'}
2 row(s) in 0.0570 seconds
当然我们可以通过建表的时候指定列簇一些配置信息
hbase(main):032:0> create 'baizhi:t_user',{
     NAME=>'cf1',VERSIONS => '3',IN_MEMORY => 'true',BLOOMFILTER => 'ROWCOL'},{
     NAME=>'cf2',TTL => 300 }
0 row(s) in 2.2930 seconds

=> Hbase::Table - baizhi:t_user
- drop
hbase(main):029:0> drop 'baizhi:t_user'

ERROR: Table baizhi:t_user is enabled. Disable it first.

Here is some help for this command:
Drop the named table. Table must first be disabled:
  hbase> drop 't1'
  hbase> drop 'ns1:t1'


hbase(main):030:0> disable 'baizhi:t_user'
0 row(s) in 2.2700 seconds

hbase(main):031:0> drop 'baizhi:t_user'
0 row(s) in 1.2670 seconds
- enable_all/disable_all
hbase(main):029:0> disable_all 'baizhi:.*'
baizhi:t_user

Disable the above 1 tables (y/n)?
y
1 tables successfully disabled

hbase(main):030:0> enable
enable                     enable_all                 enable_peer                enable_table_replication
hbase(main):030:0> enable_all 'baizhi:.*'
baizhi:t_user

Enable the above 1 tables (y/n)?
y
1 tables successfully enabled
- list
该指令仅仅返回用户表信息
hbase(main):031:0> list
TABLE
baizhi:t_user
1 row(s) in 0.0390 seconds

=> ["baizhi:t_user"]
- alter
hbase(main):041:0> alter 'baizhi:t_user',{
     NAME=>'cf2',TTL=>100}
Updating all regions with the new schema...
1/1 regions updated.
Done.
0 row(s) in 2.1740 seconds

hbase(main):042:0> alter 'baizhi:t_user',NAME=>'cf2',TTL=>120
Updating all regions with the new schema...
1/1 regions updated.
Done.
0 row(s) in 2.1740 seconds
DML操作
- put - 既可以做插入也可做更新,后面可以选择性给时间戳,如果不给系统自动计算。
hbase(main):047:0> put 'baizhi:t_user','001','cf1:name','zhangsan'
0 row(s) in 0.1330 seconds

hbase(main):048:0> get 'baizhi:t_user','001'
COLUMN                                               CELL
 cf1:name                                            timestamp=1602230783435, value=zhangsan
1 row(s) in 0.0330 seconds

hbase(main):055:0> put 'baizhi:t_user','001','cf1:sex','true',1602230783435
0 row(s) in 0.0160 seconds


hbase(main):049:0> put 'baizhi:t_user','001','cf1:name','zhangsan1',1602230783434
0 row(s) in 0.0070 seconds

hbase(main):056:0> get 'baizhi:t_user','001'
COLUMN                                               CELL
 cf1:name                                            timestamp=1602230783435, value=zhangsan
 cf1:sex                                             timestamp=1602230783435, value=true
不难看出,一般情况下用户无需指定时间戳,因为默认情况下,HBase会优先返回时间戳最新的记录。一般使用默认策略,系统会自动追加当前时间作为Cell插入数据库时间。
- get - 获取某个Column的所有Cell信息
hbase(main):056:0> get 'baizhi:t_user','001'
COLUMN                                               CELL
 cf1:name                                            timestamp=1602230783435, value=zhangsan
 cf1:sex                                             timestamp=1602230783435, value=true
默认返回该Rowkey的所有Cell的最新记录,如果用户需要获取所有的记录,可以在后面指定VERSIONS参数
hbase(main):057:0> get 'baizhi:t_user','001',{
     COLUMN=>'cf1',VERSIONS=>100}
COLUMN                                               CELL
 cf1:name                                            timestamp=1602230783435, value=zhangsan
 cf1:name                                            timestamp=1602230783434, value=zhangsan1
 cf1:sex                                             timestamp=1602230783435, value=true
如果含有多个列簇的值,可以使用[]
hbase(main):059:0> get 'baizhi:t_user','001',{
     COLUMN=>['cf1:name','cf2'],VERSIONS=>100}
COLUMN                                               CELL
 cf1:name                                            timestamp=1602230783435, value=zhangsan
 cf1:name                                            timestamp=1602230783434, value=zhangsan1
3 row(s) in 0.0480 seconds
如果需要查询指定时间版本的数据,可以指定TIMESTAMP参数
hbase(main):067:0> get 'baizhi:t_user','001',{
     TIMESTAMP=>1602230783434}
COLUMN                                               CELL
 cf1:name                                            timestamp=1602230783434, value=zhangsan1
1 row(s) in 0.0140 seconds
如果用户需要查询指定版本区间的数据,该区间是前闭后开时间区间
hbase(main):071:0> get 'baizhi:t_user', '001', {
     COLUMN => 'cf1:name', TIMERANGE => [1602230783434, 1602230783436], VERSIONS =>3}
COLUMN                                               CELL
 cf1:name                                            timestamp=1602230783435, value=zhangsan
 cf1:name                                            timestamp=1602230783434, value=zhangsan1
2 row(s) in 0.0230 seconds
- delete/delteall
如果delete后面跟时间戳,删除当前时间戳以及该时间戳之前的所有版本数据,去过不给时间戳,直接删除最新版本以及最新版本之前的数据。
hbase(main):079:0> delete 'baizhi:t_user','001' ,'cf1:name', 1602230783435
0 row(s) in 0.0700 seconds
deleteall删除row对应的所有列
hbase(main):092:0> deleteall 'baizhi:t_user','001'
0 row(s) in 0.0280 seconds
- append -主要是针对字符串结果,在后面追加内容
hbase(main):104:0> append 'baizhi:t_user','001','cf1:follower','001,'
0 row(s) in 0.0260 seconds

hbase(main):104:0> append 'baizhi:t_user','001','cf1:follower','002,'
0 row(s) in 0.0260 seconds

hbase(main):105:0> get 'baizhi:t_user','001',{
     COLUMN=>'cf1',VERSIONS=>100}
COLUMN                                               CELL
 cf1:follower                                        timestamp=1602232477546, value=001,002,
 cf1:follower                                        timestamp=1602232450077, value=001

2 row(s) in 0.0090 seconds
- incr -基于数字类型做加法运算
hbase(main):107:0> incr 'baizhi:t_user','001','cf1:salary',2000
COUNTER VALUE = 2000
0 row(s) in 0.0260 seconds

hbase(main):108:0> incr 'baizhi:t_user','001','cf1:salary',2000
COUNTER VALUE = 4000
0 row(s) in 0.0150 seconds
- count- 统计一张表里的rowkey数目
hbase(main):111:0> count 'baizhi:t_user'
1 row(s) in 0.0810 seconds

=> 1
- scan - 扫描表
直接扫描默认返回左右column
hbase(main):116:0> scan 'baizhi:t_user'
ROW                                                  COLUMN+CELL
 001                                                 column=cf1:follower, timestamp=1602232477546, value=002,003,004,005,
 001                                                 column=cf1:salary, timestamp=1602232805425, value=\x00\x00\x00\x00\x00\x00\x0F\xA0
 002                                                 column=cf1:name, timestamp=1602233218583, value=lisi
 002                                                 column=cf1:salary, timestamp=1602233236927, value=\x00\x00\x00\x00\x00\x00\x13\x88
2 row(s) in 0.0130 seconds
一般用户可以指定查询的column和版本号
hbase(main):118:0> scan 'baizhi:t_user',{
     COLUMNS=>['cf1:salary']}
ROW                                                  COLUMN+CELL
 001                                                 column=cf1:salary, timestamp=1602232805425, value=\x00\x00\x00\x00\x00\x00\x0F\xA0
 002                                                 column=cf1:salary, timestamp=1602233236927, value=\x00\x00\x00\x00\x00\x00\x13\x88
2 row(s) in 0.0090 seconds
还可以指定版本或者版本区间
hbase(main):120:0> scan 'baizhi:t_user',{
     COLUMNS=>['cf1:salary'],TIMERANGE=>[1602232805425,1602233236927]}
ROW                                                  COLUMN+CELL
 001                                                 column=cf1:salary, timestamp=1602232805425, value=\x00\x00\x00\x00\x00\x00\x0F\xA0
1 row(s) in 0.0210 seconds
用户还可以使用LIMIT配合STARTROW完成分页
hbase(main):121:0> scan 'baizhi:t_user',{
     LIMIT=>2}
ROW                                                  COLUMN+CELL
 001                                                 column=cf1:follower, timestamp=1602232477546, value=002,003,004,005,
 001                                                 column=cf1:salary, timestamp=1602232805425, value=\x00\x00\x00\x00\x00\x00\x0F\xA0
 002                                                 column=cf1:name, timestamp=1602233218583, value=lisi
 002                                                 column=cf1:salary, timestamp=1602233236927, value=\x00\x00\x00\x00\x00\x00\x13\x88
2 row(s) in 0.0250 seconds

hbase(main):123:0> scan 'baizhi:t_user',{
     LIMIT=>2,STARTROW=>'002'}
ROW                                                  COLUMN+CELL
 002                                                 column=cf1:name, timestamp=1602233218583, value=lisi
 002                                                 column=cf1:salary, timestamp=1602233236927, value=\x00\x00\x00\x00\x00\x00\x13\x88
1 row(s) in 0.0170 seconds
上面的例子中系统默认返回的是ROWKEY大于或者等于002的所有记录,如果用户需要查询的小于或者等于002的所有记录可以添加REVERSED属性
hbase(main):124:0> scan 'baizhi:t_user',{
     LIMIT=>2,STARTROW=>'002',REVERSED=>true}
ROW                                                  COLUMN+CELL
 002                                                 column=cf1:name, timestamp=1602233218583, value=lisi
 002                                                 column=cf1:salary, timestamp=1602233236927, value=\x00\x00\x00\x00\x00\x00\x13\x88
 001                                                 column=cf1:follower, timestamp=1602232477546, value=002,003,004,005,
 001                                                 column=cf1:salary, timestamp=1602232805425, value=\x00\x00\x00\x00\x00\x00\x0F\xA0
2 row(s) in 0.0390 seconds
的所有记录可以添加REVERSED属性
hbase(main):124:0> scan 'baizhi:t_user',{
     LIMIT=>2,STARTROW=>'002',REVERSED=>true}
ROW                                                  COLUMN+CELL
 002                                                 column=cf1:name, timestamp=1602233218583, value=lisi
 002                                                 column=cf1:salary, timestamp=1602233236927, value=\x00\x00\x00\x00\x00\x00\x13\x88
 001                                                 column=cf1:follower, timestamp=1602232477546, value=002,003,004,005,
 001                                                 column=cf1:salary, timestamp=1602232805425, value=\x00\x00\x00\x00\x00\x00\x0F\xA0
2 row(s) in 0.0390 seconds


