引入
- 动态图方便调试,静态图方便部署而且效率较高,各有各的优点
- 通过 Paddle2.0 的动转静功能,就能相对完美的兼顾这两者的优势
- 实现用动态图进行训练调试,训练完成后使用静态图模型进行部署
- 本文将通过一个实例来展示如何将一个动态图模型转换至静态图
- 并且通过导出的推理模型来完成模型的部署
- 并测试不同方式下的模型运行效率
动态图vs静态图
- 首先简单的介绍一下这两者的区别:
- 静态图:计算之前先构建计算图,然后按照计算图进行计算,运行效率高,但调试比较麻烦
- 动态图:计算的同时构建计算图,运行效率稍低,但是调试方便
运行速度对比
- 通过实测,在 AIStudio 的CPU平台上,不同方式部署的速度如下表
- 使用的模型为U2Netp
- 测试使用的输入均为Batch size为1的320*320分辨率的三通道数据
- 均测量第二次运行时的消耗时间,因为第一运行时可能需要一些额外的处理误差较大
- 通过内置计时测量,结果可能存在些许误差
| 动态图 |
动转静(paddle.jit.load) |
动转静(PaddleInference) |
动转静(PaddleInference+MKLDNN) |
| 2.1827 s |
1.9110 s |
1.8756 s |
0.5750 s |
动态图模型
- 对于一个训练完成的动态图模型,一般由如下几个部分组成:
- 模型代码——用于构建模型
- 模型参数文件——用于保存模型参数
- 所以加载一个动态图模型一般如下几步:
- 具体的加载方法如下:
import os
import time
import paddle
from u2net import U2NETP
model = U2NETP()
model.set_dict(paddle.load([path to the pretrained model]))
model.eval()
x = paddle.randn([1, 3, 320, 320])
d0, _, _, _, _, _, _ = model(x)
print(d0.shape)
[1, 1, 320, 320]
start = time.time()
out = model(x)
end = time.time()
print('predict time: %.04f s' % (end - start))
predict time: 2.3866 s
模型动转静
- 在Paddle2.0中,通过paddle.jit.to_static即可快速的将模型转换为静态图模型
- 只需要简单的加上几行代码,就能完成转换
- 而且转换之后可以直接像使用动态图模型那样使用
- 不仅非常方便,而且运行速度也会有一定的提升
- 具体的转换代码如下:
input_spec = paddle.static.InputSpec(shape=[None, 3, 320, 320], dtype='float32', name='image')
model = paddle.jit.to_static(model, input_spec=[input_spec])
d0, _, _, _, _, _, _ = model(x)
print(d0.shape)
[1, 1, 320, 320]
start = time.time()
out = model(x)
end = time.time()
print('predict time: %.04f s' % (end - start))
predict time: 1.9833 s
静态图模型保存
- 除了直接使用转换完成的静态图模型之外
- 当然也是可以将转换后的模型进行保存的
- 保存的方法也非常简单,只需要调用Paddle.jit.save()即可
- 存储的模型结构如下:
- .pdmodel:Program 文件
- .pdiparams:存储的持久参数变量文件
- .pdiparams.info 存储一些变量描述信息至文件,这些额外的信息将在fine-tune训练中使用
- 保存的代码如下:
paddle.jit.save(model, [path to the save model])
print(os.listdir([save dir]))
['u2netp.pdiparams.info', 'u2netp.pdiparams', 'u2netp.pdmodel']
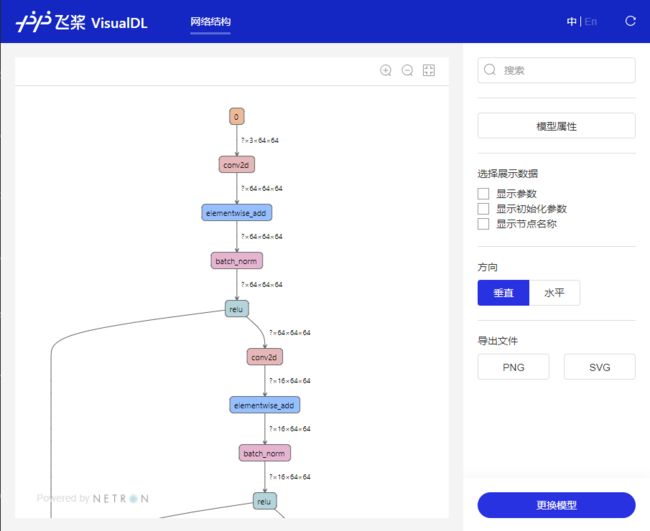
模型可视化
- 通过VisualDL工具可以轻松的进行模型结构的可视化查看
- 选择刚才保存后缀为.pdmodel的模型文件
- 具体的可视化图像就像下图所示的那样:

静态图模型加载
- 加载这样的保存的模型也是非常简单的
- 只需要使用Paddle.jit.load()即可进行模型加载
- 代码如下:
model = paddle.jit.load([path to the save model])
model.eval()
d0, _, _, _, _, _, _ = model(x)
print(d0.shape)
[1, 1, 320, 320]
start = time.time()
out = model(x)
end = time.time()
print('predict time: %.04f s' % (end - start))
predict time: 1.9530 s
PaddleInference预测部署
- 导出的推理模型也可以使用PaddleInference高性能推理引擎来进行预测部署
- 在CPU平台下还可以手动开启MKLDNN进行加速,效率将进一步提高
- 下面就通过PaddleQuickInference进行快速部署
- 更多详情请参考我的另一个项目:PaddleQuickInference
$ pip install ppqi
import numpy as np
from ppqi import InferenceModel
model = InferenceModel(
modelpath=[path to the save model],
use_gpu=False,
use_mkldnn=False
)
model.eval()
x = np.random.randn(1, 3, 320, 320).astype('float32')
d0, _, _, _, _ ,_, _ = model(x)
print(d0.shape)
(1, 1, 320, 320)
start = time.time()
out = model(x)
end = time.time()
print('predict time: %.04f s' % (end - start))
predict time: 1.8739 s
model = InferenceModel(
modelpath=[path to the save model],
use_gpu=False,
use_mkldnn=True
)
model.eval()
d0, _, _, _, _ ,_, _ = model(x)
print(d0.shape)
(1, 1, 320, 320)
start = time.time()
out = model(x)
end = time.time()
print('predict time: %.04f s' % (end - start))
predict time: 0.5673 s
部署实例
- 接下来通过加入数据预处理和后处理来完成完整的模型推理部署
import cv2
import time
import numpy as np
import matplotlib.pyplot as plt
from ppqi import InferenceModel
from processor import preprocess, postprocess
img_path = [path to the input image]
output_dir = [output dir]
img = preprocess(img_path)
model = InferenceModel(
modelpath=[path to the save model],
use_gpu=False,
use_mkldnn=True
)
model.eval()
start = time.time()
d0, _, _, _, _ ,_, _ = model(img)
end = time.time()
print('predict time: %.04f s' % (end - start))
mask_path, result_path = postprocess(d0, img_path, output_dir)
img = np.concatenate([
cv2.imread(img_path),
cv2.imread(mask_path),
cv2.imread(result_path)
], 1)
plt.axis('off')
plt.imshow(cv2.cvtColor(img, cv2.COLOR_BGR2RGB))
plt.show()
predict time: 0.7955 s

总结
- 通过简单增加几行代码就可以将动态图模型转换为静态图模型
- 在运行效率上静态图的效率在大多数情况下会好于动态图
- 导出的推理模型也可以很方便的进行推理部署
- 当然目前动转静功能还不是特别的成熟,可能会出现一些bug
- 总之体验还不错,希望这个功能未来能越来越好

