1 引言
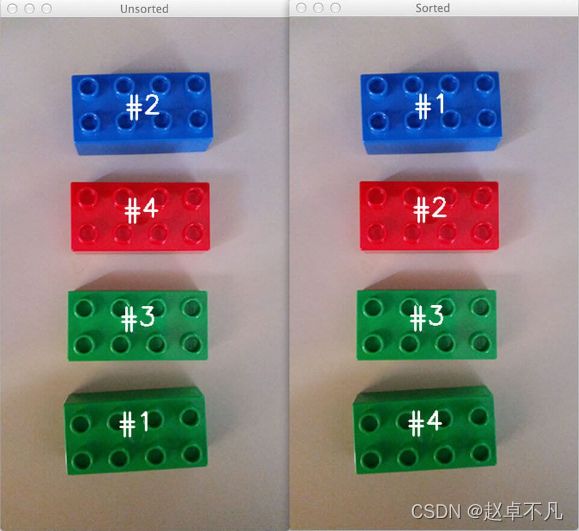
在进行图像处理过程中,我们经常会遇到一些和物体轮廓相关的操作,比如求目标轮廓的周长面积等,我们直接使用Opencv的findContours函数可以很容易的得到每个目标的轮廓,但是可视化后, 这个次序是无序的,如下图左侧所示:
本节打算实现对物体轮廓进行排序,可以实现从上到下排序或者从左倒右排序,达到上图右侧的可视化结果.
2 栗子
2.1 读取图像
首先,我们来读取图像,并得到其边缘检测图,代码如下:
image = cv2.imread(args['image'])
accumEdged = np.zeros(image.shape[:2], dtype='uint8')
for chan in cv2.split(image):
    chan = cv2.medianBlur(chan, 11)
    edged = cv2.Canny(chan, 50, 200)
    accumEdged = cv2.bitwise_or(accumEdged, edged)
cv2.imshow('edge map', accumEdged)
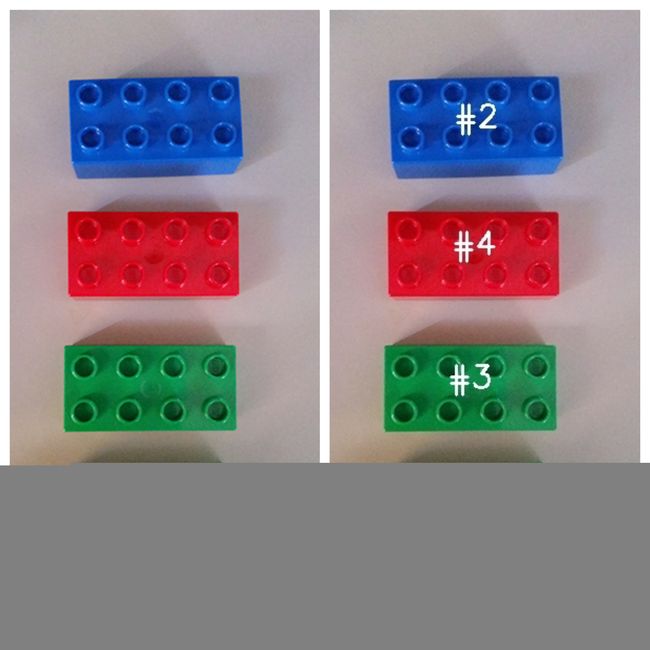
运行结果如下:
左侧为原图,右侧为边缘检测图.
2.2 获取轮廓
opencv-python中查找图像轮廓的API为:findContours 函数,该函数接收二值图像作为输入,可输出物体外轮廓、内外轮廓等等.
代码如下:
cnts = cv2.findContours(accumEdged.copy(), cv2.RETR_EXTERNAL,  cv2.CHAIN_APPROX_SIMPLE)
cnts = grab_contours(cnts)
cnts = sorted(cnts, key=cv2.contourArea, reverse=True)[:5]
orig = image.copy()
# unsorted
for (i, c) in enumerate(cnts):
    orig = draw_contour(orig, c, i)
cv2.imshow('Unsorted', orig)
cv2.imwrite("./Unsorted.jpg", orig)
运行结果如下:
需要注意的是,在OpenCV2.X版本,函数findContours返回两个值,
函数声明如下:
contours, hierarchy = cv2.findContours(binary,cv2.RETR_TREE,cv2.CHAIN_APPROX_SIMPLE)
但是在OpenCV3以上版本,该函数的声明形式如下:
image, contours, hierarchy = cv2.findContours(binary, cv2.RETR_TREE, cv2.CHAIN_APPROX_SIMPLE)
所以为了适配两种模式,我们实现函数grab_contours 来根据不同的版本,选择对应的返回轮廓的下标位置,
代码如下:
def grab_contours(cnts):
    # if the length the contours tuple returned by cv2.findContours
    # is '2' then we are using either OpenCV v2.4, v4-beta, or
    # v4-official
    if len(cnts) == 2:
        cnts = cnts[0]

    # if the length of the contours tuple is '3' then we are using
    # either OpenCV v3, v4-pre, or v4-alpha
    elif len(cnts) == 3:
        cnts = cnts[1]

    return cnts
2.3 轮廓排序
通过上述步骤,我们得到了图像中的所有物体的轮廓,接下来我们定义函数sort_contours函数来实现对轮廓进行排序操作,该函数接受method参数来实现按照不同的次序对轮廓进行排序,比如从左往右,或者从右往左.
代码如下:
def sort_contours(cnts, method='left-to-right'):
    # initialize the reverse flag and sort index
    reverse = False
    i = 0
    # handle if sort in reverse
    if method == 'right-to-left' or method == 'bottom-to-top':
        reverse = True
    # handle if sort against y rather than x of the bounding box
    if method == 'bottom-to-top' or method == 'top-to-bottom':
        i = 1

    boundingBoxes = [cv2.boundingRect(c) for c in cnts]
    (cnts, boundingBoxes) = zip(*sorted(zip(cnts, boundingBoxes), key=lambda b: b[1][i], reverse=reverse))
    return (cnts, boundingBoxes)
上述代码的核心思想为先求出每个轮廓的外接矩形框,然后通过对外接框按照x或y坐标排序进而来实现对轮廓的排序.
调用代码如下:
# sorted
(cnts, boundingboxes) = sort_contours(cnts, method=args['method'])
for (i, c) in enumerate(cnts):
    image = draw_contour(image, c, i)
cv2.imshow('Sorted', image)
cv2.waitKey(0)
运行结果如下:
2.4 其他结果
利用上述代码,我们也可以实现从左往右的排序,如下所示:
3 总结
本文利用OpenCV实现了对物体轮廓按指定顺序进行排序的功能,并给出了完整的代码示例.
到此这篇关于基于python使用OpenCV进行物体轮廓排序的文章就介绍到这了,更多相关OpenCV进行物体轮廓排序内容请搜索脚本之家以前的文章或继续浏览下面的相关文章希望大家以后多多支持脚本之家!


