在这个 Python 多线程教程中,您将看到创建线程的不同方法,并学习实现线程安全操作的同步。这篇文章的每个部分都包含一个示例和示例代码,以逐步解释该概念。
顺便说一下,多线程是几乎所有高级编程语言都支持的软件编程的核心概念。因此,您应该知道的第一件事是:什么是线程以及多线程在计算机科学中意味着什么。
什么是计算机科学中的线程?
在软件编程中,线程是具有独立指令集的最小执行单元。它是进程的一部分,并在共享程序的可运行资源(如内存)的相同上下文中运行。一个线程有一个起点、一个执行顺序和一个结果。它有一个指令指针,用于保存线程的当前状态并控制接下来按什么顺序执行。
什么是计算机科学中的多线程?
一个进程并行执行多个线程的能力称为多线程。理想情况下,多线程可以显着提高任何程序的性能。而且 Python 多线程机制非常人性化,您可以快速学习。
多线程的优点
- 多线程可以显着提高多处理器或多核系统的计算速度,因为每个处理器或核同时处理一个单独的线程。
- 多线程允许程序在一个线程等待输入时保持响应,同时另一个线程运行 GUI。此陈述适用于多处理器或单处理器系统。
- 进程的所有线程都可以访问其全局变量。如果一个全局变量在一个线程中发生变化,那么它对其他线程也是可见的。线程也可以有自己的局部变量。
多线程的缺点
- 在单处理器系统上,多线程不会影响计算速度。由于管理线程的开销,性能可能会下降。
- 访问共享资源时需要同步以防止互斥。它直接导致更多的内存和 CPU 利用率。
- 多线程增加了程序的复杂性,从而也使得调试变得困难。
- 它增加了潜在死锁的可能性。
- 当线程无法定期访问共享资源时,它可能会导致饥饿。应用程序将无法恢复其工作。
到目前为止,您已经阅读了有关线程的理论概念。如果您不熟悉 Python,我们建议您阅读我们的 30 个快速 Python 编码技巧,它们也可以帮助您编写 Python 多线程代码。我们的许多读者都使用了这些技巧,并且能够提高他们的编码技能。
Python 多线程模块
Python 提供了两个模块来在程序中实现线程。
模块和
<线程> 模块。
注意:供您参考,Python 2.x 曾经有 < thread> 模块。但它在 Python 3.x 中被弃用并重命名为 < _thread> 模块以实现向后兼容性。
两个模块的主要区别在于模块<_线程>将线程实现为函数。另一方面,< threading >模块提供了一种面向对象的方法来启用线程创建。
如何使用线程模块创建线程?
如果你决定在你的程序中应用< thread > 模块,那么使用下面的方法来产生线程。
#语法

thread.start_new_thread ( function, args[, kwargs] )
这种方法对于创建线程非常有效和直接。您可以使用它在 Linux 和 Windows 中运行程序。
此方法启动一个新线程并返回其标识符。它将使用传递的参数列表调用指定为“函数”参数的函数。当 < function > 返回时,线程将静默退出。
这里,args是一个参数元组;使用空元组调用 < function > 不带任何参数。可选的 < kwargs > 参数指定关键字参数的字典。
**如果 < function > 因未处理的异常而终止,则会打印堆栈跟踪,然后线程退出(它不会影响其他线程,它们会继续运行)。使用以下代码了解有关线程的更多信息。
基本的 Python 多线程示例
#Python 多线程示例。
#1. 使用递归计算阶乘。
#2. 使用线程调用阶乘函数。

from _thread import start_new_thread
from time import sleep

threadId = 1 #线程计数器
waiting = 2 #2秒等待的时间

def factorial(n):
    global threadId
    rc = 0

    if n < 1:   # base case
        print("{}: {}".format('\nThread', threadId ))
        threadId += 1
        rc = 1
    else:
        returnNumber = n * factorial( n - 1 )  # recursive call
        print("{} != {}".format(str(n), str(returnNumber)))
        rc = returnNumber

    return rc

start_new_thread(factorial, (5, ))
start_new_thread(factorial, (4, ))

print("Waiting for threads to return...")
sleep(waiting)
您可以在本地 Python 终端中运行上述代码,也可以使用任何在线 Python 终端。执行此程序后,它将产生以下输出。
程序输出
# Python 多线程:程序输出-
等待线程返回...

Thread: 1
1 != 1
2 != 2
3 != 6
4 != 24
5 != 120

Thread: 2
1 != 1
2 != 2
3 != 6
4 != 24
如何使用线程模块创建线程?
最新的< threading >模块比上一节讨论的遗留< thread >模块提供了丰富的特性和更好的线程支持。< threading > 模块是 Python 多线程的一个很好的例子。
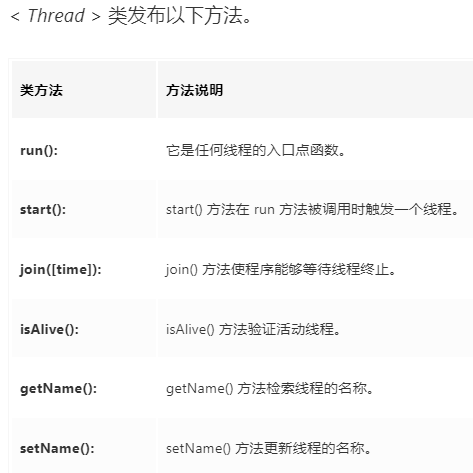
< threading > 模块结合了 < thread > 模块的所有方法,并暴露了一些额外的方法
- threading.activeCount(): 它找到总数。活动线程对象。
- threading.currentThread(): 您可以使用它来确定调用方线程控制中的线程对象数量。
- threading.enumerate(): 它将为您提供当前活动的线程对象的完整列表。
除了上述方法,< threading >模块还提供了< Thread >类,你可以尝试实现线程。它是 Python 多线程的面向对象的变体。
使用线程模块实现线程的步骤
您可以按照以下步骤使用 < threading > 模块实现一个新线程。
- 从 < Thread > 类构造一个子类。
- 覆盖 < init(self [,args]) > 方法以根据要求提供参数。
- 接下来,重写< run(self [,args]) > 方法来编写线程的业务逻辑。
一旦定义了新的 < Thread> 子类,就必须实例化它以启动一个新线程。然后,调用 < start()> 方法来启动它。它最终会调用< run()> 方法来执行业务逻辑。
示例 – 创建一个线程类来打印日期
#Python 多线程示例打印当前日期。
#1. 使用 threading.Thread 类定义子类。
#2. 实例化子类并触发线程。

import threading
import datetime

class myThread (threading.Thread):
    def __init__(self, name, counter):
        threading.Thread.__init__(self)
        self.threadID = counter
        self.name = name
        self.counter = counter
    def run(self):
        print("\nStarting " + self.name)
        print_date(self.name, self.counter)
        print("Exiting " + self.name)

def print_date(threadName, counter):
    datefields = []
    today = datetime.date.today()
    datefields.append(today)
    print("{}[{}]: {}".format( threadName, counter, datefields[0] ))

# 创建新线程
thread1 = myThread("Thread", 1)
thread2 = myThread("Thread", 2)

# 启动新线程
thread1.start()
thread2.start()

thread1.join()
thread2.join()
print("\nExiting the Program!!!")
程序输出
Starting Thread
Thread[1]: 2021-07-22
Exiting Thread

Starting Thread
Thread[2]: 2021-07-22
Exiting Thread

Exiting the Program!!!
Python 多线程——同步线程
< threading > 模块具有实现锁定的内置功能,允许您同步线程。需要锁定来控制对共享资源的访问,以防止损坏或丢失数据。
您可以调用 Lock() 方法来应用锁,它返回新的锁对象。然后,您可以调用锁对象的获取(阻塞) 方法来强制线程同步运行。
可选的阻塞参数指定线程是否等待获取锁。
- Case Blocking = 0:如果获取锁失败,线程将立即返回零值,如果锁成功则返回一。
- Case Blocking = 1:线程阻塞并等待锁被释放。
锁对象的release() 方法用于在不再需要时释放锁。
仅供参考,Python 的内置数据结构(例如列表、字典)是线程安全的,因为它具有用于操作它们的原子字节码的副作用。在 Python 中实现的其他数据结构或基本类型(如整数和浮点数)没有这种保护。为了防止同时访问一个对象,我们使用了一个Lock 对象。
锁定的多线程示例
#Python 多线程示例来演示锁定。
#1. 使用 threading.Thread 类定义子类。
#2. 实例化子类并触发线程。
#3. 在线程的 run 方法中实现锁。

import threading
import datetime

exitFlag = 0

class myThread (threading.Thread):
    def __init__(self, name, counter):
        threading.Thread.__init__(self)
        self.threadID = counter
        self.name = name
        self.counter = counter
    def run(self):
        print("\nStarting " + self.name)
        # 获取锁同步线程
        threadLock.acquire()
        print_date(self.name, self.counter)
        # 为下一个线程释放锁
        threadLock.release()
        print("Exiting " + self.name)

def print_date(threadName, counter):
    datefields = []
    today = datetime.date.today()
    datefields.append(today)
    print("{}[{}]: {}".format( threadName, counter, datefields[0] ))

threadLock = threading.Lock()
threads = []

# 创建新线程
thread1 = myThread("Thread", 1)
thread2 = myThread("Thread", 2)

# 启动新线程
thread1.start()
thread2.start()

# 添加线程到线程列表
threads.append(thread1)
threads.append(thread2)

# 等待所有线程完成
for thread in threads:
    thread.join()

print("\nExiting the Program!!!")
程序输出
Starting Thread
Thread[1]: 2021-07-22
Exiting Thread

Starting Thread
Thread[2]: 2021-07-22
Exiting Thread

Exiting the Program!!!