opencv入门实战:基于模板匹配的车牌识别
利用OpenCV的基础知识,进行图像的预处理,寻找到相关轮廓后,通过模板匹配进行车牌预测识别。
要点:
1、使用opencv进行图形处理操作。
2、车牌轮廓提取
3、定位车牌识别
步骤:
1、加载图像,对图片使用Sobel算子对图片进行边缘检测对图片进行处理
2、读取模板文件,读取template文件下的模板
3、对图片进行轮廓检测
4、计算车牌的轮廓大小,定位到车牌
5、在车牌上使用模板匹配获取车牌字符、遍历车牌对车牌进行识别
模板数据集已分享到百度云:链接
链接:https://pan.baidu.com/s/163aSra2Jhd3uyb5c-pZkkw
提取码:37fg
代码演示:
1.首先导入相关库函数

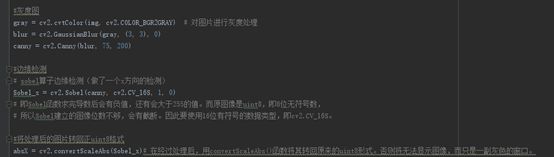
2.读取图片,对图片进行灰度处理,使用Sobel算子对图片进行边缘检测对图片进行处理,

-
读取模板文件,读取template文件下的模板

-
使用矩形卷积核、闭运算

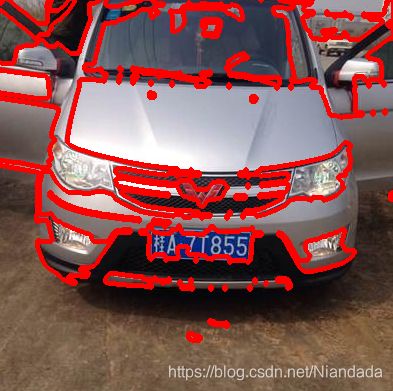
5.对图片进行轮廓检测

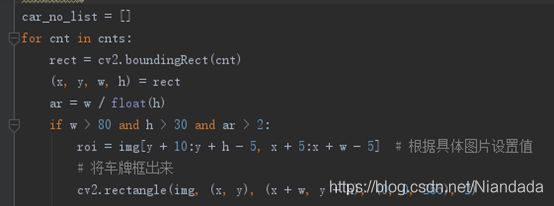
6.车牌分割,然后将车牌框出来

7.对框出来的车牌进行处理
1、将车牌进行灰度处理
![]()

2、对车牌进行高斯滤波处理
![]()
3、闭运算


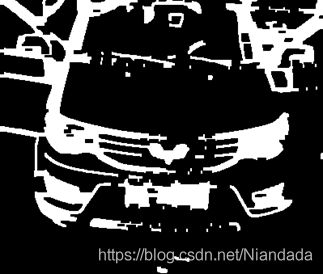
4、二值化
![]()

5、轮廓填充


8.模板匹配获取车牌字符、遍历车牌


完整代码如下:
import cv2
import numpy as np
import os
from PIL import Image, ImageDraw, ImageFont

img = cv2.imread('image/test2.jpg')

#模板
template = ['0', '1', '2', '3', '4', '5', '6', '7', '8', '9',
            'A', 'B', 'C', 'D', 'E', 'F', 'G', 'H', 'J', 'K', 'L', 'M', 'N', 'P', 'Q', 'R', 'S', 'T', 'U', 'V', 'W',
            'X', 'Y', 'Z',
            '藏', '川', '鄂', '甘', '赣', '贵', '桂', '黑', '沪', '吉', '冀', '津', '晋', '京', '辽', '鲁', '蒙', '闽', '宁',
            '青', '琼', '陕', '苏', '皖', '湘', '新', '渝', '豫', '粤', '云', '浙']

# 显示图片
def cv_show(name, img):
    cv2.imshow(name, img)
    cv2.waitKey(0)
    cv2.destroyAllWindows()

# 读取图像,解决imread不能读取中文路径的问题
def cv_imread(file_path):
    cv_img = cv2.imdecode(np.fromfile(file_path, dtype=np.uint8), -1)
    return cv_img

#灰度图
gray = cv2.cvtColor(img, cv2.COLOR_BGR2GRAY)  # 对图片进行灰度处理
blur = cv2.GaussianBlur(gray, (3, 3), 0)  #高斯
canny = cv2.Canny(blur, 75, 200)  #边缘

#边缘检测
# sobel算子边缘检测
Sobel_x = cv2.Sobel(canny, cv2.CV_16S, 1, 0)  #水平方向梯度提取

#将处理后的图片转回正uint8格式
absX = cv2.convertScaleAbs(Sobel_x)#将其转回原来的uint8形式

#使用矩形卷积核
rectKernel = cv2.getStructuringElement(cv2.MORPH_RECT, (9, 3))  # 画出一个9*3的矩形
close = cv2.morphologyEx(absX, cv2.MORPH_CLOSE, rectKernel)#闭运算

#对图片进行轮廓检测
thresh_Contours = close.copy()
cnts = cv2.findContours(thresh_Contours, cv2.RETR_EXTERNAL, cv2.CHAIN_APPROX_SIMPLE)[0]  #检索最外面的轮廓、压缩水平的、垂直的和斜的部分、只要一个9*3的轮廓
image = img.copy()
cv2.drawContours(image, cnts, -1, (0, 0, 255), 3) #轮廓绘制 image为三通道才能显示轮廓

# 轮廓排序
def sort_contours(cnts, method="left-to-right"):
    reverse = False
    i = 0

    #右到左排序或下到上
    if method == "right-to-left" or method == "bottom-to-top":
        reverse = True

    #从上到下或从下到上
    if method == "top-to-bottom" or method == "bottom-to-top":
        i = 1

    boundingBoxes = [cv2.boundingRect(c) for c in cnts]  # 得到对象轮廓后,用一个最小正矩形,包覆此轮廓x,y,h,w
    (cnts, boundingBoxes) = zip(*sorted(zip(cnts, boundingBoxes), key=lambda b: b[1][i], reverse=reverse))
    return cnts, boundingBoxes

# 读取模板文件,读取template文件下的模板
def read_template_file(directory_name):
    template_list = []
    for fileName in os.listdir(directory_name):
        template_list.append(directory_name + "/" + fileName)
    return template_list

# 读取template文件下的模板,开始到结束
def get_template(start, end):
    template_words = []
    for i in range(start, end):
        word = read_template_file('./template/' + template[i])
        template_words.append(word)
    return template_words


#车牌分割
car_no_list = []
for cnt in cnts:
    rect = cv2.boundingRect(cnt)
    (x, y, w, h) = rect
    ar = w / float(h)
    if w > 80 and h > 30 and ar > 2:
        roi = img[y + 10:y + h - 5, x + 5:x + w - 5]  # 根据具体图片设置值
        # 获取车牌位置并画框
        cv2.rectangle(img, (x, y), (x + w, y + h), (0, 0, 255), 2)
        cv_show('img', img)

        gray = cv2.cvtColor(roi, cv2.COLOR_BGR2GRAY)#灰度

        blur = cv2.GaussianBlur(gray, (3, 3), 0)#高斯   卷积大小3*3 偏置0

        rectKernel = cv2.getStructuringElement(cv2.MORPH_RECT, (2, 3))  # 闭运算
        close = cv2.morphologyEx(blur, cv2.MORPH_CLOSE, rectKernel)

        group = cv2.threshold(close, 0, 255, cv2.THRESH_BINARY | cv2.THRESH_OTSU)[1] #二值化

        digitCnts, hierarchy = cv2.findContours(group.copy(), cv2.RETR_EXTERNAL, cv2.CHAIN_APPROX_SIMPLE)  #轮廓填充
        imageROI = roi.copy()
        cv2.drawContours(imageROI, cnts, -1, (0, 0, 255), 3)

        sortedCnts = sort_contours(digitCnts)[0]  # 从左到右排序

        for digit in sortedCnts:
            temp = cv2.boundingRect(digit)
            (x, y, w, h) = temp
            if w > 5 and h > 5:  # 过滤掉车牌上的字母和数字的那个点
                roiNo = group[y:y + h, x:x + w + 1]  # 右边多留宽点
                car_no_list.append(roiNo)

def get_car_No(image, start, end):
    # 模板匹配
    best_scores = []
    template_lists = get_template(start, end)

    for template_list in template_lists:  # 每个文件夹
        scores = []
        for word in template_list:  # 一个文件夹下的多个模板
            template_file = cv2.imdecode(np.fromfile(word, dtype=np.uint8), 1)
            template_img = cv2.cvtColor(template_file, cv2.COLOR_RGB2GRAY)
            ret, template_img = cv2.threshold(template_img, 0, 255, cv2.THRESH_OTSU)
            height, width = template_img.shape[:2]

            carNo = cv2.resize(image, (width, height)) #将图片设置成统一大小
            # macthTemplate中图片要与模板尺寸一样大小
            result = cv2.matchTemplate(carNo, template_img, cv2.TM_CCOEFF)
            (_, score, _, _) = cv2.minMaxLoc(result)  # 获得分值
            scores.append(score)
        best_scores.append(max(scores))

    index = best_scores.index(max(best_scores))  # 分值最大的索引
    return template[start + index]  # 起始序号  索引

car_all_no = []
# 第一个汉字
first_chinese = get_car_No(car_no_list[0], 34, 64)
car_all_no.append(first_chinese)
# 第二个英文字母
second_english = get_car_No(car_no_list[1], 10, 33)
car_all_no.append(second_english + " ")
# 数字及英文字母
for car_no in car_no_list[2:]:
    number_english = get_car_No(car_no, 0, 33)
    car_all_no.append(number_english)
print(car_all_no)

# 显示中文
def cv2ImgAddText(img, text, left, top, textColor=(255, 255, 0), textSize=50):
    if (isinstance(img, np.ndarray)):
        img = Image.fromarray(cv2.cvtColor(img, cv2.COLOR_BGR2RGB))
    draw = ImageDraw.Draw(img)
    fontText = ImageFont.truetype("font/STSONG.TTF", textSize, encoding="utf-8")  # 字体
    draw.text((left, top), text, textColor, font=fontText)
    return cv2.cvtColor(np.asarray(img), cv2.COLOR_RGB2BGR)

result_img = cv2ImgAddText(img, "".join(car_all_no), 10, 20)
cv_show('result_img', result_img)