背景
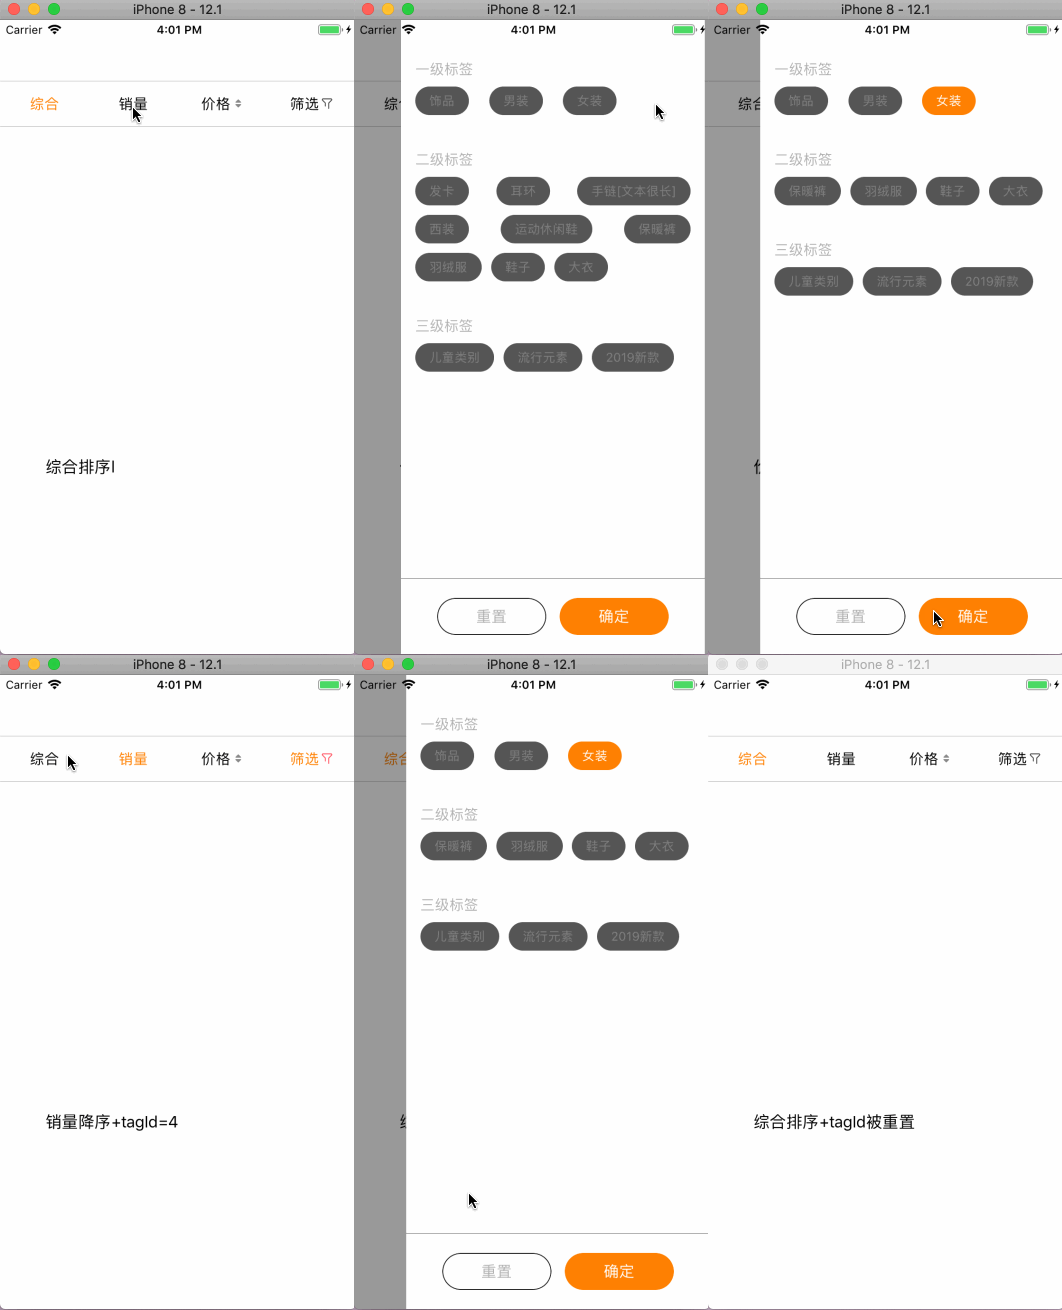
结合上一个筛选框,写一个商品的排序导航。实现特定种类商品的综合、销量,价格排序。
创建视图
把每一个选项卡做成自定义的视图ScreenNavBarItem,给这个view三种状态:未选中,单次选中,双次选中(选中状态下有升序和降序两种)。
/**
 item的样式

 - ItemSelelctTypeNone: 未选中
 - ItemSelelctTypeSingleType: 单击
 - ItemSelelctTypeDoubleType: 双击
 */
typedef NS_ENUM(NSInteger,ItemSelelctType) {
    ItemSelelctTypeNone = 0,
    ItemSelelctTypeSingleType = 1,
    ItemSelelctTypeDoubleType = 2
};
不同的状态他们都有不同的样式。比如title的文案变色还有图片更改。这部分的处理交给数据模型。
好处有:
- 可以通过创建符合约定的model,就能创建任意多的item。
- 如果item需要更改样式的话,我们只需要改变model然后刷新就好了。
其中的itemCode用来做这个item唯一标识,方便后面的点击事件的逻辑处理。
@interface ScreenNavDataModel : NSObject

@property(nonatomic, copy) NSString *title;

@property(nonatomic, copy) NSString *normalImage;

@property(nonatomic, copy) NSString *selectSingleImage;

@property(nonatomic, copy) NSString *selectDoubleImage;

@property(nonatomic, assign) NSInteger itemCode;

@property(nonatomic, assign) ItemSelelctType type;

@end
然后添加item的初始化方法和外部刷新方法。
/**
 初始化方法

 @param model 数据源
 @return 实例
 */
- (instancetype)initWithItemModel:(ScreenNavDataModel *)model;


/**
 更新item的样式

 @param type 样式的枚举
 */
- (void)updateWithType:(ItemSelelctType)type;
然后将这些按钮组装起来,放入一个view(AllProductScreenNavBar)内。由于item的个数不固定,所以要做好宽度的适配。同样它也需要一个初始化和刷新的方法。
#import
#import "ScreenNavDataModel.h"
#import "ScreenNavBarItem.h"


typedef void(^itemSelect)(ScreenNavBarItem *item, NSInteger selectIndex);

@interface AllProductScreenNavBar : UIView

@property(nonatomic, copy) itemSelect itemSelect;


/**
 初始化

 @param dataArray item数据源
 @return 实例
 */
- (instancetype)initWithScreenNavData:(NSArray *) dataArray;

/**
 更新视图

 @param dataModel 更新选中方案的数组
 */
- (void)updateWithScreenNavData:(NSArray *)dataModel;

@end
接下来是要思考处理页面的交互了。
页面交互
在AllProductScreenNavBar中,我们定义了一个block来传递事件。参数item是为了能够拿到item的code标识。通过给item添加手势,点击后回触发这个block。我们通过计算的方式拿到点击的index。
- (void)userSelectIndexItem:(UITapGestureRecognizer *)tap {
    if (self.itemSelect) {
        //找到点击的item,并将其他item的选中状态置空
        CGFloat centerX = CGRectGetMidX(tap.view.frame);
        NSInteger selectIndex = 0;
        for (int i = 0; i < self.itemArray.count; i ++) {
            CGFloat minX = i*self.unitWidth;
            CGFloat maxX = (1+i)*self.unitWidth;
            if (centerX > minX  && centerX < maxX ) {
                selectIndex = i;
            }
        }

        ScreenNavBarItem *item = self.itemArray[selectIndex];
//        ScreenNavBarItem *item = (ScreenNavBarItem *)tap.view;
        self.itemSelect(item,selectIndex);
    }
}
其实我们可以只把item block出去,然后controller里面遍历一下,如果block出去的item == listModel里面的某一个就可以拿到这个index。或者直接定义itemCode 就是当前item的下标也可以。
在ViewController中我们初始化一个AllProductScreenNavBar的实例,并写一下他的事件处理。
_bar = [[AllProductScreenNavBar alloc] initWithScreenNavData:_listModel.list];

   __weak typeof(self) weakSelf = self;
   _bar.itemSelect = ^(ScreenNavBarItem *item, NSInteger selectIndex) {
       //更改item的点击类型
       //点击行(无>单击,点击>双击,双击>单击)
       //非点击行 任意状态>无
       [weakSelf.listModel handleItemModelArrayWithItemSelect:selectIndex];

       //根据点击状态和code得到排序类型
       item.currentType = weakSelf.listModel.list[selectIndex].type;
       ProductSortType type = [weakSelf currentItemState:item.currentItemCode itemCurrentType:item.currentType];

       //处理事件
       [weakSelf eventWithSortType:type];
       [weakSelf updateData];
   };
因为筛选和其他的排序是可以共存的,所以要在筛选框的代理方法中处理一下这种特殊情况。主要是筛选框的点击状态这块需要和其他的item分开。有一点需要注意,如果这个状态没有更改就不用刷新。比如重复点开筛选框关闭筛选框操作,这个时候状态就不必更改
- (void)alertViewDidSelectSureButtonWithId:(NSString *)tagId {
    if (tagId.length) {
        _tagId = tagId;
        //传回来的ID
        ScreenNavDataModel *model4 = _listModel.list[3];
        if (model4.type != ItemSelelctTypeSingleType) {
            model4.type = ItemSelelctTypeSingleType;
            [self updateData];
        }
        _StatusLabel.text = [NSString stringWithFormat:@"%@+tagId=%@",[_StatusLabel.text substringToIndex:4],_tagId];
    }

}

- (void)alertViewDidSelectResetButtonClick {
    _tagId = @"";
    _lastScreenModel = nil;
    ScreenNavDataModel *model4 = _listModel.list[3];
    if (model4.type != ItemSelelctTypeNone) {
        model4.type = ItemSelelctTypeNone;
        _StatusLabel.text = [NSString stringWithFormat:@"%@+tagId被重置",[_StatusLabel.text substringToIndex:4]];
        [self updateData];
    }

}
反思
当初这块的代码是走一步看一步写的没有思考那么多,很多地方都没有考虑周到,散发出一种坏味道。从项目中抽离出来后,给重构了一遍。 本来判断的排序类型是放在ScreenNavBarItem的,然后通过硬编码的方式根据每个model的title来区分不同的类型在block出去,这样很不友好,不利于复用。如果需要一个新的排序的话,还得修改这个item.
- (ProductSortType)currentItemState {
    if ([_title isEqualToString:@"综合"]) {
        return ProductSortTypeComprehensive;
    }
    if ([_title isEqualToString:@"销量"]) {
        return ProductSortTypeSalesDesc;
    }
    if ([_title isEqualToString:@"价格"]) {
        if (_currentType == ItemSelelctTypeSingleType) {
            return ProductSortTypePriceAsc;
        } else if (_currentType == ItemSelelctTypeDoubleType) {
            return ProductSortTypePriceDesc;
        }
    }
    if ([_title isEqualToString:@"筛选"]) {
        return ProductSortTypeScreening;
    }
    return 0;
}
还有数据处理部分放在了listModel里面,借用了
- (NSString *)substringToIndex:(NSUInteger)to;
这种方式来返回一个新的listModel。以前是在controller里面处理。
代码
https://github.com/bumingxialuo/NavTool
如果本文中的方法或者思路对你有些帮助,点个star哦。
