作者:Natasha The Robot,原文链接,原文日期:2015-10-21
译者:小袋子;校对:千叶知风;定稿:numbbbbb
在看这篇文章之前,确认你已经看过之前发布的几篇 WatchOS 2 的文章:
- WatchOS 2: Hello, World(译文链接)
- WatchConnectivity Introduction: Say Goodbye To The Spinner(译文链接)
- WatchConnectivity: Say Hello to WCSession(译文链接)
通过 User Info 实现后台数据传输应该在你确保所有数据被传输的情况下(不仅仅像Application Context)。用户信息数据是在FIFO(先进先出)队列中排队传输的,所以不会有东西被重写。
一个典型的例子是在短信应用中使用它 —— 最后一条信息要确保能看到完整对话和上下文的重要部分。亦或者如果用户更新了他们文件信息的一小部分,则他们的个人信息和所有的修改应该被同步到 Watch 文件。
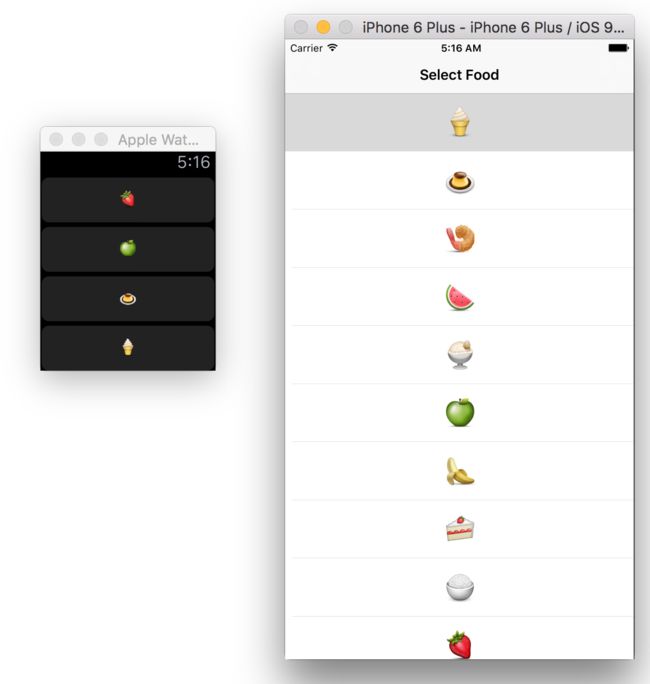
在这个教程中,我将会构建一个食物 emoji (表情符号)社交应用,因为我是个吃货,并且我喜欢!
另外,这个应用可以成为一个基于食品杂货店展示的 Apple Watch 应用 —— 你在手机上选择打算购买的食物 emoji ,然后跳转到应用上,这样你就好像在食品杂货店上浏览商品了!
免责声明
对于这个应用需要知道的是,我将会写很多抽象的数据更新层用于整个应用,因为 UI 中的多个地方需要有数据源更新,所以在示例应用中将会过度设计。
我同样尝试了不同的架构,尤其是 Swift,所以如果你知道如何在 Swift 中更好地抽象数据层,请在评论中提出。
步骤
在这个教程中,我假设你已经知道如何在** Xcode 创建一个简单的单视图应用,以及创建一个简单的食物 Emoji 列表的表视图**。如果你有任何问题,可以参考这个 FoodSelectionViewController 。
同样地,我也假设你知道如何创建一个 Watch 应用并且在 Interface.storyboard 中做过基本的样式。如果你需要帮助,请查看WatchOS 2: Hello, World tutorial 和 WatchKit: Let’s Create a Table tutorial.
最后,你需要知道如何创建基础的用于管理 WCSession 的单例,以及在 AppleDelegate 中的application:didFinishLaunchingWithOptions和在Watch 扩展中ExtensionDelegate 的applicationDidFinishLaunching中启动它。如果你不清楚,请查看 WatchConnectivity: Say Hello to WCSession tutorial。
你的 iOS 应用看起来应该像这样:
// in your iOS app
import WatchConnectivity

class WatchSessionManager: NSObject, WCSessionDelegate {

    static let sharedManager = WatchSessionManager()
    private override init() {
        super.init()
    }

    private let session: WCSession? = WCSession.isSupported() ? WCSession.defaultSession() : nil

    private var validSession: WCSession? {

        // paired - the user has to have their device paired to the watch
        // watchAppInstalled - the user must have your watch app installed

        // Note: if the device is paired, but your watch app is not installed
        // consider prompting the user to install it for a better experience

        if let session = session where session.paired && session.watchAppInstalled {
            return session
        }
        return nil
    }

    func startSession() {
        session?.delegate = self
        session?.activateSession()
    }
}
和在 Watch 应用中这样的代码:
// in your WatchKit Extension

import WatchConnectivity

class WatchSessionManager: NSObject, WCSessionDelegate {

    static let sharedManager = WatchSessionManager()
    private override init() {
        super.init()
    }

    private let session: WCSession = WCSession.defaultSession()

    func startSession() {
        session.delegate = self
        session.activateSession()
    }
}
当然,如果你需要额外的提示,可以参考这个 教程的源码。
现在让我们开始有趣的部分吧 。
发送数据
在我的应用中,每当用户选择一个食物项,都需要在后台传输给 Watch 应用。这意味着** iOS 应用是发送者**。显然这是非常简单的。
只需扩展 iOS 应用的 WatchSessionManager 单例去传输用户数据:
// in your iOS app

// MARK: User Info
// use when your app needs all the data
// FIFO queue
extension WatchSessionManager {

    // Sender
    func transferUserInfo(userInfo: [String : AnyObject]) -> WCSessionUserInfoTransfer? {
        return validSession?.transferUserInfo(userInfo)
    }
}
所以现在,当用户选择一个食物的 cell,你只需简单地调用以下方法:
// FoodSelectionViewController.swift

class FoodSelectionViewController: UITableViewController {

    private let food = ["", "", "","", "", "", "", "", "", "", "", ""]

    // Table Data Source methods truncated

    // MARK: Table view delegate

    override func tableView(tableView: UITableView, didSelectRowAtIndexPath indexPath: NSIndexPath) {

        let foodItem = food[indexPath.row]
        WatchSessionManager.sharedManager.transferUserInfo(["foodItem" : foodItem])
    }

}
就是酱紫!已选择的食物项就在 FIFO 队列中了,并且将会发送给 Watch 应用!
接收数据
现在 Watch 应用必须接收数据。这也很简单,只需要实现WCSessionDelegate中的session:didReceiveUserInfo:方法。
// in your WatchKit Extension

// MARK: User Info
// use when your app needs all the data
// FIFO queue
extension WatchSessionManager {

    // Receiver
    func session(session: WCSession, didReceiveUserInfo userInfo: [String : AnyObject]) {
        // handle receiving user info
        // this will be filled in in the Updating Data section below
    }

}
更新数据
现在你接收到了数据,我们开始处理最棘手的部分。尝试去更新你的 Watch 扩展的 InterfaceController 以及其他视图或者数据源。一种方式是使用 NSNotificationCenter,但是我会尝试使用不同的方法。这个部分可以用多种方法来做,并且对于这个应用来说有点过度设计,因此要先说清楚。
因为我们正在写 Swift,我的目标是尽量使用值类型模型。不幸的是,正如我在 WCSession 中所提到的,WCSessionDelegate只能在一个NSObject 中实现。变通一下,我创建了一个可以携带用户信息数据的 DataSource 值,然后把它转换为可供多个交互控制器使用的可变的东西。因为用户信息是在一个 FIFO 队列顺序接收的,DataSource 应该持续追踪在队列中接收的数据。
   // in your WatchKit Extension
    struct DataSource {
    let items: [Item]
    enum Item {
        case Food(String)
        case Unknown
    }
    init(items: [Item] = [Item]()) {
        self.items = items
    }
    func insertItemFromData(data: [String : AnyObject]) -> DataSource {
        let updatedItems: [Item]
        if let foodItem = data["foodItem"] as? String {
            updatedItems = [.Food(foodItem)] + items
        } else {
            updatedItems = [.Unknown] + items
        }
        return DataSource(items: updatedItems)
    }
}
我可以现在设置一个 protocol ,通过更新的数据源更新所有需要知道数据改变的部分:
// in your WatchKit Extension
//  WatchSessionManager.swift

protocol DataSourceChangedDelegate {
    func dataSourceDidUpdate(dataSource: DataSource)
}
现在让我们进入有趣的部分!你的WatchSessionManager将会以某种方式去追踪所有的dataSourceChangedDelegates。这可以通过一个数组以及一组可以添加和删除数组delegate的方法实现。WatchSessionManager还需要持续追踪最近的DataSource拷贝,这样就可以使用DataSource中的数据创建一个包含最新数据的DataSource:
 // in your WatchKit Extension
    //  WatchSessionManager.swift

    class WatchSessionManager: NSObject, WCSessionDelegate {
    static let sharedManager = WatchSessionManager()
    private override init() {
        super.init()
    }

    private let session: WCSession = WCSession.defaultSession()

    private var dataSource = DataSource()
    private var dataSourceChangedDelegates = [DataSourceChangedDelegate]()

    func startSession() {
        session.delegate = self
        session.activateSession()
    }

    func addDataSourceChangedDelegate(delegate: T) {
        dataSourceChangedDelegates.append(delegate)
    }

    func removeDataSourceChangedDelegate(delegate: T) {
        for (index, dataSourceDelegate) in dataSourceChangedDelegates.enumerate() {
            if let dataSourceDelegate = dataSourceDelegate as? T where dataSourceDelegate == delegate {
                dataSourceChangedDelegates.removeAtIndex(index)
                break
            }
        }
    }
    }
下面实现接收用户信息的方法:
// in your WatchKit Extension
//  WatchSessionManager.swift
// MARK: User Info
// use when your app needs all the data
// FIFO queue
extension WatchSessionManager {
// Receiver
func session(session: WCSession, didReceiveUserInfo userInfo: [String : AnyObject]) {
    // handle receiving user info
    dispatch_async(dispatch_get_main_queue()) { [weak self] in

        if let dataSource = self?.dataSource.insertItemFromData(userInfo) {
            self?.dataSource = dataSource
            self?.dataSourceChangedDelegates.forEach {
                $0.dataSourceDidUpdate(dataSource)
            }
        }
    }
}
}
现在我们只需要确保我们的InterfaceController继承了DataSourceChangedDelegate,并且被WatchSessionManager持续追踪:
    // in your WatchKit Extension
    //  InterfaceController.swift
    class InterfaceController: WKInterfaceController, DataSourceChangedDelegate {
    @IBOutlet var foodTable: WKInterfaceTable!

    override func awakeWithContext(context: AnyObject?) {
        super.awakeWithContext(context)

        WatchSessionManager.sharedManager.addDataSourceChangedDelegate(self)
        loadTableData(DataSource())
    }

    override func didDeactivate() {

        // remove InterfaceController as a dataSourceChangedDelegate
        // to prevent memory leaks
        WatchSessionManager.sharedManager.removeDataSourceChangedDelegate(self)
        super.didDeactivate()
    }

    // MARK: DataSourceUpdatedDelegate
    // update the table once the data is changed!
    func dataSourceDidUpdate(dataSource: DataSource) {
        loadTableData(dataSource)
    }
    }
    private extension InterfaceController {

    private func loadTableData(dataSource: DataSource) {

        foodTable.setNumberOfRows(dataSource.items.count, withRowType: "FoodTableRowController")

        for (index, item) in dataSource.items.enumerate() {
            if let row = foodTable.rowControllerAtIndex(index) as? FoodTableRowController {
                switch item {
                case .Food(let foodItem):
                    row.foodLabel.setText(foodItem)
                case .Unknown:
                    row.foodLabel.setText("¯\\_(ツ)_/¯")
                }

            }
        }

    }
}
就是这样啦!
你可以在Github上查看完整源代码!
本文由 SwiftGG 翻译组翻译,已经获得作者翻译授权,最新文章请访问 http://swift.gg。