在谈及面向对象编程的时候,总是离不开 对象 与 类 。对象 是对客观事物的抽象,类 是对 对象 的抽象。它们的关系是,对象 是 类 的实例,类 是 对象 的模板。
Object-C 是基于 类 的对象系统。类 作为对象的模板创建了类,对象的信息存储在 类 中。那么 类 的结构是什么样子呢?
// 类的实例 (即对象)
struct objc_object {
    isa_t isa;
}

// 类
struct objc_class : objc_object {
    // Class ISA;
    Class superclass;
    cache_t cache;             // formerly cache pointer and vtable
    class_data_bits_t bits;    // class_rw_t * plus custom rr/alloc flags
}
从源码可以看出,objc_class 是继承自 objc_object 的,也就是说 类 也是一个对象。这也是万物皆对象的由来。因其继承自 objc_object ,自然默认就含有了 objc_object 的成员 isa。
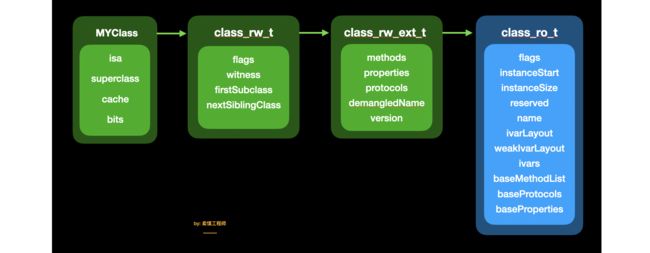
我们将类的结构用图表示如下:

isa : 其中 isa 在 看透 isa 中已做了详细的解释,感兴趣的读者可以看这篇文章:看透 isa
superclass : superclass 的类型 依然是Class, 指向了类的父类。
cache : cache 是方法缓存列表,存储了最近调用的方法。
bits : bits 的类型为 class_data_bits_t ,存储了类中更详细的信息。
1、class_data_bits_t 结构分析
struct class_data_bits_t {
    friend objc_class;

    // Values are the FAST_ flags above.
    uintptr_t bits;

public:

    class_rw_t* data() const {
        return (class_rw_t *)(bits & FAST_DATA_MASK);
    }
    void setData(class_rw_t *newData)
    {
        ASSERT(!data()  ||  (newData->flags & (RW_REALIZING | RW_FUTURE)));
        // Set during realization or construction only. No locking needed.
        // Use a store-release fence because there may be concurrent
        // readers of data and data's contents.
        uintptr_t newBits = (bits & ~FAST_DATA_MASK) | (uintptr_t)newData;
        atomic_thread_fence(memory_order_release);
        bits = newBits;
    }
}
在64位架构CPU下,bits 的第3到第46字节存储 class_rw_t 。class_rw_t 中存储 flags 、witness、firstSubclass、nextSiblingClass 以及 class_rw_ext_t。
struct class_rw_ext_t {
    const class_ro_t *ro;
    method_array_t methods;
    property_array_t properties;
    protocol_array_t protocols;
    char *demangledName;
    uint32_t version;
};
class_rw_ext_t 中存储着 class_ro_t 和 methods(方法列表)、properties(属性列表)、protocols(协议列表)等信息。
而 class_ro_t 中也存储了 baseMethodList(方法列表)、baseProperties(属性列表)、baseProtocols(协议列表) 以及 实例变量、类的名称、大小 等等信息。
struct class_ro_t {
    uint32_t flags;
    uint32_t instanceStart;
    uint32_t instanceSize;
#ifdef __LP64__
    uint32_t reserved;
#endif

    const uint8_t * ivarLayout;

    const char * name;
    method_list_t * baseMethodList;
    protocol_list_t * baseProtocols;
    const ivar_list_t * ivars;

    const uint8_t * weakIvarLayout;
    property_list_t *baseProperties;
};
苹果的工程师为什么要这样设计一个类的结构呢?
我们需要从类的编译期开始了解:
当类被编译的时候,二进制类在磁盘中的表示如下:

首先是类对象本身,包含最常访问的信息:指向元类(isa),超类(superclass)和方法缓存(cache)的指针,它还具有指向包含更多数据的结构体 class_ro_t 的指针,包含了类的名称,方法,协议,实例变量等等 编译期确定 的信息。其中 ro 表示 read only 的意思。
当类第一次从磁盘加载到内存时,它们总是以这样的形式开始布局的,但是一旦使用它们,就会发生改变:
当类被 Runtime 加载之后,类的结构会发生一些变化,在了解这些变化之前,我们需要知道2个概念:
Clean Memory:加载后不会发生更改的内存块,class_ro_t 属于 Clean Memory,因为它是只读的。
Dirty Memory:运行时会发生更改的内存块,类结构一旦被加载,就会变成 Dirty Memory,因为运行时会向它写入新的数据。例如,我们可以通过 Runtime 给类动态的添加方法。
这里要明确,Dirty Memory 比 Clean Memory 要昂贵得多。因为它需要更多的内存信息,并且只要进程正在运行,就必须保留它。另一方面, Clean Memory 可以进行移除,从而节省更多的内存空间,因为如果你需要 Clean Memory ,系统可以从磁盘中重新加载。
Dirty Memory 是这个类数据 被分成两部分的原因。
对于我们来说,越多的 Clean Memory 显然是更好的,因为它可以 节约更多的内存。我们可以通过分离出永不更改的数据部分,将大多数类数据保留为 Clean Memory,应该怎么做呢?
在介绍优化方法之前,我们先来看一下,在类加载之后,类的结构会变成如何呢?

在类首次被使用的时候,runtime会为它分配额外的存储容量,用于 读取/写入 数据的一个结构体 class_rw_t。
在这个结构体中,存储了只有在运行时才会生成的新信息。例如:所有的类都会链接成一个树状结构,这是通过 firstSubclass 和 nextSiblingClass指针实现的,这允许runtime遍历当前使用的所有的类。但是为什么在这里还要有方法列表和属性列表等信息呢? 因为他们在运行时是可以更改的。当 category 被加载的时候,它可以向类中添加新的方法。而且程序员也可以通过runtime API 动态的添加。
class_ro_t是只读的,存放的是 编译期间就确定 的字段信息;而class_rw_t是在 runtime 时才创建的,它会先将class_ro_t的内容拷贝一份,再将类的分类的属性、方法、协议等信息添加进去,之所以要这么设计是因为 Objective-C 是动态语言,你可以在运行时更改它们方法,属性等,并且分类可以在不改变类设计的前提下,将新方法添加到类中。
因为 class_ro_t 是只读的,所以我们需要在 class_rw_t 中追踪这些东西。而这样做,显然是会占用相当多的内存的。
事实证明,class_rw_t 会占用比 class_ro_t 占用更多的内存,在Apple的测试中,iPhone在系统中大约有 30MB 的 class_rw_t 结构。应该如何优化这些内存呢?
通过测量实际设备上的使用情况,大约只有 10% 的类实际会存在动态的更改行为(如动态添加方法,使用 Category 方法等)。因此,苹果的工程师 把这些动态的部分提取了出来单独放在一个区域,我们称之为 class_rw_ext_t,这样的设计使得 class_rw_t 的大小减少了一半, 所以,结构会变成这个样子。
大约90%的类从来不需要这些扩展数据,经过拆分,可以把 90% 的类优化为 Clean Memory,在系统层面,苹果测试了取得的效果是,大约节省了 14MB 的内存,使内存可用于更有效的用途。
2. catch_t 分析
实例方法存储在 类 中,类方法存储在 元类 中。在方法的查找流程中,我们可以根据 isa 与 superclass 的指向一步步查找 响应消息。
cache_t 中存储的是方法的缓存列表,之所以设计 方法缓存列表 存储在类的结构中,是为了更快的响应消息的发送。因为在缓存中查找要比一步步通过 isa 和 superclass 查找要快得多。
2.1 cache_t 结构
我们先看一下 cache_t 的结构
#define CACHE_MASK_STORAGE_OUTLINED 1
#define CACHE_MASK_STORAGE_HIGH_16 2
#define CACHE_MASK_STORAGE_LOW_4 3
#if defined(__arm64__) && __LP64__
#define CACHE_MASK_STORAGE CACHE_MASK_STORAGE_HIGH_16
#elif defined(__arm64__) && !__LP64__
#define CACHE_MASK_STORAGE CACHE_MASK_STORAGE_LOW_4
#else
#define CACHE_MASK_STORAGE CACHE_MASK_STORAGE_OUTLINED
#endif
struct cache_t {
#if CACHE_MASK_STORAGE == CACHE_MASK_STORAGE_OUTLINED
explicit_atomic _buckets;
explicit_atomic _mask;
#elif CACHE_MASK_STORAGE == CACHE_MASK_STORAGE_HIGH_16
explicit_atomic _maskAndBuckets;
mask_t _mask_unused;
#elif CACHE_MASK_STORAGE == CACHE_MASK_STORAGE_LOW_4
explicit_atomic _maskAndBuckets;
mask_t _mask_unused;
#else
#error Unknown cache mask storage type.
#endif
#if __LP64__
uint16_t _flags;
#endif
uint16_t _occupied;
explicit_atomic 是将普通指针转换为原子指针的操作,为了线程安全。所以这里我们关注 _buckets 的类型 struct bucket_t
struct bucket_t {
private:
#if __arm64__
explicit_atomic _imp;
explicit_atomic _sel;
#else
explicit_atomic _sel;
explicit_atomic _imp;
#endif
template
// 赋值 sel作为key imp作为value
void set(SEL newSel, IMP newImp, Class cls);
};
尽管不同CPU架构下的名称以及存储方式不同,但作用都是一样的,我们可以将 cache_t 的结构简单理解如下的表现形式:
[图片上传失败...(image-abd7a5-1600351301148)]
其中:
-
_buckets:是一个散列表,用来存储 缓存方法的 sel 和 imp。 -
_mask: 有2个作用,① 作为当前可存储的最大容量;② 作为掩码,取已缓存方法在 _buckets 中的下标。(后面会讲到) -
_occupied_buckets 中 已缓存的方法数量。
cache_t 的基本工作结构就是如上所示的,那么它具体是如何工作的呢? 它是如何存储的? 存储的最大容量是多少? 超出容量又如何处理呢?
我们先做个小测试,实际看一下 cache_t 中存储的内容。准备 Person 类 继承自 NSObject , 创建若干方法。
Person *p = [[Person alloc] init];
[p instanceMethod1];
[p instanceMethod2];
[p instanceMethod3];
[p instanceMethod4];
[p instanceMethod5];
[p instanceMethod6];
[p instanceMethod7];
[p instanceMethod8];
在instanceMethod1之前打断点,通过lldb调试工具,查看p的类的内存结构
(lldb) x/4gx p.class
0x100002488: 0x0000000100002460 0x0000000100334140
0x100002498: 0x0000000100680ff0 0x0005801000000007
前面类的结构中,我们已知类的内存布局,是以 isa、superclass、cache_t、class_data_bits_t 顺序排布的,其中 isa 与 superclass 分别占用8个字节,所以 cache_t 的位置应该是从类的首地址偏移16字节的位置,所以我们取 0x100002488 偏移 16字节,即 0x100002498 的地址。这里注意类型的转换。
(lldb) p (cache_t *)0x100002498
(cache_t *) $1 = 0x0000000100002498
取 cache_t 的值
(lldb) p (cache_t *)0x100002498
(cache_t *) $1 = 0x0000000100002498
(lldb) p *$1
(cache_t) $2 = {
  _buckets = {
    std::__1::atomic = 0x0000000100680ff0 {
      _sel = {
        std::__1::atomic = 0x00007fff75c3186
      }
      _imp = {
        std::__1::atomic = 4047440
      }
    }
  }
  _mask = {
    std::__1::atomic = 3
  }
  _flags = 32784
  _occupied = 1
}
其中 _buckets 中存储 sel 的地址 和 编码后的 imp;_mask 为3,_occupied 为1(虽然 自定义的实例方法还没有调用,但是 init方法已执行,所以此处为1),我们继续增加调用方法的数量,观察_mask 与_occupied 的取值,记录如下。
| 调用的方法数量 | 0 | 1 | 2 | 3 | 4 | 5 | 6 | 7 | 8 |
|---|---|---|---|---|---|---|---|---|---|
| _mask的值 | 0 | 3 | 3 | 7 | 7 | 7 | 7 | 7 | 15 |
| _occupied的值 | 0 | 1 | 2 | 1 | 2 | 3 | 4 | 5 | 1 |
我们发现,_mask 的值随着方法的调用数量在增加,但是 _occupied 的值似乎增加到一定程度后会回到1的值,带着这样的疑问,我们看看 cache_t 是如何存储的。
2.2 如何存?
一旦消息得以成功发送(msgSend( )),就会调用 cache_fill 开始加入缓存的流程
void cache_fill(Class cls, SEL sel, IMP imp, id receiver)
{
runtimeLock.assertLocked();
#if !DEBUG_TASK_THREADS
// Never cache before +initialize is done
if (cls->isInitialized()) {
cache_t *cache = getCache(cls);
#if CONFIG_USE_CACHE_LOCK
mutex_locker_t lock(cacheUpdateLock);
#endif
cache->insert(cls, sel, imp, receiver);
}
#else
_collecting_in_critical();
#endif
}
如果类已初始化完毕,就会进入 cache->insert 插入缓存
// 插入缓存信息
ALWAYS_INLINE
void cache_t::insert(Class cls, SEL sel, IMP imp, id receiver)
{
#if CONFIG_USE_CACHE_LOCK
cacheUpdateLock.assertLocked();
#else
runtimeLock.assertLocked();
#endif
ASSERT(sel != 0 && cls->isInitialized());
/**
1注: 下面这一部分为初始化的过程,如果 occupied()为0, 并且buckets中无缓存内容 ,
则开辟 4 个存储空间大小 为默认初始值。
*/
mask_t newOccupied = occupied() + 1; // 即将要占用的数 = 已占用数+ 1
unsigned oldCapacity = capacity(), capacity = oldCapacity; // 获取目前已占用数
if (slowpath(isConstantEmptyCache())) { // 如果缓存是空的
if (!capacity) capacity = INIT_CACHE_SIZE;// 如果capacity 为0 初始化为4
reallocate(oldCapacity, capacity, /* freeOld */false); // 根据当前内容分配空间
}
/**
2注: 以下为判断空间是否足够过程
如果空间不足, 扩容到原空间大小的2倍值,并重新分配空间大小
并释放已存储的缓存,插入新缓存
*/
// arm64下 如果 newOccupied <= 容量的4分之3,存储空间还足够,不需额外处理
else if (fastpath(newOccupied + CACHE_END_MARKER <= capacity / 4 * 3)) {
// Cache is less than 3/4 full. Use it as-is.
}
// 如果超过 4分之3
else {
// 扩容为原空间的 2倍大小
capacity = capacity ? capacity * 2 : INIT_CACHE_SIZE;
if (capacity > MAX_CACHE_SIZE) {
capacity = MAX_CACHE_SIZE; // 最大不能 超出 1<< 16
}
reallocate(oldCapacity, capacity, true); // 重新分配空间 存储新的数据,抹除已有缓存
}
/**
3注: 以下为插入缓存的过程
遍历 buckets()内容,如果在缓存中找到了 传入的方法,直接退出
如果在缓存中没有找到 传入的方法 将_occupied ++;,并且将方法存入缓存
如果遇到hash冲突, cache_t查找下一个 直到回到begin 全部查找结束
*/
// 获取散列表
bucket_t *b = buckets();
// 获取散列表大小 - 1
mask_t m = capacity - 1;
// 通过cache_hash函数【begin = sel & m】计算出key值 k 对应的 index值
// begin,用来记录查询起始索引
mask_t begin = cache_hash(sel, m);
// begin 赋值给 i,用于切换索引
mask_t i = begin;
do {
if (fastpath(b[i].sel() == 0)) { // 如果没有找到缓存的方法
incrementOccupied(); // _occupied ++;
b[i].set(sel, imp, cls); // 缓存实例方法
return;
}
if (b[i].sel() == sel) { // 如果找到需要缓存的方法,什么都不做,并退出循环
return;
}
} while (fastpath((i = cache_next(i, m)) != begin));
// 当出现hash碰撞 cache_t查找下一个 直到回到begin 全部查找结束
cache_t::bad_cache(receiver, (SEL)sel, cls);
}
cache->insert 函数大致做了 3件事
- 初始化缓存空间
- 判断是否需要扩容,如果需要,以原始空间的2倍扩容,重新分配空间,释放已有缓存信息
- 根据散列表中是否已有该方法的缓存情况插入缓存
更为详细的内容为:
-
- 初始化缓存空间
如果缓存空间还没有初始化,我们要对缓存空间进行初始化操作,默认开辟4个 bucket_t 大小的存储空间 ( 4 来自于if (!capacity) capacity = INIT_CACHE_SIZE)
    INIT_CACHE_SIZE_LOG2 = 2,
    INIT_CACHE_SIZE      = (1 << INIT_CACHE_SIZE_LOG2),
    // 1 << 2  = 4
得到初始化所需空间大小的值后,然后调用 reallocate(oldCapacity, capacity, /* freeOld */false); 这里的freeOld 传入的是 false,因为是刚初始化的空间,不存在已有的缓存,不需要清理。
ALWAYS_INLINE
void cache_t::reallocate(mask_t oldCapacity, mask_t newCapacity, bool freeOld)
{
    bucket_t *oldBuckets = buckets();
    // 开辟空间
    bucket_t *newBuckets = allocateBuckets(newCapacity);

    ASSERT(newCapacity > 0);
    ASSERT((uintptr_t)(mask_t)(newCapacity-1) == newCapacity-1);

    setBucketsAndMask(newBuckets, newCapacity - 1);

    // 释放旧的缓存信息
    if (freeOld) {
        cache_collect_free(oldBuckets, oldCapacity);
    }
}
bucket_t *allocateBuckets(mask_t newCapacity)
{
    bucket_t *newBuckets = (bucket_t *)
        calloc(cache_t::bytesForCapacity(newCapacity), 1);

    bucket_t *end = cache_t::endMarker(newBuckets, newCapacity);

#if __arm__
    end->set((SEL)(uintptr_t)1, (IMP)(newBuckets - 1), nil);
#else
    end->set((SEL)(uintptr_t)1, (IMP)newBuckets, nil);
#endif

    if (PrintCaches) recordNewCache(newCapacity);

    return newBuckets;
}
reallocate函数中 通过 allocateBuckets函数的 calloc 向系统申请 newCapacity 大小的空间;
并且通过 setBucketsAndMask 设置 buckets 和 mask,其中 mask 更新为 新申请的总空间大小 - 1 (capacity - 1);
初始化时的默认空间大小为 4(capacity) ,且如需扩容的时候 进行2倍 (capacity) 扩容,所以新空间大小一直为 4 的整数倍,如 4,8,16,32...,那么 mask 的大小(capacity -1)的取值为 3,7,15,31...。
-
- 判断是否需要扩容,如需扩容,按原容量2倍扩容, 重新分配空间,释放已有缓存信息 _occupied = 0
初始空间开辟完毕之后,在进行方法缓存的时候,还需要判断空间是否够用,这很好理解,因为初始化时默认的空间大小为4。扩容是依据当前 空间大小(capacity) 以及 已占用数(occupied) 的情况进行扩容。
扩容的条件为:当前已占用的存储数(occupied)是否超过当前开辟容量(capacity)的4分之3。如果大于,则重新开辟为原容量(capacity)的2倍,进行扩容。且最大容量不能超过 MAX_CACHE_SIZE = 1<<16。
 capacity = capacity ? capacity * 2 : INIT_CACHE_SIZE;
 if (capacity > MAX_CACHE_SIZE) {
       capacity = MAX_CACHE_SIZE;  //  最大不能 超出 1<< 16
 }
扩容的空间计算完毕之后,依然要重新调用 reallocate 函数重新分配存储空间,只不过这一次
调用 reallocate(oldCapacity, capacity, /* freeOld */true); 这里的 freeOld 传入的是 true。释放已有的方法缓存。将已存储的缓存依次置空。
-
- 插入缓存
所需空间已全部准备完毕,接下来就是存储当前传入的方法了。
    // 获取散列表
    bucket_t *b = buckets();
    // 获取散列表总长度 - 1 该值= mask的值
    mask_t m = capacity - 1;

    mask_t begin = cache_hash(sel, m);

    mask_t i = begin;

    do {
        if (fastpath(b[i].sel() == 0)) {  // 如果没有找到缓存的方法
            incrementOccupied(); //  _occupied ++;
            b[i].set(sel, imp, cls); // 缓存实例方法
            return;
        }
        if (b[i].sel() == sel) {  // 如果找到需要缓存的方法,什么都不做,并退出循环
            // The entry was added to the cache by some other thread
            // before we grabbed the cacheUpdateLock.
            return;
        }
    } while (fastpath((i = cache_next(i, m)) != begin));
这一步是在散列表的遍历中进行的:
begin 作为 散列表 的初始查询下标,是经过 sel & mask 计算而来的
static inline mask_t cache_hash(SEL sel, mask_t mask)
{
    // 取 & 计算索引
    return (mask_t)(uintptr_t)sel & mask;
}
mask 值 始终为 capacity - 1,之前我们提到他可能的值为3,7,15,31...,用二进制表示为 00000001,00000011,00000111,00001111,所以取任意值 & mask 必定小于等于mask,这一步 sel & mask 的操作确保了 begin 的值不会超过总容量-1,以确保遍历的时候下标不会超出 capacity ,出现越界的情况。
do ... while 循环的条件是 (i = cache_next(i, m) != begin ,判断不等于初始下标值 begin 是为了将散列表中的数据全部遍历结束,而cache_next( ) 是为了解决哈希冲突而进行的二次哈希。
static inline mask_t cache_next(mask_t i, mask_t mask) {
    return (i+1) & mask;
}
接着 根据下标值 遍历查找 buckets( ) ,如果找到sel,说明方法已经缓存,直接return,退出遍历。
如果直至遍历结束依然没有在缓存中找到该方法,则将该方法存入 _bucket ,并更新已占用存储数(occupied++)。
整个过程如下所示:

小结:方法的缓存是以散列表的形式进行存储的,所以它是无序的,当 当前缓存数量 超过 散列表 总存储空间的四分之三时,散列表的存储空间以2倍的原始大小进行扩容,并抹除已有缓存。存储缓存时,是通过遍历当前散列表的所有已存储方法,如果散列表中已有缓存,则不存储并结束遍历,如果遍历完毕依然没有找到该方法,则将该方法存入散列表。
Tip:
为什么在缓存容量达到总容量的3/4时进行扩容?这是一个选择的适当值,因为在哈希表这种数据结构里面,其性能受装载因子影响,装载因子可以用来表示空位率的大小,其公式为:
装载因子 = 已填入的容量 / 散列表的总容量。装载因子越大,说明空闲的位置越少,冲突的可能性越多,散列表的性能会下降。尽可能小的装载因子可以提高散列表的性能,同时太小的值又容易触发扩容条件,所以这里苹果设计了这样一个的适当的值。
2.3 如何取?
cache_t 的取出操作是通过 cache_getImp(cls, sel) 函数 ,该代码是使用汇编语言编写的,我们以 arm64架构 为例
STATIC_ENTRY _cache_getImp

    GetClassFromIsa_p16 p0
    CacheLookup GETIMP, _cache_getImp

LGetImpMiss:
    mov p0, #0
    ret

    END_ENTRY _cache_getImp
通过 GetClassFromIsa_p16 取到 类信息 执行 CacheLookup GETIM 在类中 查找 imp,
.macro CacheLookup

LLookupStart$1:

    // p1 = SEL, p16 = isa
    ldr p11, [x16, #CACHE]              // p11 = mask|buckets

#if CACHE_MASK_STORAGE == CACHE_MASK_STORAGE_HIGH_16
    and p10, p11, #0x0000ffffffffffff   // p10 = buckets
    and p12, p1, p11, LSR #48       // x12 = _cmd & mask
#elif CACHE_MASK_STORAGE == CACHE_MASK_STORAGE_LOW_4
    and p10, p11, #~0xf         // p10 = buckets
    and p11, p11, #0xf          // p11 = maskShift
    mov p12, #0xffff
    lsr p11, p12, p11               // p11 = mask = 0xffff >> p11
    and p12, p1, p11                // x12 = _cmd & mask
#else
#error Unsupported cache mask storage for ARM64.
#endif


    add p12, p10, p12, LSL #(1+PTRSHIFT)
                     // p12 = buckets + ((_cmd & mask) << (1+PTRSHIFT))

    ldp p17, p9, [x12]      // {imp, sel} = *bucket
1:  cmp p9, p1          // if (bucket->sel != _cmd)
    b.ne    2f          //     scan more
    CacheHit $0         // call or return imp

2:  // not hit: p12 = not-hit bucket
    CheckMiss $0            // miss if bucket->sel == 0
    cmp p12, p10        // wrap if bucket == buckets
    b.eq    3f
    ldp p17, p9, [x12, #-BUCKET_SIZE]!  // {imp, sel} = *--bucket
    b   1b          // loop

3:  // wrap: p12 = first bucket, w11 = mask
#if CACHE_MASK_STORAGE == CACHE_MASK_STORAGE_HIGH_16
    add p12, p12, p11, LSR #(48 - (1+PTRSHIFT))
                    // p12 = buckets + (mask << 1+PTRSHIFT)
#elif CACHE_MASK_STORAGE == CACHE_MASK_STORAGE_LOW_4
    add p12, p12, p11, LSL #(1+PTRSHIFT)
                    // p12 = buckets + (mask << 1+PTRSHIFT)
#else
#error Unsupported cache mask storage for ARM64.
#endif

    // Clone scanning loop to miss instead of hang when cache is corrupt.
    // The slow path may detect any corruption and halt later.

    ldp p17, p9, [x12]      // {imp, sel} = *bucket
1:  cmp p9, p1          // if (bucket->sel != _cmd)
    b.ne    2f          //     scan more
    CacheHit $0         // call or return imp

2:  // not hit: p12 = not-hit bucket
    CheckMiss $0            // miss if bucket->sel == 0
    cmp p12, p10        // wrap if bucket == buckets
    b.eq    3f
    ldp p17, p9, [x12, #-BUCKET_SIZE]!  // {imp, sel} = *--bucket
    b   1b          // loop

LLookupEnd$1:
LLookupRecover$1:
3:  // double wrap
    JumpMiss $0

.endmacro
可以通过查看右侧的注释,其实就是从 类的结构中 找到 cache_t,取到 buckets ,遍历查找其所存储的sel imp,命中则返回 imp,否则,return NULL。
这样就实现了 cache_t 的存取,为 msgSend( )的快速查找流程提供了尽可能快的条件。