重拾Java基础知识:NIO
NIO
- 前言
-
- NIO概述
-
- Channel(通道)
- Buffer(缓冲区)
- Scatter(分散) / Gather(聚集)
- Channel to Channel Transfers(通道之间传输)
- Selector(选择器)
- Pipe(管道)
- AsynchronousFileChannel
- NIO与IO
- 基本类型获取
- 视图缓冲区
- 字节存储次序
- 缓冲区数据操作
- 缓冲区细节
- 内存映射文件
- 文件锁定
前言
Java 新I/O 库是在 1.4 版本引入到
Java .nio.* package中的,旨在更快速。
实际上,新 I/O 使用 NIO(同步非阻塞)的方式重写了老的 I/O 了,因此它获得了 NIO 的种种优点。即使我们不显式地使用 NIO 方式来编写代码,也能带来性能和速度的提高。这种提升不仅仅体现在文件读写(File I/O),同时也体现在网络读写(Network I/O)中。例如,网络编程。
速度的提升来自于使用了更接近操作系统 I/O 执行方式的结构:Channel(通道) 和 Buffer(缓冲区)。换句话说,我们不能直接和 Channel 交互; 我们需要与 Buffer 交互并将 Buffer 中的数据发送到 Channel 中;Channel 需要从 Buffer 中提取或放入数据。
NIO概述
在NIO中有几个比较关键的概念:Channel(通道),Buffer(缓冲区),Selector(选择器)。
Channel(通道)
Reader 和 Writer 字符模式的类是不产生通道的。但 java.nio.channels.Channels 类具有从通道中生成 Reader 和 Writer 的实用方法。Java NIO 通道与流类似,但有一些区别:
- 您可以读取和写入通道。流通常是单向的(读取或写入)。
- 通道可以异步读写。
- 通道总是从缓冲区读取或写入。

以下是常用的几种通道:
- FileChannel:从文件读或者向文件写入数据。
- DatagramChannel:以UDP协议来向网络连接的两端读写数据。
- SocketChannel:以TCP来向网络连接的两端读写数据。
- ServerSocketChannel:监听客户端发起的TCP连接,并为每个TCP连接创建一个新的SocketChannel来进行数据读写。
FileChannel无法设置为非阻塞模式,它总是运行在阻塞模式,下面创建通过案例来讲解FileChannel的读、写、关闭操作:
public class NewFileTest {
    public static void main(String[] args) throws IOException {
        RandomAccessFile randomAccessFile = new RandomAccessFile("C:\\mnt\\this.txt", "rw");
        FileChannel inChannel = randomAccessFile.getChannel();
        ByteBuffer byteBuffer = ByteBuffer.allocate(1024);
        //byteBuffer.put(ByteBuffer.wrap("this nio".getBytes()));生成的 ByteBuffer 存储
        int read = inChannel.read(byteBuffer);//将通道内容读取到缓冲区,返回-1,表示结尾
        //将缓存数据写入到通道
        byteBuffer.put("this nio".getBytes());
        byteBuffer.flip();
        inChannel.write(byteBuffer);
        //关闭通道
        inChannel.close();
    }
}
除此之外,你可能还会用到的一些方法:
public class NewFileTest {
    public static void main(String[] args) throws IOException {
        RandomAccessFile randomAccessFile = new RandomAccessFile("D:\\mnt\\this.txt", "rw");
        FileChannel inChannel = randomAccessFile.getChannel();
        System.out.println(inChannel.size());//返回文件大小
        System.out.println(inChannel.position());//在读写时,获取文件位置
        System.out.println(inChannel.truncate(2));//截取指定的文件大小
        inChannel.force(true);//将通道数据写入磁盘
    }
}
SocketChannel是一个连接到TCP网络套接字的通道。可以通过以下2种方式创建SocketChannel:
- 打开一个SocketChannel并连接到互联网上的某台服务器。
- 一个新连接到达ServerSocketChannel时,会创建一个SocketChannel。
下面案例中,实现了SocketChannel的打开,其余的读、写、关闭和之前的用法并无差别。
public class NewFileTest {
    public static void main(String[] args) throws IOException {
        SocketChannel socketChannel = SocketChannel.open(new InetSocketAddress("www.baidu.com",8080));
    }
}
在非阻塞的情况下,调用read()你需要关注它的返回值,调用write()方法你需要先判断连接是否成功,这样才能保证内容写出,你可以通过finishConnect()来判断连接是否成功:
public class NewFileTest {
    public static void main(String[] args) throws IOException {
        SocketChannel socketChannel = SocketChannel.open(new InetSocketAddress("www.baidu.com",80));
        socketChannel.configureBlocking(false);
        System.out.println(socketChannel.finishConnect());
        /** Output:
         *  true
         */
    }
}
ServerSocketChannel 是一个可以监听新进来的TCP连接的通道。通过 ServerSocketChannel.accept() 方法监听新进来的连接,因此, accept()方法会一直阻塞到有新连接到达。可以设置成非阻塞模式。在非阻塞模式下,accept() 方法会立刻返回,如果还没有新进来的连接,返回的将是null。
public class NewFileTest {
    public static void main(String[] args) throws IOException {
        ServerSocketChannel serverSocketChannel = ServerSocketChannel.open();
        serverSocketChannel.socket().bind(new InetSocketAddress(80));
        serverSocketChannel.configureBlocking(false);
        while (true){
            SocketChannel accept = serverSocketChannel.accept();
            if(accept != null){
                //todo
            }
        }
    }
}
DatagramChannel是一个能收发UDP包的通道。因为UDP是无连接的网络协议,所以不能像其它通道那样读取和写入。它通过send()方法发送数据包和receive()方法接收数据包。
public class NewFileTest {
    public static void main(String[] args) throws IOException {
        DatagramChannel datagramChannel = DatagramChannel.open();
        datagramChannel.socket().bind(new InetSocketAddress(99));//接受端口为99的数据包
        ByteBuffer byteBuffer = ByteBuffer.allocate(1024);
        byteBuffer.clear();
        //接收数据包内容到缓存,如果超过缓冲区,多出的数据将被丢弃。
        datagramChannel.receive(byteBuffer);
        //发送数据到指定地址
        datagramChannel.send(byteBuffer,new InetSocketAddress("www.baidu.com",80));
    }
}
Buffer(缓冲区)
与 NIO 通道交互时使用 Java NIO 缓冲区。如您所知,数据从通道读取到缓冲区,然后从缓冲区写入通道。
缓冲区本质上是一块内存,您可以将数据写入其中,然后您可以稍后再次读取。该内存块被包装在一个 NIO Buffer 对象中,该对象提供了一组方法,可以更轻松地使用内存块。读取和写入数据通常遵循以下 4 步小过程:
- 将数据写入缓冲区
- 调用
buffer.flip()准备好提取字节 - 从 Buffer 中读取数据
- 调用
buffer.clear()或buffer.compact()
对于只读访问,必须使用静态 allocate() 方法显式地分配 ByteBuffer,使用 allocateDirect()。当您将数据写入缓冲区时,缓冲区会跟踪您写入的数据量。一旦需要读取数据,就需要使用flip()方法调用将缓冲区从写入模式切换到读取模式,position设回0,并将limit设置成之前position的值。在读取模式下,缓冲区允许您读取写入缓冲区的所有数据。
读取所有数据后,您需要清除缓冲区,使其准备好再次写入。您可以通过两种方式执行此操作:调用clear()或调用 compact(). 该clear()方法清除整个缓冲区。该compact() 方法仅清除您已读取的数据。任何未读数据都被移动到缓冲区的开头,数据将在未读数据之后写入缓冲区。
compact()方法将所有未读的数据拷贝到Buffer起始处。然后将position设到最后一个未读元素正后面。limit属性依然像clear()方法一样,设置成capacity。现在Buffer准备好写数据了,但是不会覆盖未读的数据。
        try (FileInputStream fileInputStream = new FileInputStream("C:\\mnt\\this.txt")) {
            FileChannel channel = fileInputStream.getChannel();
            ByteBuffer byteBuffer = ByteBuffer.allocate(32);//创建32字节的缓冲区
            int read = channel.read(byteBuffer);//读取后存放缓存区
            while (read != -1) {
                byteBuffer.flip();
                while (byteBuffer.hasRemaining()) {
                    System.out.print((char)byteBuffer.get());//读取一个字节
                }
                byteBuffer.clear();
                read = channel.read(byteBuffer);
            }
        } catch (IOException e) {
            e.printStackTrace();
        }
        /** Output:
         * this is nio
         */
    }
缓冲区本质上是一块内存,您可以将数据写入其中,然后您可以稍后再次读取。该内存块被包装在一个 NIO Buffer 对象中,该对象提供了一组方法,可以更轻松地使用内存块。为了理解工作原理,您需要熟悉三个属性:
- capacity(容器):作为一个内存块,Buffer具有一定的固定大小,也称为“容量”。您只能将capacity字节、长整数、字符等写入缓冲区。一旦 Buffer 已满,您需要先清空它(读取数据或清除它),然后才能将更多数据写入其中。
- position(位置):当您将数据写入时Buffer,您会在某个位置执行此操作。最初的位置是 0。当一个字节,长等已被写入Buffer该位置时,该位置将前进以指向缓冲区中的下一个单元格以插入数据。位置可以最大限度地变为 capacity - 1。
- limit(限制):在写入模式下,Buffer的limit表示你最多能往Buffer里写多少数据。 写模式下,limit等于Buffer的capacity。当翻转Buffer到读取模式时,限制意味着您可以从数据中读取多少数据的限制。换句话说,您可以读取与写入一样多的字节(limit被设置成已写数据的数量,这个值在写模式下就是position)。
position和limit的含义取决于Buffer 是处于读模式还是写模式。无论缓冲模式如何,容量始终意味着相同。

Java NIO 有以下Buffer类型:
- ByteBuffer
- MappedByteBuffer
- CharBuffer
- DoubleBuffer
- FloatBuffer
- IntBuffer
- LongBuffer
- ShortBuffer
这些Buffer类型代表不同的数据类型。换句话说,它们允许您将缓冲区中的字节作为 char、short、int、long、float 或 double 来处理。
要想获得一个Buffer对象首先要进行分配。 每一个Buffer类都有一个allocate()方法。下面是一个分配1024字节capacity的ByteBuffer的例子:
public class NewFileTest {
    public static void main(String[] args) {
        ByteBuffer byteBuffer = ByteBuffer.allocate(1024);
    }
}
当然还有字符缓冲
public class NewFileTest {
    public static void main(String[] args) {
        CharBuffer charBuffer = CharBuffer.allocate(1024);
    }
}
如何将数据写入缓冲区?有两种方式:
- 从Channel写到Buffer。
- 通过Buffer的
put()方法写到Buffer里。
public class NewFileTest {
    public static void main(String[] args) {
        //方法一:
        ByteBuffer byteBuffer = ByteBuffer.allocate(1024);
        byteBuffer.put("hello".getBytes());
        //方法二:
        try(FileInputStream fileInputStream = new FileInputStream("C:\\mnt\\this.txt")) {
            FileChannel channel = fileInputStream.getChannel();
            channel.read(byteBuffer);
        } catch (FileNotFoundException e) {
            e.printStackTrace();
        } catch (IOException e) {
            e.printStackTrace();
        }
    }
}
如何将读取缓冲区数据?有两种方式:
- 从Buffer读取数据到Channel。
- 使用
get()方法从Buffer中读取数据。
public class NewFileTest {
    public static void main(String[] args) {
        //方法一:
        ByteBuffer byteBuffer = ByteBuffer.allocate(1024);
        byteBuffer.get();
        //方法二:
        try(FileInputStream fileInputStream = new FileInputStream("C:\\mnt\\this.txt")) {
            FileChannel channel = fileInputStream.getChannel();
            channel.write(byteBuffer);
        } catch (FileNotFoundException e) {
            e.printStackTrace();
        } catch (IOException e) {
            e.printStackTrace();
        }
    }
}
Scatter(分散) / Gather(聚集)
Java NIO 带有内置的Scatter/Gather支持。Scatter/Gather是用于读取和写入通道的概念。
-
来自通道的分散读取是一种将数据读取到多个缓冲区中的读取操作。因此,通道将数据从通道“分散”到多个缓冲区中。

-
对通道的聚集写入是一种将数据从多个缓冲区写入单个通道的写入操作。因此,通道将来自多个缓冲区的数据“收集”到一个通道中。

在您需要分别处理传输数据的各个部分的情况下,分散/聚集非常有用。例如,如果消息由标头和正文组成,您可以将标头和正文保存在单独的缓冲区中。这样做可能会使您更容易分别处理标题和正文。
public class NewFileTest {
    public static void main(String[] args) throws IOException {
        FileInputStream fileInputStream = new FileInputStream("C:\\mnt\\this.txt");
        ByteBuffer heard = ByteBuffer.allocate(1024);
        ByteBuffer content = ByteBuffer.allocate(1024);
        ByteBuffer[] byteBuffers = {heard,content};
        FileChannel channel = fileInputStream.getChannel();
        channel.read(byteBuffers);//分散读取
        channel.write(byteBuffers);//通道聚集
    }
}
一旦缓冲区已满,通道将继续填充下一个缓冲区。这意味着它不适合动态大小的消息部分。换句话说,如果你有一个heard 和一个content ,并且heard 是固定大小的(例如 128 字节),那么分散读取就可以正常工作。如果缓冲区的容量为 128 字节,但仅包含 58 字节,则只有 58 字节从该缓冲区写入通道。与分散读取相比,聚集写入适用于动态大小的消息部分。
Channel to Channel Transfers(通道之间传输)
在 Java NIO 中,如果其中一个通道是FileChannel. 该类FileChannel有一个transferTo() 和一个transferFrom()为您执行此操作的方法。
public class NewFileTest {
    public static void main(String[] args) throws IOException {
        RandomAccessFile formFile = new RandomAccessFile("C:\\mnt\\this.txt","rw");
        RandomAccessFile toFile = new RandomAccessFile("C:\\mnt\\this2.txt","rw");
        FileChannel formChannel = formFile.getChannel();
        FileChannel toChannel = toFile.getChannel();
        toChannel.transferFrom(formChannel,0,formChannel.size());
        formChannel.transferTo(0,formChannel.size(),toChannel);
    }
}

参数position和count,告诉目标文件从哪里开始写入(position),以及最大传输多少字节(count)。如果源通道的字节数少于count字节,则传输的字节数更少。
Selector(选择器)
Java NIO中Selector是一个组件,它可以检查一个或多个Java NIO 通道 实例,并确定哪些通道已准备好例如读取或写入。这样一个线程可以管理多个通道,从而管理多个网络连接。

Selector的创建,调用open()方法创建一个Selector:
public class NewFileTest {
    public static void main(String[] args) throws IOException {
        Selector selector = Selector.open();
    }
}
将通道注册到Selector,通过调用通道的register()方法会将它注册到一个选择器上,第二个参数表示感兴趣的通道,一共有四种类型:
- SelectionKey.OP_CONNECT(连接)
- SelectionKey.OP_ACCEPT(接受)
- SelectionKey.OP_READ(读)
- SelectionKey.OP_WRITE(写)
public class NewFileTest {
    public static void main(String[] args) throws IOException {
        ServerSocketChannel serverSocketChannel = ServerSocketChannel.open();
        Selector selector = Selector.open();
        serverSocketChannel.configureBlocking(false);
        int interestSet = SelectionKey.OP_READ | SelectionKey.OP_WRITE;//多个操作事件
        serverSocketChannel.register(selector, SelectionKey.OP_READ);
    }
}
与Selector一起使用时,Channel必须处于非阻塞模式下。这意味着不能将FileChannel与Selector一起使用,因为FileChannel不能切换到非阻塞模式。另外通道一旦被注册,将不能再回到阻塞状态,此时若调用通道的configureBlocking(true)将抛出BlockingModeException异常。你可以通过四个方法,来检测channel中什么事件或操作已经就绪:
isAcceptable()isConnectable()isReadable()isWritable()
通过SelectionKey访问对应的Selector和Channel,SelectionKey.channel()方法返回的通道需要转型成你要处理的类型,如ServerSocketChannel或SocketChannel等。:
public class NewFileTest {
    public static void main(String[] args) throws IOException {
        ServerSocketChannel serverSocketChannel = ServerSocketChannel.open();
        Selector selector = Selector.open();
        serverSocketChannel.configureBlocking(false);
        SelectionKey register = serverSocketChannel.register(selector, SelectionKey.OP_READ);
        SelectableChannel channel = register.channel();
        Selector selector2 = register.selector();
    }
}
你还可以附加对象:
public class NewFileTest {
    public static void main(String[] args) throws IOException {
        ServerSocketChannel serverSocketChannel = ServerSocketChannel.open();
        Selector selector = Selector.open();
        serverSocketChannel.configureBlocking(false);
        //1.在注册的时候直接绑定
        SelectionKey register = serverSocketChannel.register(selector, SelectionKey.OP_READ,object);
        //2.注册后绑定
        register.attach(object);
        //通过对应的SelectionKey取出该对象
        register.attachment();
        //取消对象
        register.attach(null);
    }
}
注意的是如果附加的对象不再使用,一定要手动清除,因为垃圾回收器不会回收该对象,若不清除的话会成内存泄漏。
一旦向Selector注册了一或多个通道,就可以调用几个重载的select()方法。这些方法返回你所感兴趣的事件(如连接、接受、读或写)已经准备就绪的那些通道。换句话说,如果你对“读就绪”的通道感兴趣,select()方法会返回读事件已经就绪的那些通道。
select()阻塞到至少有一个通道在你注册的事件上就绪了。select(long timeout)和select()一样,但最长阻塞事件为timeout毫秒。selectNow()非阻塞,只要有通道就绪就立刻返回。
public class NewFileTest {
    public static void main(String[] args) throws IOException {
        ServerSocketChannel serverSocketChannel = ServerSocketChannel.open();
        Selector selector = Selector.open();
        serverSocketChannel.configureBlocking(false);
        SelectionKey register = serverSocketChannel.register(selector, SelectionKey.OP_ACCEPT);
        System.out.println(selector.selectNow());
        /** Output:
         *  0
         */
    }
}
select()方法返回的int值表示有多少通道已经就绪。一旦调用了select()方法,并且返回值表明有一个或更多个通道就绪了,调用select()方法后阻塞了,即使没有通道已经就绪,只需要再select()方法之前调用Selector.wakeup()方法即可。阻塞在select()方法上的线程会立马返回。
public class NewFileTest {
    public static void main(String[] args) throws IOException {
        ServerSocketChannel serverSocketChannel = ServerSocketChannel.open();
        Selector selector = Selector.open();
        selector.wakeup();
        selector.select();
    }
}
然后可以通过调用selector的selectedKeys()方法,访问“已选择键集(selected key set)”中的就绪通道。
Set selectedKeys = selector.selectedKeys();
可以通过遍历调用SelectionKey的selectedKeySet()方法访问就绪的通道:
public class NewFileTest {
    public static void main(String[] args) throws IOException {
        ServerSocketChannel serverSocketChannel = ServerSocketChannel.open();
        Selector selector = Selector.open();
        SelectionKey register = serverSocketChannel.register(selector, SelectionKey.OP_CONNECT);
        Set<SelectionKey> selectionKeys = selector.selectedKeys();
        Iterator<SelectionKey> iterator = selectionKeys.iterator();
        while (iterator.hasNext()) {
            SelectionKey next = iterator.next();
            if (next.isAcceptable()) {
                //todo 一个连接被一个ServerSocketChannel接受
            } else if (next.isConnectable()) {
                //todo 远程服务器建立连接
            } else if (next.isReadable()) {
                //todo 一个频道已准备好可供阅读
            } else if (next.isWritable()) {
                //todo 通道已经准备好了
            }
            iterator.remove();
        }
    }
}
每次迭代末尾的keyIterator.remove()调用。Selector不会自己从已选择键集中移除SelectionKey实例。必须在处理完通道时自己移除。下次该通道变成就绪时,Selector会再次将其放入已选择键集中。
用完Selector后调用其close()方法会关闭该Selector,且使注册到该Selector上的所有SelectionKey实例无效。通道本身并不会关闭。
Pipe(管道)
管道是2个线程之间的单向数据连接。Pipe有一个source通道和一个sink通道。数据会被写到sink通道,从source通道读取
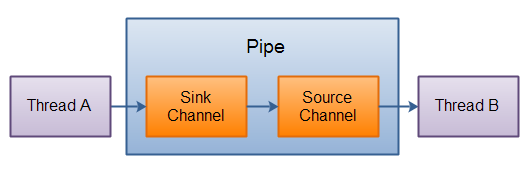
下面的案例,展示了如何从通道中写入数据后从另一个通道中读取数据
public class NewFileTest {
    public static void main(String[] args) throws IOException {
        Pipe pipe = Pipe.open();//打开管道
        Pipe.SinkChannel sink = pipe.sink();
        ByteBuffer byteBuffer = ByteBuffer.allocate(1024);
        byteBuffer.clear();
        byteBuffer.put("this is pipe".getBytes());
        byteBuffer.flip();
        int write = sink.write(byteBuffer);//向sink管道写入数据
        System.out.println(write);//Output: 12
        Pipe.SourceChannel source = pipe.source();
        ByteBuffer byteBuffer1 = ByteBuffer.allocate(1024);
        int read = source.read(byteBuffer1);//向source管道读取数据
        System.out.println(read);//Output: 12
    }
}
AsynchronousFileChannel
在Java 7,AsynchronousFileChannel 被添加到了Java NIO中。使用AsynchronousFileChannel可以实现异步地读取和写入文件数据。
public class NewFileTest {
    public static void main(String[] args) throws IOException {
        Path path = Paths.get("C:\\mnt\\this.txt");
        //第一个参数表示路径,第二个参数多选项,表示对文件进行的操作,这里进行读操作
        AsynchronousFileChannel asynchronousFileChannel = AsynchronousFileChannel.open(path,StandardOpenOption.READ);
        ByteBuffer byteBuffer = ByteBuffer.allocate(1024);
        //读取到缓存区,第二个参数表示读取数据的开始位置。
        Future<Integer> funcTrue = asynchronousFileChannel.read(byteBuffer, 0);
        //调用isDone() 方法检测读取过程是否完成
        while (funcTrue.isDone()) {
            byteBuffer.flip();
            byte[] data = new byte[byteBuffer.limit()];
            byteBuffer.get(data);
            System.out.println(new String(data));
            byteBuffer.clear();
        }
        //将缓存区数据写入通道
        ByteBuffer byteBuffer1 = ByteBuffer.allocate(1024);
        byteBuffer1.put("this write done".getBytes());
        byteBuffer1.flip();
        //从原缓存位置后面追加内容
        Future<Integer> write = asynchronousFileChannel.write(byteBuffer1, byteBuffer.position());
        while (!write.isDone()){
            System.out.println("Write done");
        }
    }
}
read() 方法会立即返回,即使整个读的过程还没有完全结束。尽管这样让cpu空转了一会,但是我们还是应该等读取操作完成后再进行后续的步骤。一旦读取完成,数据被存储到ByteBuffer,然后将数据转化为字符串既而输出。
NIO与IO
当我们掌握NIO和IO的基本使用后,我们应该学会不同场景下的使用,这或许影响你的代码设计。
| NIO | IO | 说明 |
|---|---|---|
| 面向缓存 | 面向流 | 存放缓存可以减少磁盘访问 |
| 非阻塞 | 阻塞 | 阻塞下的IO不能处理任何事情,直至数据完全写入或读取完毕;非阻塞情况下可以继续做其他事情 |
| 选择器 | - | 允许一个单独的线程来监视多个输入通道,你可以注册多个通道使用一个选择器,然后使用一个单独的线程来“选择”通道:这些通道里已经有可以处理的输入,或者选择已准备写入的通道。这种选择机制,使得一个单独的线程很容易来管理多个通道。 |
| 单线程多连接 | 单线程单连接 | 如果需要完成聊天室功能,完成多个角色的连接使用NIO,或许是一个不错的选择;如果你有少量的连接使用非常高的带宽,一次发送大量的数据,也许典型的IO服务器实现可能非常契合。 |
基本类型获取
虽然 ByteBuffer 只包含字节,但它包含了一些方法,用于从其所包含的字节中生成各种不同的基本类型数据。代码示例:
public class NewFileTest {
    public static void main(String[] args) throws IOException {
        ByteBuffer byteBuffer = ByteBuffer.allocate(1024);
        byteBuffer.rewind();
        // 保存和读取 char 数组:
        byteBuffer.asCharBuffer().put("nio");
        char c;
        while ((c = byteBuffer.getChar()) != 0) {
            System.out.print(c);
        }
        System.out.println();
        byteBuffer.rewind();
        // 保存和读取 double:
        byteBuffer.asDoubleBuffer().put(1.1);
        System.out.println(byteBuffer.getDouble());
        /** Output:
         *  nio
         *  1.1
         */
//        除此之外还有其他类型方法的保持读取:
//        byteBuffer.asFloatBuffer();
//        byteBuffer.asIntBuffer();
//        byteBuffer.asLongBuffer();
    }
}
将基本类型数据插入 ByteBuffer 的最简单方法就是使用 asCharBuffer()、asShortBuffer() 等方法获取该缓冲区适当的“视图”(View),然后调用该“视图”的 put() 方法。
视图缓冲区
“视图缓冲区”(view buffer)是通过特定的基本类型的窗口来查看底层 ByteBuffer。ByteBuffer 仍然是“支持”视图的实际存储,因此对视图所做的任何更改都反映在对 ByteBuffer 中的数据的修改中。
如前面的示例所示,这方便地将基本类型插入 ByteBuffer。视图缓冲区还可以从 ByteBuffer 读取基本类型数据,每次单个(ByteBuffer 规定),或者批量读取到数组。下面是一个通过 IntBuffer 在 ByteBuffer 中操作 int 的例子:
public class NewFileTest {
    public static void main(String[] args) throws IOException {
        ByteBuffer byteBuffer = ByteBuffer.allocate(1024);
        IntBuffer intBuffer = byteBuffer.asIntBuffer();
        intBuffer.put(new int[]{1,2,3,4,5});
        System.out.println(intBuffer.get(2));
        intBuffer.put(0,0);
        intBuffer.flip();
        while (intBuffer.hasRemaining()){
            System.out.print(intBuffer.get()+" ");
        }
        /** Output:
         *  3
         *  0 2 3 4 5
         */
    }
}
一旦底层 ByteBuffer 通过视图缓冲区填充了 int 或其他基本类型,那么就可以直接将该 ByteBuffer 写入通道。你可以轻松地从通道读取数据,并使用视图缓冲区将所有内容转换为特定的基本类型。
字节存储次序
不同的机器可以使用不同的字节存储顺序(Endians)来存储数据。“高位优先”(Big Endian):将最重要的字节放在最低内存地址中,而“低位优先”(Little Endian):将最重要的字节放在最高内存地址中。
当存储大于单字节的数据时,如 int、float 等,我们可能需要考虑字节排序问题。ByteBuffer 以“高位优先”形式存储数据;通过网络发送的数据总是使用“高位优先”形式。我们可以 使用 ByteOrder 的 order() 方法和参数 ByteOrder.BIG_ENDIAN 或 ByteOrder.LITTLE_ENDIAN 来改变它的字节存储次序。
public class NewFileTest {
    public static void main(String[] args) throws IOException {
        ByteBuffer byteBuffer = ByteBuffer.allocate(1024);
        CharBuffer charBuffer = byteBuffer.asCharBuffer().put("abcdef");
        System.out.println(Arrays.toString(byteBuffer.array()));
        byteBuffer.order(ByteOrder.BIG_ENDIAN);
        System.out.println(Arrays.toString(byteBuffer.array()));
        byteBuffer.rewind();
        byteBuffer.order(ByteOrder.LITTLE_ENDIAN);
        byteBuffer.asCharBuffer().put("abcdef");
        System.out.println(Arrays.toString(byteBuffer.array()));
        /** Output:
         *  [0, 97, 0, 98, 0, 99, 0, 100, 0, 101, 0, 102,...]
         *  [0, 97, 0, 98, 0, 99, 0, 100, 0, 101, 0, 102,...]
         *  [97, 0, 98, 0, 99, 0, 100, 0, 101, 0, 102, 0,...]
         */
    }
}
ByteBuffer 分配空间将 charArray 中的所有字节作为外部缓冲区保存,因此可以调用 array() 方法来显示底层字节。array() 方法是“可选的”,你只能在数组支持的缓冲区上调用它,否则将抛出 UnsupportedOperationException 异常。
charArray 通过 CharBuffer 视图插入到 ByteBuffer 中。当显示底层字节时,默认排序与后续“高位”相同,而“地位”交换字节
缓冲区数据操作
下图说明了 nio 类之间的关系,展示了如何移动和转换数据。例如,要将字节数组写入文件,使用 ByteBuffer.wrap() 方法包装字节数组,使用 getChannel() 在 FileOutputStream 上打开通道,然后从 ByteBuffer 将数据写入 FileChannel。
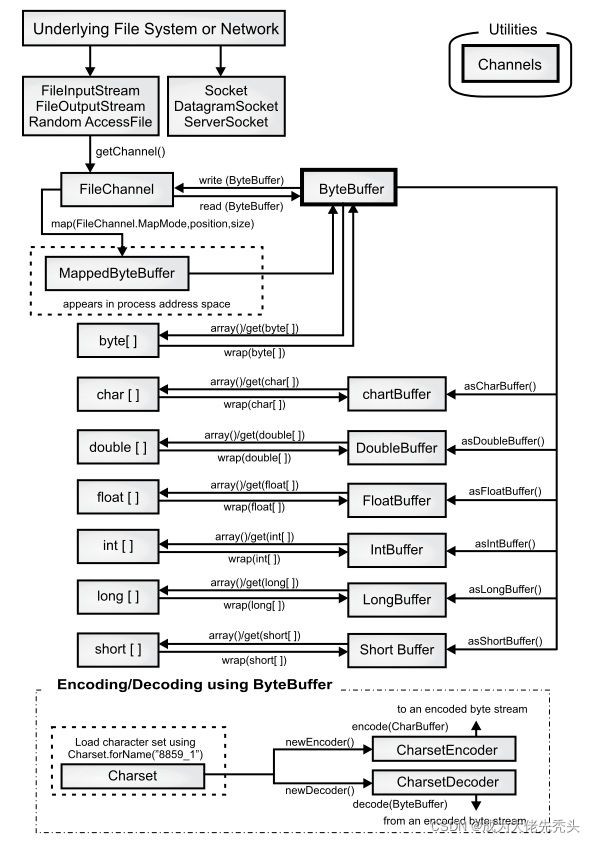
ByteBuffer 是将数据移入和移出通道的唯一方法,我们只能创建一个独立的基本类型缓冲区,或者使用 as 方法从 ByteBuffer 获得一个新缓冲区。也就是说,不能将基本类型缓冲区转换为 ByteBuffer。但我们能够通过视图缓冲区将基本类型数据移动到 ByteBuffer 中或移出 ByteBuffer。
缓冲区细节
缓冲区由数据和四个索引组成,以有效地访问和操作该数据:mark、position、limit 和 capacity(标记、位置、限制和容量)。伴随着的还有一组方法可以设置和重置这些索引,并可查询它们的值。
| 方法 | 说明 |
|---|---|
| capacity() | 返回缓冲区的 capacity |
| clear() | 清除缓冲区,将 position 设置为零并 设 limit 为 capacity;可调用此方法来覆盖现有缓冲区 |
| flip() | 将 limit 设置为 position,并将 position 设置为 0;此方法用于准备缓冲区,以便在数据写入缓冲区后进行读取 |
| limit() | 返回 limit 的值 |
| limit(int limit) | 重设 limit |
| mark() | 设置 mark 为当前的 position |
| position() | 返回 position |
| position(int pos) | 设置 position |
| remaining() | 返回 limit 到 position |
| hasRemaining() | 如果在 position 与 limit 中间有元素,返回 true |
内存映射文件
内存映射文件能让你创建和修改那些因为太大而无法放入内存的文件。有了内存映射文件,你就可以认为文件已经全部读进了内存,然后把它当成一个非常大的数组来访问。这种解决办法能大大简化修改文件的代码:
public class NewFileTest {
    public static void main(String[] args) throws IOException {
        try(RandomAccessFile randomAccessFile = new RandomAccessFile("D:\\mnt\\this.txt","rw")){
            MappedByteBuffer mappedByteBuffer = randomAccessFile.getChannel().map(FileChannel.MapMode.READ_WRITE,0,randomAccessFile.length());
        }
    }
}
MappedByteBuffer 继承了 ByteBuffer。你必须指定要在文件中映射的区域的起始点和长度—这意味着你可以选择映射大文件的较小区域。该文件似乎可以同时访问,因为它只有一部分被带进内存,而其他部分被交换出去。这样,一个非常大的文件(最多 2GB)可以很容易地修改。注意,操作系统底层的文件映射工具用于性能的最大化。
文件锁定
文件锁定可同步访问,因此文件可以共享资源。但是,争用同一文件的两个线程可能位于不同的 JVM 中,或者一个可能是 Java 线程,另一个可能是操作系统中的本机线程。文件锁对其他操作系统进程可见,因为 Java 文件锁定直接映射到本机操作系统锁定工具。
public class NewFileTest {
    public static void main(String[] args) throws IOException {
        try(FileOutputStream fileOutputStream = new FileOutputStream("D:\\mnt\\this.txt")){
            FileLock fileLock = fileOutputStream.getChannel().tryLock();
            if(fileLock != null){
                System.out.println("lock file");
                TimeUnit.MILLISECONDS.sleep(100);
                fileLock.release();
                System.out.println("release file");
            }
        } catch (InterruptedException e) {
            e.printStackTrace();
        }
        /** Output:
         *  lock file
         *  release file
         */
    }
}
通过调用 FileChannel 上的 tryLock() 或 lock(),可以获得整个文件的 FileLock。(SocketChannel、DatagramChannel 和 ServerSocketChannel 不需要锁定,因为它们本质上是单进程实体;通常不会在两个进程之间共享一个网络套接字)。
tryLock() 是非阻塞的。它试图获取锁,若不能获取(当其他进程已经持有相同的锁,并且它不是共享的),它只是从方法调用返回。
lock() 会阻塞,直到获得锁,或者调用 lock() 的线程中断,或者调用 lock() 方法的通道关闭。使用 FileLock.release() 释放锁。
还可以使用tryLock(long position, long size, boolean shared)或lock(long position, long size, boolean shared)锁定文件的一部分,锁住 size-position 区域。第三个参数指定是否共享此锁。
虽然零参数锁定方法适应文件大小的变化,但是如果文件大小发生变化,具有固定大小的锁不会发生变化。如果从一个位置到另一个位置获得一个锁,并且文件的增长超过了 position + size ,那么超出 position + size 的部分没有被锁定。零参数锁定方法锁定整个文件,即使它在增长。
底层操作系统必须提供对独占锁或共享锁的支持。如果操作系统不支持共享锁并且对一个操作系统发出请求,则使用独占锁。可以使用 FileLock.isShared() 查询锁的类型(共享或独占)。