昨日内容回顾
# 就是用来建立表与表之间的关系的字段
# 一对一

# 一对多

# 多对多

"""通过换位思考判断"""
# 级联更新

# 级联删除
# where 筛选

# group by 分组

# having 过滤

# distinct 去重

# order by 排序

# limit 分页

# regexp 正则
今日内容概要
- 多表查询思路
- navicat可视化软件
- 多表查询练习
- python操作MySQL
- 其他理论补充
内容详细
1. 多表查询思路
# 准备数据 建表
create table dep(
id int primary key auto_increment,
name varchar(20)
);

create table emp(
id int primary key auto_increment,
name varchar(20),
sex enum('male','female') not null default 'male',
age int,
dep_id int
);

#插入数据
insert into dep values
(200,'技术'),
(201,'人力资源'),
(202,'销售'),
(203,'运营'),
(205,'保洁')
;

insert into emp(name,sex,age,dep_id) values
('jason','male',18,200),
('egon','female',48,201),
('kevin','male',18,201),
('nick','male',28,202),
('owen','male',18,203),
('jerry','female',18,204);


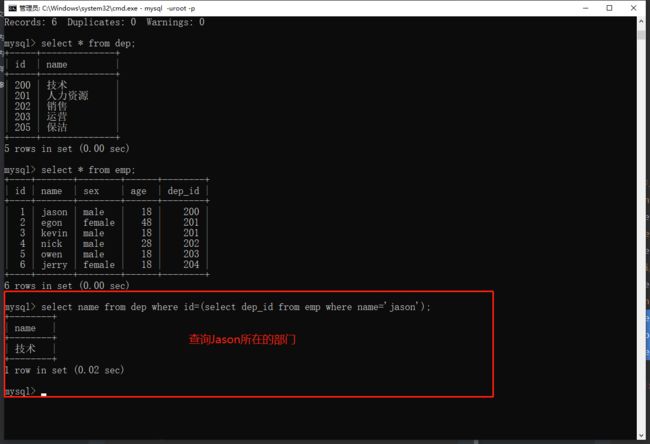
# 例:查询jason所在的部门名称
	"""涉及到SQL查询题目 一定要先明确到底需要几张表"""
	1.先查询jason所在的部门编号
		select dep_id from emp where name='jason';

	2.根据部门编号查询部门名称
		select name from dep where id=(select dep_id from emp where name='jason');
	"""
	一条SQL语句的查询结果:
		既可以看成是一张表
		也可以看成是查询条件
	"""


# 多表查询的思路
	1.子查询
		将SQL语句查询的结果括号括起来当做另外一条SQL语句的条件
			大白话:就是我们日常生活中解决问题的方式>>>:分步操作

	2.连表操作(重要)
		先将需要使用到的表拼接成一张大表 之后基于单表查询完成
			inner join	内连接
			left join	左连接
			right join	右连接
			union		全连接

"""
涉及到多表查询的时候 字段名称容易冲突 需要使用表名点字段的方式区分
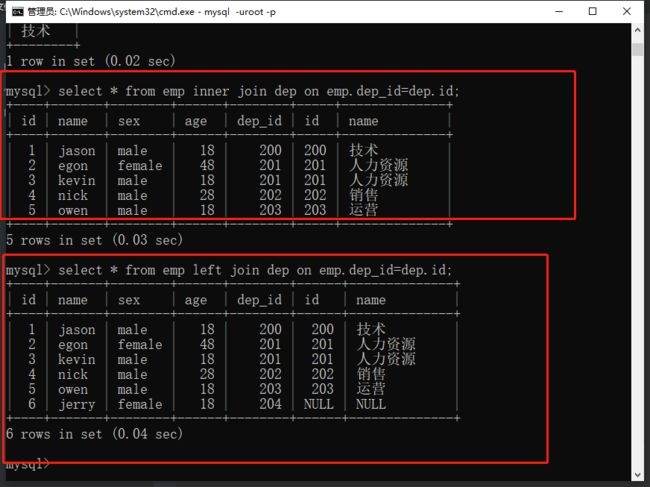
1.inner join:只拼接两张表中共有的部分
	select * from emp inner join dep on emp.dep_id = dep.id;

2.left join:以左表为基准展示所有的内容 没有的NULL填充
	select * from emp left join dep on emp.dep_id = dep.id;

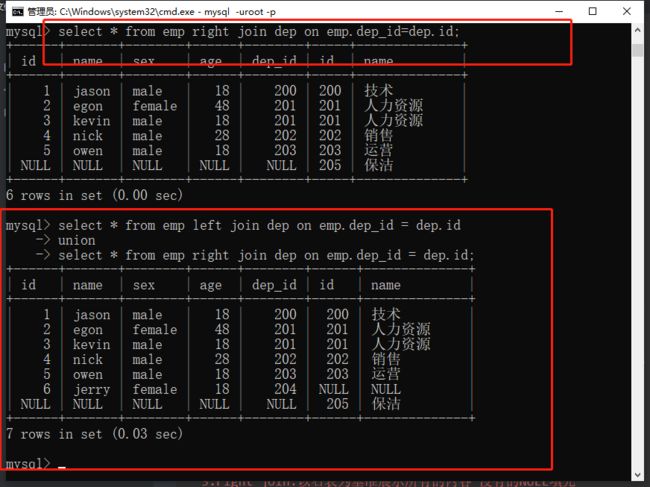
3.right join:以右表为基准展示所有的内容 没有的NULL填充
	select * from emp right join dep on emp.dep_id = dep.id;

4.union:左右表所有的数据都在 没有的NULL填充
	select * from emp left join dep on emp.dep_id = dep.id
	union
	select * from emp right join dep on emp.dep_id = dep.id;
"""

# 疑问:上述操作一次只能连接两张表 如何做到多张表?
	将两张表的拼接结果当成一张表与跟另外一张表做拼接
	依次往复 即可拼接多张表
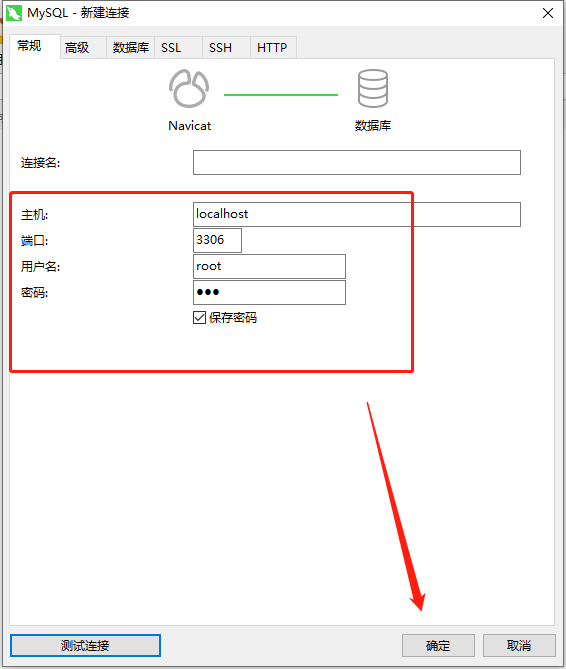
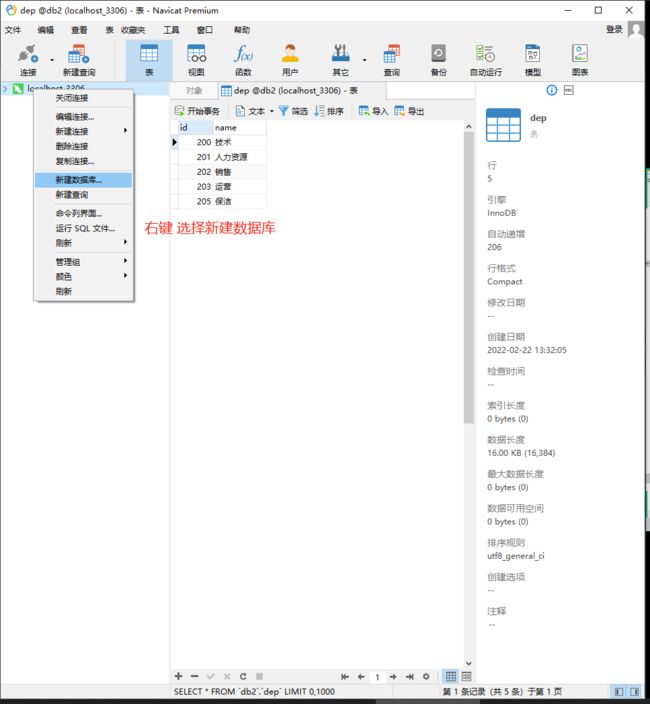
2. navicat可视化软件
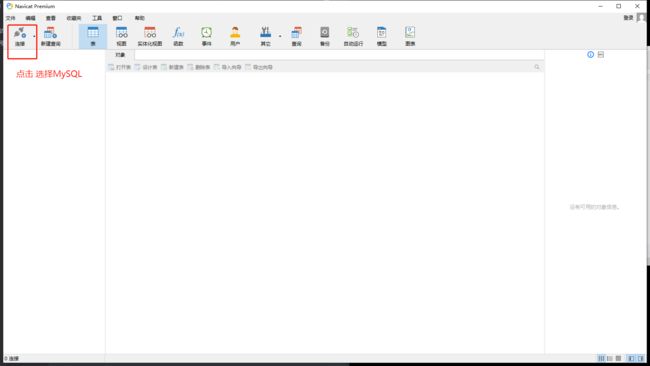
# 作用:
	内部封装了很多SQL的操作 用户只需要鼠标点点 自动构建SQL语句并执行

# 下载使用
	百度搜破解版 按步骤安装即可
	友情链接:https://shimo.im/docs/g9qK9rpcTGWX6Vgh

# navicat可以看成是很多数据库软件的客户端

# MySQL的注释语法
	# 注释
	-- 注释
3. 多表查询练习题
# 1、查询所有的课程的名称以及对应的任课老师姓名
	01 select * from teacher inner join course on teacher.tid=course.teacher_id;  # 先找出所有课程表与老师表信息

	02 select course.cname,teacher.tname from teacher inner join course on teacher.tid=course.teacher_id;  # 再根据要求筛选出课程名称与对应任课老师


# 2.查询平均成绩大于八十分的同学的姓名和平均成绩
	先确定需要使用到的表
	在思考多表查询的方式
	# 先按学生编号分组
		select student_id from score group by student_id;
	# 再求平均成绩
		select student_id,avg(num) from score group by student_id;
	# 最后筛选出大于80的(针对聚合函数的字段结果 最好起别名防止冲突)
		select student_id,avg(num) as avg_num from score group by student_id having(avg(num)>80);
	# 整合 将上述SQL的结果与student表拼接
		select student.sname,t1.avg_num from student inner join(select student_id,avg(num) as avg_num from score group by student_id having(avg(num)>80)) as t1 on student.sid=t1.student_id;


# 3.查询没有报李平老师课的学生姓名
	# 先查询李平老师教授的课程编号
		select course.cid from course where teacher_id=(select tid from teacher where tname='李平老师');

	# 再根据课程id号筛选出所有报了的学生id号
		select student_id from score where course_id in (select course.cid from course where teacher_id=(select tid from teacher where tname='李平老师'));

	# 最后去学生表中根据id号取反筛选学生姓名
		select student.sname from student where sid not in(select distinct score.student_id from score where course_id in (select course.cid from course where teacher_id=(select tid from teacher where tname='李平老师')));


# 4.查询没有同时选修物理课程和体育课程的学生姓名(只要了报了一门的  两门和一门没报的都不要)
	# 先获取两门课程的id号
		select course.cid from course where cname in ('物理','体育');

	# 再去分数表中先筛选出所有报了物理和体育的学生id(两门 一门)
		select * from score where course_id in (select course.cid from course where cname in ('物理','体育'));

	# 如何筛选出只报了一门的学生id  按照学生id分组 然后计数 并过滤出计数结果为1的数据
		select score.student_id from score where course_id in (select course.cid from course where cname in ('物理','体育')) group by score.student_id having count(score.course_id)=1;

	# 根据学生id号去student表中筛选学生姓名
		select student.sname from student where sid in (select score.student_id from score where course_id in (select course.cid from course where cname in ('物理','体育')) group by score.student_id having count(score.course_id)=1);


# 5.查询挂科超过两门(包括两门)的学生姓名和班级
	# 先筛选出小于60分的数据
		select * from score where num<60;

	# 按照学生id分组 然后统计挂科数量
		select student_id,count(course_id) from score where num<60 group by student_id;

	# 筛选出挂科超过两门的学生id
		select student_id from score where num<60 group by student_id having count(course_id)>=2;

	# 先将上述结果放在一边 去连接student和class表
		select student.sname,class.caption from class inner join student on class.cid=student.class_id where student.sid in(select student_id from score where num<60 group by student_id having count(course_id)>=2);

# 更多练习
	https://www.cnblogs.com/Dominic-Ji/p/10875493.html
4. python操作MySQL
# pycharm中先下载第三方模块 pymysql

import pymysql

# 连接MySQL服务端
conn = pymysql.connect(
    host='127.0.0.1',
    port=3306,
    user='root',
    password='123',
    database='db3',
    charset='utf8'
)
# 产生一个游标对象
cursor = conn.cursor(cursor=pymysql.cursors.DictCursor)
# 编写SQL语句
sql = 'select * from teacher'
affect_rows = cursor.execute(sql)  # 结果是表的数据行数
print(affect_rows)
# 获取执行结果
print(cursor.fetchall())
"""以上为基础代码 务必掌握"""


print(cursor.fetchall())  # [] 类似于文件光标 拿过的数据就不会再返回去再拿
print(cursor.fetchall())  # []

print(cursor.fetchone())  # {'tid': 1, 'tname': '张磊老师'} 获取单个
print(cursor.fetchone())  # {'tid': 2, 'tname': '李平老师'}

print(cursor.fetchmany(3))  # [{'tid': 1, 'tname': '张磊老师'}, {'tid': 2, 'tname': '李平老师'}, {'tid': 3, 'tname': '刘海燕老师'}]
print(cursor.fetchman  y(3))  # [{'tid': 4, 'tname': '朱云海老师'}, {'tid': 5, 'tname': '李杰老师'}] 自定义取的数量

print(cursor.fetchone())  # {'tid': 1, 'tname': '张磊老师'}
cursor.scroll(1,"relative")  # 以当前位置为起始 向后移动光标一位
print(cursor.fetchone())  # {'tid': 3, 'tname': '刘海燕老师'}

print(cursor.fetchone())  # {'tid': 1, 'tname': '张磊老师'}
cursor.scroll(1, "absolute")  # 以文件开头位置为起始 向后移动光标一位
print(cursor.fetchone())  # {'tid': 2, 'tname': '李平老师'}
5. SQL注入问题
import pymysql


# 连接MySQL服务端
conn = pymysql.connect(
    host='127.0.0.1',
    port=3306,
    user='root',
    password='123',
    database='db3',
    charset='utf8',
    autocommit=True  # 针对增 改 删自动二次确认
)
# 产生一个游标对象
cursor = conn.cursor(cursor=pymysql.cursors.DictCursor)
# 编写SQL语句
username = input('username>>>:').strip()
password = input('password>>>:').strip()
sql = "select * from userinfo where name=%s and pwd=%s"
cursor.execute(sql,(username,password))
data = cursor.fetchall()
if data:
    print(data)
    print('登录成功')
else:
    print('用户名或密码错误')

"""
sql = 'insert into userinfo(name,pwd) values("jason","123"),("kevin","321")'
res = cursor.execute(sql)
print(res)

在使用代码进行数据操作的时候 不同操作的级别是不一样的
	针对查无所谓
	针对增 改 删都需要二次确认
		关键字:conn.commit()
	推荐使用:
		autocommit=True  # 针对增 改 删自动二次确认
"""


# SQL注入现象
	1.只需要用户名也可以登录
	2.不需要用户名和密码也可以登录
"""
SQL注入的原因:
	是由于特殊符号的组合会产生特殊的效果

	实际生活中 尤其是在注册用户名的时候 会非常明显的提示你很多特殊符号不能用 原因也是一样的

结论:
	设计到敏感数据部分 不要自己拼接 交给现成的方法拼接即可
"""
6. MySQL补充知识
# 事务(重要)
	特性:ACID
		A:原子性
		C:一致性
		I:隔离性
		D:持久性

	01 原子性(atomicity)
		一个事务是一个不可分割的工作单位,事务中包括的诸操作要么都做,要么都不做

	02 一致性(consistency)
		事务必须是使数据库从一个一致性状态变到另一个一致性状态。一致性与原子性是密切相关的

	03 隔离性(isolation):
		一个事务的执行不能被其他事务干扰。即一个事务内部的操作及使用的数据对并发的其他事务是隔离的,并发执行的各个事务之间不能互相干扰

	04 持久性(durability)
		持久性也称永久性(permanence),指一个事务一旦提交,它对数据库中数据的改变就应该是永久性的。接下来的其他操作或故障不应该对其有任何影响


# 事务相关操作
	start transcation;  # 开启事务
	诸多SQL操作:
		rollback  # 回滚到操作之前的状态
		commit  # 确认事务操作 之后不能回滚


# 1.先介绍事务的三个关键字 再去用表实际展示效果
create table user(
id int primary key auto_increment,
name char(32),
balance int
);

insert into user(name,balance)
values
('jason',1000),
('egon',1000),
('tank',1000);

# 2.修改数据之前先开启事务操作
	start transaction;

# 3.修改操作
	update user set balance=900 where name='jason';  # 买支付100元
	update user set balance=1010 where name='egon';  # 中介拿走10元
	update user set balance=1090 where name='tank';  # 卖家拿到90元

# 4.回滚到上一个状态
	rollback;

# 5.如果确认修改
	commit;

# 6.查询表数据
	select * from user;

"""
开启事务之后,只要没有执行commit操作,数据其实都没有真正刷新到硬盘
	commit;

开启事务后 要检测操作是否完整,不完整就主动回滚到上一个状态,如果完整就应该执行commit操作
"""

# 站在python代码的角度,应该实现的伪代码逻辑,
try:
	update user set balance=900 where name='jason';  # 买支付100元
	update user set balance=1010 where name='egon';  # 中介拿走10元
	update user set balance=1090 where name='tank';  # 卖家拿到90元
except 异常:
	rollback;
else:
	commit;


