TensorRT入门指南
TensorRT入门全指南
- TensorRT Open Source Software工具包
-
- 将预训练模型转换为ONNX
- 导入TensorRT并生成引擎
- 在GPU上执行推理
- 编写自定义层
- 自定义层的插件编写
- 插件库的注册
- 插件的使用方法
TensorRT Open Source Software工具包
TensorRT官方的开发者指南提供的样例都在这个工具包里,
在这些样例的基础上,分为四个部分介绍TensorRT如何讲一个pytorch框架下的模型转为TensorRT,并在TensorRT框架下进行推理。
(此文章基于python API+pytorch框架!C++大佬移步)
将预训练模型转换为ONNX
import torch
from bisenet_model import BiSeNet
import onnx

def main():
    # 加载模型
    n_classes = 19
    bisenet = BiSeNet(n_classes=n_classes)
    bisenet.to(torch.device("cuda"))
    bisenet.load_state_dict(torch.load("models/79999_iter.pth"))
    bisenet.eval()

    input_shape = (3, 512, 512)
    save_path = "onnx_models/"
    onnx_file = os.path.join(save_path, 'bisenet.onnx')
    dummy_input = torch.randn(1, *input_shape))
    x = torch.onnx.export(bisenet,
                          dummy_input,
                          onnx_file,
                          opset_version=12,
                          input_names=["inputs"],
                          output_names=["outputs"])
需要注意的点:
ONNX在执行时需要运行一次模型,然后导出实际参与运算的运算符,因此如果模型是动态的,则导出结果不准确。所以要使模型中的变量参数化为常量,并需要有明确的输入。
我在导入模型时出错的点:
#  改为 H, W = torch.tensor(x.size()).tolist()
H, W = x.size()
#  计算实际的kernel和stride数值并转为 nn.AvgPool2d(kernel, stride)
self.avg_pool = nn.AdaptiveAvgPool2d(32)
tips:可以利用netron工具可视化onnx模型,如下图所示,用以检查网络节点
导入TensorRT并生成引擎
https://github.com/NVIDIA/TensorRT/tree/master/samples/python/yolov3_onnx
def get_engine(onnx_file_path, engine_file_path=""):
    """Attempts to load a serialized engine if available, otherwise builds a new TensorRT engine and saves it."""
    def build_engine():
        """Takes an ONNX file and creates a TensorRT engine to run inference with"""
        with trt.Builder(TRT_LOGGER) as builder, builder.create_network(common.EXPLICIT_BATCH) as network, builder.create_builder_config() as config, trt.OnnxParser(network, TRT_LOGGER) as parser, trt.Runtime(TRT_LOGGER) as runtime:
            config.max_workspace_size = 1 << 28 # 256MiB
            builder.max_batch_size = 1
            # Parse model file
            if not os.path.exists(onnx_file_path):
                print('ONNX file {} not found, please run yolov3_to_onnx.py first to generate it.'.format(onnx_file_path))
                exit(0)
            print('Loading ONNX file from path {}...'.format(onnx_file_path))
            with open(onnx_file_path, 'rb') as model:
                print('Beginning ONNX file parsing')
                if not parser.parse(model.read()):
                    print ('ERROR: Failed to parse the ONNX file.')
                    for error in range(parser.num_errors):
                        print (parser.get_error(error))
                    return None
            # The actual yolov3.onnx is generated with batch size 64. Reshape input to batch size 1
            network.get_input(0).shape = [1, 3, 512, 512]
            print('Completed parsing of ONNX file')
            print('Building an engine from file {}; this may take a while...'.format(onnx_file_path))
            plan = builder.build_serialized_network(network, config)
            engine = runtime.deserialize_cuda_engine(plan)
            print("Completed creating Engine")
            with open(engine_file_path, "wb") as f:
                f.write(plan)
            return engine

    if os.path.exists(engine_file_path):
        # If a serialized engine exists, use it instead of building an engine.
        print("Reading engine from file {}".format(engine_file_path))
        with open(engine_file_path, "rb") as f, trt.Runtime(TRT_LOGGER) as runtime:
            return runtime.deserialize_cuda_engine(f.read())
    else:
        return build_engine()
# 改为build_cuda_network(network)
plan=builder.buid_serialized_network(network, config)
上述步骤可以概括为1)解析模型到network 2)根据网络创建engine 3)将创建好的engine序列化为二进制流
在GPU上执行推理
    trt_outputs = []
    with get_engine(onnx_file_path, engine_file_path) as engine, engine.create_execution_context() as context:
        inputs, outputs, bindings, stream = common.allocate_buffers(engine)
        # Do inference
        print('Running inference on image {}...'.format(input_image_path))
        # Set host input to the image. The common.do_inference function will copy the input to the GPU before executing.
        inputs[0].host = image
        trt_outputs = common.do_inference_v2(context, bindings=bindings, inputs=inputs, outputs=outputs, stream=stream)

    # Before doing post-processing, we need to reshape the outputs as the common.do_inference will give us flat arrays.
    trt_outputs = [output.reshape(shape) for output, shape in zip(trt_outputs, output_shapes)]
由于GPU计算需要预先分配资源,通过allocate_buffers函数分类inputs,outputs,bindings,stream,TesnorRT的推理过程可以分为两步:
1、分配engine所需缓冲器
1)创建一个cuda流
2)对input/output分析
对于每一个input/output,
执行计算迭代空间大小(平铺数据max_batch_size)以及返回数据类型
创建内存缓冲区和设备存储区(数据所占位数)
input/output封装在hostDeviceMem类中,存储推理输入和输出
binding存储每个input/output的内存占有量
2、推理
1)给input赋值
2)从主机内存复制数据到设备内存
3)利用GPU执行推断
4)再把设备内存中的数据取出来以list返回
编写自定义层
我总结了一下需要编写自定义层的情况:
1)TensorRT不支持的pytorch操作
2)需要cuda加速的自定义操作
举个栗子:
def leaky_relu(x,leak=0.2,name="LeakyRelu"):
    f1 = 0.5 * (1 + leak)
    f2 = 0.5 * (1 - leak)
    return f1 * x + f2 * torch.abs(x)

class LeakyRelu(Module):
    def __init__(self, leak):
        super(LeakyRelu, self).__init__()
        self.leak = leak
    def forward(self, x):
        return leaky_relu(x, self.leak)
在模型中通过self.lrelu = func.LeakyRelu(0.2)引用不会报错,因为这些操作都是TensorRT支持的pytorch的tensor操作
# 报错 [TensorRT] ERROR: INVALID_ARGUMENT: getPluginCreator could not find plugin Celu version 1.
self.celu = torch.nn.CELU(0.1)
这次操作会报错,因为TensorRT不支持pytorch的celu运算,同样不支持的还包括torch.cumsum(),等等
然后再介绍如何生成自定义层插件
自定义层的插件编写
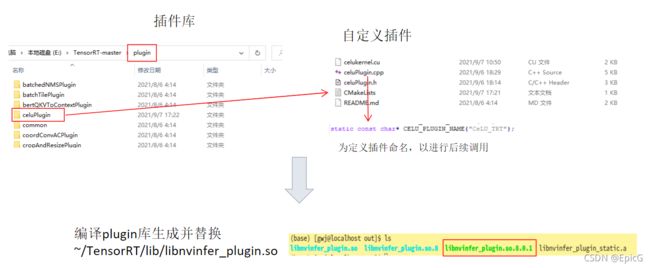
插件库的注册
在编写好插件之后有两种注册到TensorRT的方法:
我选择的是重新编译官方给定的资源库,然后将生成的libnvinfer_plugin.so替换~/TensorRT-7.2.3.4/lib/中的此文件
下载官方提供的资源包https://github.com/NVIDIA/TensorRT,选择编译整个包或者plugin包,记得将文件中用到的第三方库下载下来,并放入各个部分的third_party文件夹
官方编译命令:
cd $TRT_OSSPATH
mkdir -p build && cd build
cmake .. -DTRT_LIB_DIR=$TRT_LIBPATH-DTRT_OUT_DIR='pwd'/out
make -j$(nproc)
插件的使用方法
官方提供了三种python端的插件使用方法:
1)利用python API直接在TensorRT网络中添加自定义层
其中,“LReLU_TRT”是注册的插件名称
官方代码:
import tensorrt as trt
import numpy as np

TRT_LOGGER = trt.Logger()

trt.init_libnvinfer_plugins(TRT_LOGGER, '')
PLUGIN_CREATORS = trt.get_plugin_registry().plugin_creator_list

def get_trt_plugin(plugin_name):
        plugin = None
        for plugin_creator in PLUGIN_CREATORS:
            if plugin_creator.name == plugin_name:
                lrelu_slope_field = trt.PluginField("neg_slope", np.array([0.1], dtype=np.float32), trt.PluginFieldType.FLOAT32)
                field_collection = trt.PluginFieldCollection([lrelu_slope_field])
                plugin = plugin_creator.create_plugin(name=plugin_name, field_collection=field_collection)
        return plugin

def main():
    builder = trt.Builder(TRT_LOGGER)
    network = builder.create_network()
    config = builder.create_builder_config()
    config.max_workspace_size = 2**20
    input_layer = network.add_input(name="input_layer", dtype=trt.float32, shape=(1, 1))
    lrelu = network.add_plugin_v2(inputs=[input_layer], plugin=get_trt_plugin("LReLU_TRT"))
    lrelu.get_output(0).name = "outputs"
    network.mark_output(lrelu.get_output(0))
2)从框架导入模型时使用自定义层
分别提供了tensorflow、caffe和onnx框架的例子,由于我们开发的模型以pytorch框架为主,所以只看了onnx的方法,需要其他的可以参考官方提供的例子
https://github.com/NVIDIA/TensorRT/tree/master/samples/python/uff_custom_plugin
(tensorflow框架移步上链接)
参照onnx_packnet的方法,在生成onnx格式的模型之后将torch.nn.celu操作替换成我们在插件库注册的OP。具体步骤如图,

https://github.com/NVIDIA/TensorRT/tree/master/samples/python/onnx_packnet
[1]: http://meta.math.stackexchange.com/questions/5020/mathjax-basic-tutorial-and-quick-reference
[2]: https://mermaidjs.github.io/
[3]: https://mermaidjs.github.io/
[4]: http://adrai.github.io/flowchart.js/

