单、双目相机标定及畸变校正、立体矫正的python实现(含拍照程序)
由于本人水平有限,以下单双目代码是我自己花时间搜集、整理并加以修改的单双目标定的python代码,希望能帮到和我一样半路出家的只会python的小白。
文中标定过程中用到的相关函数在我另外一篇博客里都有介绍。
1、双目拍照
#coding:utf-8
import cv2
import time
import time

left_camera = cv2.VideoCapture(0)
left_camera.set(cv2.CAP_PROP_FRAME_WIDTH,640)
left_camera.set(cv2.CAP_PROP_FRAME_HEIGHT,480)

right_camera = cv2.VideoCapture(1)
right_camera.set(cv2.CAP_PROP_FRAME_WIDTH,640)
right_camera.set(cv2.CAP_PROP_FRAME_HEIGHT,480)

path="/home/song/pic/" #图片存储路径

AUTO =False   # True自动拍照,False则手动按s键拍照
INTERVAL = 0.0000005 # 调整自动拍照间隔

cv2.namedWindow("left")
cv2.namedWindow("right")
cv2.moveWindow("left", 0, 0)

counter = 0
utc = time.time()
folder = "/home/song/pic/" # 照片存储路径

def shot(pos, frame):
    global counter
    timestr = datetime.datetime.now()
    path = folder + pos + "_" + str(counter) +".jpg"
    cv2.imwrite(path, frame)
    print("snapshot saved into: " + path)

while True:
    ret, left_frame = left_camera.read()
    ret, right_frame = right_camera.read()

    cv2.imshow("left", left_frame)
    cv2.imshow("right", right_frame)

    now = time.time()
    if AUTO and now - utc >= INTERVAL:
        shot("left", left_frame)
        shot("right", right_frame)
        counter += 1
        utc = now

    key = cv2.waitKey(1)
    if key == ord("q"):
        break
    elif key == ord("s"):
        shot("left", left_frame)
        shot("right", right_frame)
        counter += 1

left_camera.release()
right_camera.release()
cv2.destroyWindow("left")
cv2.destroyWindow("right")
照片拍摄后如下:

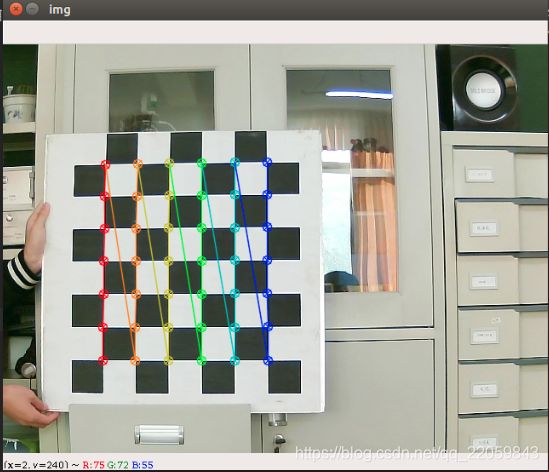
2、单目标定
刚入坑比较菜,单目标定改了老半天结果发现opencv就有官方的python例程],在它的基础上进行修改,我用的是opencv 3。
#-*- coding:utf-8 -*-
import numpy as np
import cv2
import glob

# 设置迭代终止条件
criteria = (cv2.TERM_CRITERIA_EPS + cv2.TERM_CRITERIA_MAX_ITER, 30, 0.001)

# 设置 object points, 形式为 (0,0,0), (1,0,0), (2,0,0) ....,(6,5,0)
objp = np.zeros((6*7,3), np.float32) #我用的是6×7的棋盘格,可根据自己棋盘格自行修改相关参数
objp[:,:2] = np.mgrid[0:7,0:6].T.reshape(-1,2)

# 用arrays存储所有图片的object points 和 image points
objpoints = [] # 3d point in real world space
imgpoints = [] # 2d points in image plane.

#用glob匹配文件夹/home/song/pic_1/right/下所有文件名含有“.jpg"的图片
images = glob.glob(r"/home/song/pic/right/*.jpg")

for fname in images:
    img = cv2.imread(fname)
    gray = cv2.cvtColor(img, cv2.COLOR_BGR2GRAY)
    # 查找棋盘格角点
    ret, corners = cv2.findChessboardCorners(gray, (7,6), None)
    # 如果找到了就添加 object points, image points
    if ret == True:
        objpoints.append(objp)
        corners2=cv2.cornerSubPix(gray,corners, (11,11), (-1,-1), criteria)
        imgpoints.append(corners)
        # 对角点连接画线加以展示
        cv2.drawChessboardCorners(img, (7,6), corners2, ret)
        cv2.imshow('img', img)
        cv2.waitKey(500)
cv2.destroyAllWindows()

# 标定
ret, mtx, dist, rvecs, tvecs = cv2.calibrateCamera(objpoints, imgpoints, gray.shape[::-1], None, None)
print(mtx, dist)

#对所有图片进行去畸变,有两种方法实现分别为: undistort()和remap()
images = glob.glob(r"/home/song/pic/right/*.jpg")
for fname in images:
    prefix=fname.split('/')[5]
    img = cv2.imread(fname)
    h,  w = img.shape[:2]
    newcameramtx, roi=cv2.getOptimalNewCameraMatrix(mtx, dist, (w,h), 1, (w,h))

    # # 使用 cv.undistort()进行畸变校正
    # dst = cv2.undistort(img, mtx, dist, None, newcameramtx)
    # # 对图片有效区域进行剪裁
    # # x, y, w, h = roi
    # # dst = dst[y:y+h, x:x+w]
    # cv2.imwrite('/home/song/pic_1/undistort/'+prefix, dst)

    #  使用 remap() 函数进行校正
    mapx, mapy = cv2.initUndistortRectifyMap(mtx, dist, None, newcameramtx, (w, h), 5)
    dst = cv2.remap(img, mapx, mapy, cv2.INTER_LINEAR)
    # 对图片有效区域进行剪裁
    x, y, w, h = roi
    dst = dst[y:y + h, x:x + w]
    cv2.imwrite('/home/song/pic/undistort/'+prefix, dst)

#重投影误差计算
mean_error = 0
for i in range(len(objpoints)):
    imgpoints2, _ = cv2.projectPoints(objpoints[i], rvecs[i], tvecs[i], mtx, dist)
    error = cv2.norm(imgpoints[i],imgpoints2, cv2.NORM_L2)/len(imgpoints2)
    mean_error += error

print("total error: ", mean_error/len(objpoints))
标定过程中的图片,及标定结果如下:

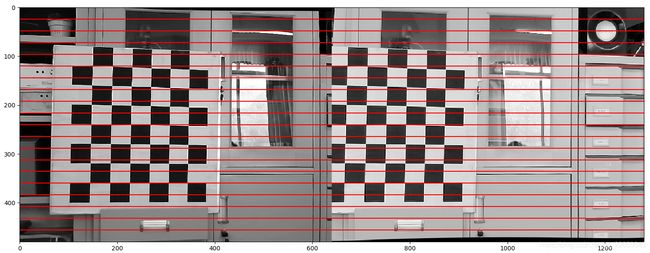
3、双目标定及其立体校正
双目的python代码比较难搞定,改了一下凑合能用,因为我最后要实现手动点击图片并获取相应像素的坐标,最终的极线对齐显示的效果就自己用plt画了一个。
#coding:utf-8
import numpy as np
import cv2
import matplotlib.pyplot as plt
from PIL import Image

# 设置迭代终止条件
criteria = (cv2.TERM_CRITERIA_EPS + cv2.TERM_CRITERIA_MAX_ITER, 30, 0.001)
criteria_stereo = (cv2.TERM_CRITERIA_EPS + cv2.TERM_CRITERIA_MAX_ITER, 30, 0.001)

# 设置 object points, 形式为 (0,0,0), (1,0,0), (2,0,0) ....,(6,5,0)
objp = np.zeros((6 * 7, 3), np.float32)  #我用的是6×7的棋盘格,可根据自己棋盘格自行修改相关参数
objp[:, :2] = np.mgrid[0:7, 0:6].T.reshape(-1, 2)

# 用arrays存储所有图片的object points 和 image points
objpoints = []  # 3d points in real world space
imgpointsR = []  # 2d points in image plane
imgpointsL = []

# 本次实验采集里共计30组待标定图片依次读入进行以下操作
for i in range(0,30):
    t = str(i)
    ChessImaR = cv2.imread('/home/song/pic/right_' + t + '.jpg', 0)  # 右视图
    ChessImaL = cv2.imread('/home/song/pic/left_' + t + '.jpg', 0)  # 左视图
    retR, cornersR = cv2.findChessboardCorners(ChessImaR,(7, 6), None)  # 提取右图每一张图片的角点
    retL, cornersL = cv2.findChessboardCorners(ChessImaL,(7, 6), None)  # # 提取左图每一张图片的角点
    if (True == retR) & (True == retL):
        objpoints.append(objp)
        cv2.cornerSubPix(ChessImaR, cornersR, (11, 11), (-1, -1), criteria)  # 亚像素精确化,对粗提取的角点进行精确化
        cv2.cornerSubPix(ChessImaL, cornersL, (11, 11), (-1, -1), criteria)  # 亚像素精确化,对粗提取的角点进行精确化
        imgpointsR.append(cornersR)
        imgpointsL.append(cornersL)

# 相机的单双目标定、及校正
#   右侧相机单独标定
retR, mtxR, distR, rvecsR, tvecsR = cv2.calibrateCamera(objpoints,imgpointsR,ChessImaR.shape[::-1], None, None)

#   获取新的相机矩阵后续传递给initUndistortRectifyMap,以用remap生成映射关系
hR, wR = ChessImaR.shape[:2]
OmtxR, roiR = cv2.getOptimalNewCameraMatrix(mtxR, distR,(wR, hR), 1, (wR, hR))

#   左侧相机单独标定
retL, mtxL, distL, rvecsL, tvecsL = cv2.calibrateCamera(objpoints,imgpointsL,ChessImaL.shape[::-1], None, None)

#   获取新的相机矩阵后续传递给initUndistortRectifyMap,以用remap生成映射关系
hL, wL = ChessImaL.shape[:2]
OmtxL, roiL = cv2.getOptimalNewCameraMatrix(mtxL, distL, (wL, hL), 1, (wL, hL))

# 双目相机的标定
# 设置标志位为cv2.CALIB_FIX_INTRINSIC,这样就会固定输入的cameraMatrix和distCoeffs不变,只求解,,,
flags = 0
flags |= cv2.CALIB_FIX_INTRINSIC

retS, MLS, dLS, MRS, dRS, R, T, E, F = cv2.stereoCalibrate(objpoints,imgpointsL,imgpointsR,OmtxL,distL,OmtxR,distR,
                                                           ChessImaR.shape[::-1], criteria_stereo,flags)


# 利用stereoRectify()计算立体校正的映射矩阵
rectify_scale= 1 # 设置为0的话,对图片进行剪裁,设置为1则保留所有原图像像素
RL, RR, PL, PR, Q, roiL, roiR= cv2.stereoRectify(MLS, dLS, MRS, dRS,
                                                 ChessImaR.shape[::-1], R, T,
                                                 rectify_scale,(0,0))
# 利用initUndistortRectifyMap函数计算畸变矫正和立体校正的映射变换,实现极线对齐。
Left_Stereo_Map= cv2.initUndistortRectifyMap(MLS, dLS, RL, PL,
                                             ChessImaR.shape[::-1], cv2.CV_16SC2)

Right_Stereo_Map= cv2.initUndistortRectifyMap(MRS, dRS, RR, PR,
                                              ChessImaR.shape[::-1], cv2.CV_16SC2)

#立体校正效果显示
for i in range(0,1):  # 以第一对图片为例
    t = str(i)
    frameR = cv2.imread('/home/song/pic/right_' + t + '.jpg', 0)
    frameL = cv2.imread('/home/song/pic/left_' + t + '.jpg', 0)

    Left_rectified= cv2.remap(frameL,Left_Stereo_Map[0],Left_Stereo_Map[1], cv2.INTER_LANCZOS4, cv2.BORDER_CONSTANT, 0)  # 使用remap函数完成映射
    im_L=Image.fromarray(Left_rectified) # numpy 转 image类

    Right_rectified= cv2.remap(frameR,Right_Stereo_Map[0],Right_Stereo_Map[1], cv2.INTER_LANCZOS4, cv2.BORDER_CONSTANT, 0)
    im_R=Image.fromarray(Right_rectified) # numpy 转 image 类

	#创建一个能同时并排放下两张图片的区域,后把两张图片依次粘贴进去
    width = im_L.size[0]*2
    height = im_L.size[1]

    img_compare = Image.new('RGBA',(width, height))
    img_compare.paste(im_L,box=(0,0))
    img_compare.paste(im_R,box=(640,0))

    #在已经极线对齐的图片上均匀画线
    for i in range(1,20):
        len=480/20
        plt.axhline(y=i*len, color='r', linestyle='-')
    plt.imshow(img_compare)
    plt.show()
立体校正最终效果如下: