DPU-PYNQ使用笔记
Ubuntu端
Tips:
1、在Ubuntu端运行Vitis AI时,最好将自己工程文件夹,放到Vitis AI 文件下级目录下,而后右键在当前路径打开终端
输入./docker_run.sh xilinx/vitis-ai
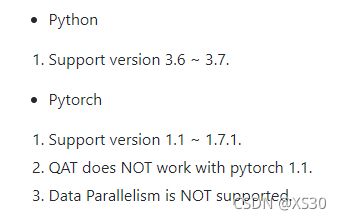
2、在训练Pytorch模型时,Vitis AI所支持的Pytorch版本是<=1.4,框架内部所安装的为1.4版本。

3、在打包Pytorch模型时(大于1.7版本),需要注意的是Pytorch高版本所生成的pth文件,为一压缩文件,如果需要得到低版本所保存的pth文件,需要在模型保存代码中加入torch.save(model.state_dict(), model_cp,_use_new_zipfile_serialization=False,最后获得的文件在Ubuntu中如下图所示,否则在量化过程中或出现版本过高的提示。关于Pytorch模型打包的几种方式,可以参考该文章

再根据的的模型框架,选择对应的版本。
查看模型的结构
可以使用Ubuntu中的Netron软件查看模型结构(Summary)

量化(quantizing)
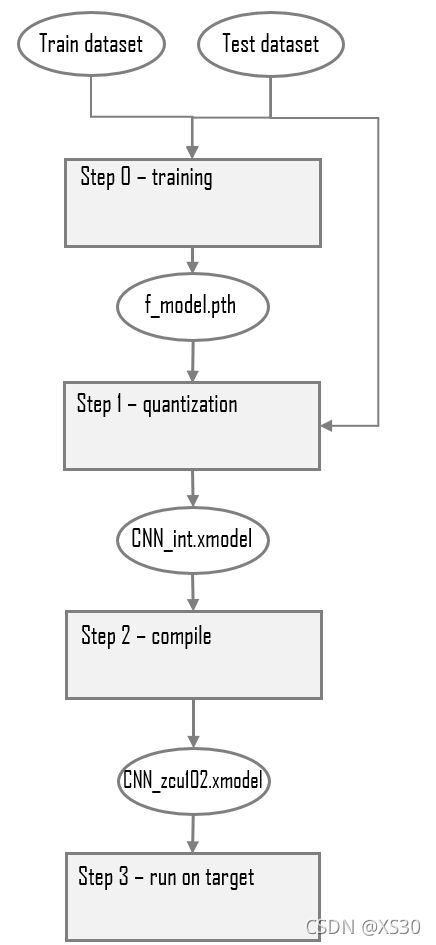
官方给出了量化的工作流程图,输入模型为浮点模型,其中预处理环节主要工作为折叠和删除无用节点,然后将模型的权重/偏差与激活 (weights/biases and activations)量化到给定的位宽。
To capture activation statistics and improve the accuracy of quantized models, the Vitis AI quantizer must run several iterations of inference to calibrate the activations. A calibration image dataset input is, therefore, required. Generally, the quantizer works well with 100–1000 calibration images. Because there is no need for back propagation, the un-labeled dataset is sufficient.
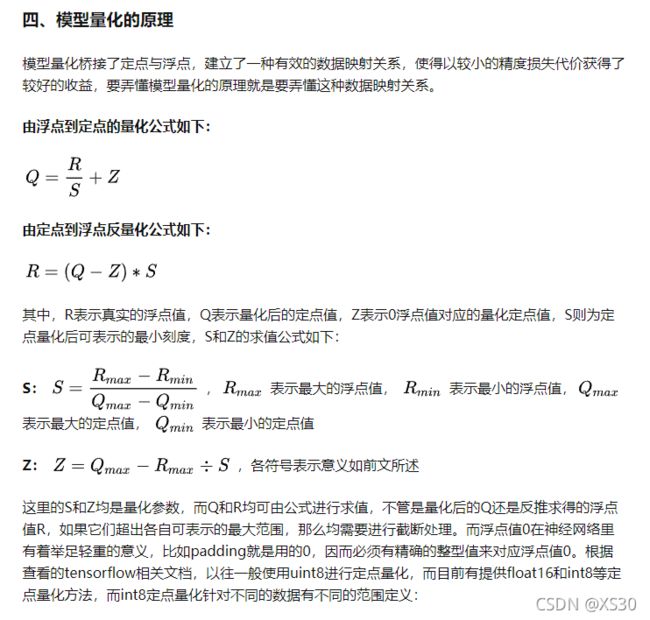
在量化过程中,为了提高最终模型的准确性,Vitis AI量化器必须运行多次推理迭代来校准激活,所以需要图像数据集输入,同时,由于不需要反向传播,所以未标记的数据集就行。对于量化的原理,可以参考这篇文章进行学习。
 而过程中不需要数据集label的原因,可以通过下图理解。即校准过程中,需要用dataset来获取的min和 max,来求取S与Z

在进行量化时,需要添加训练得到的浮点数模型与校准数据集(100-1000张)
在Tensorflow中采用的是如下代码,由下代码可看出,其遵循上述流程图步骤。
from tensorflow_model_optimization.quantization.keras import vitis_quantize

float_model = tf.keras.models.load_model(‘float_model.h5’)
quantizer = vitis_quantize.VitisQuantizer(float_model)

#load datasets start
dir=r'\xilinx\jupyter_notebooks\Image\1'
imgs=np.ones(shape = [422,224,224,3], dtype=int)
for i in range(422):
	path = os.path.join(dir, str(i)+'.jpg')
	img=cv2.imread(path)
	# print("shape of img"+str(i)+'.jpg is: '+str(img.shape))
	# print(imgs[i,:,:,:].shape)
	imgs[i,:,:,:]=img
test_img = imgs/255
#load datasets end

quantized_model = quantizer.quantize_model(calib_dataset=test_img)
quantized_model.save(os.path.join(args.output, args.name+'.h5'))
Pytorch流程
而Pytorch中的代码流程类似,详见该网页
1、导入vai_q_pytorch模块
from pytorch_nndct.apis import torch_quantizer, dump_xmodel
2、生成一个量化输入所需的量化器,并得到转换后的模型
input = torch.randn([batch_size, 3, 224, 224])
    quantizer = torch_quantizer(quant_mode, model, (input))
    quant_model = quantizer.quant_model
3、用转换后的模型建立神经网络。
acc1_gen, acc5_gen, loss_gen = evaluate(quant_model, val_loader, loss_fn)
4、输出量化结果并部署模型。
if quant_mode == 'calib':
  quantizer.export_quant_config()
if deploy:
  quantizer.export_xmodel())
在GitHub的例程中,是如下使用的,与TF2的流程差异不大。

from pytorch_nndct.apis import torch_quantizer, dump_xmodel
from common import *

def quantize(build_dir,quant_mode,batchsize):

  dset_dir = build_dir + '/dataset'
  float_model = build_dir + '/float_model'
  quant_model = build_dir + '/quant_model'


  # use GPU if available
  if (torch.cuda.device_count() > 0):
    print('You have',torch.cuda.device_count(),'CUDA devices available')
    for i in range(torch.cuda.device_count()):
      print(' Device',str(i),': ',torch.cuda.get_device_name(i))
    print('Selecting device 0..')
    device = torch.device('cuda:0')
  else:
    print('No CUDA devices available..selecting CPU')
    device = torch.device('cpu')

  # load trained model
  model = CNN().to(device)
  model.load_state_dict(torch.load(os.path.join(float_model,'f_model.pth')))

  # force to merge BN with CONV for better quantization accuracy
  optimize = 1

  # override batchsize if in test mode
  if (quant_mode=='test'):
    batchsize = 1

  rand_in = torch.randn([batchsize, 1, 28, 28])
  quantizer = torch_quantizer(quant_mode, model, (rand_in), output_dir=quant_model)
  quantized_model = quantizer.quant_model


  # data loader
  test_dataset = torchvision.datasets.MNIST(dset_dir,
                                            train=False,
                                            download=True,
                                            transform=test_transform)

  test_loader = torch.utils.data.DataLoader(test_dataset,
                                            batch_size=batchsize,
                                            shuffle=False)

  # evaluate
  test(quantized_model, device, test_loader)


  # export config
  if quant_mode == 'calib':
    quantizer.export_quant_config()
  if quant_mode == 'test':
    quantizer.export_xmodel(deploy_check=False, output_dir=quant_model)

  return
补充,pytorch的量化器包含如下代码
  device = torch.device('cpu')
 # load trained model
  model = CNN().to(device)
  model.load_state_dict(torch.load(os.path.join(float_model,'f_model.pth'))
其中torch.device代表将torch.Tensor分配到的设备的对象。
torch.device包含一个设备类型(‘cpu’或’cuda’设备类型)和可选的设备的序号。如果设备序号不存在,则为当前设备; 例如,torch.Tensor用设备构建’cuda’的结果等同于’cuda:X’,其中X是torch.cuda.current_device()的结果。
需要注意的是pytorch模型在量化时(calib阶段),调用CNN()这个类,而这个类的定义在common.py文件中,如以下程序所示
class CNN(nn.Module):
    def __init__(self):
        super(CNN, self).__init__()

        self.network = nn.Sequential(
            nn.Conv2d(1, 16, kernel_size=5, stride=2, padding=1),
            nn.BatchNorm2d(16),
            nn.ReLU(inplace=True),
            nn.Conv2d(16, 32, kernel_size=5, stride=2, padding=1),
            nn.BatchNorm2d(32),
            nn.ReLU(inplace=True),
            nn.Conv2d(32, 64, kernel_size=3, stride=2, padding=1),
            nn.BatchNorm2d(64),
            nn.ReLU(inplace=True),
            nn.Conv2d(64, 10, kernel_size=3, stride=3),
            nn.BatchNorm2d(10),
            nn.Flatten()
            )
    def forward(self, x):
        x = self.network(x)
        return x
calib完成后,会由NNDCT自动生成一个包含当前模型结构的py文件,并用于后续的量化(test)环节。
其中import pytorch_nndct as py_nndct是Xilinx量化器所采用的
import torch
import pytorch_nndct as py_nndct
class CNN(torch.nn.Module):
    def __init__(self):
        super(CNN, self).__init__()
        self.module_0 = py_nndct.nn.Input() #CNN::input_0
        self.module_1 = py_nndct.nn.Conv2d(in_channels=1, out_channels=16, kernel_size=[5, 5], stride=[2, 2], padding=[1, 1], dilation=[1, 1], groups=1, bias=True) #CNN::CNN/Sequential[network]/Conv2d[0]/input.2
        self.module_3 = py_nndct.nn.ReLU(inplace=True) #CNN::CNN/Sequential[network]/ReLU[2]/input.4
        self.module_4 = py_nndct.nn.Conv2d(in_channels=16, out_channels=32, kernel_size=[5, 5], stride=[2, 2], padding=[1, 1], dilation=[1, 1], groups=1, bias=True) #CNN::CNN/Sequential[network]/Conv2d[3]/input.5
        self.module_6 = py_nndct.nn.ReLU(inplace=True) #CNN::CNN/Sequential[network]/ReLU[5]/input.7
        self.module_7 = py_nndct.nn.Conv2d(in_channels=32, out_channels=64, kernel_size=[3, 3], stride=[2, 2], padding=[1, 1], dilation=[1, 1], groups=1, bias=True) #CNN::CNN/Sequential[network]/Conv2d[6]/input.8
        self.module_9 = py_nndct.nn.ReLU(inplace=True) #CNN::CNN/Sequential[network]/ReLU[8]/input.10
        self.module_10 = py_nndct.nn.Conv2d(in_channels=64, out_channels=10, kernel_size=[3, 3], stride=[3, 3], padding=[0, 0], dilation=[1, 1], groups=1, bias=True) #CNN::CNN/Sequential[network]/Conv2d[9]/input
        self.module_12 = py_nndct.nn.Module('flatten') #CNN::CNN/Sequential[network]/Flatten[11]/94

    def forward(self, *args):
        self.output_module_0 = self.module_0(input=args[0])
        self.output_module_1 = self.module_1(self.output_module_0)
        self.output_module_3 = self.module_3(self.output_module_1)
        self.output_module_4 = self.module_4(self.output_module_3)
        self.output_module_6 = self.module_6(self.output_module_4)
        self.output_module_7 = self.module_7(self.output_module_6)
        self.output_module_9 = self.module_9(self.output_module_7)
        self.output_module_10 = self.module_10(self.output_module_9)
        self.output_module_12 = self.module_12(start_dim=1, input=self.output_module_10, end_dim=3)
        return self.output_module_12
编译(compiling)
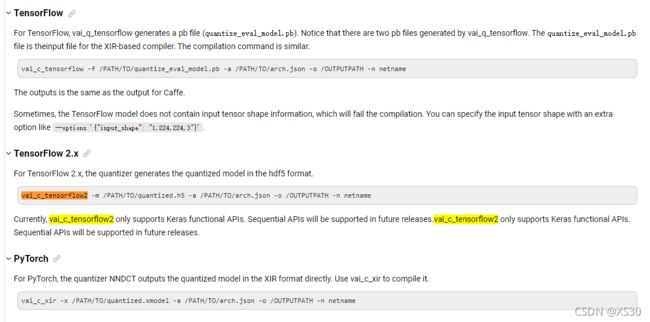
在编译环节中,我们主要采用的一般是对应框架的sh文件,而根据你所采用的深度学习框架的不同,核心编译代码也有所不同,下图源自Vitis AI 用户手册,模型编译部分

下图以Tensorflow为例,列出了tf的编译在sh文件中的使用方法。(文件名:)
#!/bin/bash

# delete previous results
rm -rf ./compile_result

NET_NAME=MNIST
ARCH="u96pynq.json"

# Compile
echo "#####################################"
echo "COMPILE WITH DNNC begin"
echo "#####################################"
vai_c_tensorflow2 \
       --model ./quantized_results/quantized_model.h5 \
       --arch ${ARCH} \
       --output_dir compile_result \
       --net_name ${NET_NAME}
       # -e "{'save_kernel':'', 'mode':'Normal', 'dump':'Graph'}"
       #--mode debug \
       # --dump Graph \

echo "#####################################"
echo "COMPILATION COMPLETED"
echo "#####################################"
下图为Pytorch所采用的compile.sh文件
if [ $1 = zcu102 ]; then
      ARCH=/opt/vitis_ai/compiler/arch/DPUCZDX8G/ZCU102/arch.json
      TARGET=zcu102
      echo "-----------------------------------------"
      echo "COMPILING MODEL FOR ZCU102.."
      echo "-----------------------------------------"
elif [ $1 = ultra96 ]; then
      ARCH=u96pynq.json
      TARGET=ultra96
      echo "-----------------------------------------"
      echo "COMPILING MODEL FOR Ultra96.."
      echo "-----------------------------------------"
else
      echo  "Target not found. Valid choices are: zcu102, zcu104, vck190, u50 ..exiting"
      exit 1
fi

BUILD=$2
LOG=$3
compile() {
  vai_c_xir \
  --xmodel      ${BUILD}/quant_model/CNN_int.xmodel \
  --arch        $ARCH \
  --net_name    CNN_${TARGET} \
  --output_dir  ${BUILD}/compiled_model
}

compile 2>&1 | tee ${LOG}/compile_$TARGET.log


echo "-----------------------------------------"
echo "MODEL COMPILED"
echo "-----------------------------------------"
使用时需要注意json文件的问题,我所采用的ultra96板卡需要在编译过程中自行添加json,方法如下,首先你所启动的docker,应该包含在Vitis AI的大文件夹下面,然后在你自己的例程中启动docker,此时你的根目录就是当前启动docker的文件夹,将json文件放在此处即可进行调用。如果不清楚是否在根目录,可以使用ls命令进行查看当前目录下的文件。

而json文件中包含的是板卡的硬件指纹

PYNQ端
在模型推理过程中,可以不加入tensorflow还是pytorch的相关库,直接进行推理,可以认为xmodel是一种通用的模型格式,不受限于你的深度学习框架,此处代码为mnist在PYNQ框架上进行推理上的代码。
1、加载模型与库
from pynq_dpu import DpuOverlay
overlay = DpuOverlay("dpu.bit")
#此处运行的是pytorch的代码所量化编译出来的xmodel文件
overlay.load_model("CNN_ultra96.xmodel")
#此处运行的是tensorflow的代码所量化编译出来的xmodel文件
#overlay.load_model("MNIST.xmodel")
print('OK')
from time import time
import numpy as np
import mnist
import cv2
import matplotlib.pyplot as plt
%matplotlib inline
from six.moves import urllib

opener = urllib.request.build_opener()
opener.addheaders = [('User-agent', 'Mozilla/5.0')]
urllib.request.install_opener(opener)
2、加载数据集(本地)
def load_mnist():

    path = 'mnist.npz' #放置mnist.py的目录。注意斜杠
    f = np.load(path)
    x_train, y_train = f['x_train'], f['y_train']
    x_test, y_test = f['x_test'], f['y_test']
    f.close()
    return (x_train, y_train), (x_test, y_test)

(train_data,train_label),(test_data,test_label) = load_mnist()

normalized_data = np.asarray(test_data/255, dtype=np.float32)
test_data = np.expand_dims(normalized_data, axis=3)
print(test_data.shape)
print(test_label.shape)
plt.imshow(test_data[1,:,:,0], 'gray')
plt.title('Label: {}'.format(test_label[1]))
plt.axis('off')
plt.show()
3、使用VART
dpu = overlay.runner

inputTensors = dpu.get_input_tensors()
outputTensors = dpu.get_output_tensors()

shapeIn = tuple(inputTensors[0].dims)
shapeOut = tuple(outputTensors[0].dims)
outputSize = int(outputTensors[0].get_data_size() / shapeIn[0])

softmax = np.empty(outputSize)
我们可以定义一些缓冲区来存储输入和输出数据。它们将在多次运行期间重复使用。
output_data = [np.empty(shapeOut, dtype=np.float32, order="C")]
input_data = [np.empty(shapeIn, dtype=np.float32, order="C")]
image = input_data[0]
我们还将定义一些函数来计算softmax
def calculate_softmax(data):
    result = np.exp(data)
    return result
4、运行DPU进行预测
num_pics  = 10
fix, ax = plt.subplots(1, num_pics, figsize=(12,12))
plt.tight_layout()
for i in range(num_pics):
    image[0,...] = test_data[i]
    job_id = dpu.execute_async(input_data, output_data)
    dpu.wait(job_id)
    temp = [j.reshape(1, outputSize) for j in output_data]
    softmax = calculate_softmax(temp[0][0])
    prediction = softmax.argmax()

    ax[i].set_title('Prediction: {}'.format(prediction))
    ax[i].axis('off')
    ax[i].imshow(test_data[i,:,:,0], 'gray')
5、模型评估
total = test_data.shape[0]
predictions = np.empty_like(test_label)
print("Classifying {} digit pictures ...".format(total))

start = time()
for i in range(total):
    image[0,...] = test_data[i]
    job_id = dpu.execute_async(input_data, output_data)
    dpu.wait(job_id)
    temp = [j.reshape(1, outputSize) for j in output_data]
    softmax = calculate_softmax(temp[0][0])
    predictions[i] = softmax.argmax()

stop = time()
correct = np.sum(predictions==test_label)
execution_time = stop-start
print("Overall accuracy: {}".format(correct/total))
print("  Execution time: {:.4f}s".format(execution_time))
print("      Throughput: {:.4f}FPS".format(total/execution_time))
输出结果
Classifying 10000 digit pictures …
Overall accuracy: 0.9896
Execution time: 2.6838s
Throughput: 3726.0886FPS
参考资料
1、Vitis AI 1.3用户手册
2、Vitis AI 1.4用户手册
3、Vitis AI 1.4 Github教程
4、Vitis AI 1.4 Github地址
5、Vitis AI 1.4用户文档(总)
6、DPU-PYNQ Github地址
7、Vitis AI Model Zoo Lits
8、Ultra96V2开发板配置pynq以及dpu-pynq

