opencv学习01-GUI模块
一、思维导图

二、相关操作
2.1、图像
2.1.1、图像读取
cv2.imread(filename, flags)
filename: 图像名称或路径。type:string
flags:
cv2.IMREAD_COLOR,值为1
cv2.IMREAD_GRAYSCALE,值为0
cv2.IMREAD_UNCHANGED,值为-1
2.1.2、图像显示
cv2.imshow(filename, img)
filename: 窗口的名字。type:string
img:显示的图像名称
2.1.3、图像存储
cv2.imwrite(filename, img)
filename: 将图像保存为filename,type:string
img: 需要保存的图像
代码:
# 导入cv库
import cv2 # 读取的格式为BGR

# 读取图片(此处读取灰度图)
img = cv2.imread('cat.jpg', 0)

cv2.namedWindow('image', cv2.WINDOW_NORMAL)  # 先创建窗口,后面再加载图像

cv2.imshow('image', img)
# cv2.imwrite('img.png', img)

# cv2.waitKey(0)  # 键盘绑定函数,需要指出其时间(毫秒)
# 64位系统需要加上&0xFF
k = cv2.waitKey(0)&0xFF

if k == 27:  # Press the ESC to exit
    cv2.destroyAllWindows()
elif k == ord('s'):  # Press for 's' key to save and exit
    cv2.imwrite('img.png', img)
    cv2.destroyAllWindows()
注意:
cv2.namedWindow(name, flags)
name: 窗口名字
flags:
cv2.WINDOW_AUTOSIZE:自动调整窗口大小
cv2.WINDOW_NORMAL:可以调整窗口大小
cv2.waitKey(flags)
flags:
没有键盘输入(-1)
无限期等待键盘输入(0)
也可以用于检测键盘按键是否按下(k=cv2.waitkey(0))
cv2.destroyAllWindows(name): 删除特定的窗口
2.2、视频
作用:可用于将视频分成帧或者将帧组合为视频
cv2.VideoCapture(flags)flags:获取摄像头:值为0读取本地视频:直接传入视频文件cv2.VideoWriter(outputname, fourcc, fps, (Width, Height),isColor)outputname: 保存后的新视频fourcc: 编码fps:帧的大小H,W:帧的大小isColor:是否为彩色图:True/False
import cv2
cap = cv2.VideoCapture('test.mp4')

W = int(cap.get(cv2.CAP_PROP_FRAME_WIDTH)) # 视频宽
H = int(cap.get(cv2.CAP_PROP_FRAME_HEIGHT)) # 视频高
fps = cap.get(cv2.CAP_PROP_FPS)  # FPS
count = cap.get(cv2.CAP_PROP_FRAME_COUNT)  # 帧数

# Define the codec and create VideoWriter object
fourcc = cv2.VideoWriter_fourcc(*'XVID')
out = cv2.VideoWriter('output.avi', fourcc, 20.0, (W, H))

while (cap.isOpened()):
    ret, frame = cap.read()
    if ret == True:
        # 0:上下翻转。1:左右翻转
        frame = cv2.flip(frame, 0)
        # 转成灰度图
        frame= cv2.cvtColor(frame, cv2.COLOR_BGR2GRAY)

        # write the flipped frame
        out.write(frame)

        cv2.imshow('frame', frame)

        if cv2.waitKey(1)&0xFF == ord('q'):
            break
    else:
        break

# Release everthing if job is finished
cap.release()
out.release()
cv2.destroyAllWindows()
2.3、绘图
img: 绘制图形的图像
color: 绘制图形的颜色
thickness: 线条的粗细,如果闭合图形设置为-1,则图形将被填充。默认值为1
linetype: 线条的类型,8连接,抗锯齿等。默认情况下是8连接。cv2.LINE_AA为抗锯齿,这样看起来很平滑。
线条:需要起点(x1,y1)和终点(x2,y2)
cv2.line(img, (x1,y1), (x2,y2), color=(255,255,255), thickness=1)
矩形:需要左上角(x1,y1)和右下角(x2,y2)坐标
cv2.rectangle(img,(x1,y1),(x2,y2),(0,255,0),thickness=3)
圆:需要知道圆心坐标(x,y)和半径(r)
cv2.circle(img,(x,y), r, (0,0,255), thickness=-1)
椭圆:需要中心点坐标(x,y)和长轴(a)短轴(b)长度。沿逆时针方向旋转角度(c),顺时针旋转角度(d)和结束角度(d1)。若d=0和d1=360,则为椭圆
cv2.ellipse(img,(x,y),(a,b),c,d,d1,255,-1)
# 多边形:多边形每个顶点的坐标,用这些顶点构成二维数组,行数即为顶点数,数据类型必须为int32
pts=np.array([[x1,y1],[x2,y2],[x3,y3],[x4,y4]], np.int32)
pts=pts.reshape((-1,1,2))
cv2.polylines(img, pts=[points], isClosed=True, color=(255,255,255), thickness=1)#文字:需要知道绘制内容,位置(x,y),字体类型,大小,颜色,粗细
font=cv2.FONT_HERSHEY_SIMPLEX
cv2.putText(img,'OpenCV',(x,y), font, 4,(255,255,255),2)
代码:
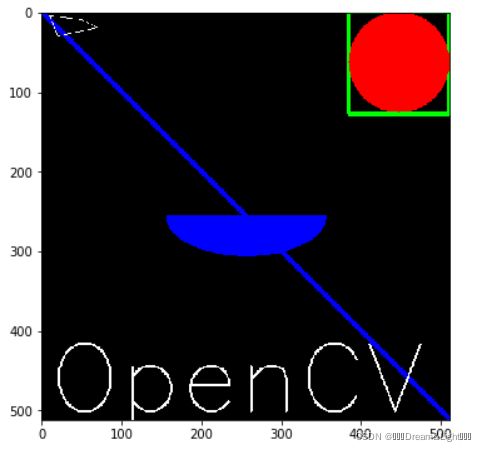
import cv2
import numpy as np
import matplotlib.pyplot as plt

img = np.zeros((512, 512, 3), np.uint8)

# 画线
cv2.line(img, (0, 0), (511, 511), (255, 0, 0), 5)
# 画矩形
cv2.rectangle(img,(384,0),(510,128),(0,255,0),3)
# 画圆
cv2.circle(img,(447,63), 63, (0,0,255), -1)
# 画椭圆
cv2.ellipse(img,(256,256),(100,50),0,0,180,255,-1)
# 画多边形
pts=np.array([[10,5],[20,30],[70,20],[50,10]], np.int32)
pts=pts.reshape((-1,1,2))
cv2.polylines(img, [pts], isClosed=True, color=(255,255,255), thickness=1)
# 图片上添加文字
font=cv2.FONT_HERSHEY_SIMPLEX
cv2.putText(img,'OpenCV',(10,500), font, 4,(255,255,255),2)

# CV(BGR)与matplotlib(RGB)的通道顺序不一样,因此显示图像时需要对通道进行交换
B,G,R = cv2.split(img)
img2 = cv2.merge((R,G,B))
plt.figure(figsize=(12,6))
plt.imshow(img2)
plt.show()
效果:
2.4、画笔
鼠标事件:
enum cv::MouseEventTypes {
cv::EVENT_MOUSEMOVE = 0,
cv::EVENT_LBUTTONDOWN = 1,
cv::EVENT_RBUTTONDOWN = 2,
cv::EVENT_MBUTTONDOWN = 3,
cv::EVENT_LBUTTONUP = 4,
cv::EVENT_RBUTTONUP = 5,
cv::EVENT_MBUTTONUP = 6,
cv::EVENT_LBUTTONDBLCLK = 7,
cv::EVENT_RBUTTONDBLCLK = 8,
cv::EVENT_MBUTTONDBLCLK = 9,
cv::EVENT_MOUSEWHEEL = 10,
cv::EVENT_MOUSEHWHEEL = 11
}
enum cv::MouseEventFlags {
cv::EVENT_FLAG_LBUTTON = 1,
cv::EVENT_FLAG_RBUTTON = 2,
cv::EVENT_FLAG_MBUTTON = 4,
cv::EVENT_FLAG_CTRLKEY = 8,
cv::EVENT_FLAG_SHIFTKEY = 16,
cv::EVENT_FLAG_ALTKEY = 32
}
代码:
import cv2
import numpy as np

drawing = False
mode = True
ix, iy = -1, -1

def drawCircle(event, x, y, flags, param):
    global ix, iy, drawing, mode
    # 当按下左键时返回起始坐标位置
    if event == cv2.EVENT_LBUTTONDOWN:
        drawing = True
        ix,iy = x,y
    # 当鼠标左键按下并移动是绘制图形。event可以查看移动,flag查看是否按下
    elif event == cv2.EVENT_MOUSEMOVE and flags == cv2.EVENT_FLAG_LBUTTON:
        if drawing == True:
            if mode == True:
                cv2.rectangle(img, (ix,iy), (x,y), (0,255,0), -1)
            else:
                # 绘制圆圈,小圆点连在一起就成了线,3代表了笔画的粗细
                cv2.circle(img, (x,y), 3, (0,0,255), -1)
    # 当鼠标松开停止绘画
    elif event == cv2.EVENT_LBUTTONUP:
        drawing = False

img = np.zeros((512,512,3), np.uint8)
cv2.namedWindow('image')
cv2.setMouseCallback('image', drawCircle)
while(1):
    cv2.imshow('image', img)
    k = cv2.waitKey(1)&0xFF
    if k == ord('m'):
        mode = not mode
    elif k == 27:
        break
cv2.destroyAllWindows()
2.5、调色板
cv2.getTrackbarPos(trackbarname, winname)Parameters:- trackbarname: Name of the trackbar- winname: Name of the window that is the parent of the trackbarReturn:- return the current position of the specified trackbarcv2.creatTrackbar(trackbarname,winname,value,count,onChange,userdata )Parameters:- trackbarname: name of created trackbar- winname: Name of the window that will be used as a parent of the created trackbar- value: Optional pointer to an integer variable whose value reflects the position of the creation,Upon creation,the slider position is defined by this variable.- count: Maximal position of the slider.the minimal position is always 0.- onChange: Pointer to the function to be called every time the slider changes position.This function should be prototyped as void Foo(int,void*);,where the first parameter is the trackbar position and the second parameter is the user data(see the next parameter).if the callback is the NULL pointer,no callbacks are called ,but only value is updated.userdata: User data that is passed as is to the callback.It can be used to handle trackbar events without using global variables.
cv2.setMouseCallback(winname, onMouse,userdata =0)Parameters:- winname:Name of the window- onMouse: Mouse callback.See OpenCV samples,such as Link ,on how to specify and use the callback.- userdata: The optional parameter passed to the callbacktypedef void(* cv::MouseCallback) (int event, int x, int y, int flags, void *userdata)Parameters:
- event: one of the cv::MouseEventTypes constants.- x: the x-coordinate of the mouse event.- y: the y-coordinate of the mouse event.- flags: one of the cv::MouseEventFlags constants- userdata: The optional parameter.
code:
import cv2
# import copy
import numpy as np
import matplotlib.pyplot as plt

def nothing(x):
    pass

# 如果mode为True绘制矩形,按下'm'编程绘制曲线
mode = True
# 开始的位置
sx,sy = -1, -1
# 结束位置
ex, ey = -1, -1
# 创建回调函数
def drawCircle(event, x, y, flags, param):
    r = cv2.getTrackbarPos('R', 'image')
    g = cv2.getTrackbarPos('G', 'image')
    b = cv2.getTrackbarPos('B', 'image')
    color = (b,g,r)

    global sx,sy,ex,ey,mode
    # 当按下左键是返回起始位置坐标
    if event == cv2.EVENT_LBUTTONDOWN:
        sx, sy = x, y
        print('start point:({},{})'.format(sx,sy))
    # 当鼠标左键按下并移动是绘制图形。event可以查看移动,flag查看是否按下
    elif event == cv2.EVENT_MOUSEMOVE and flags == cv2.EVENT_FLAG_LBUTTON:
        if sx > 0 and sy > 0:
            ex = x
            ey = y
            dx = ex - sx
            dy = ey - sy
            if dx > 0 and dy > 0:
                if mode == True:
                    img = tmp.copy()
                    cv2.rectangle(img, (sx, sy), (ex, ey), color, 2)
                    cv2.imshow('image', img)
#                     cv2.imshow('ROI', img[sx:ex, sy:ey])
#                     plt.imshow(img[ix:ex,iy:ey])
#                     plt.show()
                else:
                    # 绘制圆圈
                    img = tmp.copy()
                    cv2.circle(img, (ex, ey), 3, color, -1)
                    cv2.imshow('image', img)

    elif event == cv2.EVENT_LBUTTONUP:
        ex = x
        ey = y
        dx = ex - sx
        dy = ey - sy
        print('end point2:({},{})'.format(ex,ey))
        if dx > 0 and dy > 0:
            if mode == True:
                img = tmp.copy()
                cv2.rectangle(img, (sx, sy), (ex, ey), color, 2)
                cv2.imshow('image', img)
                cv2.imshow('ROI', img[sx:ex, sy:ey])
#               plt.imshow(img[ix:ex,iy:ey])
#               plt.show()
            else:
                # 绘制圆圈
                img = tmp.copy()
                cv2.circle(img, (ex, ey), 3, color, -1)
                cv2.imshow('image', img)
            # 准备下一次绘制
            sx, sy = -1, -1


img = cv2.imread('cat.jpg')
height = img.shape[0]
width = img.shape[1]

tmp = np.zeros(img.shape, np.uint8)

cv2.namedWindow('image')
cv2.createTrackbar('R', 'image', 0, 255, nothing)
cv2.createTrackbar('G', 'image', 0, 255, nothing)
cv2.createTrackbar('B', 'image', 0, 255, nothing)
cv2.setMouseCallback('image', drawCircle)

cv2.imshow('image', img)
tmp = img.copy()
while(1):
    k = cv2.waitKey(1)&0xFF
    if k == ord('m'):
        mode = not mode
    elif k == 27:
        break
cv2.destroyAllWindows()
result:
