友情提示:点击查看本文所涉及的demo代码
导语
代理即是代表授权方处理事务(From Wikipedia)。
思考一下我们生活中什么时候会用到代理呢?
租房、买房时,我们需要一位中介帮我们联系房东,处理手续上的事情,降低我们和房东的沟通成本。
叫外卖时,我们需要外卖小哥帮我们送外卖,好让我们有更多时间去专注别的事情。
所以可以理解为中介帮我们解决两个层面上的问题:
- 减少互相依赖的问题
- 减少做重复的事情
所以从本质上来说,Proxy体现的还是"中间层"的设计思想,具体应用于"消息转发"的业务场景。
循环引用
在讲述今天这个Demo前,我们先回想一下之前我们接触过的Proxy的应用场景,我想你脑海中肯定第一时间浮现出:使用Proxy解决NSTimer循环引用的问题。
所以我们首先聊一聊 Proxy 使用最刚需的 「解决循环引用」的场景。
循环引用是怎么产生的
下图是内存正常回收的过程:
下面是产生循环引用导致内存泄漏的过程:
验证是否产生循环引用的最佳方式就是判断是否产生了一个引用环。
NSTimer 循环引用问题
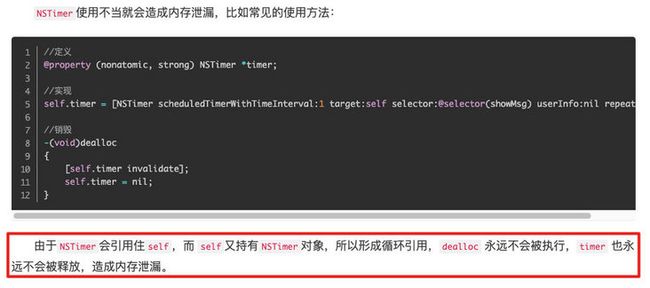
NSTimer 问题最有趣的点是,网上关于 NSTImer 为什么会导致循环引用的解释 80%都是不清晰的,比如这样一个最普遍的说法:
这样的说法就好似有人问小明:"NSTimer为什么会导致循环引用?"
小明却回答:"NSTimer会导致循环引用"。
上演了一出"搁着搁着呢"的好戏。
循环引用一定是 ViewController 和 NSTimer 相互强引用,但为什么 NSTimer addTarget 会导致循环引用,但平时我们使用的 UIButton addTarget却不会导致循环引用呢?
回答清楚这个问题,才算是说清楚了"NSTimer为什么会导致循环引用"。
其实解答这个问题也很简单 我们查一下大苹果提供的文档说明,
对于 UIControl :
The control does not retain the object in the target parameter. It is your responsibility to maintain a strong reference to the target object while it is attached to a control.
翻译成中文含义就是: 控件不保留目标参数中的对象。在目标对象附加到控件时,维护对目标对象的强引用是您的责任
对于 NSTimer 说明如下:
The object to which to send the message specified by aSelector when the timer fires. The timer maintains a strong reference to this object until it (the timer) is invalidated.
中文含义是:当定时器触发时,要发送由aSelector指定的消息到的对象。计时器维护对该对象的强引用,直到它(计时器)失效。
这样一看就明白多了,之所以 NSTimer 会导致强引用,但 UIControl 不会导致强引用,是大苹果的feature,达到了真正的类比深入的效果。
破解 NSTimer 循环引用的方法我们都很熟练了,我们贴一张图即可:
简单小Demo
开发时我们经常会写出这样的代码:
- (UIButton *)closeBtn {
    if (!_closeBtn) {
        _closeBtn = [[UIButton alloc] initWithFrame:CGRectMake(100, 200, 150, 50)];
        [_closeBtn setTitle:@"关闭" forState:UIControlStateNormal];
        [_closeBtn addTarget:self action:@selector(onClickCloseBtn) forControlEvents:UIControlEventTouchUpInside];
    }
    return _closeBtn;
}

- (void)onClickCloseBtn {
    if (self.delegate && [self.delegate conformsToProtocol:@protocol(NSTimerViewControllerDelegate)]) {
        [self.delegate onClickTimerAction];
    }
}
消息转发流程是: click button -> button selector -> delegate method,
而实际上我们只需要: click button -> delegate method
我们想省去 button selector 这个步骤,怎么做呢?
既然是消息转发的事情,那就采用 Proxy 的思路:
#import "DelegateMethodProxy.h"
#import
#import

@interface DelegateMethodProxy ()

@property (nonatomic, copy) dispatch_block_t block;

@end

@implementation DelegateMethodProxy

+ (instancetype)initWithBlock:(dispatch_block_t)block {
    DelegateMethodProxy *proxy = [[DelegateMethodProxy alloc] init];
    proxy.block = block;
    return proxy;
}

- (void)addClickActionToButton:(UIButton *)view {
    objc_setAssociatedObject(view, @"DelegateMethodProxy", self, OBJC_ASSOCIATION_RETAIN);
    [view addTarget:self action:@selector(onClick) forControlEvents:UIControlEventTouchUpInside];
}

- (void)onClick {
    if (self.block) {
        self.block();
    }
}

@end
优化 UIButton 的调用方法:
- (UIButton *)closeBtn {
    if (!_closeBtn) {
        _closeBtn = [[UIButton alloc] initWithFrame:CGRectMake(100, 200, 150, 50)];
        [_closeBtn setTitle:@"关闭" forState:UIControlStateNormal];
        [DelegateMethodProxy initWithBlock:^{
            if (self.delegate && [self.delegate conformsToProtocol:@protocol(NSTimerViewControllerDelegate)]) {
                [self.delegate onClickTimerAction];
            }
        }] addClickActionToButton:_closeBtn];
        [_closeBtn addTarget:self action:@selector(onClickCloseBtn) forControlEvents:UIControlEventTouchUpInside];
    }
    return _closeBtn;
}
如此一来,业务层就直接实现了 click button -> delegate method 的调用链路。
**这个公众号会持续更新技术方案、关注业内技术动向,关注一下成本不高,错过干货损失不小。
↓↓↓**![]()


