用Python开发web应用—Streamlit框架解析:组件
Streamlit的组件Components是一系列第三方的Python模块,其极大地扩展了Streamlit的功能。
Components带来了无穷的想象力和可能性,比如与React、Vue等前端框架联动、创建自定义风格和行为的新部件、以及增加新的可视化图表类型等。
使用组件
查找可用组件
查找组件有个常用的途径:
Component Gallery ,这是官方挑选出来的特色组件;
安装组件
安装这些组件,只需:
pip install some_cool_component
以 AgGrid 组件为例,安装命令为:
pip install streamlit-aggrid
使用组件
查看组件的使用文档,还是以AgGrid为例:
from st_aggrid import AgGrid
AgGrid(my_dataframe)
创建组件
如果已有的组件不满足自己的需求,还可以自己创建组件。
先来看一下插件的类型:
import streamlit as st

x = st.slider('x')
st.markdown(f'`{x}` squared is `{x * x}`')
如上代码中有两种组件:
(1)静态组件static components,即 st.markdown ,它是无状态的,仅向浏览器发送和渲染数据;
(2)双向组件bidirectional components,即 st.slider
,它有内部状态,会从浏览器中返回数据,也可以向浏览器发送和渲染数据,即在后台Python代码和前端JavaScript代码之间交换数据。
对于组件开发,Streamlit提供了 streamlit.components.v1 这个包:
importstreamlit.components.v1 as components
这个略显冗长的导入声明对组件API明确地指明了版本号,这样以后升级后就不会破坏已有的组件。
具体地,对于静态组件,有两种方法可供使用:
(1) html(...) 可以基于HTML、JavaScript和CSS来创建组件;
(2) iframe(...) 可以嵌入外部网站。
对于双向组件:
declare_component(...) 可以创建在Streamlit和浏览器之间双向交换数据的动态部件。
创建静态组件
如果创建的组件目的是为了仅仅展示HTML代码或从Python可视化库中渲染图表,那么可以有两种很简单的方法实现 components.html() 和 components.iframe() 。
示例1:Gist代码段
比如想在页面中嵌入如下这种Github Gist代码段:
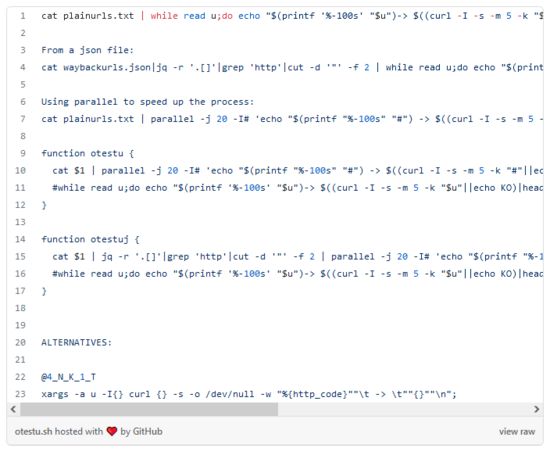
那么,可以这样写:
import streamlit as st
import streamlit.components.v1 as components

def github_gist(gist_creator, gist_id, height=600, scrolling=True):
    components.html(
        f"""


    """,
        height=height,
        scrolling=scrolling,
    )

github_gist('gwen001', '6843c83d878ff22783bd573ac48a2c93', height=600)
可以看出,在 components.html()
可以方便地嵌入和调用javascript脚本。
示例2:boostrap
如下例子是使用bootstrap库创建自定义按钮。
import streamlit as st
import streamlit.components.v1 as components
# bootstrap 4 collapse example
components.html(
"""
Collapsible Group Item #1 content
Collapsible Group Item #2 content
""",
height=600,
)
效果如下:
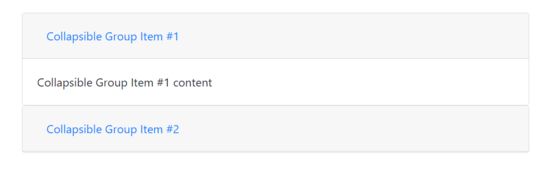
可以看出,可以嵌入任意的HTML、CSS和JavaScript代码。
同时,因为Component运行在由一个 iframe
创建的沙盒sandbox中,不用担心安全问题。
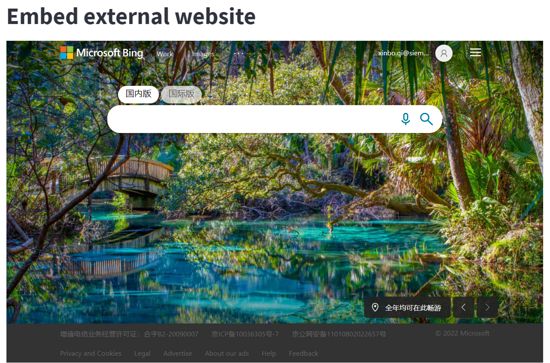
示例3:嵌入外部网站
components.iframe 与 components.html 功能类似,只是它的输入是URL地址,这样就能轻松地将外部网站嵌入到Streamlit app中。
import streamlit as st
import streamlit.components.v1 as components

# embed streamlit docs in a streamlit app
st.title("Embed external website")
components.iframe("http://www.bing.com/", height=600, width=1000)
效果如下:
创建双向组件
双向组件由两部分构成:
(1)一个前端frontend:基于HTML或任意web技术栈(JS技术,React、Vue等框架)构建,然后在Streamlit app中通过一个 iframe 标签所渲染;
(2)一个Python API:使得app可以实例化,并与前端交流数据。
环境配置
要创建双向组件,需要先安装如下环境:
(1)Python3.7-python3.9
(2)Streamlit 0.63+
(3)nodejs
(4)npm或yarn
下载模板
可以使用任意web技术来构建组件,Streamlit官方提供了基于React.js前端和纯TypeScript的开发模板,见 这个仓库 。
也可以使用Vue.js及其他技术。这里以一个社区成员提供的 Vue3模板 为例,下载该模板:
git clone [email protected]:andfanilo/streamlit-component-template-vue.git
安装依赖并运行模板
$ cd my_component/frontend
$ npm install    # Install npm dependencies
$ npm run serve  # Start the Webpack dev server
注意这里是使用了开发服务器来运行前端代码,好处是开发阶段,每次代码的变动都能直接起效。
在实际上线过程中,使用:
npm run build
来进行打包。具体详情可查看“发布组件”一节。
运行app
另开一个终端,然后运行该模板所对应的app:
streamlit run my_component/__init__.py # run the example
效果如下:
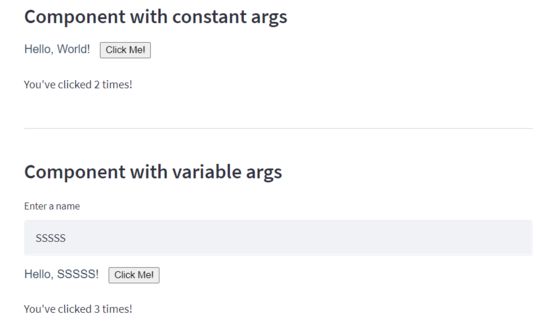
这个例子展示了双向交流数据是怎样进行的。Streamlit Component展示一个按钮( python->JavaScript ),然后终端用户可以点击按钮。每次按钮被点击后,JavaScript前端就增加计算器数值,然后把它传递回Python( JavaScript->Python ),然后Streamlit又再次渲染展示( Python->JavaScript )。
原理
数据交换过程
(1)Python到JavaScript
基于Vue的前端在 my_component/frontend/src/MyComponent.vue 文件中。Python脚本传来的参数可以在 args 属性中获得:
以此例来说,在Python脚本中定义的函数及其参数为:
_component_func = components.declare_component(
    "my_component",
    url="http://localhost:3001",
)

def my_component(name, key=None):
    component_value = _component_func(name=name, key=key, default=0)
    return component_value

num_clicks = my_component("World")
然后在前端Vue模板中可以这样接收和使用:
Hello, {{ args.name }}!
(2)JavaScript到Python
在前端中通过 Streamlit.setComponentValue() 向Python脚本传递数据:
Streamlit.setComponentValue(numClicks.value)
在Python脚本中获得如上数值:
num_clicks = my_component("World")
st.markdown("You've clicked %s times!" % int(num_clicks))
当调用 Streamlit.setComponentValue(new_value) 时,这个新的数值就会传给Streamlit,其就会从上到下重新运行Python脚本,当脚本重新运行后,对 my_component(...)
的调用就会返回新的数值。
数据序列化
(1)Python到JavaScript
如前所述,可以在Python的 my_component 函数中传递数据,从而在JavaScript中获取。可以传递的数据有:
numpy.array
pandas.DataFrame
第一种任何可序列化为JSON的数据都会被序列化为JSON字符串,然后在JavaScript中反序列化。
第二种和第三种都是通过 Apache Arrow 序列化,然后被反序列化为 ArrowType ,它是Arrow自定义的一种数据格式,提供了非常简便的API供调用。
(2)JavaScript到Python
如前所述,可以在JavaScript的 Streamlit.setComponentValue() 函数中传递数据给Python。不像是前面Python到JavaScript那样可以传递参数并解析参数,这个函数仅能传递一个数值。如果想传递多个数值,需要将它们封装成 Array 或 Object 。
从JavaScript到Python,可以传递可序列化为JSON的数据,以及 ArrowTable 这种能表示data frame的数据结构。
发布组件
新的组件创建好后,可以将其打包发布到PyPI上,供其他Python用户使用。即使不是为了公开自己的组件,对于双向组件,也是需要将前端部分进行生产环境下的打包。
对于静态组件的发布,以及上传PyPI,这些操作在这里都不再详述,具体可以参考 这里 。
这一部分主要看双向组件的配置,因为其既还有Python代码,也有JS和HTML代码,需要将这些前端代码编译成静态文件。
双向组件的配置基于前面的template。
(1)命名组件
首先,将 template/my_component/ 文件夹重命名为 template/ ;
然后,将组件名字传入 declare_component() 的第一个参数。
if not _RELEASE:
    _component_func = components.declare_component(
        "hello_world",
        url="http://localhost:3001",
    )
else:
    parent_dir = os.path.dirname(os.path.abspath(__file__))
    build_dir = os.path.join(parent_dir, "frontend/dist")
    _component_func = components.declare_component(
        "hello_world", path=build_dir)
(2)打包前端文件
$ cd frontend
$ npm run build
即将Vue代码编译为HTML、CSS和JS文件。这将会新建一个 frontend/dist/ 文件夹,里面存放了这些文件。
(3)更改Release模式
将Python脚本中的模式设为release模式: _RELEASE = True
这样配置以后,就无需通过 npm run serve 开启一个开发服务器,直接使用一个终端运行 streamlit run 即可。