Vue—表单的输入绑定,绑定Vue3表单的输入,轻松入门Vue3(六)
目录
- 文本框
- 选择框
- 更改绑定显示的值
- 修饰符
- .lazy
- .number
- .trim
v-model 指令用来在 input、select、textarea、checkbox、radio 等表单控件元素上创建双向数据绑定,根据表单上的值,自动更新绑定的元素的值,在表单中,我们同样可以用到v-model来进行数据的绑定。

文本框
文本包括text和textarea元素
text 和 textarea 元素使用 value property 和 input 事件
实现
<html>
<head>
<meta charset="utf-8">
<title>Vue 测试实例title>
<script src="https://unpkg.com/vue@next">script>
head>
<body>
<div id="demo">
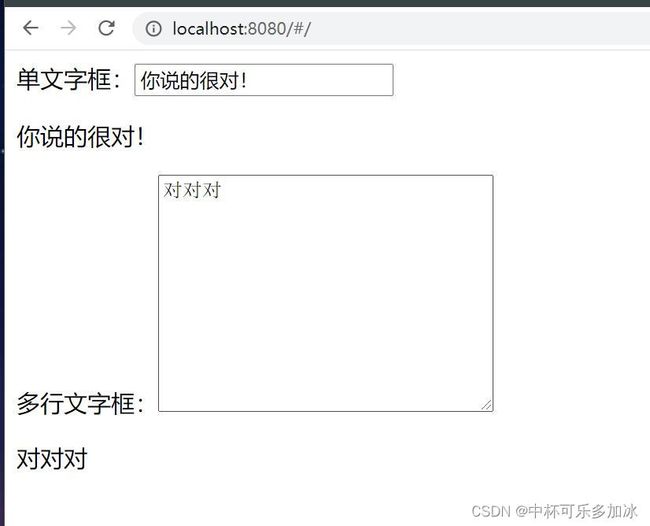
单文字框:<input type="text" v-model="message1" placeholder="edit me">
<p>{{message1}}p>
多行文字框:<textarea name="mytext" id="" cols="30" rows="10" v-model="message2" placeholder="edit me">textarea>
<p>{{message2}}p>
div>
<script>
const vm = Vue.createApp({
data() {
return {
message1:"",
message2:""
}
},
}).mount('#demo')
script>
body>
html>
选择框
checkbox 和 radio 使用 checked property 和 change 事件;
select 字段将 value 作为 prop 并将 change 作为事件。
同样使用v-model可以绑定
<html>

<head>
  <meta charset="utf-8">
  <title>Vue 测试实例title>
  <script src="https://unpkg.com/vue@next">script>
head>

<body>
  <div id="demo">
    是否已满18岁:<input type="checkbox" name="checkbox1" id="checkbox1" v-model="check18"/>
    <label>{{check18}}label><br>
    爱好:<input type="checkbox" name="checkbox2" id="checkboxRead" value="read" v-model="mylike">
    <label for="checkboxRead">读书label>
    <input type="checkbox" name="checkbox2" id="checkboxListen" value="listen" v-model="mylike">
    <label for="checkboxListen">听歌label>
    <input type="checkbox" name="checkbox2" id="checkboxSleep" value="sleep" v-model="mylike">
    <label for="checkboxSleep">睡觉label>
    <span>Selected: {{ mylike }}
      <br>
    性别:<input type="radio" name="checkbox3" id="checkboxMale" value="male" v-model="gender">
    <label for="checkboxMale">男label>
    <input type="radio" name="checkbox3" id="checkboxFemale" value="female" v-model="gender">
    <label for="checkboxFemale">女label>
    <span>Selected:{{gender}}span><br>

    地区:<select v-model="area">
      <option disabled value="">Please select oneoption>
      <option>华北option>
      <option>华中option>
      <option>华南option>
    select>
    <span>Selected: {{ area }}span><br>

    类型:<select v-model="typeselect" multiple>
      <option>Aoption>
      <option>Boption>
      <option>Coption>
    select>
    <span>Selected: {{ typeselect }}span>


  div>
  <script>
   const vm = Vue.createApp({
  data() {
    return {
      check18:false,
      mylike:[],
      gender:"",
      area:"",
      typeselect:""
    }
  },
}).mount('#demo')
  script>
body>
html>

在上面的用法中,对于单选按钮,复选框及选择框的选项,v-model 绑定的值通常是静态字符串 (对于复选框也可以是布尔值):
如:,当选中时,gender为字符串“male”;
如:,当选中时,check18为true;
如:
<select v-model="area">
      <option disabled value="">Please select oneoption>
      <option>华北option>
      <option>华中option>
      <option>华南option>
    select>
当选中第一个选项时,area为华北。
更改绑定显示的值
1、加入true-value和 false-value操控绑定后显示的值:
<input type="checkbox" v-model="heath" true-value="heathy" false-value="not heathy" />
    <span>Selected: {{ heath }}span>
当被选中时,heath为heathy而不是常规的true,当未被选中时,heath为not heathy而不是常规的false。
2、使用v-bind
<input type="radio" v-model="pick" v-bind:value="a" />
<script>
// 当选中时
vm.pick === vm.a
script>
3、使用内联
<select v-model="selected">

  <option :value="{ number: 123 }">123option>
select>
<script>
// 当选中时
typeof vm.selected // => 'object'
vm.selected.number // => 123
script>
修饰符
.lazy
在默认情况下,v-model 在每次 input 事件触发后将输入框的值与数据进行同步,但你可以添加一个修饰符 lazy ,如单文字框:,从而转变为在 change 事件中同步,什么意思呢?
就是当添加.lazy修饰符之后,改变input框中的内容并不会使得span中的内容马上发生变化,而是当输入框失去焦点后触发change事件然后发生变化。如:

.number
如果想自动将用户的输入值转为数值类型,可以给 v-model 添加 number 修饰符:
当输入类型为 text 时这通常很有用。如果输入类型是 number,Vue 能够自动将原始字符串转换为数字,无需为 v-model 添加 .number 修饰符。如果这个值无法被 parseFloat() 解析,则返回原始的值。
.trim
如果要自动过滤用户输入的首尾空白字符,可以给 v-model 添加 trim 修饰符: