uni-app 小项目开发 仿小米商城 后端提供数据1
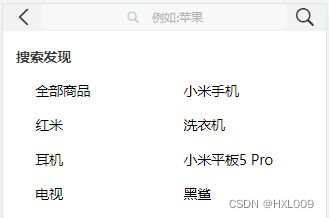
页面介绍
主要功能
1.点击左侧图标返回上一级。
2.按下回车搜索框或点击右侧搜索图标,搜索内容会添加到搜索历史中。
3.当搜索历史为 0 时,不展示搜索历史,在搜索历史展示时,会有全部删除的图标,可全部删除。
4.点击搜索发现的内容可获取内容的 _id 的值。
(注:本页面的搜索功能仅能加入搜索历史,不进行页面跳转。搜索历史与搜索发现仅可获取 _id 的值)
数据部分
发送请求
向后端发送请求
export default {
	// 全局配置 默认
	common: {
		// 默认请求路径
		baseUrl: "http://localhost:3000/admin",
		data: {},
		// 默认请求方法
		method: 'GET',
		dataType: 'json'
	},
	// 请求方法, 返回一个promise
	request(options = {}){
		// 混合用户参数配置和默认配置 options为调用时传入的参数集合
		options.url = this.common.baseUrl + options.url;
		options.header = options.header || this.common.header;
		options.data = options.data || this.common.data;
		options.method = options.method || this.common.method;
		options.dataType = options.dataType || this.common.dataType
		// 请求
		return new  Promise((reslove, reject)=>{
			uni.request({
				...options,
				success: (result)=> {
					if(result.statusCode !== 200){
						return reject(result);
					}
					const data = result.data;
					reslove(data);
				},
				fail: (error)=>{
					console.log(error, 'fail')
					uni.showToast({
						title: error.errMsg || '请求失败',
						icon: 'none'
					});
					// 返回reject否则无法捕获错误
					return reject(error);
				}
			})
		})
	}
}
调用
request.request({
	// options 处
	url:`/searchHistory/deleted`,
	method:"DELETE"
}).then(response=>{
	if(response.flag){
		request.request({
			url:`/searchHistory`
		}).then(response=>{
			this.searchHistory=response.data;
		})
	}
}).catch(error=>{
	console.log(error)
})
获取的数据
1.搜索历史
2.搜索发现
对数据的操作
1.搜索历史
搜索历史的获取,添加和删除。
2.搜索发现
搜索发现的获取
(注:第一次获取数据在 onload 中进行)
后端处理
安装 moogoose,node ,koa 等,安装教程可自行搜索。
1.在 app.js 添加路由
//......省略其他路由
const searchFind = require("./routes/searchFind");
// 引用路由
app.use(searchFind.routes(), searchFind.allowedMethods());
2.在 routes 文件夹下新建 searchFind.js 路由
const router = require("koa-router")();
const searchFind = require("../controller/admin/searchFind");
const jwt = require("jsonwebtoken");
router.prefix("/admin/searchFind");

router.get("/", searchFind.index);

module.exports = router;
3.新建 config 文件夹,用于连接数据库
config.js 连接数据库的一些默认数据
module.exports = {
    DBConfig: {
        'type': 'mongodb', // 数据库类型
        'hostname': "localhost",  // 服务器地址
        'hostport': 27017, // 默认端口号
        'database': "uni-appShop", // 数据库名称
        'username': '', // 访问数据库用户名
        'password': '', // 访问数据库密码
        'charset': 'utf8', // 字符集
        'prefix': '', // 表前缀 mysql b0335-admin
    }
};
db.js 用于连接数据库
const mongoose = require('mongoose');
const { DBConfig } = require("./config");
mongoose.connect(
  `${DBConfig.type}://${DBConfig.hostname}:${DBConfig.hostport}/${DBConfig.database}`
);

const db = mongoose.connection;

db.on('error', (error) => {
  console.log('数据库连接错误: ', error);
});

module.exports = db;
4.新建 model 文件夹,用于数据的定义
const mongoose = require("mongoose");
const db = require('../config/db');
const Schema = mongoose.Schema;

const searchFindScheam = new Schema(
    {
        list_id: {
            type: Number
        },
        list_text: {
            type: String
        }
    }
);

const searchFind = mongoose.model("searchFind", searchFindScheam);

module.exports = searchFind;
5.新建 service 文件夹用于,数据的操作
const searchFind = require("../model/searchFind");

async function findAll() {
    try {
        const result = await searchFind.find();
        if (!result) {
            return {
                flag: false,
                errMsg: "query:Error",
            };
        }
        return { errMsg: "query:Ok", flag: true, data: result };
    } catch (error) {
        return {
            flag: false,
            errMsg: error,
        };
    }
}

module.exports = {
    findAll
};
5.新建 controller 文件夹,在其中 admin 文件夹用于获取数据
const searchFind = require("../../service/searchFind");

module.exports = {
    async index(ctx, next) {
        const { flag, data, errMsg, xxx } = await searchFind.findAll();
        ctx.response.type = "application/json";
        if (flag) {
            ctx.response.body = {
                flag: true,
                errMsg: "requets:OK",
                statusCode: 20000,
                data,
            };
        }
    },
}
(注:代码为搜索发现的实现过程,搜索历史与之类似)
源码
Github:Github:https://github.com/hrbust1914010305/uni-app-shop
newSearch.zip
