SpringBoot整合SpringSecurity带图片验证码简单实现
SpringBoot整合SpringSecurity带图片验证码简单实现
简单说一下帖子内容
新项目结构自己定,就决定使用SpringSecurity权限。也因为之前一直都没有写过全向方面的东西,所以过程中遇到了很多问题,并且各种查阅资料、帖子、贴吧等,很多问题都是复制粘贴,根本无法解决问题。因此决定自己写这篇文章,不进是为了自己借鉴,也为大家提供帮助。以下内容主要是针对SpringSecurity与图片验证码的使用,对于mybatis、druid等不做介绍,也就不会再多写什么。
内容中也许有些代码会借鉴别处,是看了太多帖子经过自己修改的,没有可以去抄袭谁的。目的在于走通,本来就这么用,代码都一样。
补充
针对把code码放到httpServletRequest中易引发并发问题,考虑之后,重写了SpringSecurity内的部分内容,实现把code码放入到login的提交表单内,与用户名和密码一起发送。
参考:SpringBoot整合SpringSecurity登录表单添加额外自定义字段
正式开始
因为是根据项目中总结,所以不提供源码。有问题可以留言交流。springboot配置文件不做介绍,这块没有什么相关的。方便了解文章先简单陈列以下目录,一目了然:
- jar包的引入Security与thymeleaf,;
- 数据库表的准备;
- 配置MVC端点;
- SpringSecurity核心配置;
- 登录用户权限验证;
- 登录成功拦截;
- 登录失败拦截;
- 自定义验证方式;
- 图片校验,jar包、配置类、调用;
- 页面引擎注意;
- 遇到问题
- 图片校验更改为拦截校验
1、jar包的引入
此处只用文章对应的jar包,至于其他则与本文无关,就不再陈述。需要注意的是thymeleaf中security支持的版本问题,根据jar包决定,不然会有问题。
<dependency>
    <groupId>org.springframework.boot</groupId>
    <artifactId>spring-boot-starter-security</artifactId>
</dependency>
<dependency>
    <groupId>org.springframework.boot</groupId>
    <artifactId>spring-boot-starter-thymeleaf</artifactId>
</dependency>
<!--thymeleaf中security支持-->
<dependency>
    <groupId>org.thymeleaf.extras</groupId>
    <artifactId>thymeleaf-extras-springsecurity5</artifactId>
</dependency>
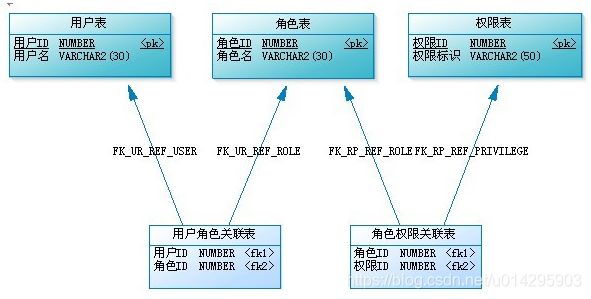
2、准备数据库,设计表结构,至少有用户表且包含权限角色字段。
根据系统权限结构的完善程度,一搬都包含用户表、用户角色关联表、角色表、角色权限关联表、权限表。(目前项目只采用两个角色的简单权限,也不涉及太多资源划分,资源控制在配置类或者页面就足以解决,文章只是实现,自行完善)。
CREATE TABLE `sys_user`  (
  `user_id` int(11) NOT NULL AUTO_INCREMENT COMMENT 'id主键',
  `username` varchar(20) CHARACTER SET utf8mb4 COLLATE utf8mb4_general_ci NOT NULL COMMENT '用户名',
  `password` varchar(128) CHARACTER SET utf8mb4 COLLATE utf8mb4_general_ci NOT NULL COMMENT '用户密码',
  `upload_amount` int(11) NULL DEFAULT NULL COMMENT '上传文件数量',
  `status` int(11) NULL DEFAULT NULL COMMENT '用户状态:1正常     -1禁用',
  `role` int(11) NOT NULL COMMENT '用户权限,对应权限表',
  `createtime` timestamp(0) NOT NULL DEFAULT CURRENT_TIMESTAMP COMMENT '用户创建时间',
  `phone_number` varchar(11) CHARACTER SET utf8mb4 COLLATE utf8mb4_general_ci NULL DEFAULT NULL COMMENT '联系电话',
  `mail` varchar(64) CHARACTER SET utf8mb4 COLLATE utf8mb4_general_ci NULL DEFAULT NULL COMMENT '用户邮箱',
  `remark` varchar(100) CHARACTER SET utf8mb4 COLLATE utf8mb4_general_ci NULL DEFAULT NULL COMMENT '备注信息',
  PRIMARY KEY (`user_id`) USING BTREE
) ENGINE = InnoDB AUTO_INCREMENT = 71 CHARACTER SET = utf8mb4 COLLATE = utf8mb4_general_ci COMMENT = '本系统用户表' ROW_FORMAT = Dynamic;

SET FOREIGN_KEY_CHECKS = 1;
3、配置MVC端点,系统中跳转处理
没啥可解释的,拦截跳转。根据需要扩充
import org.springframework.context.annotation.Configuration;
import org.springframework.web.servlet.config.annotation.ViewControllerRegistry;
import org.springframework.web.servlet.config.annotation.WebMvcConfigurer;

@Configuration
public class MvcConfig implements WebMvcConfigurer {

    public void addViewControllers(ViewControllerRegistry registry) {
        registry.addViewController("/").setViewName("index");
        registry.addViewController("/login").setViewName("login");
    }
}
4、SpringSecurity核心配置
配置SpringSecurity访问策略,包括登录、登出处理,资源访问开放,密码基本加密,验证引入等,很重要。
(a、遇到退出后再登录跳转到上一次操作的url上,而不是首页,添加登录成功拦截解决。)
一些注释代码中全都包含了,可以直接看代码。
import org.springframework.beans.factory.annotation.Autowired;
import org.springframework.context.annotation.Bean;
import org.springframework.context.annotation.Configuration;
import org.springframework.security.authentication.AuthenticationProvider;
import org.springframework.security.config.annotation.authentication.builders.AuthenticationManagerBuilder;
import org.springframework.security.config.annotation.method.configuration.EnableGlobalMethodSecurity;
import org.springframework.security.config.annotation.web.builders.HttpSecurity;
import org.springframework.security.config.annotation.web.configuration.EnableWebSecurity;
import org.springframework.security.config.annotation.web.configuration.WebSecurityConfigurerAdapter;

import net.security.MyAuthenctiationSuccessHandler;
import net.security.MyAuthenticationProvider;


@Configuration
@EnableWebSecurity
@EnableGlobalMethodSecurity(prePostEnabled = true)
public class WebSecurityConfig extends WebSecurityConfigurerAdapter {
	@Autowired
	private MyAuthenctiationSuccessHandler myAuthenctiationSuccessHandler;
//	@Autowired
//	private MyAuthenctiationFailureHandler myAuthenctiationFailureHandler;

	@Override
	protected void configure(HttpSecurity http) throws Exception {
		http.headers().frameOptions().disable(); //用于加载页面iframe部分
		http.authorizeRequests()
				.antMatchers("/", "/getVerify","/css/**", "/js/**", "/image/**", "/fonts/**", "/images/**").permitAll() // 允许所有用户访问
				//.antMatchers("/**").hasRole("admin") // 仅允许admin角色访问全部
				//.antMatchers("/**").access("hasAnyRole('FILE','USER')") // 仅允许具备其中某一角色的用户访问
				//.antMatchers("/**").access("hasRole('admin') or hasRole('child')") // 仅允许同时具备两个角色的用户访问
				.anyRequest().authenticated()
				.and()
			.formLogin() // 定义当需要用户登录时候,转到的登录页面
				.loginPage("/login") //自定义的登录页,不写的话调用security内部的.loginProcessingUrl("/beacon/user/login")//默认登录的方法
				.failureUrl("/login?error=true")
				.defaultSuccessUrl("/index")//成功登录后跳转页面
				.successHandler(myAuthenctiationSuccessHandler)
				//.failureHandler(myAuthenctiationFailureHandler)
				.permitAll()
				.and()
			.sessionManagement()
				.invalidSessionUrl("/login")//session失效后跳转路径
				//.sessionFixation().newSession()//用户认证之后,会新创建一个session,但是不会将旧的session中的属性,迁移到新的session中(旧的也可以用,不建议)。默认.migrateSession()新建属性从原session中拷贝过来
				.and()
			.requestCache().disable()//使退出前的操作请求缓存为空失效,但是并没有更改获取缓存路径并跳转的实现,避免登录后跳转到上一次操作嗯对全路径下而非主页
			.logout()
				.logoutSuccessUrl("/login") //成功退出后跳转到的页面
				.permitAll()//退出
				.and()
			.csrf().disable();

//		http.requestCache().requestCache(new NullRequestCache());//与disable相似,disable()同样实现了new NullRequestCache(),此处记录学习
		http.csrf().ignoringAntMatchers("/druid/*");//druid监控web界面开放
//		http.sessionManagement().maximumSessions(1).expiredUrl("/login");//会话管理:用户仅允许一个登陆
	}

	//加入中间验证层,可实现自定义验证用户等信息
	@Bean
    public AuthenticationProvider authenticationProvider() {
        AuthenticationProvider provider = new MyAuthenticationProvider();
        return provider;
    }

    @Override
    protected void configure(AuthenticationManagerBuilder auth) throws Exception {
        auth.authenticationProvider(authenticationProvider());
    }

}
5、登录用户权限验证
用户为数据库用户,在数据库中查询登录用户,并赋予角色。
import java.util.ArrayList;

import javax.servlet.http.HttpServletRequest;

import org.apache.commons.lang3.StringUtils;
import org.slf4j.Logger;
import org.slf4j.LoggerFactory;
import org.springframework.beans.factory.annotation.Autowired;
import org.springframework.context.annotation.Bean;
import org.springframework.security.core.GrantedAuthority;
import org.springframework.security.core.authority.SimpleGrantedAuthority;
import org.springframework.security.core.userdetails.UserDetails;
import org.springframework.security.core.userdetails.UserDetailsService;
import org.springframework.security.core.userdetails.UsernameNotFoundException;
import org.springframework.security.crypto.bcrypt.BCryptPasswordEncoder;
import org.springframework.security.crypto.password.PasswordEncoder;
import org.springframework.stereotype.Component;

import net.usermanage.bean.SysUser;
import net.usermanage.service.SysUserService;

@Component
public class MyUserDetailService implements UserDetailsService {
	Logger logger = LoggerFactory.getLogger(MyUserDetailService.class);

    @Autowired
    private SysUserService sysUserService;
    @Autowired
    private HttpServletRequest httpServletRequest;

    @Bean
    public PasswordEncoder passwordEncoder(){
        return new BCryptPasswordEncoder();
    }

    @Override
    public UserDetails loadUserByUsername(String username) throws UsernameNotFoundException {
    	//用户验证前先验证是否有验证码
    	String requestCode = httpServletRequest.getParameter("vercode");
        if(StringUtils.isEmpty(requestCode)) {
        	logger.info("验证码不能为空!");
        	throw new UsernameNotFoundException("验证码不能为空!");
        }
        if(StringUtils.isEmpty(username)) {
        	logger.info("用户名不能为空!");
        	throw new UsernameNotFoundException("用户名不能为空!");
        }

        //通过用户名获取用户信息
        SysUser user = sysUserService.selectByUserName(username);
        if (user == null){
        	logger.info("登录用户"+username+"不存在!");
            throw new UsernameNotFoundException("登录用户不存在!");
        }else if(user.getStatus() == -1){
        	logger.info("登录用户"+username+"已禁用!");
        	throw new UsernameNotFoundException("登录用户已禁用!");
        }
        String role = "";
        if(user.getRole() ==1) {
        	role = "admin";
        }else if(user.getRole() ==2) {
        	role = "child";
        }
        //获取用户的角色
        ArrayList<GrantedAuthority> grantedAuthorities = new ArrayList<>();
        //角色必须以`ROLE_`开头
        grantedAuthorities.add(new SimpleGrantedAuthority("ROLE_" + role));

        return new org.springframework.security.core.userdetails.User(user.getUsername(),
        		//passwordEncoder().encode(user.getPassword()),//数据库的密码是没有加密的,所有这里要加密
                user.getPassword(),//若入库密码已进行加密,此处则不需要解密
                grantedAuthorities);
    }
}
6、登录成功拦截
import java.io.IOException;

import javax.servlet.ServletException;
import javax.servlet.http.HttpServletRequest;
import javax.servlet.http.HttpServletResponse;

import org.slf4j.Logger;
import org.slf4j.LoggerFactory;
import org.springframework.security.core.Authentication;
import org.springframework.security.web.authentication.SimpleUrlAuthenticationSuccessHandler;
import org.springframework.security.web.savedrequest.HttpSessionRequestCache;
import org.springframework.security.web.savedrequest.RequestCache;
import org.springframework.security.web.savedrequest.SavedRequest;
import org.springframework.stereotype.Component;


@Component("myAuthenctiationSuccessHandler")
public class MyAuthenctiationSuccessHandler extends SimpleUrlAuthenticationSuccessHandler {

	private Logger logger = LoggerFactory.getLogger(this.getClass());

	@Override
	public void onAuthenticationSuccess(HttpServletRequest request, HttpServletResponse response,
			Authentication authentication) throws IOException, ServletException {
		logger.info("security登陆成功拦截!");
		RequestCache requestCache = new HttpSessionRequestCache();

		String url = null;
		SavedRequest savedRequest = requestCache.getRequest(request, response);
		if (savedRequest != null) {
	       url = savedRequest.getRedirectUrl();
        }
        if(url == null){
            getRedirectStrategy().sendRedirect(request,response,"/");
        }
        super.onAuthenticationSuccess(request, response, authentication);
	  }

}
7、登录失败拦截
import java.io.IOException;

import javax.servlet.ServletException;
import javax.servlet.http.HttpServletRequest;
import javax.servlet.http.HttpServletResponse;

import org.slf4j.Logger;
import org.slf4j.LoggerFactory;
import org.springframework.security.core.AuthenticationException;
import org.springframework.security.web.authentication.SimpleUrlAuthenticationFailureHandler;
import org.springframework.security.web.savedrequest.HttpSessionRequestCache;
import org.springframework.security.web.savedrequest.RequestCache;
import org.springframework.security.web.savedrequest.SavedRequest;
import org.springframework.stereotype.Component;

@Component("myAuthenctiationFailureHandler")
public class MyAuthenctiationFailureHandler extends SimpleUrlAuthenticationFailureHandler {

	private Logger logger = LoggerFactory.getLogger(this.getClass());

	@Override
	public void onAuthenticationFailure(HttpServletRequest request, HttpServletResponse response,
			AuthenticationException exception) throws IOException, ServletException {

		logger.info("security登陆失败拦截!");
		RequestCache requestCache = new HttpSessionRequestCache();

		String url = null;
		SavedRequest savedRequest = requestCache.getRequest(request, response);
		if (savedRequest != null) {
	       url = savedRequest.getRedirectUrl();
        }
        if(url == null){
            getRedirectStrategy().sendRedirect(request,response,"/login");
        }
        super.onAuthenticationFailure(request, response, exception);
	}

}
8、自定义验证方式
此处作为图片验证,通过获取session信息,页面上传到session的验证码与后台生成的是否一致。(有两种方式,此处介绍一种。采用方式与SpringSecurity核心配置的写法相关)
import java.util.Collection;

import javax.servlet.http.HttpServletRequest;
import javax.servlet.http.HttpSession;

import org.apache.commons.lang3.StringUtils;
import org.slf4j.Logger;
import org.slf4j.LoggerFactory;
import org.springframework.beans.factory.annotation.Autowired;
import org.springframework.context.annotation.Bean;
import org.springframework.security.authentication.AuthenticationProvider;
import org.springframework.security.authentication.DisabledException;
import org.springframework.security.authentication.UsernamePasswordAuthenticationToken;
import org.springframework.security.core.Authentication;
import org.springframework.security.core.AuthenticationException;
import org.springframework.security.core.GrantedAuthority;
import org.springframework.security.core.userdetails.UserDetails;
import org.springframework.security.crypto.bcrypt.BCryptPasswordEncoder;
import org.springframework.security.crypto.password.PasswordEncoder;
import org.springframework.stereotype.Component;

import net.common.controller.UserLogBaseController;

@Component
public class MyAuthenticationProvider extends UserLogBaseController implements AuthenticationProvider {
	Logger logger = LoggerFactory.getLogger(MyAuthenticationProvider.class);

    @Autowired
    private MyUserDetailService userService;
    @Autowired
    HttpServletRequest httpServletRequest;

    @Bean
    public PasswordEncoder passwordEncoder(){
        return new BCryptPasswordEncoder();
    }

    /**
     * 自定义验证方式
     */
    @Override
    public Authentication authenticate(Authentication authentication) throws AuthenticationException {
        String username = authentication.getName();
        String password = (String) authentication.getCredentials();

        UserDetails user = userService.loadUserByUsername(username);

        //加密过程在这里体现
        logger.info("结果CustomUserDetailsService后,已经查询出来的数据库存储密码:" + user.getPassword());
        if (!passwordEncoder().matches(password, user.getPassword())) {
        	logger.info("登录用户密码错误!");
            throw new DisabledException("登录用户密码错误!");
        }

        String requestCode = httpServletRequest.getParameter("vercode");
        HttpSession session = httpServletRequest.getSession();
		String saveCode = (String) session.getAttribute("RANDOMVALIDATECODEKEY");//captcha
		//获取到session验证码后随时清除
		if(!StringUtils.isEmpty(saveCode)) {
			session.removeAttribute("RANDOMVALIDATECODEKEY");//captcha
		}
		logger.info("requestCode:"+requestCode+",saveCode:"+saveCode);
		if(StringUtils.isEmpty(saveCode) || StringUtils.isEmpty(requestCode) || !requestCode.equals(saveCode)) {
			logger.info("图片验证码错误!");
			throw new DisabledException("图形验证码错误!");
		}
		logger.info("登录成功");

		addUserLog("用户登录", "登录", 1, username);

        Collection<? extends GrantedAuthority> authorities = user.getAuthorities();
        return new UsernamePasswordAuthenticationToken(user, password, authorities);
    }

    @Override
    public boolean supports(Class<?> arg0) {
        return true;
    }
}
9、图片校验的引入
采用kaptcha,包含jar包、配置类、controller层调用等
jar包
<!-- kaptcha图片验证码 -->
<dependency>
  <groupId>com.github.penggle</groupId>
  <artifactId>kaptcha</artifactId>
  <version>2.3.2</version>
</dependency>
配置类
import java.util.Properties;

import org.springframework.context.annotation.Bean;
import org.springframework.context.annotation.Configuration;

import com.google.code.kaptcha.Producer;
import com.google.code.kaptcha.impl.DefaultKaptcha;
import com.google.code.kaptcha.util.Config;
@Configuration
public class KaptchaConfig {

	@Bean
	public Producer captcha() {
		Properties properties = new Properties();
		properties.setProperty("kaptcha.border","no");
		properties.setProperty("kaptcha.image.width","120");//图片宽
		properties.setProperty("kaptcha.image.height","38");//图片高
		properties.setProperty("kaptcha.textproducer.char.string","0123456789");//只包含数字验证码,其他直接添加即可
		properties.setProperty("kaptcha.textproducer.char.length","4");//验证码长度
		properties.setProperty("kaptcha.textproducer.font.names","Times New Roman");//禁止使用微软雅黑
		properties.setProperty("kaptcha.textproducer.font.size","30");//字体大小
		properties.setProperty("kaptcha.textproducer.font.color","0,255,0");//字体颜色
		properties.setProperty("kaptcha.textproducer.char.space","6");//文字间隔
		//properties.setProperty("kaptcha.noise.impl","com.google.code.kaptcha.impl.DefaultNoise");//干扰实现类
		properties.setProperty("kaptcha.noise.color","224,21,14");//干扰颜色
		//properties.setProperty("kaptcha.obscurificator.impl","com.google.code.kaptcha.impl.ShadowGimpy");//图片样式,默认的看的清楚点
		//properties.setProperty("kaptcha.background.impl","com.google.code.kaptcha.impl.DefaultBackground");//背景实现类
		//properties.setProperty("kaptcha.background.clear.from","grey");//背景颜色渐变,開始颜色
		//properties.setProperty("kaptcha.background.clear.to","white");//背景颜色渐变。结束颜色
		//properties.setProperty("kaptcha.word.impl","com.google.code.kaptcha.text.impl.DefaultWordRenderer");//文字渲染器


		Config config = new Config(properties);
		DefaultKaptcha defaultKaptcha = new DefaultKaptcha();
		defaultKaptcha.setConfig(config);

		return defaultKaptcha;
	}
}
调用
@RequestMapping(value = "getVerify")
  	public void getVerify(HttpServletRequest request, HttpServletResponse response) {
  		System.out.println("获取验证码 ");
  	    try {
  	        response.setContentType("image/jpeg");//设置相应类型,告诉浏览器输出的内容为图片
  	        response.setHeader("Pragma", "No-cache");//设置响应头信息,告诉浏览器不要缓存此内容
  	        response.setHeader("Cache-Control", "no-cache");
  	        response.setDateHeader("Expire", 0);
  	        RandomValidateCodeUtil randomValidateCode = new RandomValidateCodeUtil();
  	        randomValidateCode.getRandcode(request, response);//输出验证码图片方法
  	    } catch (Exception e) {
  	        System.out.println("获取验证码失败>>>>   ");
  	    }
  	}
10、页面引擎注意
HTML标签处处引入引擎与权限框架的整合,这样才能保证在页面处进行权限操作。语法不做介绍
<html xmlns:th="http://www.thymeleaf.org" xmlns:sec="https://www.thymeleaf.org/thymeleaf-extras-springsecurity4">
11、遇到问题
想起来什么后续更新吧
A、验证过程中验证失败返回提示信息并非自定义,而是BadCredentials(坏的凭证)
这是因为源码中继承的时候,自己new了新的异常,导致报错异常。
B、系统退出后再登录,直接跳转到了之前操作界面的url上,而不是主页。
原因没有找到,尝试核心配置类中清除request缓存,更新session信息、登录登出配置调整等方式都不管用。最后登陆成功拦截处理后成功处理了。
12、图片校验更改为拦截校验
在第八步进行验证阿妈校验时获取request的方式存在并发错误,因此,把之前的有关获取验证码的部分去掉,只保留用户密码校验即可。然后再单独找出一个过滤器单独处理。
@Autowired
    HttpServletRequest httpServletRequest;
12.1配置文件
配置文件加入以下内容,用于指定需要校验得接口
#图片验证指定验证的URL
captcha.verifyUrl=/cloud/login,/cloud/test/getSys1
12.2过滤器
这只是示例,代码自己优化一下就可以了
import java.io.IOException;
import java.util.List;

import javax.servlet.FilterChain;
import javax.servlet.ServletException;
import javax.servlet.http.HttpServletRequest;
import javax.servlet.http.HttpServletResponse;

import org.apache.commons.lang3.StringUtils;
import org.slf4j.Logger;
import org.slf4j.LoggerFactory;
import org.springframework.beans.factory.annotation.Autowired;
import org.springframework.beans.factory.annotation.Value;
import org.springframework.http.HttpStatus;
import org.springframework.stereotype.Component;
import org.springframework.util.PathMatcher;
import org.springframework.web.filter.OncePerRequestFilter;

import net.cnki.common.msgreturn.ResponseUtil;
import net.cnki.common.msgreturn.ResultCode;
import net.cnki.common.msgreturn.ResultGenerator;

/**
 * 建议采用Redis存储
 * @author ZhiPengyu
 * @ClassName:    [ImageValidateFilter.java]
 * @Description:  [加强安全校验-图片验证码或其他]
 * @CreateDate:   [2020年8月17日 下午3:21:37]
 */
@Component
public class ImageValidateFilter extends OncePerRequestFilter{
	private Logger logger = LoggerFactory.getLogger(this.getClass());
	@Autowired
	ResultGenerator resultGenerator;
	@Autowired
    private PathMatcher pathMatcher;
	@Value(value = "${captcha.verifyUrl}")
	private List<String> verifyUrl;//需要验证的接口

	@Override
	protected void doFilterInternal(HttpServletRequest request, HttpServletResponse response, FilterChain filterChain)
			throws ServletException, IOException {
		//判断URL是否需要验证
        Boolean flag = false;
        String requestUrl = request.getRequestURI();
        for(String url : verifyUrl){
            if(pathMatcher.match(url, requestUrl)){
                flag = true;
                break;
            }
        }
        //根据判断结果执行校验
        if (flag) {
        	logger.info("验证码校验-执行校验!");
        	String vcode = request.getParameter("vcode");
        	if (StringUtils.isEmpty(vcode)) {
        	response.setCharacterEncoding("UTF-8");
	    	response.setStatus(HttpStatus.UNAUTHORIZED.value());
	        response.setContentType("application/json;charset=UTF-8");
	        response.getWriter().write(resultGenerator.getFreeResult(ResultCode.LOGIN_FAIL,"验证码为空!").toString());
        		return;
			}
        	// 验证成功 放行
        	filterChain.doFilter(request, response);
            return;
		}
        // 无需验证 放行
        filterChain.doFilter(request, response);
	}

}
12.3融入配置中心
很简单,找对位置,把过滤器放入即可,记得要放在验证那块,保证与用户名密码等校验在一起,要不都登录完了都没校验。
//登录时校验码校验
		http.addFilterBefore(imageValidateFilter, MyLoginAuthenticationFilter.class);