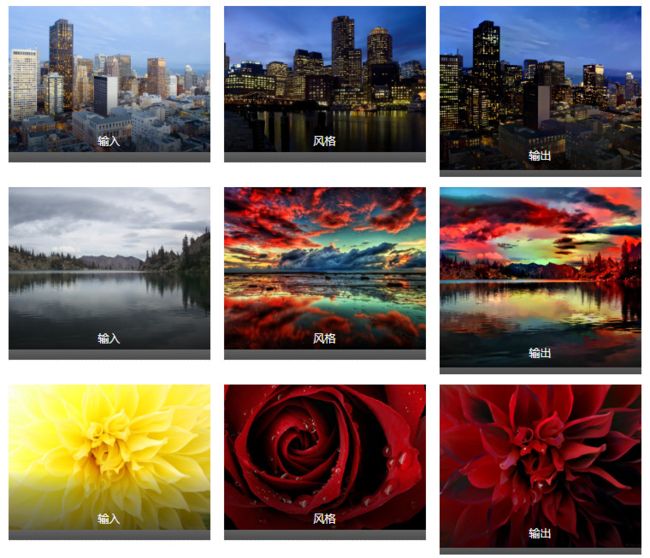
使用这个工具,你也可以成为一名优秀“画家”
图像风格迁移已经属于比较成熟的领域了,现在连实时的风格迁移都不成问题。之前一直想出一篇这样的文章,但无奈于大部分开源项目配置起来非常麻烦,比如 luanfujun/deep-photo-styletransfer 项目,需要安装 CUDA、pytorch、cudnn等等,配置能花一天的时间。
不过最近我发现一个非常好的开源应用项目,那就是基于OpenCV的DNN图像风格迁移。你只需要安装OpenCV就可以使用。
它也有局限性,我们只能用别人训练好的模型进行风格迁移,如果我们要自定义风格,那就必须配置cudn等工具,使用 deep-photo-styletransfer 等项目的方法进行训练。
不过作为初学者,我们只需要体验一下这样的风格迁移算法即可。感兴趣的同学可以再自己深入研究。今天的教程我们拿 fast-neural-style 训练好的模型对下面的图片做一次风格迁移。
1.准备
开始之前,你要确保Python和pip已经成功安装在电脑上,如果没有,进行安装。
(可选1) 如果你用Python的目的是数据分析,可以直接安装Anaconda,它内置了Python和pip.
(可选2) 此外,推荐大家用VSCode编辑器,它有许多的优点。
请选择以下任一种方式输入命令安装依赖:
- Windows 环境 打开 Cmd (开始-运行-CMD)。
- MacOS 环境 打开 Terminal (command+空格输入Terminal)。
- 如果你用的是 VSCode编辑器 或 Pycharm,可以直接使用界面下方的Terminal.
pip install python-opencv
2.选择模型
fast-neural-style放出的模型风格一共有9种,我们将一一尝试,其中部分风格如下比如:
模型文件可以扫描下方二维码关注 Python实用宝典,回复 风格迁移 下载,里面有全部9个模型风格的资源和源代码。
3.克隆OpenCV源码
我们直接克隆OpenCV开源项目中关于DNN图像迁移的例子,地址是:
https://github.com/opencv/opencv/blob/3.4.0/samples/dnn/fast_neural_style.py
代码:
import cv2 as cv
import numpy as np
import argparse

parser = argparse.ArgumentParser(
        description='This script is used to run style transfer models from '
                    'https://github.com/jcjohnson/fast-neural-style using OpenCV')
parser.add_argument('--input', help='Path to image or video. Skip to capture frames from camera')
parser.add_argument('--model', help='Path to .t7 model')
parser.add_argument('--width', default=-1, type=int, help='Resize input to specific width.')
parser.add_argument('--height', default=-1, type=int, help='Resize input to specific height.')
parser.add_argument('--median_filter', default=0, type=int, help='Kernel size of postprocessing blurring.')
args = parser.parse_args()

net = cv.dnn.readNetFromTorch(args.model)

if args.input:
    cap = cv.VideoCapture(args.input)
else:
    cap = cv.VideoCapture(0)

cv.namedWindow('Styled image', cv.WINDOW_NORMAL)
while cv.waitKey(1) < 0:
    hasFrame, frame = cap.read()
    if not hasFrame:
        cv.waitKey()
        break

    inWidth = args.width if args.width != -1 else frame.shape[1]
    inHeight = args.height if args.height != -1 else frame.shape[0]
    inp = cv.dnn.blobFromImage(frame, 1.0, (inWidth, inHeight),
                              (103.939, 116.779, 123.68), swapRB=False, crop=False)

    net.setInput(inp)
    out = net.forward()

    out = out.reshape(3, out.shape[2], out.shape[3])
    out[0] += 103.939
    out[1] += 116.779
    out[2] += 123.68
    out /= 255
    out = out.transpose(1, 2, 0)

    t, _ = net.getPerfProfile()
    freq = cv.getTickFrequency() / 1000
    print t / freq, 'ms'

    if args.median_filter:
        out = cv.medianBlur(out, args.median_filter)

    cv.imshow('Styled image', out)
注意,源代码是基于Python2的,所以第46行少了括号,如果你是Python3请注意补上括号。
这份代码可以直接使用, parser 里定义了5个参数,–input输入要迁移的图像宽度和高度, median_filter 是中值滤波器,基本思想是用像素点邻域灰度值的中值来代替该像素点的灰度值,因此理论上数值越大,图像越平滑,输出的结果细节越好(不确定)。
亲自试了一下median_filter对图像的影响,发现改变微乎其微,因此直接为默认值即可。
4.开始迁移
将第二步的代码保存到一个文件中,命名为1.py,在CMD/Terminal中带参数运行脚本,其中input是源图像路径,model是迁移的风格模型文件,如运行:
python 1.py --input 1.jpg --model udnie.t7
效果:
全部9种风格的迁移效果:
如果你喜欢今天的Python 教程,请持续关注我,如果对你有帮助,麻烦在下面点一个赞/关注哦~


