YOLOV5 网络模块解析
YOLOV5:训练自己数据集
YOLOV5:Mosaic数据增强
YOLOV5 :网络结构 yaml 文件参数理解
前言
【个人学习笔记记录,如有错误,欢迎指正】
YOLO-V5 代码仓库地址:https://github.com/ultralytics/yolov5
一、Conv 模块
介绍各个模块前,需要介绍 YOLOV5 中的最基础 Conv 模块。
class Conv(nn.Module):
    def __init__(self, c1, c2, k=1, s=1, p=None, g=1, act=True):
    			# ch_in, ch_out, kernel, stride, padding, groups
        super(Conv, self).__init__()
        self.conv = nn.Conv2d(c1, c2, k, s, autopad(k, p), groups=g, bias=False)
        self.bn = nn.BatchNorm2d(c2)
        self.act = nn.Hardswish() if act else nn.Identity()

    def forward(self, x):
        return self.act(self.bn(self.conv(x)))

    def fuseforward(self, x):
        return self.act(self.conv(x))
这里的 Conv 模块就是 【卷积】+【BN】+【激活】的组合。激活函数使用 【Hardswish】,【nn.Identity】 简单理解为一个返回输入的占位符。
其中,【autopad(k,p)】就是一个 自动 padding 函数,
def autopad(k, p=None):  # kernel, padding
    # Pad to 'same'
    if p is None:
        p = k // 2 if isinstance(k, int) else [x // 2 for x in k]  # auto-pad
    return p
二、Focus 模块
class Focus(nn.Module):
    def __init__(self, c1, c2, k=1, s=1, p=None, g=1, act=True):
        super(Focus, self).__init__()
        # 通道数变为原来 4 倍
        self.conv = Conv(c1 * 4, c2, k, s, p, g, act)
    def forward(self, x):
        return self.conv(torch.cat([x[..., ::2, ::2], x[..., 1::2, ::2], x[..., ::2, 1::2], x[..., 1::2, 1::2]], 1))
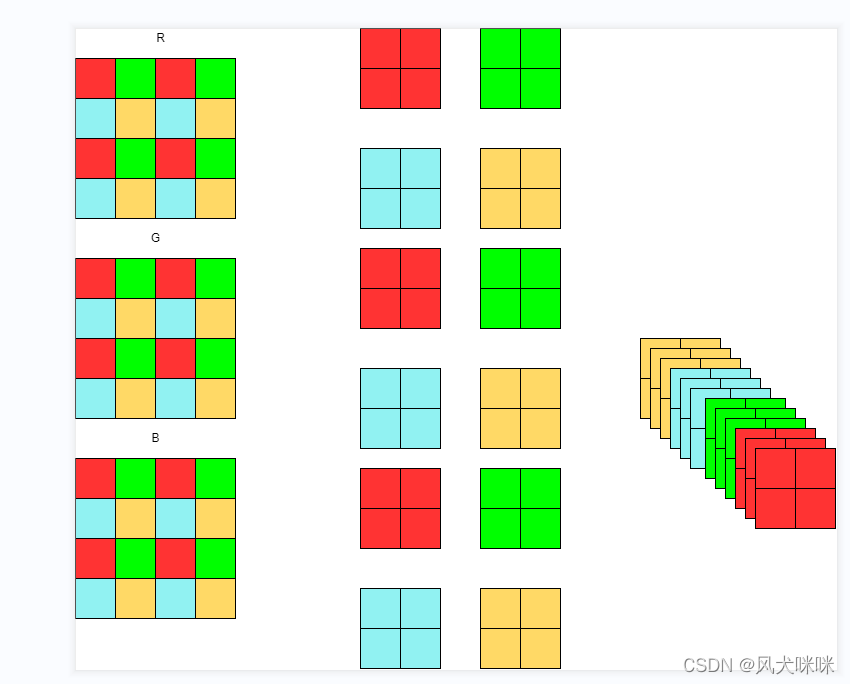
Focus 模块的操作如图

Focus 模块的操作是:将 RGB 三个通道上的像素每隔一个取出,如上图,这样每个通道就能生成四个通道,即高宽减半、通道变为4倍。
三、Bottleneck 模块
定义的Bottleneck模块
class Bottleneck(nn.Module):
    def __init__(self, c1, c2, shortcut=True, g=1, e=0.5):  # ch_in, ch_out, shortcut, groups, expansion
        super(Bottleneck, self).__init__()
        c_ = int(c2 * e)  # hidden channels
        self.cv1 = Conv(c1, c_, 1, 1)
        self.cv2 = Conv(c_, c2, 3, 1, g=g)
        self.add = shortcut and c1 == c2

    def forward(self, x):
        return x + self.cv2(self.cv1(x)) if self.add else self.cv2(self.cv1(x))
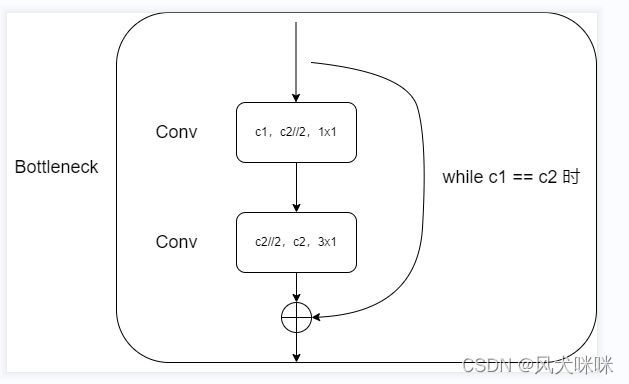
Bottleneck 模块的流程图

当输入通道数【c1】和输出通道数【c2】相等时,就有 shortcut 连接。
第一个【Conv】:将输入通道数通过 1x1 的卷积核变为输出通道数的一半,
第二个【Conv】:正常的普通卷积(可通过更改超参数变为组卷积)。
注:这里的通道数减半是通过参数 【e】设定的,当 e == 1 时,通道数不变!
四.BottleneckCSP 模块
class BottleneckCSP(nn.Module):
    def __init__(self, c1, c2, n=1, shortcut=True, g=1, e=0.5):
    			 # ch_in, ch_out, number, shortcut, groups, expansion
        super(BottleneckCSP, self).__init__()
        c_ = int(c2 * e)  # hidden channels
        self.cv1 = Conv(c1, c_, 1, 1)
        self.cv2 = nn.Conv2d(c1, c_, 1, 1, bias=False)
        self.cv3 = nn.Conv2d(c_, c_, 1, 1, bias=False)
        self.cv4 = Conv(2 * c_, c2, 1, 1)
        self.bn = nn.BatchNorm2d(2 * c_)  # applied to cat(cv2, cv3)
        self.act = nn.LeakyReLU(0.1, inplace=True)
        self.m = nn.Sequential(*[Bottleneck(c_, c_, shortcut, g, e=1.0) for _ in range(n)])

    def forward(self, x):
        y1 = self.cv3(self.m(self.cv1(x)))
        y2 = self.cv2(x)
        return self.cv4(self.act(self.bn(torch.cat((y1, y2), dim=1))))
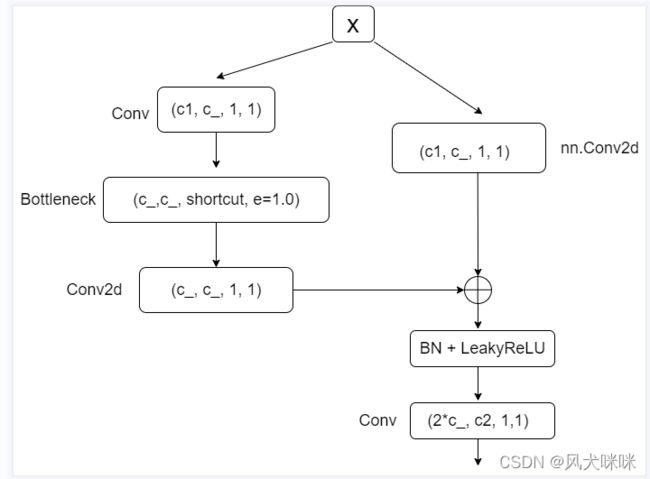
定义的 BottleneckCSP 模块流程图

输入的【x】经过两个不同的模块,然后进行【shortcut】连接,最后经过【BN】+【LeakyReLU】和 普通的【Conv】卷积。
模块一(左边):通过 1x1 的卷积进行通道数减半,然后经过一个【Bottleneck】模块,这里的参数 【e】控制 Bottleneck 模块内的 hidden 层的通道数。然后在经过一个 【Conv2d】模块(没有经过 BN 和 激活函数)。
模块二(右边):通过 1x1 的卷积进行通道数减半(也不经过 BN 和激活函数)。
五.SSP 模块
class SPP(nn.Module):
    # Spatial pyramid pooling layer used in YOLOv3-SPP
    def __init__(self, c1, c2, k=(5, 9, 13)):
        super(SPP, self).__init__()
        c_ = c1 // 2  # hidden channels
        self.cv1 = Conv(c1, c_, 1, 1)
        self.cv2 = Conv(c_ * (len(k) + 1), c2, 1, 1)
        self.m = nn.ModuleList([nn.MaxPool2d(kernel_size=x, stride=1, padding=x // 2) for x in k])

    def forward(self, x):
        x = self.cv1(x)
        return self.cv2(torch.cat([x] + [m(x) for m in self.m], 1))
定义的 SPP 模块流程图

将输入的 【x】 通过一个 【Conv】模块将输入通道数减半,然后经过三个不同卷积核的最大值池化得到相同大小和通道数的输出,然后在维度一进行 concat 拼接,拼接之后经过 【Conv】将通道数缩放为 c2 的通道数。
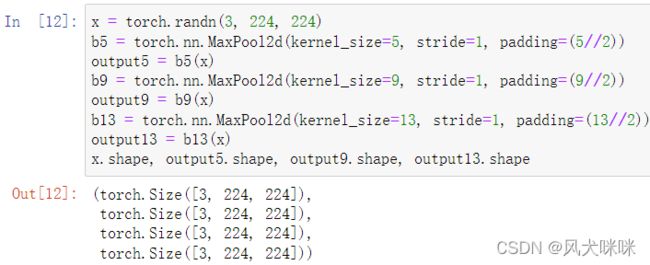
不同卷积核的最大池化下采样:

经过三个不同卷积核的最大池化下采样之后,输出通道数是一样的,这样方便后续的拼接操作。
六.Detect 模块
这里没有给出整个类定义代码。
# 类初始化函数中
self.m = nn.ModuleList(nn.Conv2d(x, self.no * self.na, 1) for x in ch)

# forward 函数中
for i in range(self.nl):
    x[i] = self.m[i](x[i])  # conv
    bs, _, ny, nx = x[i].shape  # x(bs,255,20,20) to x(bs,3,20,20,85)
    x[i] = x[i].view(bs, self.na, self.no, ny, nx).permute(0, 1, 3, 4, 2).contiguous()
定义的 Detect 模块流程图

输入【x】是在三个特征图上得到的结果,shape 如图所示,每个特征图经过不一样的卷积操作【nn.ModuleList】得到通道数一样,但是大小和原输入一样的特征图。然后将 shape Resize 为:
(batch_size, num_anchors,h, w, (类别个数+置信度+预测框的宽度、高度+中心点的横轴坐标))
总结
到这里,YOLOV5 中用到的模块就基本介绍完了。
