前言
为了进一步了解以太坊区块链网络的工作方式和运行原理,笔者通过官方软件Geth搭建了私有以太坊网络fantasynetwork,最终实现了单机和多机节点间的相互连通:首先通过VMware Workstation创建基础Ubuntu实验平台,再安装Golang[1]、Geth[2]等依赖环境;其次使用puppeth工具生成私网的配置文件fantasynetwork.json并复制到三个节点目录下,三个节点均使用该配置文件初始化网络;最后使用static-nodes.json的方式将三个节点设为默认接入节点,实现节点间的连通,连通后各节点中的账户可以互相转账挖矿。
单机多节点私网[3]
本试验的项目结构为:
privateNet
├── accounts.txt
├── fantasynetwork.json
├── node1
│   ├── geth
│   ├── keystore
│   ├── node.sh
│   ├── password.txt
│   └── static-nodes.json
├── node2
│   ├── geth
│   ├── keystore
│   ├── node.sh
│   ├── password.txt
│   └── static-nodes.json
└── node3
    ├── geth
    ├── keystore
    ├── node.sh
    ├── password.txt
    └── static-nodes.json
创建工作目录
- 创建私网工作目录
mkdir privateNet && cd privateNet - 创建三个节点数据目录
mkdir node1 node2 node3privateNet/ ├── node1 ├── node2 └── node3
创建默认用户
- Node1
test@ubuntu:~/privateNet$ geth --datadir node1/ account new Your new account is locked with a password. Please give a password. Do not forget this password. Password: Repeat password: Your new key was generated Public address of the key: 0x600d77B8ce36B829BFC8a1Cc5696Faf2218bDf75 Path of the secret key file: node1/keystore/UTC--2021-08-11T04-51-26.533482715Z--600d77b8ce36b829bfc8a1cc5696faf2218bdf75 - Node 2
test@ubuntu:~/privateNet$ geth --datadir node2/ account new Your new account is locked with a password. Please give a password. Do not forget this password. Password: Repeat password: Your new key was generated Public address of the key: 0x2F7fD5BD0026f7C2f0dB94b79D58AFE517BC56d2 Path of the secret key file: node2/keystore/UTC--2021-08-11T04-53-30.820914994Z--2f7fd5bd0026f7c2f0db94b79d58afe517bc56d2 - Node3
 test@ubuntu:~/privateNet$ geth --datadir node3/ account new
 Your new account is locked with a password. Please give a password. Do not forget this password.
 Password:
 Repeat password:

 Your new key was generated

 Public address of the key:   0x6c1440E9c6Ca93C18B1e2A069D1D5a70e29C2363
 Path of the secret key file: node3/keystore/UTC--2021-08-11T04-54-24.244487186Z--6c1440e9c6ca93c18b1e2a069d1d5a70e29c2363
在此创建账户的密码设置为
fantasy,操作完成后会在每个节点目录下的keystore目录中找到账户密钥文件/钱包地址。
保存账户凭证
- 将以上账户的公钥地址保存至文本文件
echo '0x600d77B8ce36B829BFC8a1Cc5696Faf2218bDf75' >> accounts.txt echo '0x2F7fD5BD0026f7C2f0dB94b79D58AFE517BC56d2' >> accounts.txt echo '0x6c1440E9c6Ca93C18B1e2A069D1D5a70e29C2363' >> accounts.txt - 为了实验方便,将账户对应的密码文件保存至对应节点目录下
 echo 'fantasy' > node1/password.txt
 echo 'fantasy' > node2/password.txt
 echo 'fantasy' > node3/password.txt
创建配置文件
- 设置网络名称
test@ubuntu:~/privateNet$ puppeth Please specify a network name to administer (no spaces, hyphens or capital letters please) > fantasynetwork Sweet, you can set this via --network=fantasynetwork next time! INFO [08-10|22:08:31.110] Administering Ethereum network name=fantasynetwork WARN [08-10|22:08:31.110] No previous configurations found path=/home/test/.puppeth/fantasynetwork - 选择程序功能
What would you like to do? (default = stats) 1. Show network stats 2. Configure new genesis 3. Track new remote server 4. Deploy network components > 2 - 选择创建网络
What would you like to do? (default = create) 1. Create new genesis from scratch 2. Import already existing genesis > 1 - 选择共识算法
Which consensus engine to use? (default = clique) 1. Ethash - proof-of-work 2. Clique - proof-of-authority > 1 - 选择默认账号
Which accounts should be pre-funded? (advisable at least one) > 0x600d77B8ce36B829BFC8a1Cc5696Faf2218bDf75 > 0x2F7fD5BD0026f7C2f0dB94b79D58AFE517BC56d2 > 0x6c1440E9c6Ca93C18B1e2A069D1D5a70e29C2363 > 0x - 设置默认单位
Should the precompile-addresses (0x1 .. 0xff) be pre-funded with 1 wei? (advisable yes) > yes - 设置网络ID
Specify your chain/network ID if you want an explicit one (default = random) > 7777 INFO [08-10|22:16:40.485] Configured new genesis block - 导出配置文件
What would you like to do? (default = stats) 1. Show network stats 2. Manage existing genesis 3. Track new remote server 4. Deploy network components > 2 1. Modify existing configurations 2. Export genesis configurations 3. Remove genesis configuration > 2 Which folder to save the genesis specs into? (default = current) Will create fantasynetwork.json, fantasynetwork-aleth.json, fantasynetwork-harmony.json, fantasynetwork-parity.json > INFO [08-10|22:18:48.283] Saved native genesis chain spec path=fantasynetwork.json INFO [08-10|22:18:48.285] Saved genesis chain spec client=aleth path=fantasynetwork-aleth.json INFO [08-10|22:18:48.286] Saved genesis chain spec client=parity path=fantasynetwork-parity.json INFO [08-10|22:18:48.287] Saved genesis chain spec client=harmony path=fantasynetwork-harmony.json - 退出工具
What would you like to do? (default = stats)
1. Show network stats
2. Manage existing genesis
3. Track new remote server
4. Deploy network components
> ^C
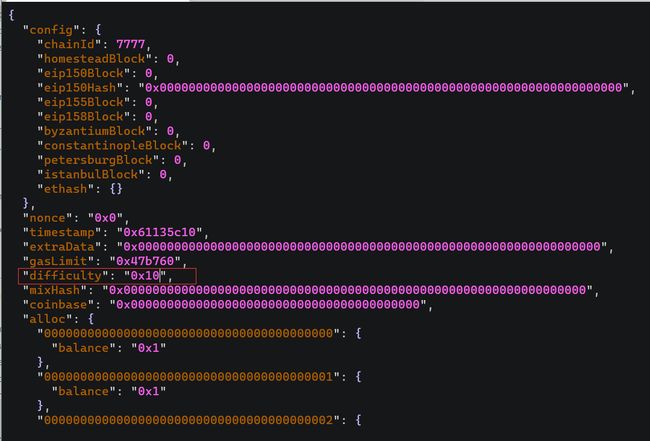
此时可在当前目录下看见生成的四个配置文件,在此只用到
fantasynetwork.json文件,其他文件可删去。
初始化三个节点
每个节点必须使用相同的配置文件进行初始化:
geth --datadir node1/ init fantasynetwork.json
geth --datadir node2/ init fantasynetwork.json
geth --datadir node3/ init fantasynetwork.json
运行三个节点
进入对应的节点目录下执行一下命令(其它参数含义可参考《以太坊客户端Geth命令用法-参数详解》[5]):
- Node1
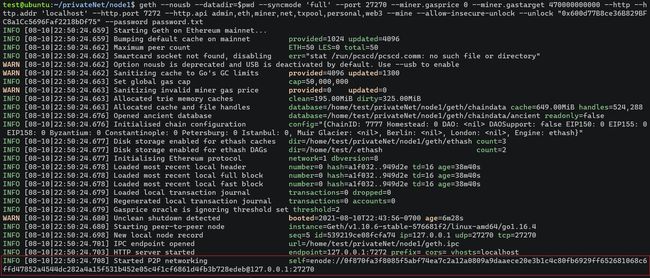
geth --nousb --datadir=$pwd --syncmode 'full' --port 27271 --miner.gasprice 0 --miner.gastarget 470000000000 --http --http.addr 'localhost' --http.port 7271 --http.api admin,eth,miner,net,txpool,personal,web3 --mine --allow-insecure-unlock --unlock "0x600d77B8ce36B829BFC8a1Cc5696Faf2218bDf75" --password password.txt
得到节点一的enode:enode://0f870fa3f8085f5abf74ea7c2a12a0809a9daaece20e3b1c4c80fb6929ff652681068c6ffd47852a4544dc282a4a15f531b452e05c4f1cf6861d4fb3b728edeb@127.0.0.1:27271 - Node2
得到节点二的enode:geth --nousb --datadir=$pwd --syncmode 'full' --port 27272 --miner.gasprice 0 --miner.gastarget 470000000000 --http --http.addr 'localhost' --http.port 7272 --http.api admin,eth,miner,net,txpool,personal,web3 --mine --allow-insecure-unlock --unlock "0x2F7fD5BD0026f7C2f0dB94b79D58AFE517BC56d2" --password password.txtenode://45c2fc2bfdf0f48afe2083d82cc1cc642a96fcc2815755024a17b95b9fd1b3124f89e186c88a5013ced1c00bd10060a90e6b53e94fdbbfa6098b3088b3f78274@127.0.0.1:27272 - Node3
得到节点三的enode:geth --nousb --datadir=$pwd --syncmode 'full' --port 27273 --miner.gasprice 0 --miner.gastarget 470000000000 --http --http.addr 'localhost' --http.port 7273 --http.api admin,eth,miner,net,txpool,personal,web3 --mine --allow-insecure-unlock --unlock "0x6c1440E9c6Ca93C18B1e2A069D1D5a70e29C2363" --password password.txtenode://ae4b4e18afa6238753e14ca3e99c0858509fc76efee715dd1c8278bbb7eaa5614fdc8b77a82bf7baf128c14ef574cc6701514fbb97780d30c731f7bc82dfd932@127.0.0.1:27273
连通三个节点
Geth主要有三种方法连通其它节点:启动前配置static-nodes.json文件添加节点、启动时通过--bootnodes添加节点、启动后在控制台通过admin.addPeer命令添加节点。在此我们使用第一种方法。
- 在工作目录下创建
static-nodes.json:[ "enode://0f870fa3f8085f5abf74ea7c2a12a0809a9daaece20e3b1c4c80fb6929ff652681068c6ffd47852a4544dc282a4a15f531b452e05c4f1cf6861d4fb3b728edeb@127.0.0.1:27271", "enode://45c2fc2bfdf0f48afe2083d82cc1cc642a96fcc2815755024a17b95b9fd1b3124f89e186c88a5013ced1c00bd10060a90e6b53e94fdbbfa6098b3088b3f78274@127.0.0.1:27272", "enode://ae4b4e18afa6238753e14ca3e99c0858509fc76efee715dd1c8278bbb7eaa5614fdc8b77a82bf7baf128c14ef574cc6701514fbb97780d30c731f7bc82dfd932@127.0.0.1:27273" ] - 将该文件复制到每个节点根目录下:
cp static-nodes.json node1/ cp static-nodes.json node2/ cp static-nodes.json node3/ - 为了简化启动,可以创建启动节点批处理文件
- node1/node.sh
nohup geth --nousb --datadir=$pwd --syncmode 'full' --port 27271 --miner.gasprice 0 --miner.gastarget 470000000000 --http --http.addr 'localhost' --http.port 7271 --http.api admin,eth,miner,net,txpool,personal,web3 --mine --allow-insecure-unlock --unlock "0x600d77B8ce36B829BFC8a1Cc5696Faf2218bDf75" --password password.txt & echo "Geth started on node 1" - node2/node.sh
nohup geth --nousb --datadir=$pwd --syncmode 'full' --port 27272 --miner.gasprice 0 --miner.gastarget 470000000000 --http --http.addr 'localhost' --http.port 7272 --http.api admin,eth,miner,net,txpool,personal,web3 --mine --allow-insecure-unlock --unlock "0x2F7fD5BD0026f7C2f0dB94b79D58AFE517BC56d2" --password password.txt & echo "Geth started on node 2" - node2/node.sh
nohup geth --nousb --datadir=$pwd --syncmode 'full' --port 27273 --miner.gasprice 0 --miner.gastarget 470000000000 --http --http.addr 'localhost' --http.port 7273 --http.api admin,eth,miner,net,txpool,personal,web3 --mine --allow-insecure-unlock --unlock "0x6c1440E9c6Ca93C18B1e2A069D1D5a70e29C2363" --password password.txt &
echo "Geth started on node 3"
- node1/node.sh
- 启动各节点
test@ubuntu:~/privateNet/node1$ sh node.sh test@ubuntu:~/privateNet/node2$ sh node.sh test@ubuntu:~/privateNet/node3$ sh node.sh - 打开三个终端,使用
geth attach命令接入三个节点命令行test@ubuntu:~/privateNet/node1$ geth attach geth.ipc test@ubuntu:~/privateNet/node2$ geth attach geth.ipc test@ubuntu:~/privateNet/node3$ geth attach geth.ipc
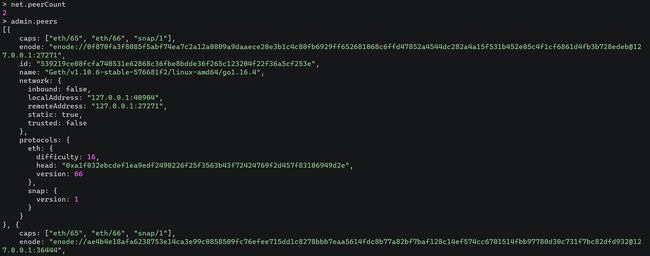
- 查看已连接节点

此时各节点已连接完成,每个节点账户默认为10个以太币,各节点账户间可自由转账和挖矿,需要注意的是转账后必须经过挖矿操作才能被写入区块链。上方法启动后的程序将会运行在后台,关闭需通过ps ax | grep geth命令和kill 命令。
多机多节点私网
准备
- 设置上节Ubuntu虚拟机网络模式为桥接,且IP设为静态IP
172.25.1.99 - Windows的IP设为静态
172.25.1.55
加入私网
- 在Windows下创建文件夹node4,并将fantasynetwork.json复制到其中
- 初始化节点4
C:\Users\Fantasy\Desktop\node4> geth --datadir . init fantasynetwork.json - 新建账户
C:\Users\Fantasy\Desktop\node4>geth -datadir . console > personal.newAccount("fantasy") WARN [08-11|16:13:32.987] Please remember your password! "0xbef61b5754ffaa843cc9199fb9a11aac468134f4" > exit - 启动节点4
geth --nousb --datadir=. --syncmode "full" --port 27271 --miner.gasprice 0 --miner.gastarget 470000000000 --http --http.addr 0.0.0.0 --http.port 7271 --http.api admin,eth,miner,net,txpool,personal,web3 --mine --allow-insecure-unlock console - 添加节点1[6]
> net.peerCount
0
> admin.addPeer("enode://0f870fa3f8085f5abf74ea7c2a12a0809a9daaece20e3b1c4c80fb6929ff652681068c6ffd47852a4544dc282a4a15f531b452e05c4f1cf6861d4fb3b728edeb@172.25.1.99:27271")
true
> net.peerCount
1
此时各节点已连接完成,各节点账户间可自由转账和挖矿,需要注意的是转账后必须经过挖矿操作才能被写入区块链。
注意事项:
- 很多教程中说不同节点启动时不能使用相同的端口,那是因为其运行在同一个主机上,这里节点1和节点4运行在不同的端口上,故可以使用相同的端口。
- 添加节点无效常见原因/解决办法:
admin.addPeer后等一段时间才会生效admin.addPeer时使用的是NAT后公网地址,而公网防火墙通常拒绝异常接入admin.addPeer后开始挖矿增加同步速度- 简单的方法是使用上节中的
static-nodes.json方法
参考
yuanlulu. golang学习1:ubuntu下安装golang并简单测试. CSDN. [2021-02-21] ↩︎
shciily. Linux系统下安装Geth客户端. CSDN. [2020-08-29] ↩︎
Divyang Desai. Setup Your Private Ethereum Network With Geth. c-sharpcorner.com. [2020-08-04] ↩︎
soowin. 创世区块配置文件genesis.json的格式解读. CSDN. [2021-01-26] ↩︎
mb5fe559b5073e8. 以太坊客户端Geth命令用法-参数详解. CSDN. [2021-06-13] ↩︎
Someone. "admin.addPeer" is not working. Github. [2020-09-27] ↩︎
