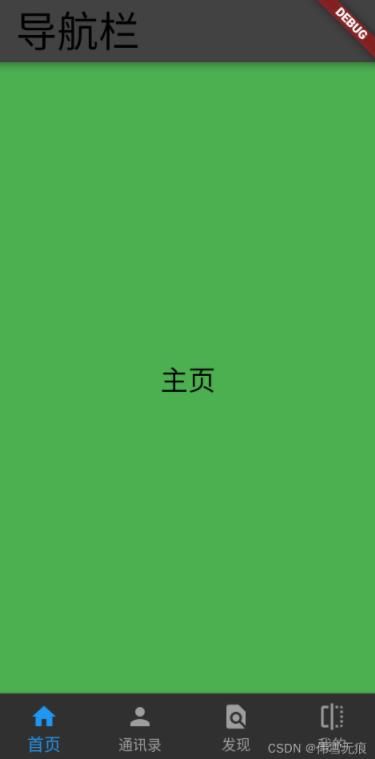
本文实例为大家分享了flutter实现底部导航栏的具体代码,供大家参考,具体内容如下
一.flutter底部导航栏常用组件BottomNavigationBar 属性介绍
BottomNavigationBar({
    Key? key,
    required this.items, //必填项,设置各个按钮
    this.onTap, //点击事件
    this.currentIndex = 0, //当前选中item下标
    this.elevation, //控制阴影高度
    this.type, //BottomNavigationBarType,默认 fixed,设置为 shifting 时,需要设置选中样式,和未选中样式,提供一个特殊动画
    Color? fixedColor, //选中 item 填充色
    this.backgroundColor, //整个BottomNavigationBar 背景色
    this.iconSize = 24.0, //图标大小
    Color? selectedItemColor, //选中title填充色
    this.unselectedItemColor, //未选中title填充色
    this.selectedIconTheme, //选中item图标主题
    this.unselectedIconTheme, //未选中item图标主题
    this.selectedFontSize = 14.0, //选中title字体大小
    this.unselectedFontSize = 12.0, //未选中title字体大小
    this.selectedLabelStyle, //选中title样式 TextStyle
    this.unselectedLabelStyle, //未选中title样式 TextStyle
    this.showSelectedLabels, //是否展示选中title,默认为true
    this.showUnselectedLabels, //是否展示未选中title,默认为true
    this.mouseCursor, //鼠标悬停
    this.enableFeedback,
    this.landscapeLayout,
  })
二.BottomNavigationBar的具体实现
1.创建四个页面,分别为,首页,通讯录,发现和我的,这里以homepage.dart为例,其他页面只需要修改对应内容显示即可,eg:
import 'package:flutter/material.dart';

class HomePage extends StatefulWidget{

  const HomePage({Key? key}) : super(key: key);

  @override
  State createState()=>_HomePageState();

}

class _HomePageState extends State{

  @override
  Widget build(BuildContext context) {
    return const Center(
      child: Text(
        "主页",
        style:TextStyle(
          color: Colors.black,
          fontSize: 20
        ),
      ),
    );
  }

}
2.添加BottomNavigationBar,需要在主页中实现BottomNavigationBar,eg:
import 'package:flutter/material.dart';
import 'findpage.dart';
import 'mypage.dart';
import 'contactpage.dart';
import 'homepage.dart';

class MainPage extends StatefulWidget{
  const MainPage({Key? key}) : super(key: key);

  @override
  State createState()=>_MainPageState();
}

class _MainPageState extends State{

  var allPages=[HomePage(),ContactPage(),FindPage(),MyPage()];
  var currentIndex=0;


  @override
  Widget build(BuildContext context) {
    return Scaffold(
      appBar: AppBar(
        title: Text(
          "导航栏",
          style: TextStyle(
            color: Colors.black,
            fontSize: 30,
          ),
          textAlign: TextAlign.center,
        ),
      ),
      body: allPages[currentIndex],
      backgroundColor: Colors.green,
      bottomNavigationBar: BottomNavigationBar(
        currentIndex: currentIndex,
        type: BottomNavigationBarType.fixed,
        unselectedItemColor: Colors.grey,
        selectedItemColor: Colors.blue,
        /*unselectedLabelStyle:TextStyle(
          color: Colors.black
        ),*/
        items: [
          BottomNavigationBarItem(
              icon: Icon(Icons.home),
              label: "首页",
              //backgroundColor:Colors.blue
          ),

          BottomNavigationBarItem(
              icon: Icon(Icons.person),
              label: "通讯录",
              //backgroundColor:Colors.blue
          ),

          BottomNavigationBarItem(
              icon: Icon(Icons.find_in_page),
              label: "发现",
              //backgroundColor:Colors.blue
          ),

          BottomNavigationBarItem(
              icon: Icon(Icons.flip_outlined),
              label: "我的",
              //backgroundColor:Colors.blue
          ),
        ],

        onTap: (index){
          setState(() {
            print("the index is :$index");
            currentIndex=index;
          });
        },
      ),
    );
  }
}
三.实际效果展示,eg:
以上就是本文的全部内容,希望对大家的学习有所帮助,也希望大家多多支持脚本之家。
