kotlin顶部导航栏(TabLayout+viewpager)、底部导航栏(谷歌官方)
一、顶部导航栏(TabLayout+viewpager)
简介
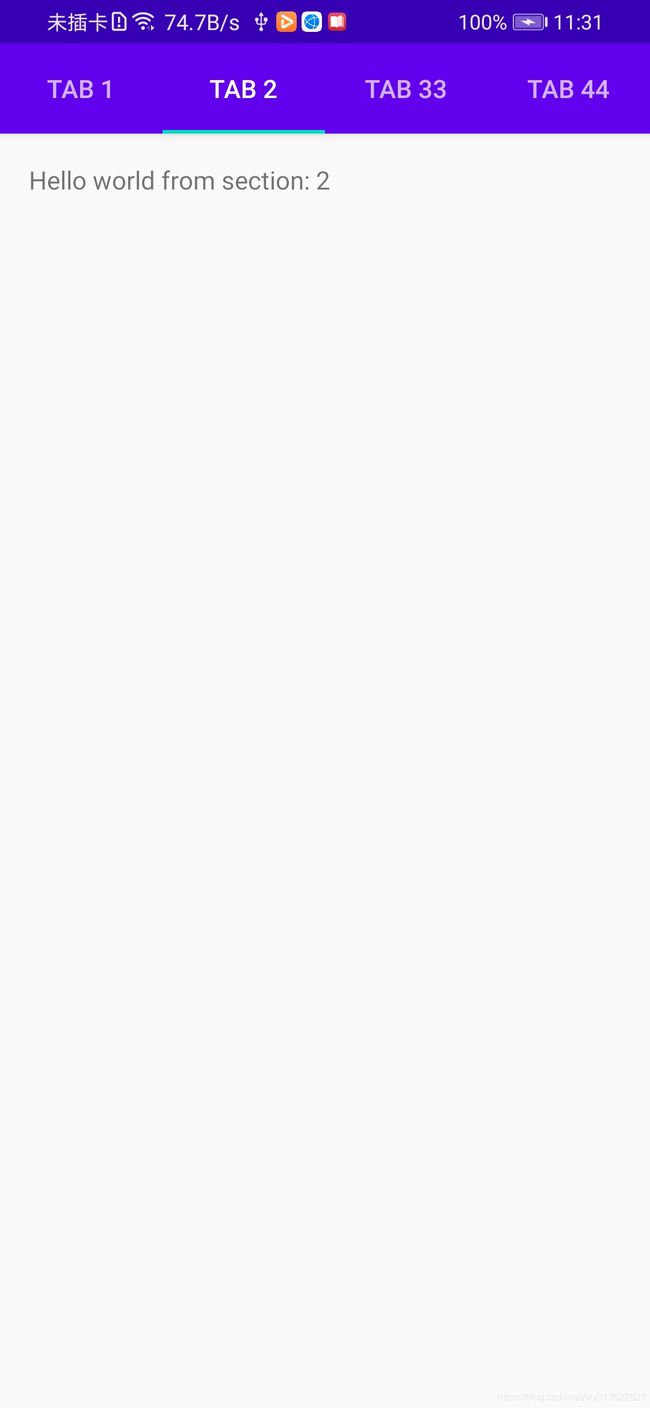
使用google原生推荐的TabLayout+viewpager,超级好用,而且性能上已经是优化到最好了,超级推荐大家这样用,代码的每个细节的作用和功能我都已经标明,下面来看看效果图:


代码
MainActivity
class MainActivity : AppCompatActivity() {

    override fun onCreate(savedInstanceState: Bundle?) {
        super.onCreate(savedInstanceState)
        setContentView(R.layout.activity_main)

        val sectionsPagerAdapter = SectionsPagerAdapter(this, supportFragmentManager)
        val viewPager: ViewPager = findViewById(R.id.view_pager)
        viewPager.adapter = sectionsPagerAdapter
        val tabs: TabLayout = findViewById(R.id.tabs)
        tabs.setupWithViewPager(viewPager)

    }
}
SectionsPagerAdapter
class SectionsPagerAdapter(private val context: Context, fm: FragmentManager)
    : FragmentPagerAdapter(fm) {
    //顶部tablayout的字符
    private val TAB_TITLES = arrayOf(
        R.string.tab_text_1,
        R.string.tab_text_2,
        R.string.tab_text_3,
        R.string.tab_text_4

    )

    override fun getItem(position: Int): Fragment {
        // 顶部有多少个tab,就会运行多少次(初次会加载第一第二,第三第四要点第三个tab才会运行)
        /*******新建Fragment******/
        Log.d("WY+","运行第几次:"+(position+1))
         when (position) {
            0 -> {
                return PlaceholderFragment.newInstance(position + 1)
            }
            1 -> {
                return PlaceholderFragment.newInstance(position + 1)
            }
            2 -> {
                return ThreeFragment.newInstance(0)
            }
            3 -> {
                return FourFragment.newInstance(0)
            }
        }
        return PlaceholderFragment.newInstance(position + 1)

    }

    override fun getPageTitle(position: Int): CharSequence? {
        return context.resources.getString(TAB_TITLES[position])
    }

    override fun getCount(): Int {
        // 顶部显示多少个页,不要超过TAB_TITLES的总数.
        return 4
    }
}
PageViewModel
class PageViewModel : ViewModel() {

    private val _index = MutableLiveData<Int>()


    val text: LiveData<String> = Transformations.map(_index) {

        "Hello world from section: $it"


    }

    fun setIndex(index: Int) {
        _index.value = index
    }
}
ThreeFragment
class ThreeFragment : Fragment() {
    override fun onCreateView(
            inflater: LayoutInflater, container: ViewGroup?,
            savedInstanceState: Bundle?
    ): View? {
        val root = inflater.inflate(R.layout.fragment_three, container, false)

        return root
    }

    companion object {
        /**
         * 单例,返回给定节编号的此片段的新实例。
         */
        @JvmStatic
        fun newInstance(sectionNumber: Int): ThreeFragment {
            return ThreeFragment().apply {

            }
        }
    }
}
PlaceholderFragment
class PlaceholderFragment : Fragment() {

    private lateinit var pageViewModel: PageViewModel

    override fun onCreate(savedInstanceState: Bundle?) {
        super.onCreate(savedInstanceState)

//        实例一个PageViewModel,object.apply返回一个自身的对象(object),apply可以赋值一个类里面的属性和调用方法
        pageViewModel = ViewModelProviders.of(this).get(PageViewModel::class.java).apply {
            setIndex(arguments?.getInt(ARG_SECTION_NUMBER) ?: 1)
        }

    }

    override fun onCreateView(
            inflater: LayoutInflater, container: ViewGroup?,
            savedInstanceState: Bundle?
    ): View? {
        val root = inflater.inflate(R.layout.fragment_main, container, false)
        val textView: TextView = root.findViewById(R.id.section_label)

        pageViewModel.text.observe(viewLifecycleOwner, Observer<String> {
            Log.d("WY+", "===>$it")
            textView.text = it

        })
        return root
    }

    companion object {
        private const val ARG_SECTION_NUMBER = "section_number"

        /**
         * 返回给定节编号的此片段的新实例。
         */
        @JvmStatic
        fun newInstance(sectionNumber: Int): PlaceholderFragment {
            return PlaceholderFragment().apply {
                arguments = Bundle().apply {
                    putInt(ARG_SECTION_NUMBER, sectionNumber)
                }
            }
        }
    }
}
FourFragment
class FourFragment : Fragment() {

    override fun onCreateView(
        inflater: LayoutInflater, container: ViewGroup?,
        savedInstanceState: Bundle?
    ): View? {
        val root = inflater.inflate(R.layout.fragment_four, container, false)

        return root
    }

    companion object {
        /**
         * 单例,返回给定节编号的此片段的新实例。
         */
        @JvmStatic
        fun newInstance(sectionNumber: Int): ThreeFragment {
            return ThreeFragment().apply {

            }
        }
    }
}
activity_main.xml
<?xml version="1.0" encoding="utf-8"?>
<androidx.constraintlayout.widget.ConstraintLayout xmlns:android="http://schemas.android.com/apk/res/android"
    xmlns:app="http://schemas.android.com/apk/res-auto"
    xmlns:tools="http://schemas.android.com/tools"
    android:layout_width="match_parent"
    android:layout_height="match_parent"
    tools:context=".MainActivity">

    <com.google.android.material.appbar.AppBarLayout
        android:layout_width="match_parent"
        android:layout_height="wrap_content"
        app:layout_constraintTop_toTopOf="parent"
        android:theme="@style/AppTheme.AppBarOverlay">

        <com.google.android.material.tabs.TabLayout
            android:id="@+id/tabs"
            android:layout_width="match_parent"
            android:layout_height="50dp"
            android:background="?attr/colorPrimary" />
    </com.google.android.material.appbar.AppBarLayout>

    <androidx.viewpager.widget.ViewPager
        android:id="@+id/view_pager"
        android:layout_width="match_parent"
        android:layout_height="match_parent"
        app:layout_behavior="@string/appbar_scrolling_view_behavior" />

</androidx.constraintlayout.widget.ConstraintLayout>
fragment_main.xml
<?xml version="1.0" encoding="utf-8"?>
<androidx.constraintlayout.widget.ConstraintLayout xmlns:android="http://schemas.android.com/apk/res/android"
    xmlns:app="http://schemas.android.com/apk/res-auto"
    xmlns:tools="http://schemas.android.com/tools"
    android:id="@+id/constraintLayout"
    android:layout_width="match_parent"
    android:layout_height="match_parent"
    tools:context=".ui.main.fragment.PlaceholderFragment">

    <TextView
        android:id="@+id/section_label"
        android:layout_width="wrap_content"
        android:layout_height="wrap_content"
        android:layout_marginStart="@dimen/activity_horizontal_margin"
        android:layout_marginTop="@dimen/activity_vertical_margin"
        android:layout_marginEnd="@dimen/activity_horizontal_margin"
        android:layout_marginBottom="@dimen/activity_vertical_margin"
        app:layout_constraintLeft_toLeftOf="parent"
        app:layout_constraintTop_toTopOf="@+id/constraintLayout"
        tools:layout_constraintLeft_creator="1"
        tools:layout_constraintTop_creator="1" />

</androidx.constraintlayout.widget.ConstraintLayout>
fragment_three.xml
<?xml version="1.0" encoding="utf-8"?>
<androidx.constraintlayout.widget.ConstraintLayout xmlns:android="http://schemas.android.com/apk/res/android"
    xmlns:app="http://schemas.android.com/apk/res-auto"
    xmlns:tools="http://schemas.android.com/tools"
    android:id="@+id/constraintLayout"
    android:layout_width="match_parent"
    android:layout_height="match_parent"
    tools:context=".ui.main.fragment.PlaceholderFragment">

    <TextView
        android:id="@+id/section_label"
        android:layout_width="wrap_content"
        android:layout_height="wrap_content"
        app:layout_constraintLeft_toLeftOf="parent"
        app:layout_constraintTop_toTopOf="@+id/constraintLayout"
        android:text="独立的fragment3" />

</androidx.constraintlayout.widget.ConstraintLayout>
fragment_four.xml
<?xml version="1.0" encoding="utf-8"?>
<androidx.constraintlayout.widget.ConstraintLayout xmlns:android="http://schemas.android.com/apk/res/android"
    xmlns:app="http://schemas.android.com/apk/res-auto"
    xmlns:tools="http://schemas.android.com/tools"
    android:id="@+id/constraintLayout"
    android:layout_width="match_parent"
    android:layout_height="match_parent"
    tools:context=".ui.main.fragment.PlaceholderFragment">

    <TextView
        android:id="@+id/section_label"
        android:layout_width="wrap_content"
        android:layout_height="wrap_content"
        app:layout_constraintLeft_toLeftOf="parent"
        app:layout_constraintTop_toTopOf="@+id/constraintLayout"
        android:text="2222" />
</androidx.constraintlayout.widget.ConstraintLayout>
最后想要demo的朋友可到这里下载:https://download.csdn.net/download/wy313622821/12520093
注意:谷歌原生的代码布局是使用CoordinatorLayout,在配合底部导航栏使用时,切换其他的页面时会产生一个空白的区域,解决这个问题就是把CoordinatorLayout换成ConstraintLayout
二、底部导航栏(谷歌官方)

试用BottomNavigationView时,如果底部的菜单项多于3个时,除第一个外都只显示图标,而不显示文字。

解决办法:
bottomNavigationView.labelVisibilityMode = LabelVisibilityMode.LABEL_VISIBILITY_LABELED
需要代码的可以到这里下载:
添加链接描述